

 Thanks: 0
 Likes: 0
 Needs Pictures: 0
 Picture(s) thanks: 0
Results 1 to 12 of 12
-
28th June 2010, 08:00 AM #1
 New Member


- Join Date
- Jun 2010
- Location
- USA
- Age
- 70
- Posts
- 5
 Need Advice "Record" Woodworking Vise Model 52ED
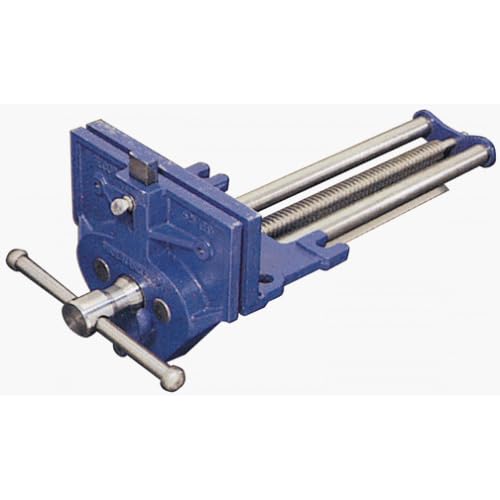
Aprox. 20yrs ago I received a "Record" 7" Woodworking Vise (Model 52ED) from my father who was a lot more experienced than I am with carpentry/woodworking. I'm just now getting around to installing it onto my work-bench. I'm having problems with the instructions.
Specifically, I need to remove the front jaw of the vise along with the lead screw and guide bars to reduce the weight so as to make it easier to install. I still have all the instructions that came with the vise, but they fail to mention how to remove the front jaw and/or guide bars. I don't want to foul up my new vise and would like to get some advise as to how to dismantle the vise.
Anybody out there familiar with this Make and Model of woodworking vise?
-
28th June 2010 08:00 AM # ADSGoogle Adsense Advertisement
- Join Date
- Always
- Location
- Advertising world
- Age
- 2010
- Posts
- Many
-
28th June 2010, 10:25 AM #2
The Laird
- Join Date
- Jan 2007
- Location
- Katoomba NSW
- Posts
- 4,774

I don't have that model vice but I would think you just keep unscrewing till it comes out. There may be a clip or something on the end of the lead screw to prevent it from falling out if you unscrew it too far.
Edit: Just had a look at a pic, remove the plate on the end of the guides (can't see how it is attached from the pics i saw) then unscrew till it comes out. If the quick release is springloaded, make sure it is captive or note how it fits in when you remove the lead screw. I may be way off here but it might help.
-
28th June 2010, 04:30 PM #3
New Member
- Join Date
- Jun 2010
- Location
- USA
- Age
- 70
- Posts
- 5
G'day NCArcher, Originally Posted by NCArcher

Thanks for getting back to me. I tried simply unscrewing the vise till the front jaw separated from the back jaw but I had no luck. It appears that there may be something like a "cotter" (sp.?) pin at the end of the screw, but I can's seem to get it to budge and I'm loath the force it for fear of damaging the vise. It appears that the quick release is indeed spring loaded, but my luck with maintaining spring tension or returning spring loaded parts to their original tension has never been good. I'm going to have my son take some pictures of the vise tomorrow when there's daylight and then I'll post it so that others may be able to tell me how to proceed.
I posted another note earlier in the "Welcome" forum and mentioned my ignorance as to the purpose/function of the "dog" feature. Can you enlighten me as to what this feature serves?
Once again; Thank you for your assistance and your patience.
Patt
-
28th June 2010, 08:42 PM #4
Immature member
- Join Date
- Aug 2007
- Location
- Mainland N.Z.
- Posts
- 877
G'day Patt
Are you prepared to take advice from someone that has dis-assembeld and re-assembled exactly two #52 Record vises? You are? Let's hope that's a good thing....
At the far end of the vise ( the end that doesn't have #52 stamped into it) there is a split-pin. Carefully remove this and the washer that is behind it and put them somewhere safe. The end piece should then be able to be tapped off without much force. Now take a good look at the half-nut that the quick-release bar is holding against the screw.....see the notch....see how it goes against the bar? You'll need to remember this for later......when the half-nut drops out onto the floor.
Now for the big moment. Dis-engage the quick-release at the front of the vise and the back/mounting plate should slide right off.
Re-assembly is the process in reverse. It takes some jiggling about with the quick-release to be able to re-fit the backing plate but it's not a big issue.
Take care to fit the end-piece the right way up as I found that 50% of the time it can be fitted up-side-down.
Use plenty of scrap timber to level the vise on the bench while you doing this and I found that very little force was needed for any of the part removal....light taps only.
Good-Luck.
So, dis-assembly makes them easier to fit to a bench......shame secondhand vises don't come with instructions.")

cheers
SeanWe don't know how lucky we are......
-
28th June 2010, 08:56 PM #5
Immature member
- Join Date
- Aug 2007
- Location
- Mainland N.Z.
- Posts
- 877
There should be a 'fat' end and a 'thin' end on the pin......the diference between fat and thin in this case might be hard to tell. Look carefully....you, of course, knock the thin end through. I just cushioned the end of the vise on a block of soft-wood and gave the pin a light tap with an engineers hammer. One of the pins could then be pulled free with pliers. The pin on the other vise had to be encouraged out with a small nail-punch that I pretended was a drift......I wouldn't recommend anybody do that with their own vise.It appears that there may be something like a "cotter" (sp.?) pin at the end of the screw, but I can's seem to get it to budge and I'm loath the force it for fear of damaging the vise.
Just a thought......if the vise has been un-used for 20 years, some CRC or other light penetrating oil might be a good idea on the parts you want to remove.We don't know how lucky we are......
-
3rd July 2010, 06:13 PM #6
New Member
- Join Date
- Jun 2010
- Location
- USA
- Age
- 70
- Posts
- 5

Hi Seanz and all of you that gave me advice,
Thank you so very much for your help. I never did get the pin out of the vise's drive screw. I finally had to improvise my own methods. It took longer than I would have liked but it looked and worked great once I got it installed on my workbench. Then to my annoyance I realized that I'd forgotten to install the wooden "cheeks" to the front and back vise jaws.  I'm going to do that once I get back to town after the 4th of July holiday.
I'm going up to our cabin in the mountains which is going to be a good thing since I've got more than half the tools I own stored up there. I'm building a new deck onto the cabin and I figured that It would be easier if I just left them up there rather than haul them back and forth. Unfortunately, I found I needed the tools here at home for my home projects now that summer is finally here and it's warm enough to get some of my projects done. Maybe I should buy two sets of everything.
I've got a question that I can't seem to get an answer for.... What is the function or purpose of the "dog" feature on my vise? Can you explain to me how and/or what I use it for?
Once again; thanks for all your help and/or advice.
PattLast edited by Patt Weebel; 3rd July 2010 at 06:30 PM. Reason: Forgot to thank the other people that gave me advice....
-
10th July 2010, 05:09 PM #7
GOLD MEMBER
- Join Date
- Oct 2007
- Location
- Alexandra Vic
- Age
- 69
- Posts
- 2,810
Most articles about work benches discuss the use of dogs to secure materials to the bench. Dogs operate in sets or pairs, one being fixed in an appropriate hole in the bench, and the other moving in a face or end vice. With the appropriate seperation between the dogs, and the vice opened, the work is laid on the benchtop and the vice is closed until the work is locked between the dogs so that it cannot move on the bench.
With your vice the dog can retract below the top of the vice so that it does not interfere with tasks such as planing a board secured in the vice. This arrangement allows the use of thinner vice pads than some other face vice systems that use a 2 inch thick timber jaw pad whuch is drilled for round dogs to be inserted as needed, resulting in up to 1 1/4 inches of additional operining space between the jaws.
Hope this makes sense
-
14th July 2010, 03:29 PM #8
New Member
- Join Date
- Jun 2010
- Location
- USA
- Age
- 70
- Posts
- 5
G'Day Malb,
Thank you for your help and advice. Your explanation was very clear. I'd like to know if you have any ideas for installing the dogs in/onto the bench. I'm visualizing installing several spaced at varying distances in my bench. (The idea being to give me even greater options over and above those offered by just opening and closing the vise.) I figure that I could bore and/or miter some holes into my bench and then use some quarter inch steel for the "dogs". Is this a viable option?
I appreciate the advise and enjoy reading about other projects being worked on in the forums.
Thanks,
Patt
-
15th July 2010, 06:00 PM #9
GOLD MEMBER
- Join Date
- Oct 2007
- Location
- Alexandra Vic
- Age
- 69
- Posts
- 2,810
There are a number of types of dog around. They mount into dog holes in the bench top in line with the dog(s) in the vice, spaced at maximum intervals of about 80% of the vice jaw travel accross or along the bench, depending on the vices installed and dog capable.
Rectangular dogs can be metal or hardwood, this is a steel one. Head is larger than the body, and there is a retaining spring on the side to hold the the dog is the users desired position. Typically use a 1in x 7/8th in hole in the benchtop inclined about 3 degrees toward the dog in the vice. Dog hole is enlarged at the top to allow the head to drop below the benchtop when not in use. This is a traditional form, typically used with benchtops laminated from numerous strips timer side by side. Modern technique is to cut the dog holes into the strips using a table saw or router and template before the strips are glued up, but could be cut into a finished top using morticing techniques.
Round dogs can be metal or timber. This is a typical brass dog. Typically 3/4 inch diameter and various lengths. Dog holes can be drilled or routed into top at required locations once the top is completed, and can be used in solid timber, ply/MDF, or Torsion box tops.
There are other devices that also use round dog holes quite effectively, including holdfasts, surface vices that mount to the bench top by a couple of dog holes and add an extra vice to the bench, surface clamps which combine a holdfast and the screw half of a convention clamp, and hold down clamps. In some instances these additional devices can be very usefull for supporting the far end of boards held between vice faces, and so round dog holes are sometimes found drilled horizontally into the face edge of a bench top and the legs.
1/4 steel might be a bit light for dogs, for two reasons. One, it will tend to bend away from the work under moderate loads, and two, it will not provide much contact surface area, so could crush into the edges of the material being clamped.
-
16th July 2010, 06:15 PM #10
GOLD MEMBER
- Join Date
- Oct 2007
- Location
- Alexandra Vic
- Age
- 69
- Posts
- 2,810
Hi Patt,
Just adding a cople of bis clippe from magazines relating to how to form square dog holes in bench top laminations before glue up, and alternative face vice setups with dog holes drilled into the jaw block and bench face piece. Might clarify some of the bumf in my previous post. Both best viewed at 75 to 100%.
-
4th January 2012, 06:53 PM #11
New Member
- Join Date
- Jan 2012
- Location
- Newcastle
- Posts
- 3
Hi There, I have just joined this group, and probably shoul post my question as a new post, but please help me if you can.
I have just recieved a Record 52 vice, it's in good condition - but unfortuneately it is in bits. I have been searching for assembly instructions without any luck. Would anybody have a photo of how the quick release setup is assembled?
-
19th November 2012, 05:09 AM #12
New Member
- Join Date
- Nov 2012
- Location
- UK
- Posts
- 1
Exploded Record vice view
Hi,
Don't know if you had your question answered, but I found this exploded view of a Record vice which might help you assemble.
http://www2.woodcraft.com/pdf/77a01.pdf
HTH

 Reply With Quote


Similar Threads
-
1930 Model "A" Ford tourer
By powderpost in forum SCALE MODELLINGReplies: 8Last Post: 8th December 2008, 02:57 PM -
New Jet Xacta model...the "deluxe"
By chocwheaton in forum TABLE SAWS & COMBINATIONSReplies: 2Last Post: 30th September 2007, 03:35 PM -
Record 52ed Vice
By Pat in forum HAND TOOLS - UNPOWEREDReplies: 5Last Post: 8th September 2004, 08:04 PM
Tags for this Thread
20yrs,
52ed,
advice,
advise,
ago,
and/or,
aprox,
bars,
carpentry/woodworking,
dismantle,
easier,
experienced,
fail,
familiar,
foul,
front,
guide,
install,
installing,
instructions,
jaw,
lot,
mention,
model,
record,
remove,
screw,
vise,
woodworking,
work-bench
