

 Thanks:
  Likes:
  Needs Pictures:
  Picture(s) thanks:
Results 196 to 210 of 216
Thread: Dan's Blackbutt Roubo Bench
-
1st July 2010, 07:19 PM #196
 What... you mean it's not 1792?


- Join Date
- Oct 2006
- Location
- Melbourne
- Posts
- 5,271

Congratulations! That's a very fine looking bench.
 Here's to many years of productive woodworking!
.
Here's to many years of productive woodworking!
.
I know you believe you understand what you think I wrote, but I'm not sure you realize that what you just read is not what I meant.
Regards, Woodwould.
-
1st July 2010 07:19 PM # ADSGoogle Adsense Advertisement
- Join Date
- Always
- Location
- Advertising world
- Posts
- Many
-
2nd July 2010, 07:58 PM #197
Dan @ TheLoveOfWood
- Join Date
- Jan 2008
- Location
- Australia
- Posts
- 752
I've made some progress on the vices. It should be pretty explanatory from teh photos. Let me know if you have and questions.
For the wagon vice, I ended up not following the instructions. Also, I tapped some holes rather than using the nuts.My blog: ~ for the love of wood ~ - http://theloveofwood.blogspot.com/
-
3rd July 2010, 10:48 PM #198
Dan @ TheLoveOfWood
- Join Date
- Jan 2008
- Location
- Australia
- Posts
- 752
Some action shots of the new vices in action.
My blog: ~ for the love of wood ~ - http://theloveofwood.blogspot.com/
-
4th July 2010, 07:37 AM #199
kiwioutdoors
- Join Date
- Aug 2005
- Location
- Auckland New Zealand
- Age
- 49
- Posts
- 397
Has your vesper square arrived yet? Or have you finished those bits that required it another way?
"All that is necessary for evil to succeed is for good men to do nothing"
(Edmund Burke 1729-1797)
-
4th July 2010, 08:38 AM #200
Skwair2rownd
- Join Date
- Nov 2007
- Location
- Dundowran Beach
- Age
- 76
- Posts
- 19,922

Excellent WIP Boz, and I'm pleased to see the bench being put to good use.

Last edited by artme; 4th October 2010 at 07:24 PM.
-
4th July 2010, 08:48 AM #201
Dan @ TheLoveOfWood
- Join Date
- Jan 2008
- Location
- Australia
- Posts
- 752

Vesper squares: $200, $250 and $280 respectively.

Super Cheap Auto Square: $2.95
Which is better?
The Super Cheap one (cause it actually exists...lol.)
I'm still waiting on the square. How I get around it is I use my cheap square which is about 89.2 degrees on both sides of the wood and kinda average it out. Horrifying isn't it. Good thing most of my joints stretch over 1m and hide the slight imperfections. (Maybe if I bought 100 of them, 1 would be square.)
I told Chris I would buy one, and I'll stick to my word.My blog: ~ for the love of wood ~ - http://theloveofwood.blogspot.com/
-
4th July 2010, 08:54 AM #202
Mildly Moderate
- Join Date
- Nov 2007
- Location
- Albury Well Just Outside
- Posts
- 13,315
Love the work in progress.
I know that you made this bench for the purpose of using it in your work shop, but I feel that as you have completed the various stages of the build I was there building with you.
Little side track story.
I used to visit my sister in her third floor unit some time ago. Next door they were building some town houses. I used to drop in and say hello and while I was taking the shoes just inside of the door I would look out the window. I watch the progress of the building next door. It got to the stage that I would say hi and just stare out the window. On one of those days she asked "Are you coming to visit me of visit the building next door?"
Well natually I said the building progress.
Her flatmate came back with a response and asked "If I would like a chair?" Thus allowing me to sit and watch the building.
At this point I corrected them, as they only had low chairs and I would not be able to see out and down into the building site.
-
3rd October 2010, 09:21 PM #203
Dan @ TheLoveOfWood
- Join Date
- Jan 2008
- Location
- Australia
- Posts
- 752
The bench is still not completed. As it is, it is functional and working well.
The details remaining include attaching the leather work to the vices, tweaking the leg vices to be ultra smooth, attaching a name plate, and one final sand and oil.
Here's some pics I posted on another thread with the bench in action for another build.


 My blog: ~ for the love of wood ~ - http://theloveofwood.blogspot.com/
-
16th January 2011, 07:25 PM #204
Neander Normite
- Join Date
- Jan 2005
- Location
- Melbourne
- Age
- 65
- Posts
- 11,997
How is the bench going Boz? I know I should be the last person to ask, but I couldn't help myself

-
16th January 2011, 07:35 PM #205
Dan @ TheLoveOfWood
- Join Date
- Jan 2008
- Location
- Australia
- Posts
- 752
scratched, marked, small bit of oil spill, small bit of glue spill...
looking like it should... like a workbench.
work has been delayed while working on other projects...
Still a few things to do...
more dog holes,
rebuild the carriage block for the wagon,
attach the leather,
attach the made by me logo,
functionally it's working well.
now I'm planning the matching oversized wood rack made with blackbutt decking.My blog: ~ for the love of wood ~ - http://theloveofwood.blogspot.com/
-
16th January 2011, 10:21 PM #206
Heavy Machinery
- Join Date
- Mar 2008
- Location
- Lambton, Newcastle, NSW, Australia
- Posts
- 4,957
Hi Dan
Super job on the bench, glad to hear its looking like a real bench and not covered with plastic protective sheeting
-
16th January 2011, 10:45 PM #207
Lignum Vexator
- Join Date
- May 2007
- Location
- North of the coathanger, Sydney
- Age
- 68
- Posts
- 9,417
Howdy
Just found this
Stirling effort
I'll have to stop reading these bench builds - makes me want to build my own regards
Nick
veni, vidi, tornavi
Without wood it's just ...
-
3rd March 2011, 06:18 PM #208
Dan @ TheLoveOfWood
- Join Date
- Jan 2008
- Location
- Australia
- Posts
- 752
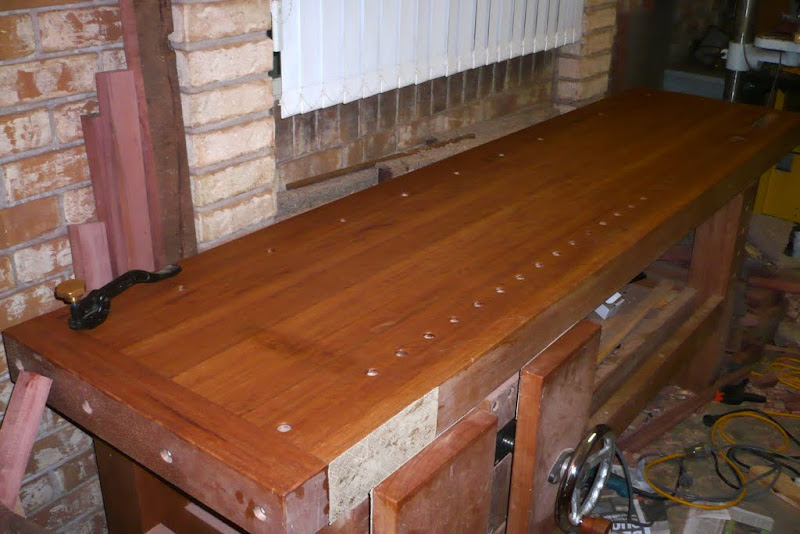
Bench Update. Planning the next stages.
Here are a few photos of the bench after several months of use.

I need a place to store the parallel guide pins (seen here in dog holes.) I wanted this to be in the lower stretcher but with the top on I couldn't fit the drill in.

Top needs it's annual re-surfacing. I also need to add more dog holes. I was planning on adding center and back rows spaced 6-12" (cf. 3" at the front.)

I had trouble with the parallel guide joining the chop on the leg vices. Both joints have moved a little. The original/current joint is a through tenon with two wedges. Relatively good construction but the pressure is considerable.
I had the option to remove the joint, clean it and re-set it. However as I used titebond III it will make a mess even if I drill out the wedges. I thought of inlaying the inside corner with a metal brace. I'll need to adjust the leg mortise.
I'm not keen to remake the parallel guide as there is a lot of drilling involved and a decorative end piece.
I still have the bench crafted leather, and the hide glue to attach it. I wanted to see how the bench was handling in case pieces needed to be replaced but it looks like a goer.

 My blog: ~ for the love of wood ~ - http://theloveofwood.blogspot.com/
-
6th March 2011, 10:18 PM #209
Dan @ TheLoveOfWood
- Join Date
- Jan 2008
- Location
- Australia
- Posts
- 752
Today I drilled a back row of bench dogs. Used a forster bit on the drill press to drill a 3/4 hole 4" from a marker... then lined that up with every 3rd front hole... if that makes sense... progress... While I was there I re-sanded the top and put a new coat of organoil on.
I debated a center row... but couldn't decide...

I used titebond liquid hide to attach the leather. Easy enough. Cut to size. Apply glue. Place baking paper between vices and close. I probably used a little too much glue. I'll wait till tomorrow to test this out.My blog: ~ for the love of wood ~ - http://theloveofwood.blogspot.com/
-
6th March 2011, 10:25 PM #210
Neander Normite
- Join Date
- Jan 2005
- Location
- Melbourne
- Age
- 65
- Posts
- 11,997


 Reply With Quote


Similar Threads
-
WIP Roubo bench
By mic-d in forum FURNITURE, JOINERY, CABINETMAKING - formerly BIG STUFFReplies: 48Last Post: 30th January 2009, 04:34 PM -
Saw for Milling Blackbutt in WA
By vsquizz in forum TIMBERReplies: 11Last Post: 14th June 2004, 01:16 AM
