

 Thanks:
  Likes:
  Needs Pictures:
  Picture(s) thanks:
Results 151 to 165 of 216
Thread: Dan's Blackbutt Roubo Bench
-
23rd May 2010, 11:14 AM #151
 Neander Normite


- Join Date
- Jan 2005
- Location
- Melbourne
- Age
- 65
- Posts
- 11,997

My money is on him too. Looking good there Boz. What is the plan for the end-cap and carriage vise, I'm keen to see it.
-
23rd May 2010 11:14 AM # ADSGoogle Adsense Advertisement
- Join Date
- Always
- Location
- Advertising world
- Age
- 2010
- Posts
- Many
-
23rd May 2010, 11:44 AM #152
Heavy Machinery
- Join Date
- Mar 2008
- Location
- Lambton, Newcastle, NSW, Australia
- Posts
- 4,957
I think I've solved your problem Groggy, your Labrajointer is realy only a watch dog
 not a working dog
-
23rd May 2010, 10:53 PM #153
hardly human

- Join Date
- Jun 2005
- Location
- Sydney
- Posts
- 3,096
Have fun flipping that B&stard!
Yeah, if that top needs glueing you need to back off the plane blade a 1/2" or so.
-
29th May 2010, 12:40 PM #154
Dan @ TheLoveOfWood
- Join Date
- Jan 2008
- Location
- Australia
- Posts
- 752
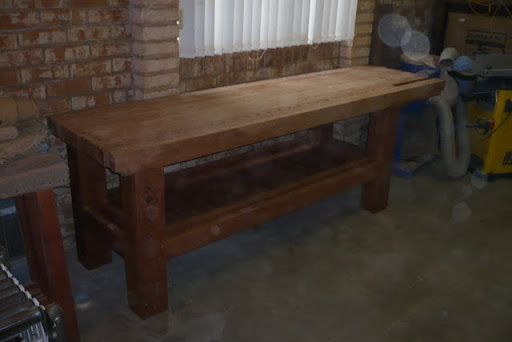
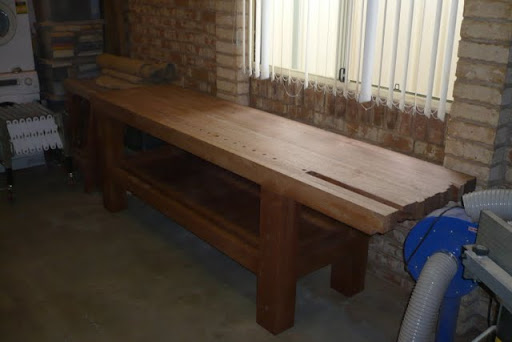
Flipped the bench this morning. Ended up doing it my own. Was easier then I thought. But a little fore thought, and a little leverage and it was surprising easy.
Groggy, haven't forgotten your question re: end caps. Will have a post of them soon.My blog: ~ for the love of wood ~ - http://theloveofwood.blogspot.com/
-
29th May 2010, 01:08 PM #155
Neander Normite
- Join Date
- Jan 2005
- Location
- Melbourne
- Age
- 65
- Posts
- 11,997
Looking very nice Boz. Now the fiddly bits eh? Vises, chop, end caps, deadman, maybe a plane stop...
I wish I was that far along
-
29th May 2010, 11:08 PM #156
Mildly Moderate
- Join Date
- Nov 2007
- Location
- Albury Well Just Outside
- Posts
- 13,315
Cool
-
30th May 2010, 04:21 PM #157
Dan @ TheLoveOfWood
- Join Date
- Jan 2008
- Location
- Australia
- Posts
- 752
Here's a sneak peak at the end caps. I had cut the end caps and the mortise a long time ago. Forsner drilling and hand chiseling.
The end tenon I cut with circ saw, hand saw, and chisel. To make the matching staggered tenon I first tried a coping saw, and after breaking 3 blades.... I switched to drilling along my cut line and chiseling it out. It doesn't look pretty... a fair bit of blow out. But the tenon is a nice fit, with the right amount of mallet strength to align it.
5" bolts and captured nuts. 5/16" bolts in 1/2" oversized slotted holes for expansion.
It's not a perfect fit. Tricky using a circ saw. I plan on picking up a rabbet plane soon, so will wait to clean it up with that.
The second end cap is tricky as it has the wagon component in it.My blog: ~ for the love of wood ~ - http://theloveofwood.blogspot.com/
-
30th May 2010, 04:59 PM #158
Neander Normite
- Join Date
- Jan 2005
- Location
- Melbourne
- Age
- 65
- Posts
- 11,997
CoupleA number of questions for you Dan:
1. What is the distance from the end of the end cap tenon to the leg?
2. How did you drill the dog holes all the way through (drill press?)
3. Did you consider reversing the end cap bolts so the holes are not visible? i.e put slots under the table to enable them to slide in then the nuts go up a hole in the bottom ofd the end cap.
4. No dovetails on the end caps?
5. The slide on your wagon vice, is it rounded like the diagrams or, like mine, a new design that is square?
6. Will you have a crotchet?
-
30th May 2010, 05:03 PM #159
Neander Normite
- Join Date
- Jan 2005
- Location
- Melbourne
- Age
- 65
- Posts
- 11,997
And another, it looks like the top of the dog holes are rounded by a router (minor burn below the top) - what radius bit did you use?
The top is looking great, built like the deck of the USS Iowa
-
30th May 2010, 05:44 PM #160
Neander Normite
- Join Date
- Jan 2005
- Location
- Melbourne
- Age
- 65
- Posts
- 11,997
A note for anyone who purchased the wagon vise. There has been a change to the design and I have just noticed the plans have an amendment. The difference is the wagon block slide is now square, instead of rounded on one shoulder, and should be installed 1/8" lower. Using the old plans will result in an error.
-
30th May 2010, 06:16 PM #161
What... you mean it's not 1792?
- Join Date
- Oct 2006
- Location
- Melbourne
- Posts
- 5,271
I trust you discovered the modification in time? Originally Posted by Groggy
 .
.
I know you believe you understand what you think I wrote, but I'm not sure you realize that what you just read is not what I meant.
Regards, Woodwould.
-
30th May 2010, 06:20 PM #162
Neander Normite
- Join Date
- Jan 2005
- Location
- Melbourne
- Age
- 65
- Posts
- 11,997
This is why I would not do any cutting off the plan. I wanted to be able to sit down and think it through with the vise in front of me. As I went through it step by step I picked up the changes. Then I started writing to them and went to their site to re-check the version of plans, it was different to the one I downloaded a short while ago. I'm assuming Dan has the original vise and plans as he got his a while ago. Originally Posted by Woodwould
-
30th May 2010, 09:12 PM #163
Dan @ TheLoveOfWood
- Join Date
- Jan 2008
- Location
- Australia
- Posts
- 752
Cap 1 - 5 1/2" - minimal distance. I actually considered having it flush with the base. I made it wider to accept the end cap and to fit a bench dog hole either side of it. Note I don't have bench dog's where the legs are.1. What is the distance from the end of the end cap tenon to the leg?
Cap 2 - ~21" - overhang for wagon, and to allow the casework to be held (eg. a blanket box held from the inside.)
I used a 19mm forstner bit to drill ~8cm (maximal travel) on my drill press. Then used a 19mm spade bit in my makita power drill to finish the hole. (With a support piece underneath.2. How did you drill the dog holes all the way through (drill press?)
No. I didn't think of that. Strange, I started of considering using wooden screw vices and making the entire thing old school and of wood. I swore I didn't want to use bolts but drawerbore tenons. Then I ended up putting coach screws in to hold the metal, and my sliding leg is half metal anywhere. I don't mind the look of the bolts.3. Did you consider reversing the end cap bolts so the holes are not visible? i.e put slots under the table to enable them to slide in then the nuts go up a hole in the bottom ofd the end cap.
I thought about it. To be honest with the tools and experience I have I thought that well done bolted endcaps would be nicer than poorly done dovetails. The other thing is that I can remove the end caps which I thought my be handy considering one has the wagon on it.4. No dovetails on the end caps?
Round.5. The slide on your wagon vice, is it rounded like the diagrams or, like mine, a new design that is square?
I thought about it. I don't think I'll need it. I think the two leg vices should be sufficent. I have used bench dog holes in both legs to support the piece vertically. I included this even on the leg vice so that I wouldn't be tempted to rest the piece on the screw.6. Will you have a crotchet?
Yeah. I have a little be of a murphey moment with my router. I was working on a section and the bearing fell off. Which resulted in a much deeper cut. So I screwed it back on. Tightened it. Then it didn't spin and burnt the wood.And another, it looks like the top of the dog holes are rounded by a router (minor burn below the top) - what radius bit did you use?
I haven't flattened the top yet. So I did a quick round over to prevent chip out when planing. Easy enough. I will re-rout and sand at the end.
To answer your question. I use a CMT 1/8 radius. I rarely take it out of my router and use it on nearly every piece I make.My blog: ~ for the love of wood ~ - http://theloveofwood.blogspot.com/
-
30th May 2010, 09:57 PM #164
Neander Normite
- Join Date
- Jan 2005
- Location
- Melbourne
- Age
- 65
- Posts
- 11,997
My bench dogs will be inset 95-100mm from the edge. Is that too far do you think? The leg is 85mm deep and the first beam is 95 deep, so I decided to put the dog holes in the second piece about 10mm in. Then I can drill dog holes in an unobstructed path, I want to use a 100mm spacing so there will be a few holes, plus 2 or 3 lateral rows as well to help hold wider work. Originally Posted by BozInOz
I'll need to drill 130mm so it looks like a mixture for me too. Fiddly, fiddly.I used a 19mm forstner bit to drill ~8cm (maximal travel) on my drill press. Then used a 19mm spade bit in my makita power drill to finish the hole. (With a support piece underneath.
I am thinking of either doing the tenons like yourself or using a triple row of dominos. I have bolts exposed on my current bench and I'd rather hide them this time if possible.No. I didn't think of that. Strange, I started of considering using wooden screw vices and making the entire thing old school and of wood. I swore I didn't want to use bolts but drawerbore tenons. Then I ended up putting coach screws in to hold the metal, and my sliding leg is half metal anywhere. I don't mind the look of the bolts.
That's a good point. I'm not decided yet and keep changing my mind.I thought about it. To be honest with the tools and experience I have I thought that well done bolted endcaps would be nicer than poorly done dovetails. The other thing is that I can remove the end caps which I thought my be handy considering one has the wagon on it.
I agree with you. I think I will just use a holdfast if needed.I thought about it. I don't think I'll need it. I think the two leg vices should be sufficent. I have used bench dog holes in both legs to support the piece vertically. I included this even on the leg vice so that I wouldn't be tempted to rest the piece on the screw.
Bugger, I had that happen as I finished an edge for a table. I won't repeat what I said at the timeYeah. I have a little be of a murphey moment with my router. I was working on a section and the bearing fell off. Which resulted in a much deeper cut. So I screwed it back on. Tightened it. Then it didn't spin and burnt the wood.

Great idea, consider it pinchedI haven't flattened the top yet. So I did a quick round over to prevent chip out when planing. Easy enough. I will re-rout and sand at the end.
Ahh, that's a 3mm. I have 2mm and 4mm roundover bits, think I'll need to experiment. The 2mm on the dog holes and 4mm on the edges maybe.To answer your question. I use a CMT 1/8 radius. I rarely take it out of my router and use it on nearly every piece I make.
-
4th June 2010, 05:31 PM #165
Dan @ TheLoveOfWood
- Join Date
- Jan 2008
- Location
- Australia
- Posts
- 752
Experimenting with the vice fitting... seems simple enough...
My blog: ~ for the love of wood ~ - http://theloveofwood.blogspot.com/


 Reply With Quote


Similar Threads
-
WIP Roubo bench
By mic-d in forum FURNITURE, JOINERY, CABINETMAKING - formerly BIG STUFFReplies: 48Last Post: 30th January 2009, 04:34 PM -
Review of Dan's Shed
By Tex B in forum THE GARDEN SHEDReplies: 9Last Post: 27th October 2006, 09:30 PM -
Blackbutt T&G
By gemi_babe in forum FLOORING, DECKING, STUMPS, etc.Replies: 20Last Post: 8th October 2004, 12:43 AM -
Saw for Milling Blackbutt in WA
By vsquizz in forum TIMBERReplies: 11Last Post: 14th June 2004, 01:16 AM
