

 Thanks:
  Likes:
  Needs Pictures:
  Picture(s) thanks:
Results 1 to 15 of 16
-
20th February 2023, 03:26 AM #1
 Be inspired. Be creative. Be bold.


- Join Date
- Apr 2001
- Location
- Perth
- Posts
- 10,826
 New MFT rail hinge and fence - Mk 2
A while back I decided to dip my toes in the MFT water, and built a table and rail hinge. The hinge was made from cutting boards, which likely sounds suspect, but worked very well ...

However, my OCD got the better of me, and I decided to build one in aluminium, inspired by both Benchdogs and Dashboard. I have dimensions for anyone who wants to copy it.
I had also built a fence from 8020, along with shopmade clamps ..

This turned out to be too high for the saw's motor to ride over. Back to the drawing board on this one.
The hinge rail first. It needs to be mentioned that everything was built over 2 weekends. The aluminium was purchased on eBay as 2 x 100 x 300mm (by 6mm thick) sheets, and 2 x 100 x 300mm (by 3mm thick) sheets. These were cut to side with a bandsaw (bimetal blade) - woodworking tools are fine with aluminium. Slotting was done with a router and straight bit. Holes were drilled on a drill press, and threaded tapped by hand. Just work carefully, and you will be rewarded with a great system.
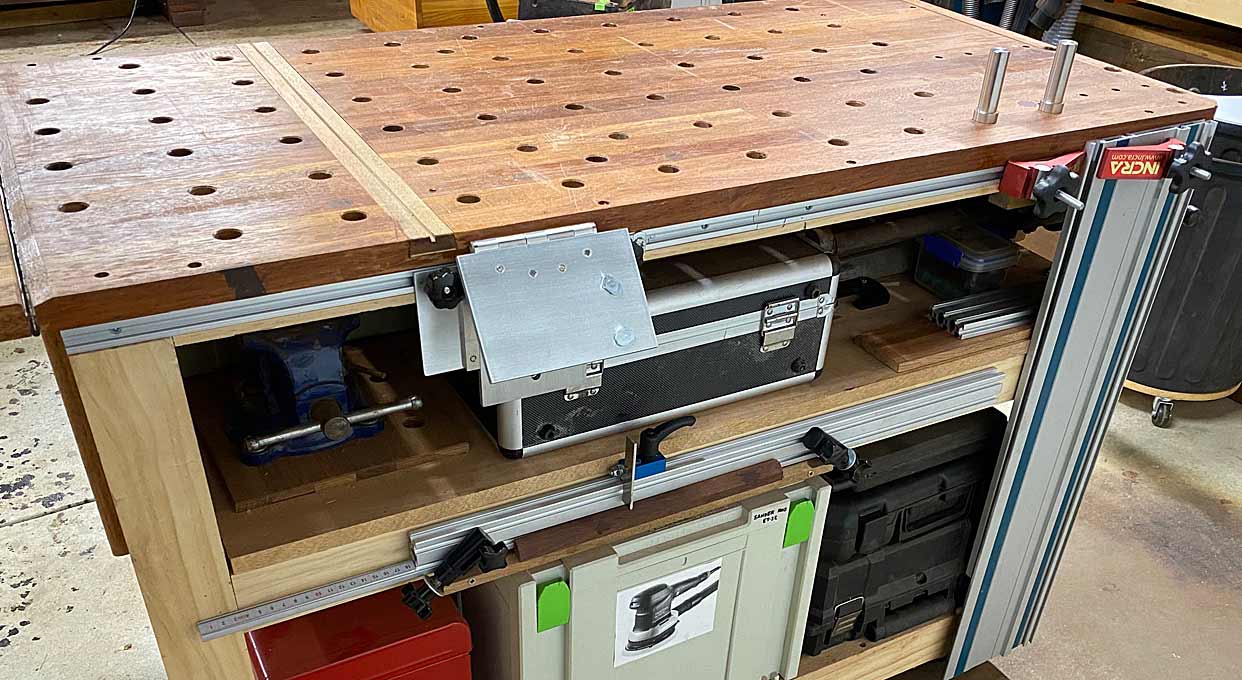
Here is the bench ...
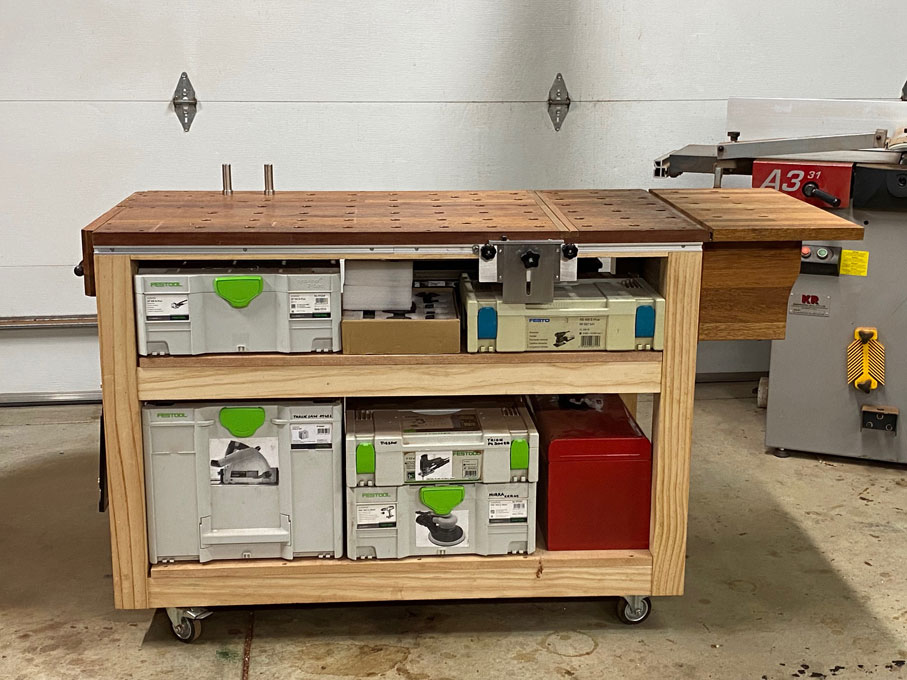
The rest for the rail (I am not sure if there is another name) ...
The rail has a height cutting capacity of a little over 50mm. The saw used is a Festool AT65E. The pin is UHMW, and slightly tapered, which allows the rail groove to fit without slop ...
The dimensions here: 115mm high x 100mm wide. The rest at the top is 145mm wide. All built from 6mm thick plate. The 90mm long slot is sized for an 8mm bolt.
The base is made from 3mm plate and is 195mm wide and 75mm high. The two guides are 10mm wide and 35mm in from each side ...
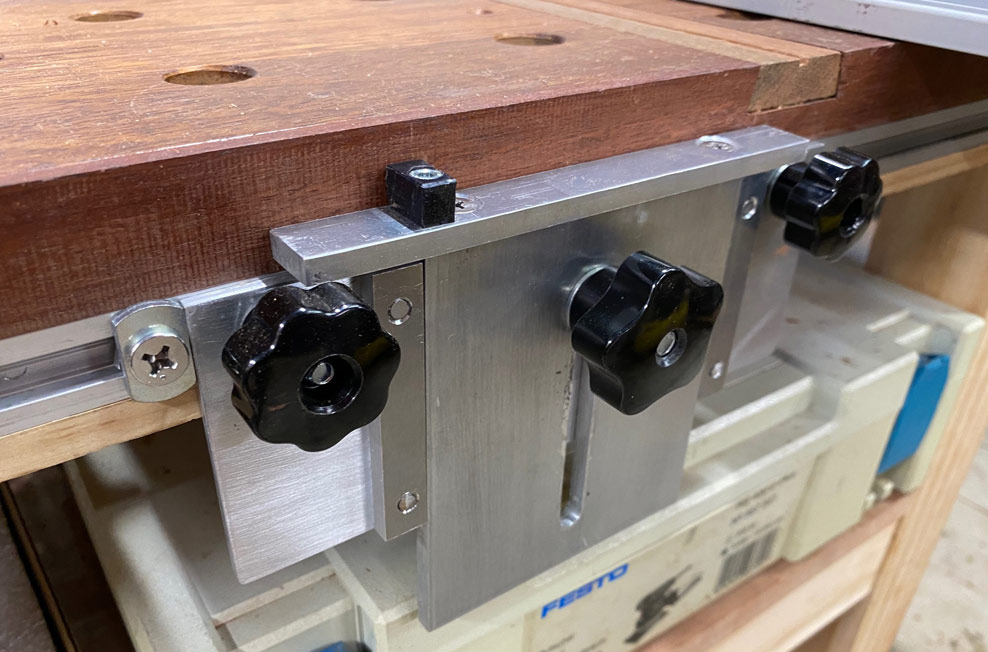
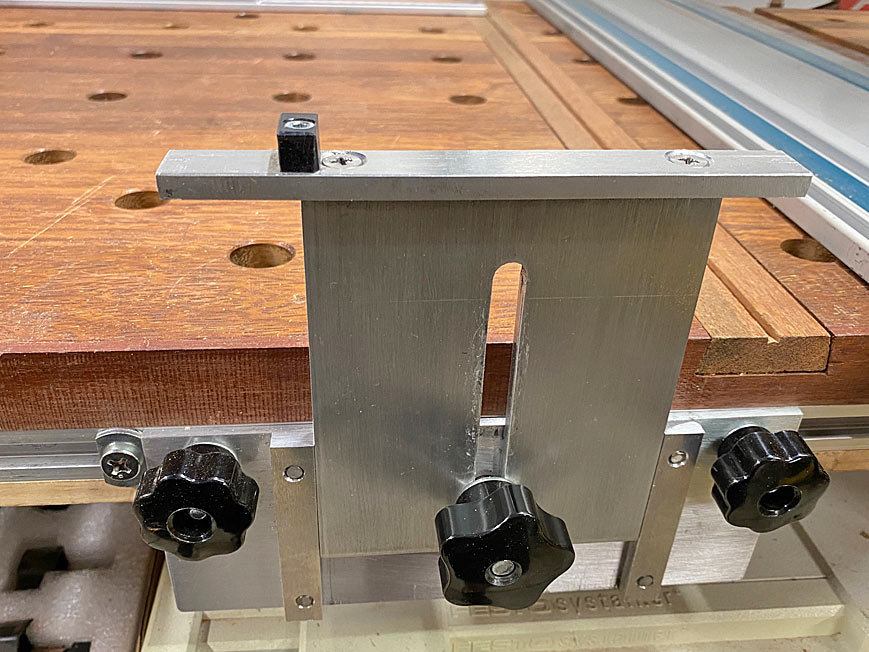
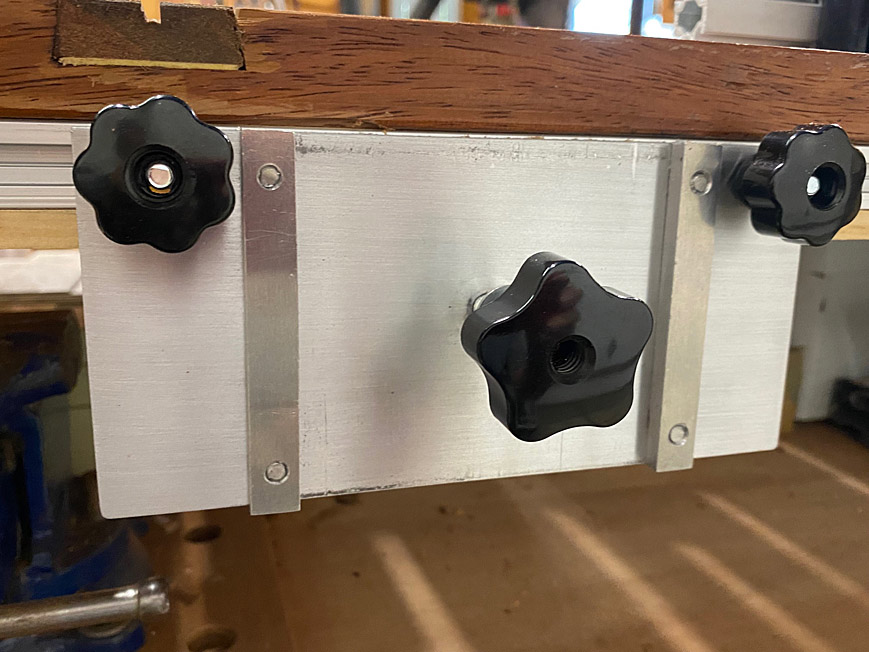
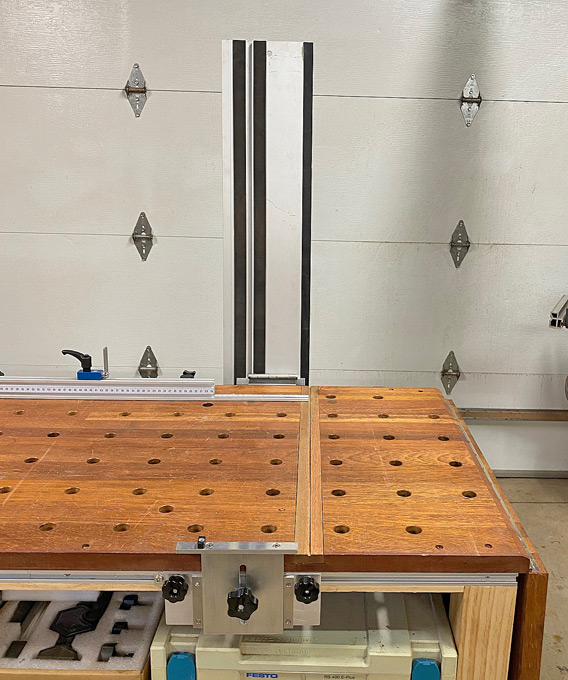
The hinge
Close up ...
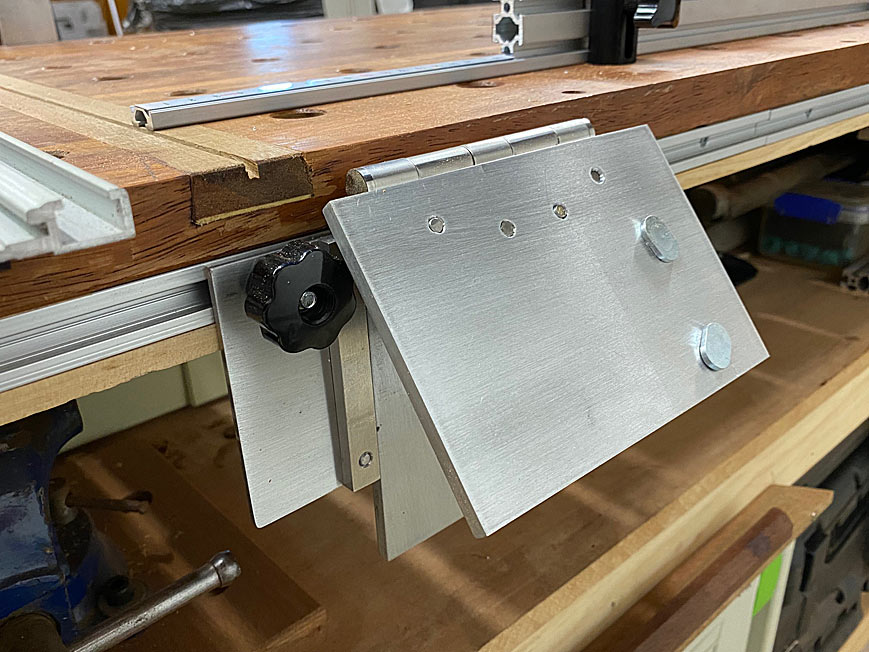
From this angle you can see the stop against which the mechanism can be returned, if moved ...
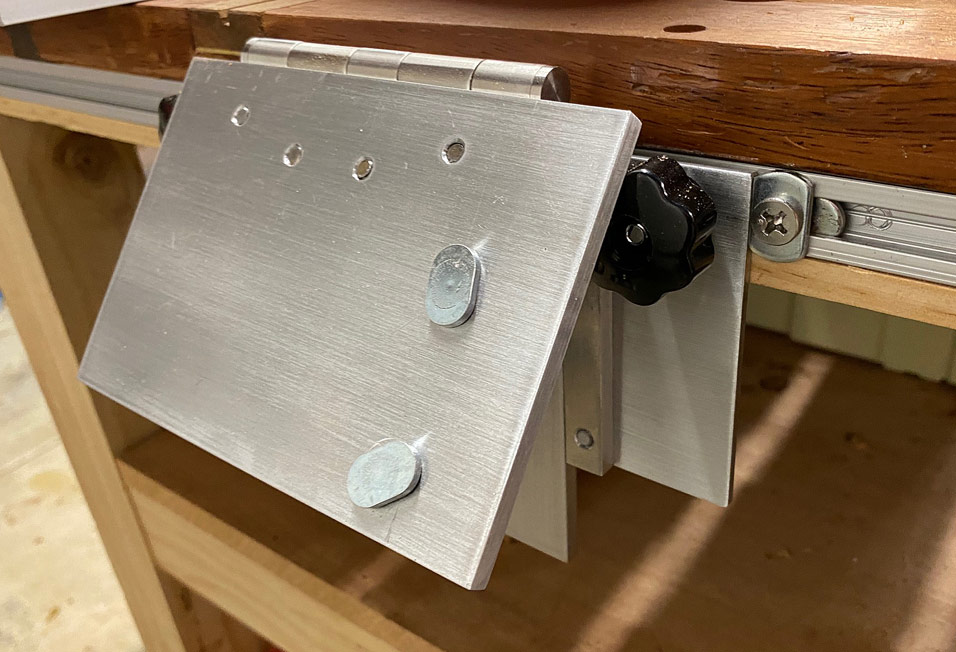
Rather than a bar to clamp the rail from this end, I used the Benchdogs system. This is secured with stainless steel wheels on the underside. Why not use a bar? I found it more accurate to drill two holes, rather than two holes AND then drill the bar accurately ...
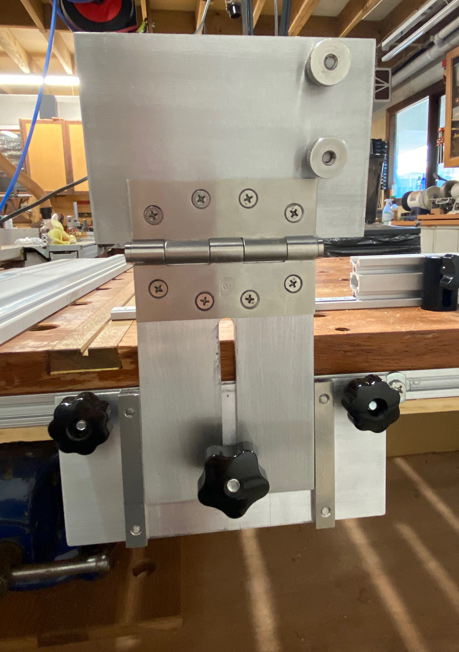
Here is a detailed picture ...
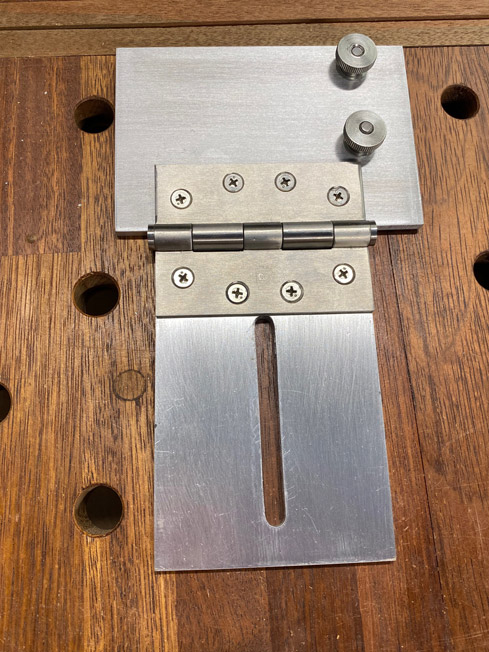
The top plate is 150mm wide x 100mm deep. The 100 x 75mm hinge is stainless steel and has nil movement. The riser is 100mm wide x 140mm high. The slot is 90mm long. All is built from 6mm plate and parts are joined with tapped holes and 5mm machine screws.
All the parts were sanded with a block with 180 grit to create a brushed appearance, and then finished with clear lacquer spray.
The Fence
The fence is made from 6020 extrusion, in the same design as the Benchdogs fence. The cut out was completed on the bandsaw ...
I ordered the Benchdogs Flagstop (flip stop), which can be seen here ...
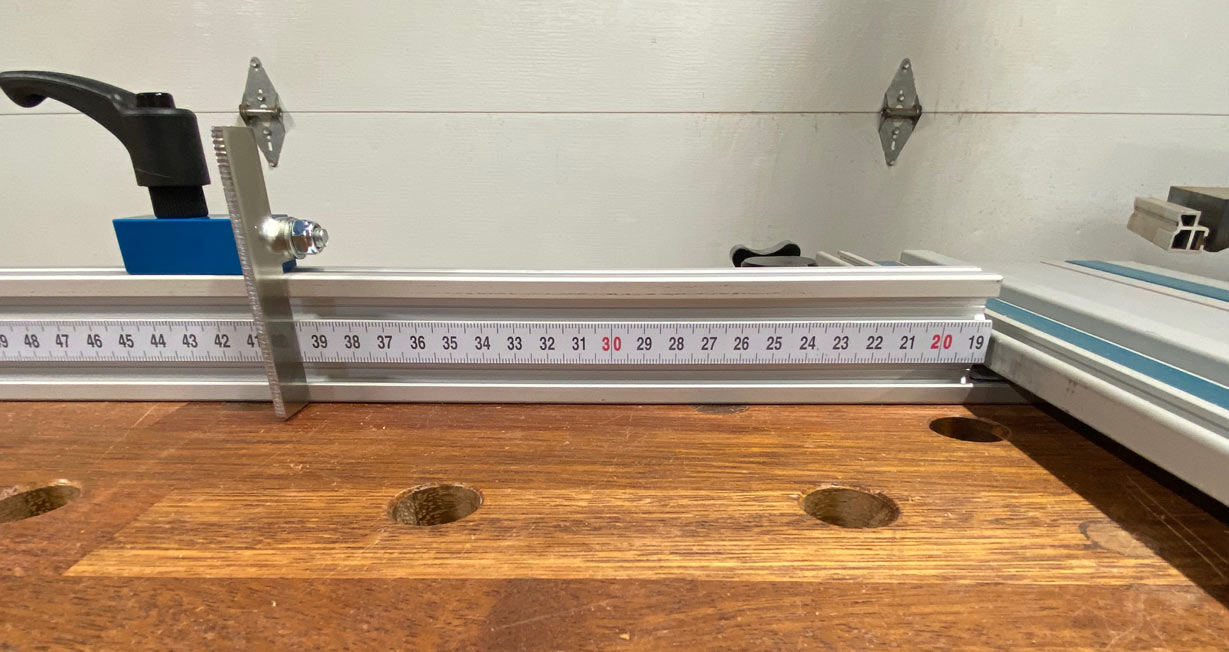
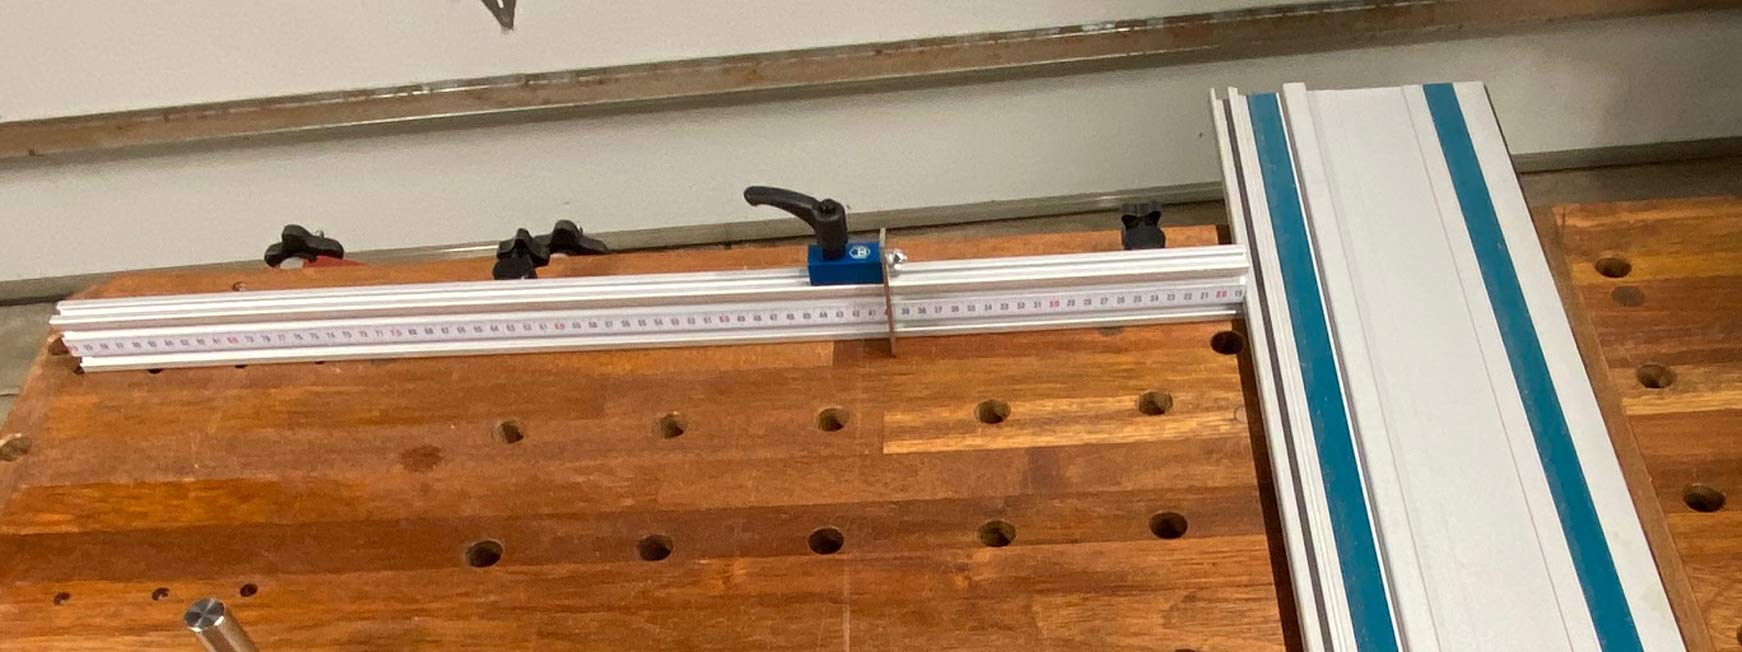
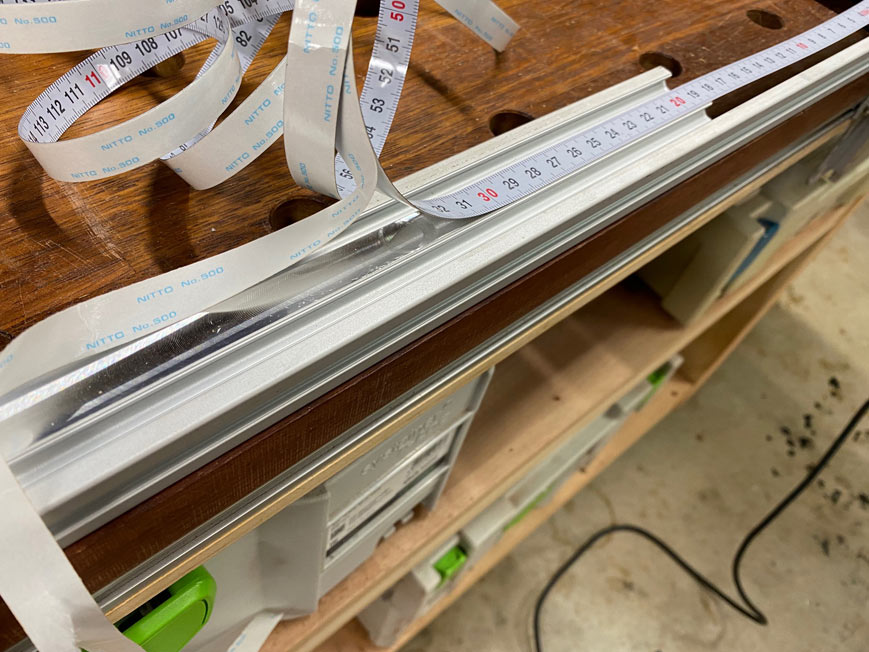
The fence has a scale along its 900mm length ...
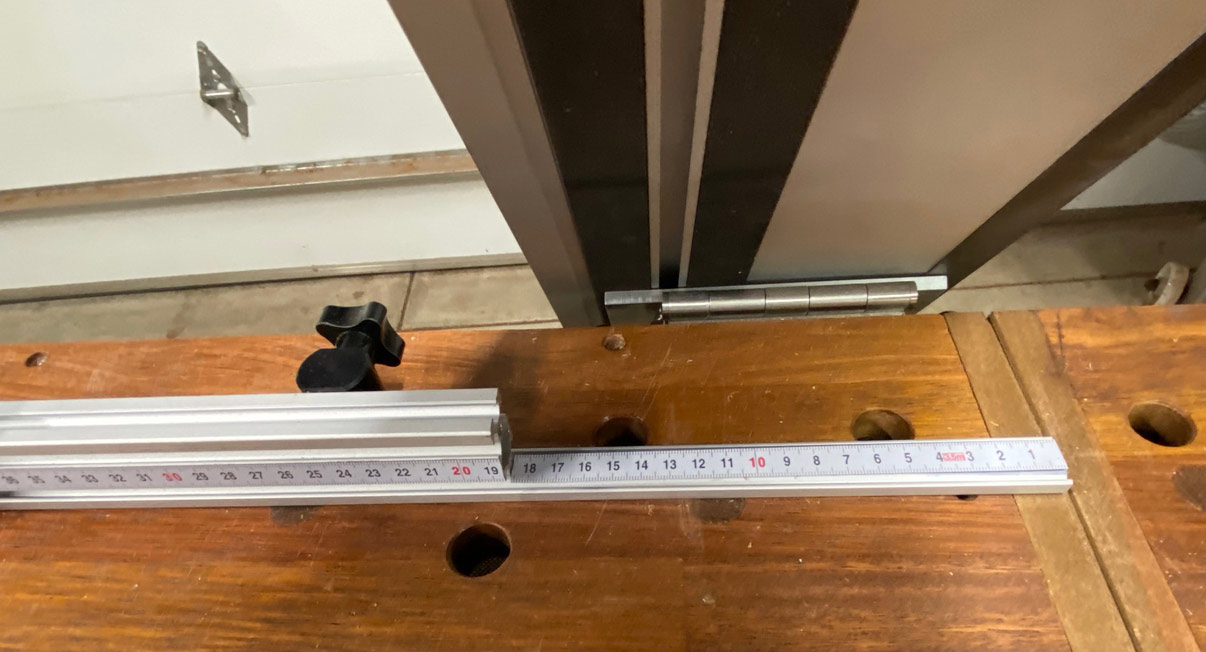
To add this to the aluminium extrusion, the centre section was routed to a depth of 1mm with a width of 1/2", and a Kreg tape attached ...
The rear of the fence reveal the Benchdogs "Fence Dogs", which replaced the shopmade versions previously used ...

So all is now complete, and I can get on with the next furniture build.
Regards from Perth
DerekVisit www.inthewoodshop.com for tutorials on constructing handtools, handtool reviews, and my trials and tribulations with furniture builds.
-
20th February 2023 03:26 AM # ADSGoogle Adsense Advertisement
- Join Date
- Always
- Location
- Advertising world
- Posts
- Many
-
20th February 2023, 11:42 AM #2
Senior Member
- Join Date
- Feb 2023
- Location
- Sydney
- Posts
- 107
Hi Derek
About 9 months ago I made a similar MFT table rail hinge and fence. I made mine from polycarbonate (from the roofing aisle at Bunnings) but they looked the same as your Aluminum components. Polycarbonate is relatively easy to work with power tools and strong. I used UHMW polyethylene on the contact points of the height adjuster on the opposite side to the hinge.
Since the photos were taken (I was prototyping at that stage but they are the only clear photos on my phone), I have drilled the MFT holes (using the UJK Parf system), laid the fence flat, and integrated with UJK dog system.
20220531_183258.jpg20220531_182717.jpg
Anthony
-
20th February 2023, 11:58 AM #3
Be inspired. Be creative. Be bold.
- Join Date
- Apr 2001
- Location
- Perth
- Posts
- 10,826
Hi Anthony
Many thanks for contributing to this thread. I hope other do to throw in their ideas. I have a question for you shortly.
I did consider polycarbonate as a material for my Mk1. I have used it quite a bit over the years. The issue I have with it is that it chips. Consequently, I instead turned to the plastic cutting boards, which are stiff enough (in the thickness I used), self-lubricating, and pretty durable. The only reason I moved to aluminum in Mk2 was extra stiffness and the challenge.
With regard to design, it was important to me that the rising parts did not wander when heights were changed. How does your design fare here? I used side supports/guides. I do not see them on yours.
My original fence was the same height as yours, but had a cut-away for the rail to pass over. Have you used your set up yet? What is your experience?
Right now I would like to add a spring to assist raising the pin end, but not sure how to design this. Any thoughts?
Regards from Perth
DerekVisit www.inthewoodshop.com for tutorials on constructing handtools, handtool reviews, and my trials and tribulations with furniture builds.
-
20th February 2023, 02:41 PM #4
GOLD MEMBER
- Join Date
- Aug 2004
- Location
- Coffs Harbour
- Posts
- 2,018
mft conversion
You are a wizard Derek
I was already impressed with your shop cart/outfeed table.
I have moved to a smaller workshop and it looked ideal for my new setup.
I use my Festool track saw to break down slabs and rough edges and I bought a short Guide rail for cross cutting.
Pretty sure I don't need a cross cut rail on my bench as I have a good mitre saw. But I like the TS55 and it would be good to rest long boards/slabs on the long workbench.
I haven't been able to decide if it is a good addition or will it be in the way of my only workbench.
Compiling all the bits is a pain too. I have many odd fitting threaded rods/knobs with the wrong threaded nuts. Ten mm wont thread a 3/8" unfortunately.
I would like a set of plans if you could get them to me please.Scally
__________________________________________
The ark was built by an amateur
the titanic was built by professionals
-
20th February 2023, 02:55 PM #5
Be inspired. Be creative. Be bold.
- Join Date
- Apr 2001
- Location
- Perth
- Posts
- 10,826
Hi Scally
The details/dimensions for the parts here are in the body of my post. I have not drawn up a plan, per se (it is too simple to do yourself from the photos).
I do have my Mk1 for sale, in the Market Place.
Regards from Perth
DerekVisit www.inthewoodshop.com for tutorials on constructing handtools, handtool reviews, and my trials and tribulations with furniture builds.
-
21st February 2023, 01:17 PM #6
Senior Member
- Join Date
- Feb 2023
- Location
- Sydney
- Posts
- 107
The material choice as availability (Bunnings), easy of working (most power tools can work polycarbonate) and strength. I haven't had any issues with chipping except when drilling. I found you start with the smallest bit you have and work up. I used UHMW polyethylene strip on top of the "pin" side for the same reason you use cutting boards, except UHWM PE is tough to work but it was a left over from a table saw jig. In fact my "pin" that rests in the guide rail slot is also UHMW PW just screwed into the strip. Originally Posted by derekcohen

An overarching design approach came from several sources - Peter Millard's You-Tube channel had a number of similar builds, but also there were several you-tube videos of home-made approaches to MDF tables and track-saw hinges. Some designs were brilliant, others needed a lot more thinking/work. Also Benchdogs and a few brands were also putting our aftermarket versions of the Festool hinge system, which I also drew inspiration from.
On the hinge side, I have polycarbonate strips glued to the polycarbonate base so the sliding section with the hinge slides up vertically with no wandering. The hinge unit is mounted to the bench via "T-track" with t-track bolts, washers and knobs being the mounting hardware. The "T-track" takes M6, M8, 1/4" and 5/16" bolts and I use 5/16" to minimise flex from that end.With regard to design, it was important to me that the rising parts did not wander when heights were changed. How does your design fare here? I used side supports/guides. I do not see them on yours.
On the pin side, I have three slots cut in the polycarbonate and just faff with those to get the pin side flat.
I abandoned the high fence setting because it was unstable, and have it in the low setting, with the guide track passing over the fence. I attach the fence to the workbench via the t-track within the sides with repurposed "t-track" off-cuts and hardware.My original fence was the same height as yours, but had a cut-away for the rail to pass over. Have you used your set up yet? What is your experience?
I use a piece of insulation foam (again from Bunnings) beneath my cuts to protect the bench top and support the workpiece. This makes the fence redundant, and in fact I use the fence more as stop to prevent tools rolling off the table in terms of everyday use. I have also used to attach hold-down jigs (the value of the Rockler fence).
In terms of use, I use UJK super-dogs in the MFT top (drilled using the Parf system - which is the best I found) to give me a straight reference. I square up the guide track to this straight reference using the bolts that attach the hinge to the guide track (noting that dog holes are parallel to the bench edge but there's slop in the hinge/bolts/etc that needs to be accounted out). Put the foam down and make the cross-cuts.
Ideally, the original design approach was to use the Rockler fence as the reference and keep the hinge attached to the bench so I could just pull it down and make a cut (like the various commercial systems like Benchdogs). However, the hinge and hardware got in the way too much if left assembled (I mostly use hand tools and the bench is my everyday workbench), and only get installed when using the track saw.
I have been meaning to re-examine the design to see if there are neater solutions and ways to use the fence as originally planned. But to be honest, I use the hinge about once every two months as most of my cross-cuts are on the table saw when breaking down stock or with a hand saw and bench hook for fine work. That said when there are multiple cuts, it's great.
If you used two plates - one connected to the workbench via a t-track, the other one with the pin that connects to the rail, and the "pin plate" was within a "u-shaped" rebate in the "bench plate", then at the bottom you could use a steel leaf spring to provide positive force as you lifted the "pin plate". The leaf could be screwed into the "U", and a brass contact epoxyed to the base of the "pin plate" to provide smooth running.Right now I would like to add a spring to assist raising the pin end, but not sure how to design this. Any thoughts?
-
24th February 2023, 08:33 PM #7
GOLD MEMBER
- Join Date
- Apr 2009
- Location
- Melbourne
- Age
- 52
- Posts
- 1,126
Hi Derek, Originally Posted by derekcohen
Great work as always mate, where did you get the aluminium fence?
-
24th February 2023, 09:16 PM #8
Be inspired. Be creative. Be bold.
- Join Date
- Apr 2001
- Location
- Perth
- Posts
- 10,826
Hi EB
Go to eBay and search for aluminium extrusion. The one you linked to is a 8020. The one I replaced it with is a 6020. These extrusions use their own nuts and bolts. For further information on the latter, go here (1/2 way down): http://www.inthewoodshop.com/Powered...Adventure.html
Regards from Perth
DerekVisit www.inthewoodshop.com for tutorials on constructing handtools, handtool reviews, and my trials and tribulations with furniture builds.
-
4th March 2023, 04:16 PM #9
Be inspired. Be creative. Be bold.
- Join Date
- Apr 2001
- Location
- Perth
- Posts
- 10,826
Added information for completion of fixture ...
The MFT hinge I have build runs smoothly and is very solid. However, there was one element that bugged me, and it took me a while to recognise how to sort this out. This was that the rail would not lean back, as seen in the professionally made versions. My hinge/rail would lift, but then fall back on the table side.
It finally dawned on me that the rail needed to be held up by gravity. That is, the weight of the rail. And to do this, the rail needed to tip over the vertical point. Dumb of me not to see this earlier on!
So .. I made a spacer block out of a scrap of Oak. The was drilled to fit the existing hinge, and a bevel was cut at 15 degrees at the rear ....

This was then stained black, oiled and fitted ...


Working perfectly!

Inciodentally, this is just an 800mm long (Makita) rail. I was considering getting the Festool 1080, but am not seeing a reason.

Regards from Perth
DerekVisit www.inthewoodshop.com for tutorials on constructing handtools, handtool reviews, and my trials and tribulations with furniture builds.
-
4th March 2023, 05:44 PM #10
GOLD MEMBER
- Join Date
- Apr 2009
- Location
- Melbourne
- Age
- 52
- Posts
- 1,126
Stick with Makita Derek, I think the Festool is way over priced.
-
10th March 2023, 01:00 AM #11
New Member
- Join Date
- Dec 2011
- Location
- Mandurah Western Australia
- Posts
- 9
Spacer Block
Great idea, Derek. I will do that to my Mark 1.
Thanks Len
-
25th May 2023, 01:17 AM #12
New Member
- Join Date
- May 2023
- Location
- Perth
- Posts
- 8
I’m not as talent as you Derek I just bought the Benchdog setup
-
31st May 2023, 08:07 PM #13
New Member
- Join Date
- May 2023
- Location
- Perth
- Posts
- 8
Hi Graeme can't add pictures don't have privileges
-
31st May 2023, 08:15 PM #14
Hoarder of Timber
- Join Date
- Jun 2006
- Location
- East Warburton, Vic
- Age
- 54
- Posts
- 14,189
I’ve just approved you, so you should be able to now. Originally Posted by Routerfan
Cheers
DJ
ADMIN
-
1st June 2023, 01:51 AM #15
New Member
- Join Date
- May 2023
- Location
- Perth
- Posts
- 8
MFT Hinge
Will try and post some tomorrow as I have the day off


 Reply With Quote


Similar Threads
-
Building a MFT: Part Two - making a rail hinge
By derekcohen in forum THE WORK BENCHReplies: 2Last Post: 7th January 2023, 12:09 AM -
Fence support rail
By shortsta in forum TABLE SAWS & COMBINATIONSReplies: 6Last Post: 12th May 2016, 01:49 PM -
How to straighten a table saw fence rail?
By Fuzzie in forum TABLE SAWS & COMBINATIONSReplies: 6Last Post: 7th July 2011, 08:21 AM -
Help With Post and Rail Fence?
By Exit in forum WOODWORK - GENERALReplies: 9Last Post: 14th February 2011, 04:00 PM
