

 Thanks:
  Likes:
  Needs Pictures:
  Picture(s) thanks: 0
Results 31 to 45 of 259
Thread: The Outdoor Workbench
-
6th September 2012, 07:02 AM #31
 GOLD MEMBER


- Join Date
- Aug 2009
- Location
- Armadale Perth WA
- Age
- 55
- Posts
- 4,524

OK. I've now accepted I'm building a workbench.
... It takes me a while
I hadn't pictured it becoming a 'big thing' - but the opportunity is there so might as well go with it. I had figured that eventually I would make one out of jarrah - like Groggy and others.
So ... starting to think how it is going to work as a bench, as Chippy said I'll need at least one flat side ... and the sticky-out bolt ends become an issue. I'm thinking I will weld the bolt to the inside of the flange and arrange it so that there isn't any thread projecting past the front of the flange.
Toby suggested turning the bench over, and I'm thinking that is the plan. The cross-pieces (well two of them) sit in mortices that are open-ended below as it sat when I picked it up. In fact one of them needed bashing upwards by an inch or so to go back into place. So there is no support underneath for them facing this way and they would need to be nailed or bolted from the side.
Also the choice is between laying a work surface in between the rails the original way up, or on top of the rails the other way up. I assume that given the top might expand and contract in depth, that it would be better to sit it on the rails and fix it to the front of the bench and let the rear float a little. How to attach that I haven't thought of yet.
So ... today ... having turned over the benchtop and thinking there was a bit of work to do ... you'll be pleased to know I treated the #5 blade to a reasonable sharpening also. I roughly levelled the bottom-now-top - using two bar clamps for winding sticks. They are -not- perfectly flat along the edges I was sighting, but a bit of filing got them close enough to be getting on with.
I then picked the nicer side to become the flat front of the bench and started on that with the #5, but it became quickly obvious that the scrub was needed. The wood was mostly a bit old and soft, you can probably make that out in the photos. But after scrubbing across and then along, the wood started to reveal its character. Interesting I thought ... I'm sure an electric planer would have had all sorts of trouble with this stuff.
Having completed enough exploratory surgery, I looked at taking it apart - and it was quite easy. Luckily at least one nut was happy enough to turn on each bar - which is far from my usual experience taking things apart
So then all cover up and called it a day. I wasn't planning on this as an activity for the week, so I need to get this done - at least the top section - ASAP ... which is not my usual way of working. Not even close.
I think the machines may be playing a part in this effort.
Cheers,
Paul
-
6th September 2012 07:02 AM # ADSGoogle Adsense Advertisement
- Join Date
- Always
- Location
- Advertising world
- Age
- 2010
- Posts
- Many
-
6th September 2012, 10:21 PM #32
GOLD MEMBER
- Join Date
- Aug 2009
- Location
- Armadale Perth WA
- Age
- 55
- Posts
- 4,524
Today's first job was to flatten one side by hand. It was easy enough to flatten about the right third of the surface so that it was level against the length of RHS. Then I used an old pair of mahogany winding sticks to mark where the left hand side was lower, level or higher - and then attack those areas with the #5.
Using the winding sticks is quite brilliant - such a simple idea but quite powerful. I got it cross-wise parallel, but putting the RHS back on found that I'd hollowed the side about a foot in from one end. With more experience I can see it being a very efficient method of flattening a surface.
Bowing to time pressure - and not totally averse to playing with machinery - I judged it flat enough to take over to the thicknesser and let it have its way with it. Then flipped it back to the first side - because it did a pretty damn good job.
I was tempted to leave it there, but on checking the second rail for flatness it was basically there ... so I scrubbed it lightly on both sides to remove some of the old wood and check for nails. Then again to the thicknesser.
Tomorrow - time allowing - the top needs preparing.
Cheers,
paul
-
6th September 2012, 10:37 PM #33
Mildly Moderate
- Join Date
- Nov 2007
- Location
- Albury Well Just Outside
- Posts
- 13,315
It is turning out to be quite an interesting work in progress.
-
7th September 2012, 12:46 AM #34
Senior Member
- Join Date
- Feb 2012
- Location
- Adelaide
- Posts
- 451
i would have liked to see some perseverance with hand tools..but i do enjoy seeing these pics, so its good compensation, you have such high quality junk its like heaven, well if it aint high quality its aesthetic! and Oh my ...friggin lord, that is the most gorgeous ugly thicknesser i have ever seen, looks like it was the predecessor to the first Terminator, you take a risk powering it (Arnie) up and dont let it near a computer lest it learn a thing or two...watch out for Sara Conner when she comes a knockin......incredible, love it!
-
7th September 2012, 11:00 PM #35
GOLD MEMBER
- Join Date
- Aug 2009
- Location
- Armadale Perth WA
- Age
- 55
- Posts
- 4,524
 Originally Posted by ch!ppy


It's been confirmed officially. The last time we had a road-side pick-up, I got rid of a bunch of 'projects' that were not looking like happening any time soon. 80% of it was gone the same day ... so consequently I maintain I have some of the best junk in the area
The other half really likes it too. She said we should get 5 acres ... said something about living in diagonally opposite corners.
I only had crappy photos in the album section of it, so I took some new photos of the thicknesser. https://www.woodworkforums.com/member...y-thicknesser/
Ugly? Don't say that - you'll hurt his feelings. Curse that damn Jack Forsberg and his beautiful machines.
OK. Today I tackled the pieces for the top. One of them was cupped significantly - which was a real advantage. I planed down the two edges and used the RHS and winding sticks to get them co-planar, ready for the thicknesser.
The scrub blade needed some attention, and I hadn't reshaped it before. Having hopefully learnt a few things now, I ground a nice curve across it, and then worked on the bevel. I should have spent a little longer with the grinder - you can see I didn't get it all the way to the edges. But close enough for now - it was working nicely.
Sun, baby-oil and chips - very nice
I also marked a line and grabbed a bunch of ripsaws to cut a better edge to the board. That was interesting and a bit unexpected ... still thinking on that one.
The second board had some twist to it and was harder to level out. By this time it was about 3pm and I'd been up since before midnight and starting to fade on energy and concentration ... so I enlisted the electric planar to help level out areas, checking with the winding sticks.
Then back and forth through the thicknesser, and clean up.
I'll be thinking about how to attach the top to the body of the bench, and whether the top will need epoxy to fill the cracks. Also the arrangement for the legs and what to do about vices. I wouldn't mind a diagonal leg vice - but there isn't one in the Landis book - so I can't yet remember where I've seen one.
Cheers,
Paul
-
8th September 2012, 02:42 AM #36
GOLD MEMBER
- Join Date
- Aug 2009
- Location
- Armadale Perth WA
- Age
- 55
- Posts
- 4,524
Two things I forgot.
First - I'm pretty happy with the Cr02 stropping. I never really had the "shaves hair" thing when I sharpened. Sometimes yes - but not usually gliding past like a razor. But the picture below is a result of being a little carried away with the scrub plane blade I sharpened.
Second - it took me until 3am this morning before the penny dropped about having used the #5 with the winding sticks the day before. I said that I had my intervals all parallel to my first stick at the front of the board - but had planed in a hollow near one end. Just out of the blue, my brain considered what that would look like if I ran a #7 or #8 down the length of the board ... no shavings from the hollow area. Duh.
I guess if I was going to use the #5 to take down high spots, I could alternate with planing lengthways with a try plane. Or, like the cupped board today, use the try plane in the first place.
Woulda been nice to think of that 12 hours earlier.
Paul
-
8th September 2012, 08:00 AM #37
Mossback
- Join Date
- Apr 2012
- Location
- Cat-Pig Swamp
- Posts
- 705
You should rename this thing "Paul's Excellent Bench Adventure".
This is going to be an all time best thread. And we're going to get to see all of Paul's tools!
Toby

-
8th September 2012, 11:20 AM #38
Senior Member
- Join Date
- Feb 2012
- Location
- Adelaide
- Posts
- 451
ah well, think i said a few days ago paul, to dimension the timber first, or if leaving assembled pick the lowest place ,after, it has been patched (if that is what you wanted to do) and work your levels from there. the string line trick and two straight edges would make it easy too Originally Posted by pmcgee
if you are adding the top to sit on top of the rails it wouldnt be noticed if the rails were made not as deep (you could cut 30mm or so off to remove the 'valleys'), if you were inserting pieces to make the top it would be nicer to keep some depth...there are a few different ways to make the top if inserting, one you might not of thought of yet is to rip down your plank into 3 or so inch thick pieces, dimension them up in the Schwazenegger beast etc and glue em together, need to keep an expansion joint between the rails, but easy enough to disguise it as tool holder or bench stop (like the common split top roubo benches have, doesnt have to be in the center though)
cheers
chippy
-
9th September 2012, 06:40 AM #39
GOLD MEMBER
- Join Date
- Aug 2009
- Location
- Armadale Perth WA
- Age
- 55
- Posts
- 4,524
If you haven't seen Magic Jack Forsberg's work on old Wadkin machinery ... here's a starting point: https://www.woodworkforums.com/f163/w...ml#post1548519
"Look at his machine. Now back at me.
Now back at him. Now back at me.
I'm sitting on a horse's ass"
WA Carving Guild gave a workshop today on chip carving - really excellent day - got a solid start onto something that I had assumed I wouldn't ever get a handle on. It was a quick meeting also, awarding prizes from the woodshow. I just realised I got at least one photo of some of the work with my phone ... I'll find it.
-
9th September 2012, 06:59 AM #40
GOLD MEMBER
- Join Date
- Aug 2009
- Location
- Armadale Perth WA
- Age
- 55
- Posts
- 4,524
Putting the parts so far roughly together on friday/saturday I was feeling that I might have killed the character that was in the bench originally.
I guess that is partially inevitable given the degree of clean-up being done, but I'm starting to regain my feeling that it can still retain a dignity and character that will reflect its background.
There's *plenty* of wood around here, so open to any and all suggestions on the final style. For example I thought I could butterfly the two halves of the top together in three or four places with jarrah or sheoak.
It will need vertical end-boards. The base obviously (who knows what height yet).
Maybe even a front (and/or back?) section to the top in jarrah. Not sure about that idea.
Cheers,
Paul
The top could sit inside the rails and be wider - I don't need to retain the original cross-pieces.
I'll mock that up after work.
-
9th September 2012, 07:09 AM #41
GOLD MEMBER
- Join Date
- Aug 2009
- Location
- Armadale Perth WA
- Age
- 55
- Posts
- 4,524
UK Alf's Nicholson workbench.
http://www.ukworkshop.co.uk/forums/n...ch-t33792.html
-
9th September 2012, 09:21 AM #42
Mildly Moderate
- Join Date
- Nov 2007
- Location
- Albury Well Just Outside
- Posts
- 13,315
I like legs to be inside, flush with the side.
-
9th September 2012, 01:03 PM #43
GOLD MEMBER
- Join Date
- Aug 2009
- Location
- Armadale Perth WA
- Age
- 55
- Posts
- 4,524
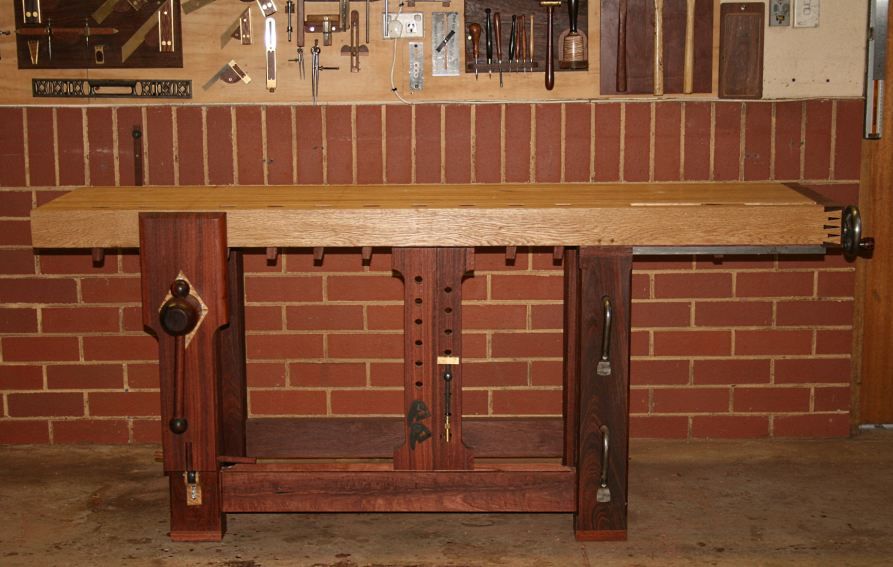
I am interested in the way that guys leg vice has been made. There is a lot of room in that paddle - as the screw is set very low.
And now I notice that it corresponds to give the whole depth of the skirt free for clamping.
I think this format - see Derek's picture - is what I have probably thought of as about 'normal'.
Although, now I am looking through the Landis book again looking specifically at the leg vices, and seeing a lot of variation.
-
9th September 2012, 01:44 PM #44
GOLD MEMBER
- Join Date
- Aug 2009
- Location
- Armadale Perth WA
- Age
- 55
- Posts
- 4,524
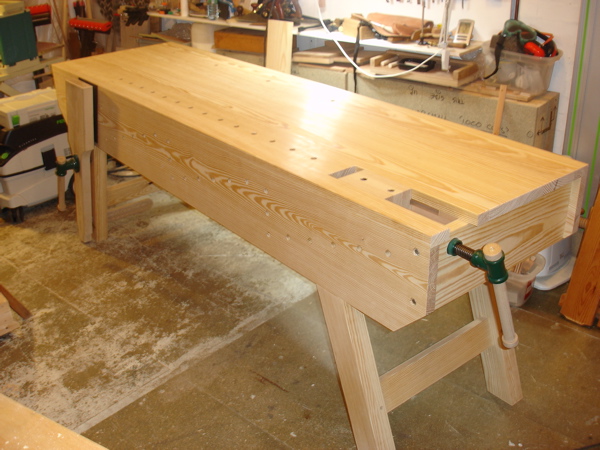
OK here is the mock-up of the wider-top bench format ... I'm thinking I like the idea.
Plus the work-holding options on-hand at the moment: one small Carter 7", an unknown quick-release vice, and 4 assorted ACME thread screws.
-
9th September 2012, 02:44 PM #45
Mossback
- Join Date
- Apr 2012
- Location
- Cat-Pig Swamp
- Posts
- 705
This does look much better than putting them on top.
Toby


 Reply With Quote

Similar Threads
-
Advice for outdoor workbench
By Robot in forum THE WORK BENCHReplies: 25Last Post: 23rd June 2012, 05:23 PM -
Finish needed for outdoor metal workbench
By Dengue in forum FINISHINGReplies: 10Last Post: 20th June 2012, 12:39 PM -
Outdoor workbench- ground support and finish
By woodhunt in forum THE WORK BENCHReplies: 7Last Post: 24th August 2011, 11:03 PM -
Best metal finish for outdoor workbench
By Dengue in forum THE WORK BENCHReplies: 10Last Post: 13th May 2009, 02:20 PM -
intro myselft and outdoor workbench
By nukang in forum THE WORK BENCHReplies: 6Last Post: 11th February 2007, 03:20 PM
