

 Thanks:
  Likes:
  Needs Pictures: 0
 Picture(s) thanks:
Results 31 to 45 of 245
Thread: Roubo Bench Issues and Questions
-
22nd January 2012, 05:43 PM #31
 Neander Normite


- Join Date
- Jan 2005
- Location
- Melbourne
- Age
- 65
- Posts
- 11,997
-
22nd January 2012 05:43 PM # ADSGoogle Adsense Advertisement
- Join Date
- Always
- Location
- Advertising world
- Age
- 2010
- Posts
- Many
-
22nd January 2012, 06:04 PM #32
GOLD MEMBER
- Join Date
- Feb 2003
- Location
- back in Alberta for a while
- Age
- 68
- Posts
- 12,006
 Derek,
 Originally Posted by derekcohen

is this of any assistance ?
http://benchcrafted.blogspot.com/sea...al%20Questions
fitting a tal vies to an existing bench, with dimensioned photosregards from Alberta, Canada
ian
-
22nd January 2012, 06:07 PM #33
GOLD MEMBER
- Join Date
- Feb 2003
- Location
- back in Alberta for a while
- Age
- 68
- Posts
- 12,006
-
24th January 2012, 12:46 AM #34
Be inspired. Be creative. Be bold.
- Join Date
- Apr 2001
- Location
- Perth
- Posts
- 10,826
Hi Greg and Ian
Many thanks for the pics and links. This has been most helpful. Greg, your point about getting the tail vise to work over the leg is an excellent one. I will return to this shortly. My apologies for not replying sooner, but we are struggling with our internet connection (there was a recent storm with lightning that fried a lot of modems. I think ours has been affected as well).
Regards from Perth
DerekVisit www.inthewoodshop.com for tutorials on constructing handtools, handtool reviews, and my trials and tribulations with furniture builds.
-
24th January 2012, 01:53 AM #35
Be inspired. Be creative. Be bold.
- Join Date
- Apr 2001
- Location
- Perth
- Posts
- 10,826
I should title this "How not to build a bench"!
There has been some progress, but it has been a lot slower than I planned owing to changes made, and the repairs to these changes, and then being in two minds about the installation of the tail vise.
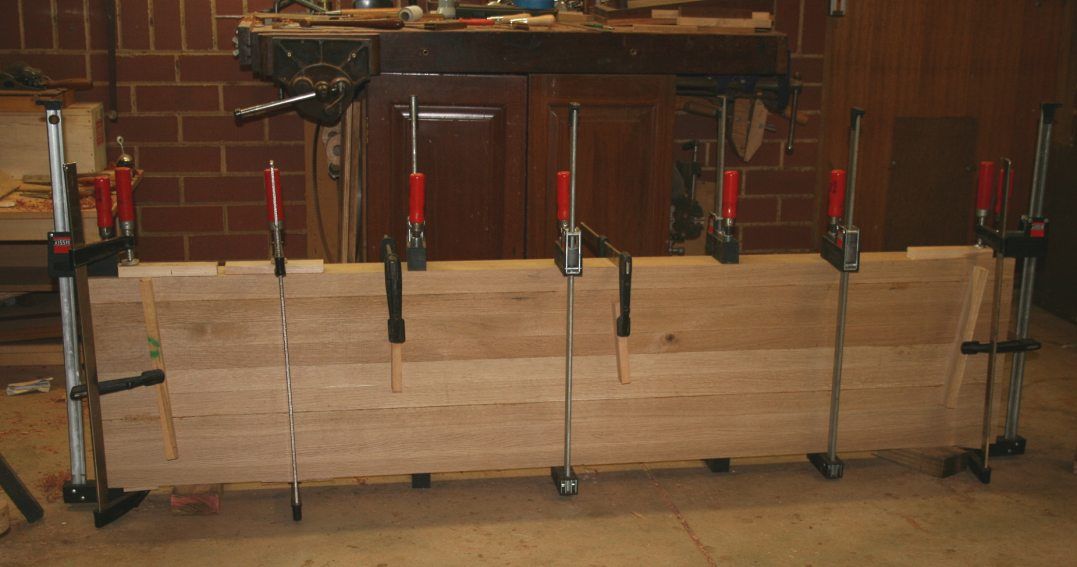
First of all, the bench top has now reached the stage where it is recognisable as a bench top. I glued the sections together to look like this ..
Next comes the dog hole strip. This was a little more complicated that it needed to be owing to the absence of the requisite board to build it. I searched Perth high and low for more timber, but there is no European Oak to be had in small qualities. So I decided to use the off-cuts from the bench build and create a modular system of dog holes. The advantage here would be the freedom to fit them into the system I will finally decide on. System? More on this later.
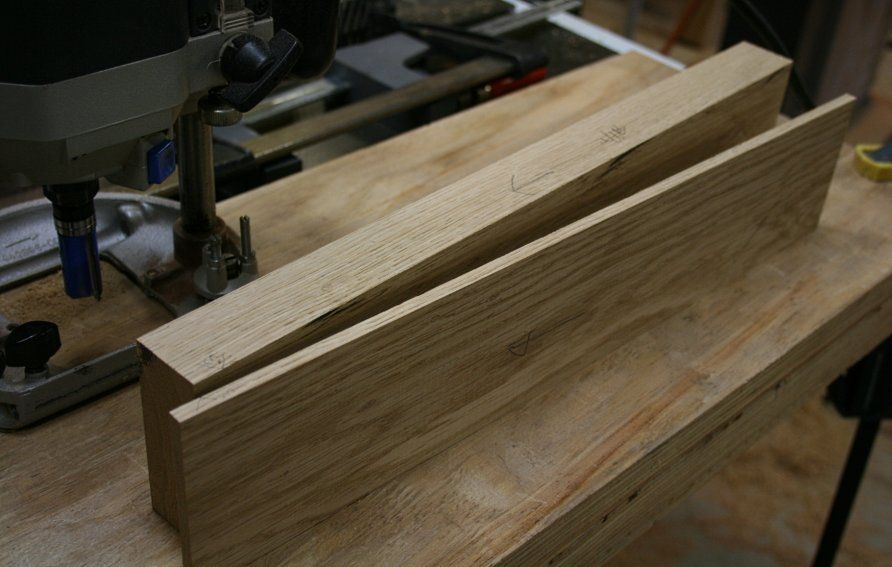
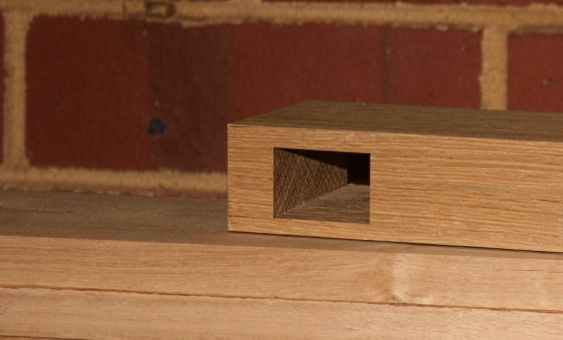
Building dog holes: The dog holes are 1" wide and 1 1/2" deep across the top. They are angled towards the vise at 2 degrees. The dog in the BC tailvise is the same size, and also angled forward by 2 degrees.
The dogs need to be centred in the dog strip. First the dog strip board is resawn ...
Then a jig was built for the router ...
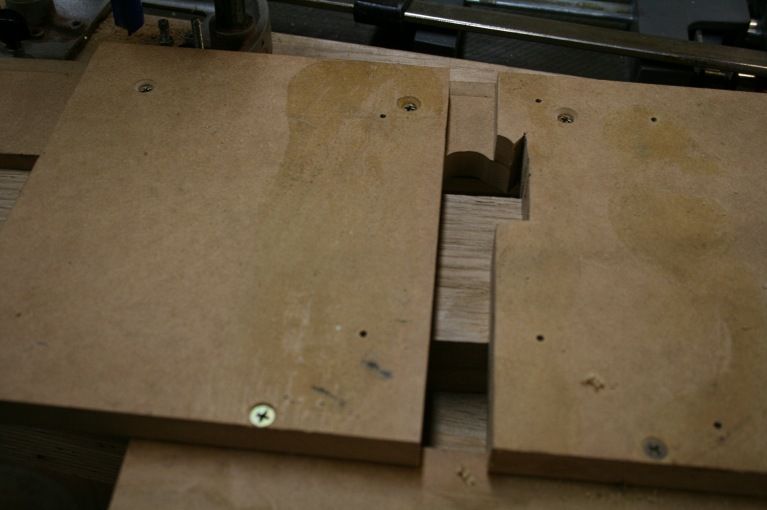
... and the dog holes machined out ..

The "bumps" are to prevent the dogs dropping out of the dog holes.
Finally, the two boards were glued together ..

The result was a bunch of dog hole strips with each dog hole 3" apart ..
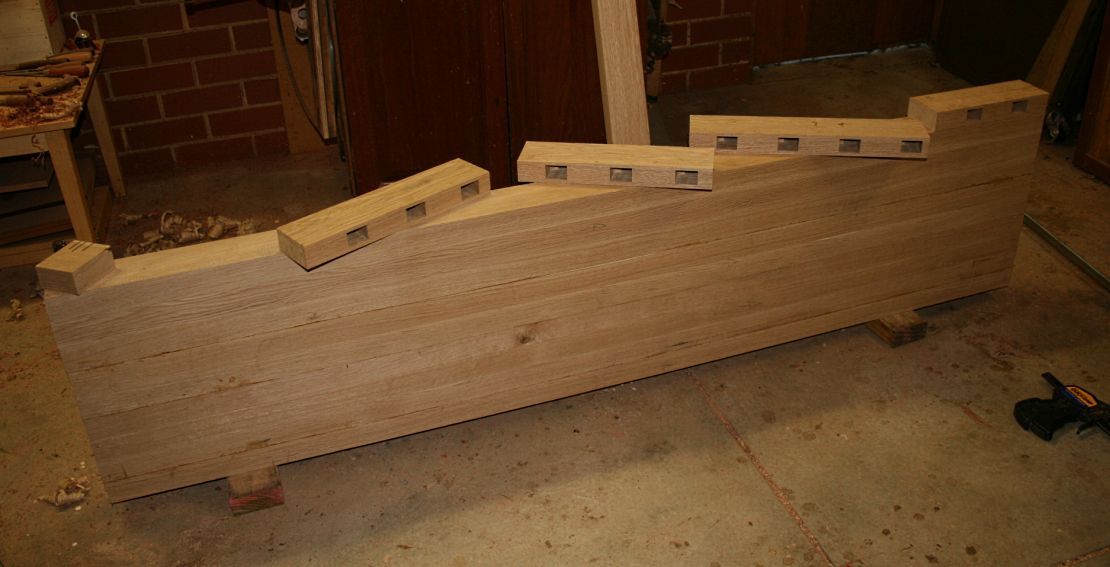
... which I cut to fit the length here, but which I can re-configure as I wish later on (also, note the difference in size of this 75" bench top length versus the <60" length of my old bench) ...
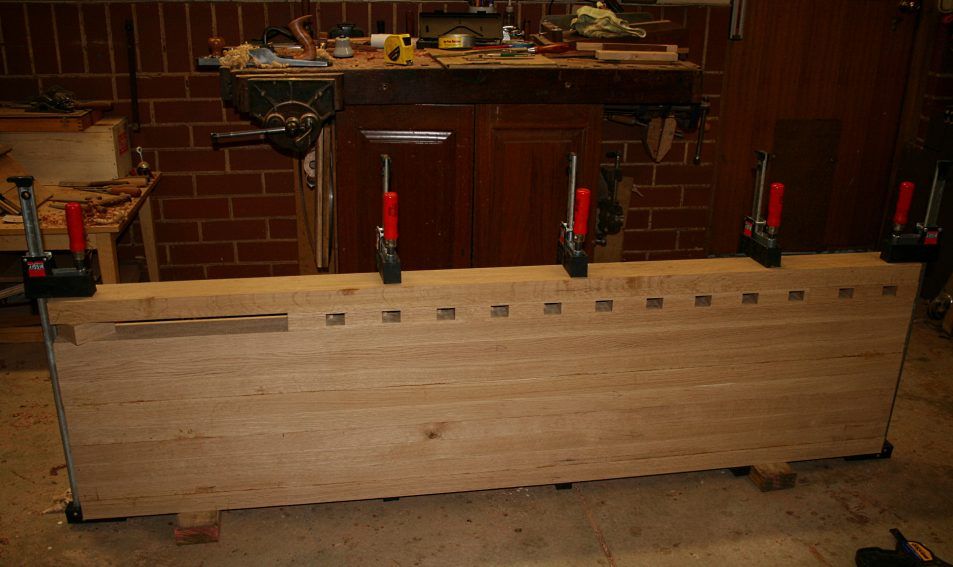
The width of the bench here is 20". The final width is expected to be between 21" and 22".
What is the issue?
Essentially, there are two choices. Either the dog holes are placed as close to the edge of the bench (say 2 1/2", as above), which makes it easier to use when rebating, planing moldings, and other edge treatments ... or, the dog holes are arranged so that the vise can hold work over the rear leg, which is useful for work that requires hammer blows, such as morticing.
The problem is that you cannot have both systems. You have to choose. In the situation where the dog holes are close to the edge of the bench, they will be interrupted by the legs (which are 5" wide and 3 5/8" deep). Consequently, there will be dead spots along the edge of the bench. In the case of the dogs being situated at a distance to the inside of the legs, they will have to be about 3 1/2" - 4" out from the bench edge.
My question to the forum is which is more important for you?
In the case that I go with the second option, I shall need to extend the width of the bench by 1 1/2". And no more European Oak. I decided I would use Tasmanian Oak as a substitute. It is interesting that Tassie Oak is not an oak but a Eucalypt, yet its colour and grain of the edge grain is very similar to the European Oak ...
The Tassie Oak is a little lighter in colour, but after a year I doubt that anyone would pick it out.
Now the other area I had a change of mind was the bench height. In an earlier post I wrote that a height of 30" appeared to work when planing. This was a result of using Chris Schwarz' "pinky test". Over the next couple of days the thought began to firm that planing is just one activity - I prefer a higher bench for detail work, such as the moldings I made with H&R planes - and that I have become used to a 34" bench height. I decided to compromise at 32".
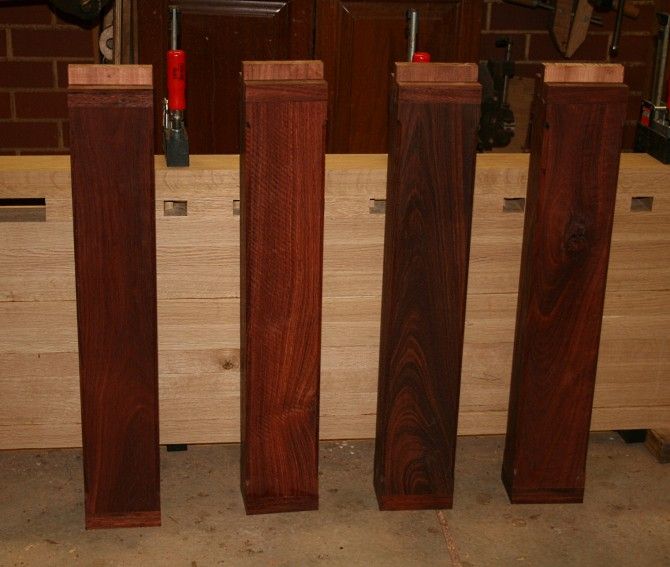
Unfortunately ... I had already cut the legs for a 30" high bench. To make matters more stressful, the bench top thickness is going to end up closer to 3 1/2" than 4". The slight difference in thickness does not bother me, but this affects the bench height.
So now I began to obsess about how I could fix the legs.
Fortunately, when I cut them to length I left the tenons long - 2" in total. The final tenon length will be 1".

Here is one idea, which I shelved: molding made with the above-mentioned H&Rs ..
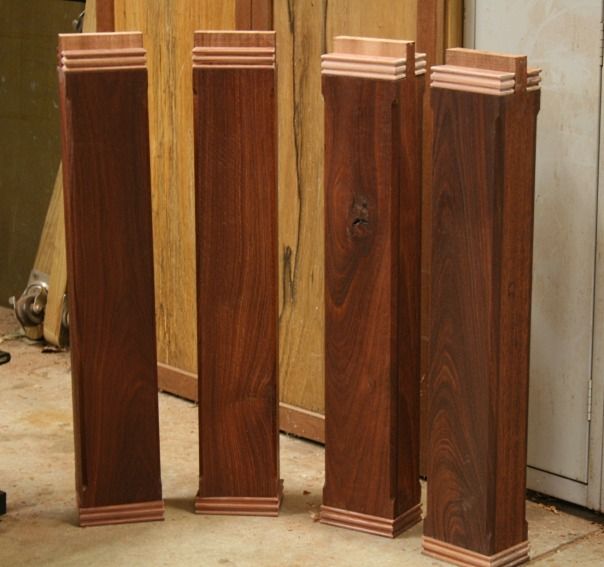
This was too busy for my taste, even if I stained the pieces dark.
I ended up with this ...
Back to the bench top. Here is the BC end vise (with dog hole strip) ready for installation. Just a final decision to make about the choice preferred ...

What are your thoughts in that area?
Regards from Perth
DerekVisit www.inthewoodshop.com for tutorials on constructing handtools, handtool reviews, and my trials and tribulations with furniture builds.
-
24th January 2012, 02:31 AM #36
Junior Senior Member
- Join Date
- Dec 2008
- Location
- Adelaide, SA
- Posts
- 962
Sorry if this has been already answered, but are the square dog holes over round just personal preference? It just seems easier to drill holes in the bench...
-
24th January 2012, 02:39 AM #37
Be inspired. Be creative. Be bold.
- Join Date
- Apr 2001
- Location
- Perth
- Posts
- 10,826
Hi John
It was discussed in #10 ...
" Why rectangular? Simply because I believe that they will hold work more securely than round dogs. They have a broader face and will not twist. Plus, I wonder how many bench (dog) builders realise that the dogs need to incline slightly (I am using 2 degrees) towards the work piece? This is difficult to do if drilling for a round dog. Yes, it is possible to cut and angle a flat upper section of a round dog, but this thins and potentially weakens the dog, making it more susceptible to bending under stress. A rectangular dog is more work, both in planning and build, but it worth it. This does not preclude one from adding holes for bench accessories, such as hold downs."
Regards from Perth
DerekVisit www.inthewoodshop.com for tutorials on constructing handtools, handtool reviews, and my trials and tribulations with furniture builds.
-
24th January 2012, 08:44 AM #38
 GOLD MEMBER
- Join Date
- Mar 2009
- Location
- Sydney
- Age
- 37
- Posts
- 2,711
The bench is coming along nicely Derek

I'm amazed at how fast you are working - when do you expect it to be finished?
Andy
-
24th January 2012, 08:59 AM #39
GOLD MEMBER
- Join Date
- Mar 2004
- Location
- Brisbane (western suburbs)
- Age
- 77
- Posts
- 12,130
Derek, that's the problem with thinking too much, it throws up too many questions & too many choices!

Dog setback: It has to come down to what you think will fit your work style best. My dog holes are close to the edge of the bench, ~40mm setback. There are times when it would be nice to have them further from the edge, but I would say that in the main, they are far more useful to me being close, for the reasons you state. I frequently have the need to overhang narrow boards for jobs like rebating or sticking an edge, whether using manual or powered methods, to clear fences & bearing guides, etc. A lot of cabinet pieces that need that sort of operation are 60-75mm wide, so a setback of 50mm or less is ok, but more would make it difficult to hold such pieces securely.
I really like the way your routed profile has the notch rounding into the 'shaft' of the dog slot. That is a consequence of the way you made them, of course, but it's brilliant, because it means that it will be so much easier to clean out the crap that inevitably finds its way in there. I slavishly followed the design as laid down by the great gurus and chiselled my notches out (perfectly straight & square, of course) after routing a straight slot. They were a constant PITA, because sawdust & chips sneak in there & build up slowly, untill the dog won't sit down fully. Add a dash of Danish, or spilled glue that you don't notice, & the gloop gets really solid, needing a chisel to clean it out. Eventually, after cursing them for years, I got fed up & managed to pare most of them off at an angle, but it's not an easy task after assembly!
I still think it would be a good idea to make your travelling section long enough for two dog slots spaced at half the distance between the bench slots. It will save you a million turns per half lifetime, and even with your magical hand wheel, you'll be glad you did it, I reckon......
As to getting the travelling section to come over the leg, I seem to be missing something in translation. I would be at pains to make sure it stops before the leg area, so that the work is held sitting over, or mostly over, the most well-supported part of the bench, where you can pound away at will. I avoid all but light hitting over my tail vise, which of course is cantilevered from a slide attached under the bench proper. You are slightly better off with your system in that the slide has solid bench on either side of it, and work wider than the slot will rest on that, so thumping something over the slide area is a little less drastic, but still probably not the best idea, as some of it will be transferred to the mechanism.
My bench also has a cross member between the front & rear legs, so that area of the bench is well supported & rigid. Your design does away with cross members, so you don't get that additional support, but given the thickness of the darn thing, I doubt you are likely to notice much bounce, anywhere on the surface, unless you use much larger mallets & hit a lot harder than ever I do!
Interesting that you have rethunk the height issue. As I said before, there is no perfect height, the only solution for me was to build to the height that suits the majority of operations, and particularly the heavy-duty stuff like planing, then find other ways to get work held at the most convenient heights. Neither of us has the room for another solution (several benches) so it's always going to be a compromise.
Anyway, it's definitely looking like a bench, now, and I think you wil be most thankful for the extra length. You'll ask yourself repeatedly why on earth you put up with that tiddler you've been using, for so long..............
Avagoday,IW
-
24th January 2012, 03:06 PM #40
The prize lies beneath - hidden in full view
- Join Date
- Oct 2010
- Location
- 1017m up in Katoomba, NSW
- Posts
- 10,662
Derek, just a thought, and please bear in mind that this comes from a novice (if that) who has never even used a woodworker's bench, let alone built one. Only got one plane and 6 (current) Irwin chisels too, so that'll give you an idea of the experience level here! Currently having difficulties with Shellac.
However.....with regard to the dog 'oles - what if you made that section of the side (or part thereof) reversible so that the holes could be two different distances from the edge, on demand. To regain strength you'd need to use some pretty hefty coach bolts (recess the head). Or is this going to affect the whole structure, and not be possible/viable? If you had some sustained task/s to do it would be worthwhile doing the unbolting/rebolting.
Cheers, Brett
-
24th January 2012, 05:31 PM #41
The Laird
- Join Date
- Jan 2007
- Location
- Katoomba NSW
- Posts
- 4,774
An interesting idea Brett Originally Posted by FenceFurniture
 There may be some difficulty implementing it because of the mortises required underneath for the legs but It would not be impossible. Worth thinking about.
My dog holes are inside the legs, around 150mm from the edge. They needed to be that far in to line up with the dog in the QR vice I use as a tail vice. I haven't had any problems with them being there yet but it is still early days I can easily secure to the edge of the bench using the face vice and a clamp if necessary. I use the Veritas brass bench dogs. Well worth the money. I need to get some more.
I ploughed some channels, with the Sargent 1080, in a long piece of pine (Mighty Bean race track") google it) It was too long for the bench and it didn't matter what the underneath looked like so I drilled a 25mm hole underneath with a forstner bit and slipped it over the top of the dog. Worked a treat.
google it) It was too long for the bench and it didn't matter what the underneath looked like so I drilled a 25mm hole underneath with a forstner bit and slipped it over the top of the dog. Worked a treat.
-
24th January 2012, 07:32 PM #42
GOLD MEMBER
- Join Date
- Feb 2003
- Location
- back in Alberta for a while
- Age
- 68
- Posts
- 12,006
interesting concept Brett Originally Posted by FenceFurniture
two issues you may care to consider
1) a furniture making bench needs to be level both along and across the bench. if part of the bench is reversible, maintaining the levelness could be challenging
2) ideally the dog holes along the bench should be in line with the moving dog in the tail or end vise.regards from Alberta, Canada
ian
-
24th January 2012, 09:07 PM #43
The prize lies beneath - hidden in full view
- Join Date
- Oct 2010
- Location
- 1017m up in Katoomba, NSW
- Posts
- 10,662
1) If the timber has been jointed and thicknessed, and with the skills of this particular maker - should be do-able Originally Posted by ian
2) Yes, had considered that Ian, which is why I was suggesting perhaps part of the side - further up away from the tail vise. For planing longer boards using the tail vise you could have a "head" (sic) of a flat piece of timber with a dog out of one end, overlap the other end over the side of the bench and secure it with a wing nutted 5/16 thread into a female thread embedded in the bench side. More or less U shaped if you include the dog.
Actually having used one might give me a better stab!
-
24th January 2012, 09:18 PM #44
SENIOR MEMBER
- Join Date
- Jan 2011
- Location
- Sydney
- Posts
- 613
What about our friend the ever versatile Z-Vice?. Could you use it to fill one of the two needs when required and then remove it when not needed? Originally Posted by derekcohen
-
29th January 2012, 12:27 PM #45
SENIOR MEMBER
- Join Date
- Jul 2008
- Location
- Aspley, Brisbane
- Age
- 46
- Posts
- 362
Derek,
I recall from prior posts that you were considering the inclusion of a tool well in your next bench. Traditionally Rubo benches don't have this feature and I was wondering if you considered modifying the design to include a tool well?
Regards,
Denim.


 Reply With Quote


Similar Threads
-
Underhill's Roubo bench
By The Pom in forum THE WORK BENCHReplies: 4Last Post: 14th June 2011, 11:57 AM -
Dan's Blackbutt Roubo Bench
By BozInOz in forum THE WORK BENCHReplies: 215Last Post: 8th April 2011, 08:21 PM -
WIP Roubo bench
By mic-d in forum FURNITURE, JOINERY, CABINETMAKING - formerly BIG STUFFReplies: 48Last Post: 30th January 2009, 04:34 PM -
Bench Questions
By noodle_snacks in forum WOODWORK - GENERALReplies: 89Last Post: 13th March 2006, 11:32 PM -
bench top glue-up questions
By Richie in forum GLUEReplies: 3Last Post: 18th February 2006, 12:00 AM
