

 Thanks: 0
 Likes:
  Needs Pictures:
  Picture(s) thanks:
Results 76 to 90 of 1194
Thread: WIP - Groggy's Workbench
-
16th August 2009, 11:30 AM #76
 Neander Normite


- Join Date
- Jan 2005
- Location
- Melbourne
- Age
- 65
- Posts
- 11,997
-
16th August 2009 11:30 AM # ADSGoogle Adsense Advertisement
- Join Date
- Always
- Location
- Advertising world
- Age
- 2010
- Posts
- Many
-
16th August 2009, 11:50 AM #77
Timber Hoarder
- Join Date
- Sep 2002
- Location
- Minbun, FNQ, Australia
- Age
- 66
- Posts
- 12,881
 You probley cut it up & binned it.
 Originally Posted by Groggy

 Cliff.
If you find a post of mine that is missing a pic that you'd like to see, let me know & I'll see if I can find a copy.
-
16th August 2009, 11:53 AM #78
GOLD MEMBER
- Join Date
- May 1999
- Location
- Grovedale, Victoria Australia
- Age
- 66
- Posts
- 3,896
When you slide the clamps in will there be dividers so the other clamps will not catch each other.
Nothing worse the trying to get one out and a few others follw up with a tangled mess.Jim Carroll
One Good Turn Deserves Another. CWS, Vicmarc, Robert Sorby, Woodcut, Tormek, Woodfast
Are you a registered member? Why not? click here to register. It's free and only takes 37 seconds!
-
16th August 2009, 12:32 PM #79
Neander Normite
- Join Date
- Jan 2005
- Location
- Melbourne
- Age
- 65
- Posts
- 11,997
We think alike Jim. Originally Posted by Jim Carroll

Originally I was planning to run some hardboard dividers dado'd into both the top and bottom shelves but that is overly complicated and the grains run in different directions. At present the plan is to use some triangular guides attached to just the bottom shelf with glue (and a few brads to hold it until the glue dries ) I don't want the ends constantly catching each other.
-
16th August 2009, 04:10 PM #80
Neander Normite
- Join Date
- Jan 2005
- Location
- Melbourne
- Age
- 65
- Posts
- 11,997
It never ceases to amaze me how many tools climb onto the bench while I'm mortising.
The first end-frame is together (dry fitted) and I am very happy with it. The frame pictured is the right end of the bench, the dark leg is the front. The mortises will be draw bored when assembled.
A nice blurry shot of the twin tenons.
The frame is dead square with no 'encouraging' from me.
Now for the second one.
-
17th August 2009, 01:49 AM #81
 Fossil Member
- Join Date
- Jan 2005
- Location
- Perth
- Posts
- 1,181
Hi Groggy,
Nice work. Nice fit. Nice square. Oh,... and that bench. Looks pretty damn tidy to me, even the floor is tidy. All those tools led to that perfect fit so I guess the more tools the better.
Keep the photos coming, thanks.
Cheers
Pops
-
17th August 2009, 09:40 AM #82
Neander Normite
- Join Date
- Jan 2005
- Location
- Melbourne
- Age
- 65
- Posts
- 11,997
I just noticed in that photo that I haven't routed the edges of the side stretchers.

Job for during the week.
-
17th August 2009, 08:36 PM #83
Neander Normite
- Join Date
- Jan 2005
- Location
- Melbourne
- Age
- 65
- Posts
- 11,997
Got them done, took no time at all really, I must be getting used to the flute cutting. Maybe an hour all told, including setup.
Ran the router flat out so I could climb cut but still got some burning, not too deep though so they should sand out with a bit of work.
-
18th August 2009, 12:15 AM #84
What... you mean it's not 1792?
- Join Date
- Oct 2006
- Location
- Melbourne
- Posts
- 5,271
They look really well.
 .
.
I know you believe you understand what you think I wrote, but I'm not sure you realize that what you just read is not what I meant.
Regards, Woodwould.
-
18th August 2009, 09:04 PM #85
Neander Normite
- Join Date
- Jan 2005
- Location
- Melbourne
- Age
- 65
- Posts
- 11,997
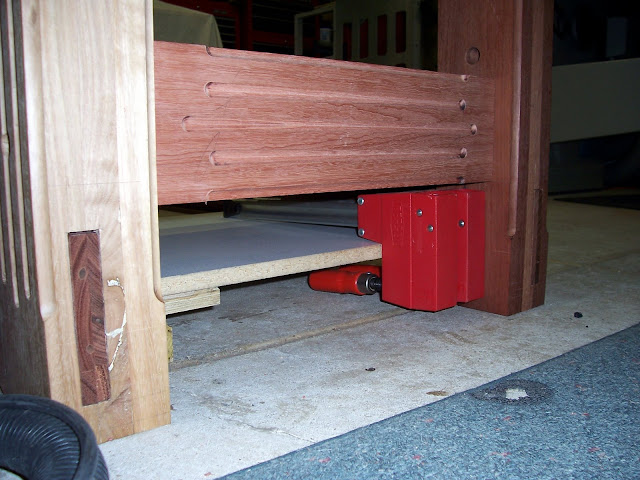
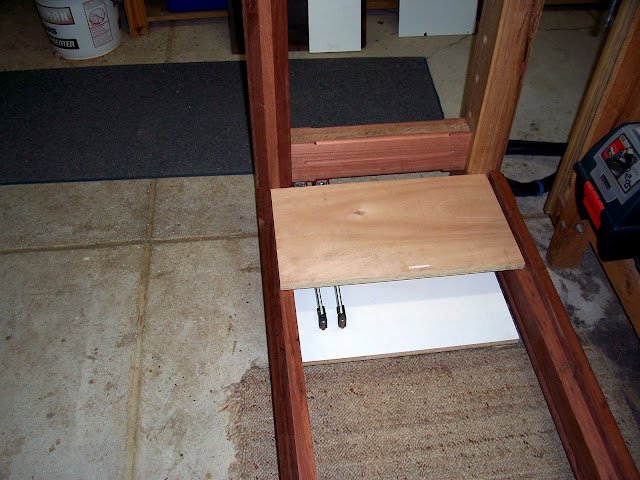
Had a play tonight and erected the frame dry to see how it was going. Pretty pleased with the result as it sits very solidly and pushing it does very little to it, even with dry joints. Once it is glued, wedged and dowelled, then a top attached with more mortises, I doubt very much that it will move at all.
The first photo shows the general frame. The others are showing the way the clamps will be stored. The heads of the clamps will be slightly raised so any vibration will move them in rather than out of the storage area.
I have had a lot of comments from people about how difficult it will be to move the bench, in fact it will be very simple. Anyone care to hazard a guess as to how it will be done?


-
18th August 2009, 09:43 PM #86
GOLD MEMBER
- Join Date
- Mar 2005
- Location
- In the shed, Melbourne
- Age
- 52
- Posts
- 6,883
How it's going to be done?
a. Much like a deadman switch on a c/saw, you'll do the same on the bench with castor wheels. (after some Buds i can't be stuffed to find a link from FWW of what I'm talking about, but if I'm on the money in any way youi know what I'm already talking abiout)
b. But really, it'll only ever live in one spot and you get some burly blokes to move it into place then ply the blokes with vitamins for helping move the beast.
or c. much like above, but you'll put the frame of the bench where its final resting place will be and attach the top and rest of it after it has been located in the final resting place. (make sence? clear as mud)
-
18th August 2009, 09:49 PM #87
Neander Normite
- Join Date
- Jan 2005
- Location
- Melbourne
- Age
- 65
- Posts
- 11,997
-
18th August 2009, 09:50 PM #88
GOLD MEMBER
- Join Date
- Mar 2005
- Location
- In the shed, Melbourne
- Age
- 52
- Posts
- 6,883
-
18th August 2009, 09:54 PM #89
Neander Normite
- Join Date
- Jan 2005
- Location
- Melbourne
- Age
- 65
- Posts
- 11,997
I'll have to come back tomorrow, my son has used up our bandwidth and I am on dialup speed Originally Posted by Waldo

Oh well, nothing wasted this month
-
18th August 2009, 10:27 PM #90
Senior Member
- Join Date
- Apr 2006
- Location
- Sydney, Australia
- Posts
- 226
Groggy, Just popped into this thread to have a peak at your new bench. I haven't read all the posts but the bench looks like it will turn out very impressive. Originally Posted by Groggy
The reason for me butting in, as I has to have a little chuckle at your "dead square" comment. I couldn't understand why it wouldn't. I had a close peak at your work bench and I could count 7 possibly 8 squares on it. I understand double checking, but 7 times, that's gotta make it perfect.
Squirrel.
PS.. the picture was the first one in post #80


 Reply With Quote


Similar Threads
-
workbench
By Rhys Cooper in forum THE WORK BENCHReplies: 125Last Post: 4th August 2009, 09:42 PM -
Workbench on WC
By dhurrang in forum THE WORK BENCHReplies: 3Last Post: 13th February 2006, 10:42 AM -
Catch-22 - building a workbench without a workbench
By brianhay in forum THE WORK BENCHReplies: 11Last Post: 18th January 2005, 04:56 PM -
New Workbench ala FWW
By bigAl in forum THE WORK BENCHReplies: 27Last Post: 20th April 2004, 09:41 PM -
workbench
By spargs in forum THE WORK BENCHReplies: 4Last Post: 15th April 2004, 07:18 PM
