

 Thanks:
  Likes:
  Needs Pictures:
  Picture(s) thanks:
Results 1,381 to 1,395 of 1484
Thread: Show us ya shed!
-
16th July 2011, 10:24 PM #1381
 Tree Terrorist


- Join Date
- Dec 2005
- Location
- Emerald, QLD
- Posts
- 4,489
 With a collection of tools like that, I don't think anyone will even notice what the cabinets are made of - nice job
 Originally Posted by derekcohen


-
16th July 2011 10:24 PM # ADSGoogle Adsense Advertisement
- Join Date
- Always
- Location
- Advertising world
- Posts
- Many
-
22nd July 2011, 04:24 AM #1382
GOLD MEMBER
- Join Date
- Sep 2002
- Location
- Paignton. Devon. U.K.
- Posts
- 6,062
Originally Posted by derekcohen
Well it is and I changed the setup in mine this morning after a five year run.
The new bandsaw arrived this morning with a really cheerful Axminster driver who asked where the bandsaw was to be placed, "no trouble he said".
I said I had also got a mobile base and could he fit that on before we established its final resting place because of its gross weight. "no trouble he said"
He new what he was doing and it no time at all everything was upright and in position. I didnt have a bead of sweat on me, but he did, thank you Alan.
I have felt very stressful all week, but well done Axminster.
So here are a few pictures.
I had cleared the garage door end of the workshop, (the old record bandsaw left a few minutes after this picture was taken, (to family).
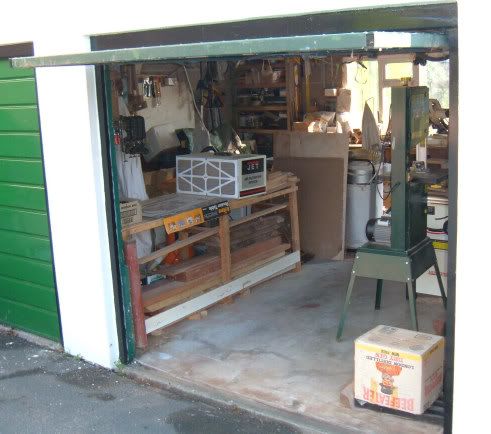
New bandsaw in position and on base.
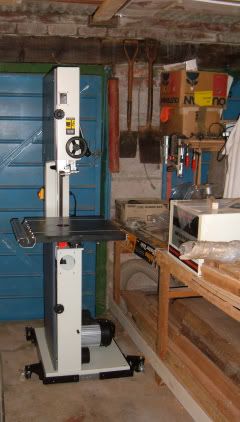
Ample working space, I will be able to shoot a 7ft board through the blade if needed.
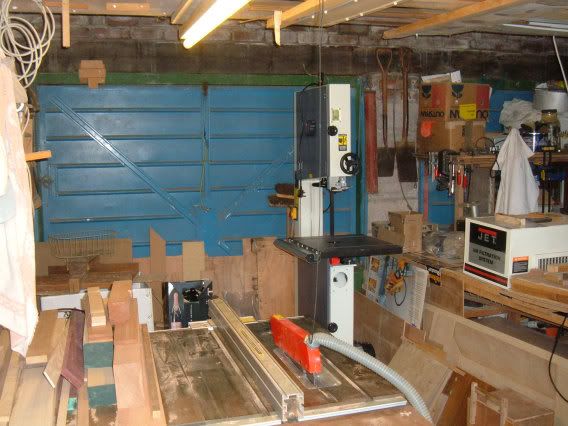
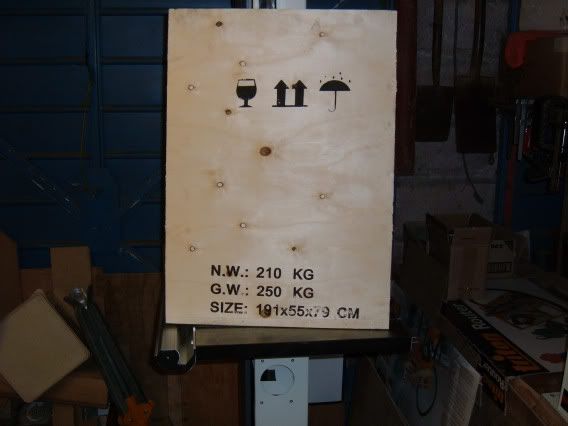
And just to show what weight we had to cope with, 5cwt net, 4cwt in position.
First question, I am requiring help, the drive belt is set to the low speed and I have got to move it over to get to the high speed. The belt is around 20mm square, and very tight.
How would you get it to change pulleys?woody U.K.
"Common looking people are the best in the world: that is the reason the Lord makes so many of them." ~ Abraham Lincoln
-
22nd July 2011, 10:07 AM #1383
GOLD MEMBER
- Join Date
- May 1999
- Location
- Grovedale, Victoria Australia
- Age
- 66
- Posts
- 3,896
Nice looking unit John
There shold be a locking lever near the bottom pulley that allows you to take the tension of the belt.
If all else fails have a look at the manual, Jim Carroll
One Good Turn Deserves Another. CWS, Vicmarc, Robert Sorby, Woodcut, Tormek, Woodfast
Are you a registered member? Why not? click here to register. It's free and only takes 37 seconds!
-
22nd July 2011, 05:38 PM #1384
GOLD MEMBER
- Join Date
- Sep 2002
- Location
- Paignton. Devon. U.K.
- Posts
- 6,062
Thanks Jim, I will post a help thread in general woodwork, there are problems. Originally Posted by Jim Carroll
woody U.K.
"Common looking people are the best in the world: that is the reason the Lord makes so many of them." ~ Abraham Lincoln
-
22nd July 2011, 06:04 PM #1385
Hewer of wood
- Join Date
- Jan 2002
- Location
- Melbourne, Aus.
- Age
- 71
- Posts
- 12,746
Derek, Jarrah Jack might benefit from hearing about a coffin plane ;-}
Cheers, Ern
-
24th July 2011, 06:12 PM #1386
SENIOR MEMBER
- Join Date
- Jul 2010
- Location
- Canberra
- Posts
- 566
 Update to my shed
I've added another bit of furniture to the shed, an old roller top desk that I scored for free, which I am going to use to house a computer and a heap of home brewing gear.
I got rid of a bit more rubbish and a rusting filing cabinet, and an old chipboard desk in the process, and got a heap more room in the shed as a result.
The computer will play music and house about a two thousand pdfs of plans and woodworking articles that I want to keep handy.
Craig
-
24th July 2011, 06:48 PM #1387
GOLD MEMBER
- Join Date
- Sep 2002
- Location
- Paignton. Devon. U.K.
- Posts
- 6,062
Very nice, and I see you are a Triton man. Much better than me btw, I always had sawdust around. I now recall when I sold my Triton gear the young buyer (in twenties) said he was going to set it up in his bedroom, he must have been better than me as well.
 woody U.K.
"Common looking people are the best in the world: that is the reason the Lord makes so many of them." ~ Abraham Lincoln
-
24th July 2011, 08:26 PM #1388
SENIOR MEMBER
- Join Date
- Jul 2010
- Location
- Canberra
- Posts
- 566
Sawdust
You shoulda seen it before the photos and tidyup
Mind you, getting concrete on the floor and putting the fiddly stuff into cupboards has made cleanup a lot easier.
The next project I've got lined up for the shed is a mitresaw station that will go under the woodrack.
Craig
-
28th July 2011, 09:07 PM #1389
Senior Member
- Join Date
- Jul 2011
- Location
- Bendigo
- Age
- 73
- Posts
- 462
In my way of perhaps giving something back to this forum, on which I have learnt so much in such a short time, Id like to offer up my own shop. Originally Posted by Grumpy John
The background.
I have a very, very small shop. 2mtrs x 4 mtrs.
Heres a pic or two of it so you can see for yourself.
Attachment 177431 Attachment 177432
As you can see, its really only suitable for storing tools and stuff and a bit of bench work. Although, if you look at the back wall, I reckon there is room for a small lathe there. Thanks to this forum, that might just be my next addition.
Ok, cruising along nicely, any jobs that need to be done around the house being handled ok.
Then along comes the need for more space in which to do some real work.
In my case, it was metal fabrication but it could also be the building of a new kitchen for somebody else.
The only covered space available is a partially enclosed single car carport. But SWMBO insists that her car MUST be undercover every night. So carport must be empty each night.
Does this sound at all like a familiar scenario?
I needed a saw bench suitable for a SCMS and a metal cutting chop saw.
And I needed a large, 2000mm x 1200mm assembly table. Plus power and light.
Below is the bench I designed and built.
Attachment 177433
In this pic it carries the SCMS, but by installing a different cradle into the recessed area, I can just as easily slip my chop saw in. Steel comes in up to 8mtr lengths so some length was required on the table.
I built it from steel because I wasnt confident of building in timber with hand power tools only. Weight is not an issue once installed.
Its not painted yet because soon Ill be swapping the chop saw for a horizontal hack saw. Quieter for the neighbours and no sparks in summer. Once that is done, Ill paint it all.
If I had it all to do again, I would not attempt to make the fences on the saws line up exactly with the fence on the table. Id bring the saws forward a tad so I can still use a stop block for repetitive cuts but if the material is slightly bowed, it would still lay flat against the saws fence. When all is said and done, that is all that is really required.
On the other side I pushed some power through from the shop and then ran it over the overhead beams to the saws.
Attachment 177434
Theres also space to hang things there although theres only a broom there at present.
My table is welded 25mmx25mm RHS with no top. I dont need one for my work. Its sized exactly to measurement of the largest item I make on it. 2000mm x 1200mm. And its square so I can clamp my work around its edge and the panel Im building is square as well.
The table has wheels on two legs. Its easy to roll out the back of the carport to the back yard. All steel, means weatherproof.
At the end of the day, the saws go into the shop, the saw table folds down and the table rolls out into the backyard.
A quick sweep and the carport is again ready to accept the LOMLs car.
Attachment 177435
Still to come is putting some doors on the posts near the saw table which will give me 4 deep cupboards for tools and materials used in my work. Plus some better lighting for dull days.
I had an alternative deign for the table that I decided against of using steel cables, pulleys and a cheap boat winch to winch it up against the rafters. Its a common concept used in poultry sheds that Im happy to explain further if anyone is interested.
-
28th July 2011, 09:52 PM #1390
GOLD MEMBER
- Join Date
- Sep 2002
- Location
- Paignton. Devon. U.K.
- Posts
- 6,062
Lovely working area, you should be very happy and content with that one.
woody U.K.
"Common looking people are the best in the world: that is the reason the Lord makes so many of them." ~ Abraham Lincoln
-
28th July 2011, 10:43 PM #1391
Old Fart (my step daughters named me)

- Join Date
- Sep 2010
- Location
- Mallala S.A.
- Age
- 76
- Posts
- 1,455
I rekon you blokes have done very well with the limited space you have. My shed is 20x40ft and I can not find anywhere enough room to do what you blokes do. ( really I just hate the bloody dust). Most of my dirty work is done outside on saw stands where possible.
-
30th July 2011, 11:00 AM #1392
Mildly Moderate
- Join Date
- Nov 2007
- Location
- Albury Well Just Outside
- Posts
- 13,315
Nice setup with limited demands.
-
30th July 2011, 11:56 AM #1393
Senior Member
- Join Date
- Jul 2011
- Location
- Bendigo
- Age
- 73
- Posts
- 462
Thank you all for your kind comments.
The purpose behind posting wasnt to show what Ive managed to do so much as to offer one possible solution to others who may have a similar problem.
If there is one common denominator in all workshops, it is that the shop is never big enough. Regardless of how big the shop may be.
There have been several very innovative solutions on this thread on ways to make space expand that I have learnt from.
I hope this effort of mine may assist others.
Im posting today mainly because my eldest son called in yesterday.
He hadnt seen the new work area yet.
I told him all I need now is my TS restored and installed, but obviously that aint gunna happen.
I cant wheel the TS outside at night.
He went quiet for a minute or two and came up with two very usable possible solutions.
Solution 1: Build a floor level with the slab outside the carport to the left in this pic.
Attachment 177433
A timber floor would allow the open storm water spoon drain there to continue functioning under it. Build some short walls and roof on that with doors into the carport and wheel the TS into its own custom sized space when not in use.
Solution 2: There IS room in the shop proper to house the TS. What there isnt room for is the material being sawn. As the TS is primarily for ripping, build a flap in the wall on the infeed side and set up some portable roller stands in the carport. Similarly on the outfeed side put another flap and some more rollers on the back lawn.
Then, I could put up to a 4mtr board on the infeed rollers and poke it through the flap. Go inside and do my ripping by pushing it out the outfeed flap onto the rollers in the backyard.
Both of these solutions would work, and I may just use one of them down the track. Probably the first one.
The point is, we should never look at our space available and think we obviously cant do that, as I had done with my TS scenario.
Given enough time and some inspiration oft times from an outside source .such as this forum we can come up with ways to make it work.
I raised my sons to think outside the square and never accept that something cannot be done. Yet I found myself doing the exact opposite as I had taught them. It's a easy trap to fall into.
-
30th July 2011, 12:06 PM #1394
Hewer of wood
- Join Date
- Jan 2002
- Location
- Melbourne, Aus.
- Age
- 71
- Posts
- 12,746
Just a comment on the use of clear (polycarb) sheets for light, without a ceiling ....
In Melb. apart from turning the shed into a hothouse in summer, I've found that with only a slight roof pitch, in winter condensation forms and drops onto the floor, or your cast iron machine table (orange polka dots, bugga) or onto finished or in-process work.
I now put a double layer of sheet on in summer, separated by some boards (a safari roof) but don't have a solution to the condensation prob. apart from keeping critical stuff out of the line of fire.Cheers, Ern
-
30th July 2011, 01:58 PM #1395
SENIOR MEMBER
- Join Date
- Jul 2008
- Location
- Lara, VIC
- Age
- 50
- Posts
- 747
Re: Show us ya shed!
Oh yeah is that ever a problem in Geelong area as well - I forgot to cover my jointer one weekend and came back to a huge rust stain on the bed very upset Originally Posted by rsser


 Reply With Quote


Similar Threads
-
Show us ya shed!
By Moo73 in forum WOOD WHISPERING WOMENReplies: 35Last Post: 1st March 2007, 06:04 PM -
UK Woodworkers Show, Kempton park. Show report.
By docusk in forum WOODWORK - GENERALReplies: 3Last Post: 22nd November 2006, 07:10 AM -
Melb WWW Show at Jeff's Shed OCT 20-22
By myguitar in forum TIMBER & WORKING WITH WOOD SHOWSReplies: 28Last Post: 25th October 2006, 11:09 AM -
Sydney Wood Show Vs Canberra Show
By I_wanna_Shed in forum WOODWORK - GENERALReplies: 8Last Post: 10th April 2006, 06:16 PM
