

 Thanks:
  Likes:
  Needs Pictures: 0
 Picture(s) thanks: 0
Results 31 to 45 of 65
Thread: Disston D-8 replica
-
8th April 2015, 01:29 PM #31
 .
.


- Join Date
- Dec 2013
- Location
- San Antonio, Texas, USA
- Posts
- 3,070

I'm finally getting back to working on saw stuff and picked up with this one as it's the farthest along, too bad nobody will love it since it's just a D-8 copy.
The handle is roughed-in and the saw plate has been ground, hammer tensioned, lapped and cryotreated. Now it's time to decide on screws. Three medium screws and a medallion looks kind of busy.
D-8 three medium screws medallion in the middle.jpg
Two medium screws look kind of lost even in the company of a medallion.
D-8 three large screws medallion on the bottom.jpg
Two large screws and the medallion look better but which way to set them. Medallion on the bottom?
D-8 two large screws medallion on the bottom.jpg
Or in the middle?
D-8 two large screws medallion in the middle.jpg
While pondering this earth-stopping quandary I heard a loud buzzing. After quickly dismissing the thought that I was finally being called to account for my many sins I looked around and found this.
eyed elater.jpg
This beast is an eyed elater, it's about 3.5 cm long , the largest click-bug in North America.Innovations are those useful things that, by dint of chance, manage to survive the stupidity and destructive tendencies inherent in human nature.
-
8th April 2015 01:29 PM # ADSGoogle Adsense Advertisement
- Join Date
- Always
- Location
- Advertising world
- Posts
- Many
-
8th April 2015, 11:58 PM #32
GOLD MEMBER
- Join Date
- Aug 2009
- Location
- Armadale Perth WA
- Age
- 55
- Posts
- 4,524
Disston tended to use a smaller first bolt ... I always wondered why ... probably exactly this, I guess.
What about ... (I know your handle is inset, but ...)
Hard to judge from close-up pictures IMHO ...
-
9th April 2015, 03:20 AM #33
Deceased
- Join Date
- May 2008
- Location
- Australia
- Posts
- 2,357
Hi Rob. 3 saw bolt assemblies looks the go. I doubt the 4th assembly would be able to pick up any of the saw plate. Not sure about the look of the bottom rail to cheek connection. The additional complexity of taper grinding the saw plate would scare off most other saw makers. You deserve a lot of kudos.

Look forward to viewing the completed hand saw.
regards Stewie;
-
9th April 2015, 01:12 PM #34
.
- Join Date
- Dec 2013
- Location
- San Antonio, Texas, USA
- Posts
- 3,070
I worked more on this saw today between other tasks adjusting the hang angle and blade inletting. Here is a comparison of old and new.
3 mediums and a medallion.jpg
I like the medallion in the middle and three medium head screws. Abdul is less than interested.
Abdul cant take it anymore.jpg
Now for the stamp for the medallion. I talked with my jeweler friend today and he said he would press the vendor to finish my quotation.
Stewie, did you receive yours yet?Innovations are those useful things that, by dint of chance, manage to survive the stupidity and destructive tendencies inherent in human nature.
-
9th April 2015, 03:23 PM #35
Deceased
- Join Date
- May 2008
- Location
- Australia
- Posts
- 2,357
Hi Rob. Not yet. I delayed the order with the stamp until I got around to purchasing a 10 tonne hydraulic press. The press arrived yesterday, so I have set it ready for use when I get the time.
Stewie;
-
16th April 2015, 01:33 PM #36
.
- Join Date
- Dec 2013
- Location
- San Antonio, Texas, USA
- Posts
- 3,070
Somehow I managed to squeeze in some work on this saw today - this is turning out to be an extremely busy spring for me.
First the configuration of the screws. I settled on the distribution pattern of the D-8 discussed above and the question now is which size.
Medium
screw positions final.jpg
or large?
screw positions large final.jpg
I decided to go with the large ones because the topmost screw looked a little lost in that relatively broad area of the handle. I set this handle up with the stainless bushings to ensure a positive and durable lock-up between the stock and the blade.
stainless bushings in place.jpg
A few minutes later and we have the screws in.
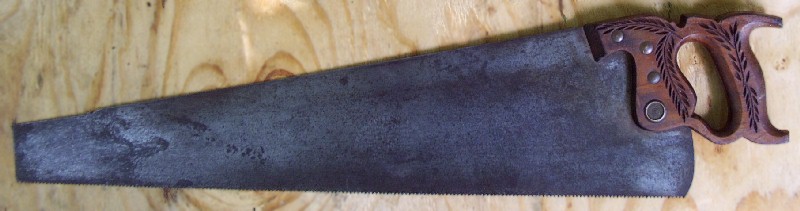
D-8 handle finished a little closer.jpg
D-8 full length.jpg
Now for detailing and finish application.
When I get my saws to this stage I start testing them. I sharpened and set this saw and gave it a try. It took some adjusting to get the set correct so that it tracked straight. While making test cuts I noticed that this saw did not have the harmonic oscillation that causes the tip of the blade to ring that so many Disston saws have. Does anybody know if this tip-ringing phenomenon has a name? I've always found the ringing of some Disstons to be extremely annoying in use. The Disston is sharpened and pitched to the same specification as my D-8. (15o -> 10o progressive rake, 15o fleam, 5o bevel and 12 tpi)
This one works better overall in my hand and it cuts about 20% faster than does the Disston.
I also pulled the blade around 180o (bent it in a U shape back toward the handle) and let it snap back - no residual distortion in either direction.Innovations are those useful things that, by dint of chance, manage to survive the stupidity and destructive tendencies inherent in human nature.
-
17th April 2015, 05:20 AM #37
GOLD MEMBER
- Join Date
- Aug 2009
- Location
- Armadale Perth WA
- Age
- 55
- Posts
- 4,524
I have a few ideas. Is the tip of the Disston any thinner than yours? Some of them get very thin right at the toe-top. Originally Posted by rob streeper

I've found that the "inefficient" sounds vary with how I hold my hand and arm.
My hand can be rotated a little CW or CCW out of vertical ... and sometimes the direction I'm holding is not directly along the line of the saw ... so tiny adjustments make a difference to the sound and any"flapping".
So ... I wonder, even if the blades were identical in thickness profile if, being newer, yours has more stiffness/less flexibility or "flop" to it?
I wonder if there can be changes along the "grain" of the metal with time and use?
Or if it is directly related to the "grain" of the metal.
Cheers,
Paul
-
17th April 2015, 10:18 AM #38
.
- Join Date
- Dec 2013
- Location
- San Antonio, Texas, USA
- Posts
- 3,070
Here's some photo's of the bend test.
first to the right.jpg
then to the left.jpg
still straight.jpgInnovations are those useful things that, by dint of chance, manage to survive the stupidity and destructive tendencies inherent in human nature.
-
17th April 2015, 11:26 AM #39
.
- Join Date
- Dec 2013
- Location
- San Antonio, Texas, USA
- Posts
- 3,070
Hi Paul, Originally Posted by pmcgee
The grind profile of the D-8 is very similar to my saw. I'm wondering if the early references to 'fast and loose' in the literature discussing hammer tensioning are in fact discussing this effect.
Cheers,
RobInnovations are those useful things that, by dint of chance, manage to survive the stupidity and destructive tendencies inherent in human nature.
-
17th April 2015, 11:30 AM #40
Deceased
- Join Date
- May 2008
- Location
- Australia
- Posts
- 2,357
hi Rob. That last photo that shows the line of the saw plate after its been flexed in both directions. Does that concern you.
regards Stewie;
-
17th April 2015, 11:49 AM #41
.
- Join Date
- Dec 2013
- Location
- San Antonio, Texas, USA
- Posts
- 3,070
Hard to take a good photo with the iPhone. Looking at the saw in person I can see the blade is straight. I'll try to get a better photo, the skew back accentuates the appearance of non-linearity if the centroid of the focal area is less than perfectly aligned with the long axis of the blade. Here, this is somewhat better. Originally Posted by planemaker
straight.jpgInnovations are those useful things that, by dint of chance, manage to survive the stupidity and destructive tendencies inherent in human nature.
-
18th April 2015, 12:42 AM #42
Deceased
- Join Date
- May 2008
- Location
- Australia
- Posts
- 2,357
Thanks Rob. That looks much better.
Stewie;
-
20th April 2015, 09:04 AM #43
.
- Join Date
- Dec 2013
- Location
- San Antonio, Texas, USA
- Posts
- 3,070
I've been experimenting with hot finishes too. Here's the handle after three coats. This is shellac/beeswax/BLO.
3 coats hot wax treatment.jpgInnovations are those useful things that, by dint of chance, manage to survive the stupidity and destructive tendencies inherent in human nature.
-
20th April 2015, 11:21 AM #44
 GOLD MEMBER

- Join Date
- Nov 2011
- Location
- Melbourne
- Posts
- 7,008
A little bit more information pleassseee Sir
(On the hot finishes)
-
20th April 2015, 12:28 PM #45
.
- Join Date
- Dec 2013
- Location
- San Antonio, Texas, USA
- Posts
- 3,070
Here's the current recipe:
~100 ml turpentine + ~100 ml BLO + 1 button of shellac + 30 gm beeswax. Mix together in a glass jar, place the jar in a pan of boiling water until wax is dissolved - careful of fire safety of course and don't screw the lid down or the jar might explode. Take the pan containing the water and the bottle of finish to your workstation. Wait until the finish cools enough to be comfortable to handle and wipe on with a rag or paper towel. Allow the finish on the handle to cool and buff with a soft cloth. A couple of coats will generally do. When the finish solution is too cool to use the wax forms a fluffy yellow precipitate - boil in water again to re-use.Innovations are those useful things that, by dint of chance, manage to survive the stupidity and destructive tendencies inherent in human nature.


 Reply With Quote

Similar Threads
-
replica of my street car
By hornpout in forum SCALE MODELLINGReplies: 8Last Post: 16th April 2012, 12:14 PM -
HMB Endeavour replica
By dopeydriver in forum MISC BOAT RELATED STUFFReplies: 0Last Post: 13th March 2012, 04:04 PM -
replica box
By nine fingers in forum MARQUETRY and INTARSIAReplies: 10Last Post: 3rd March 2010, 05:13 PM -
Replica Box By Ninefingers
By AUSSIE in forum BOX MAKINGReplies: 0Last Post: 1st March 2010, 01:43 PM -
Replica lantern
By aniceone2hold in forum WOODWORK PICSReplies: 2Last Post: 12th September 2006, 07:06 PM
