

 Thanks: 0
 Likes: 0
 Needs Pictures: 0
 Picture(s) thanks: 0
Results 106 to 120 of 173
Thread: Building a Navigator yawl
-
27th May 2010, 02:50 PM #106
 SENIOR MEMBER


- Join Date
- Oct 2008
- Location
- Victoria
- Age
- 71
- Posts
- 631
 adjustments
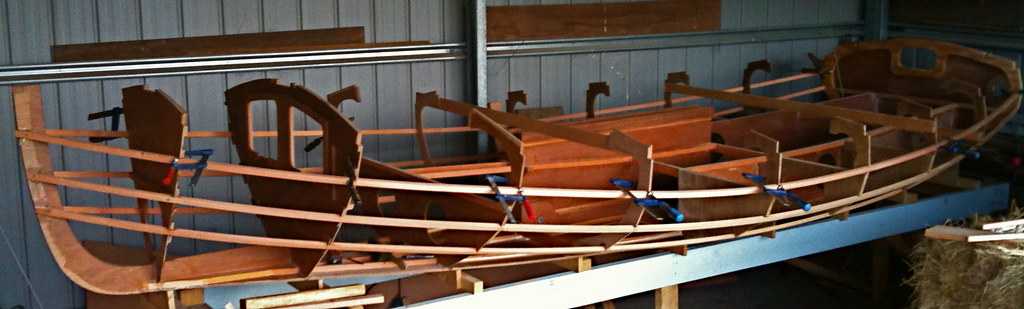
I posted a smaller version of this same pic earlier. Since then I've done a few adjustments to the fairness of the stringers and thought (despite my inclination to hide my mistakes) it might be useful for a beginner to see the sort of thing we seek to avoid. This is all about honing the old senses into perceiving shapes more sensitively than we otherwise might. Looking at our work isn't enough. We have to look from all angles in all lights and in several moods, and still it will never really be perfect (if it comes out of my shed,, anyway)
Anyway, in the pic above there is a nasty, nasty line. I can see it now because I was able to approach it from different angles while I was doing something else, and fortunately it bugged me.
Bulkhead 3 intersects the top stringer a shade too high and the effect is to interfere with the pleasant flow of the curve down to its lowest point. So we have the stringer running down through B1, B2 but by B3 it rises a little in it's descent. Since then I have released the stringer from B2 and B3 and have cut the bulkheads under the slot to let the stringer sit about 4mm lower on B3 and 2-3mm lower on B2. The other side of the boat will be even harder to spot the concerns because it is against the wall almost. Might have to move the stack of hay!
-
27th May 2010 02:50 PM # ADSGoogle Adsense Advertisement
- Join Date
- Always
- Location
- Advertising world
- Age
- 2010
- Posts
- Many
-
27th May 2010, 03:03 PM #107
GOLD MEMBER
- Join Date
- Mar 2007
- Location
- Adelaide
- Posts
- 2,139
Interesting Rob thanks for demonstrating how to discern a fair line or what to look for.
I tried spotting the problem without reading the rest of the post and have to admit I was having trouble however when you point it out it is there.
It is a little thing that would bug me and I'm sure you for years to come having noticed it. As for the other side good luck. I guess you may be able to see it from the bow as well (advantage of stringers) perhaps or do you just repeat the adjustment and hope for the best. I'm going to have the same problem.
Great stuff
-
27th May 2010, 03:58 PM #108
SENIOR MEMBER
- Join Date
- Oct 2008
- Location
- Victoria
- Age
- 71
- Posts
- 631
Cheers Mike, well we won't be the first to make boats in narrow spaces. Maybe some boats are only photographed from the 'preferred side'! Originally Posted by m2c1Iw

The trouble with trying to assess the stringers from the bow is they look like a coil of rope, foreshortened from the front; bowing down then up, and on the way twisting and rotating, and seeming to bulge around square corners that, from above, look like lovely curves!
The good news is that in planing the stringers to take the planking we will remove the bulges and fill some of the dips, and glide over the sags, and with a bit of luck, kept in a dark shed with a tarp over it and only sailed at night when there is no moon, no-one will notice
-
29th May 2010, 08:17 PM #109
SENIOR MEMBER
- Join Date
- Oct 2008
- Location
- Victoria
- Age
- 71
- Posts
- 631
back-set edge marking tool
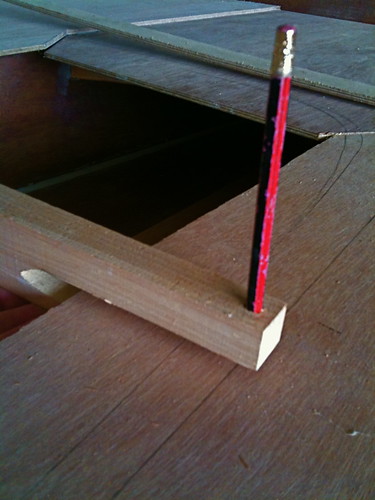

This tool can literally be made in a couple of minutes from a piece of scrap destined for the fire place. In this case I'm using it to draw the curved outline of the cockpit seat fronts (which are now tucked back and underneath the top) onto an oversized seat top sheet so that I can establish a good overhang when drawing the final shape of the seat. So this tool draws a line directly above the surface the bottom fork follows.
The bottom fork of the tool can be made to run directly below the pencil, or adjusted forwards or back to give an off-set. or overhang. As it happens, this overhang will not be parallel to the seat front, but I still wanted to know exactly where it was. Made from a 3 x 1 scrap of something, fork cut with jigsaw, hole a tight fit for a pencil.
Incidentally, this tool will be very useful in making the ply doublers that fit under the seat edges. I will be able to draw the inside shape onto the new ply while it lies on top of the seats, and scribe the edge from the seat edges.
-
29th May 2010, 11:25 PM #110
SENIOR MEMBER
- Join Date
- Oct 2008
- Location
- Victoria
- Age
- 71
- Posts
- 631
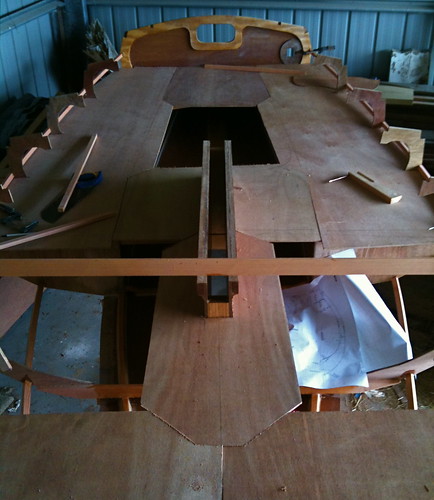
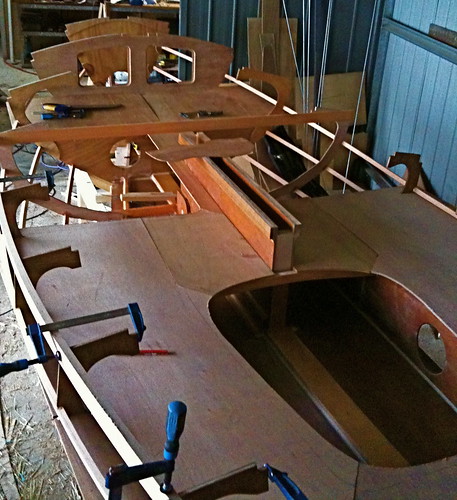
Here the eight pieces that will eventually form the seats and inside decking have been trial fitted, waiting for their new internal edge lines, that will make sense of the whole jig-saw puzzle. I'm doing the shapes pretty much as John designed them- I like his curves, and his backside has spent a lot more time in small boats than mine ever will, so who am I to argue about the sensible use of space? (my only concern is that I'm pretty tall, but I see my toes on the leeward seats a bit anyway, curling in the fresh air )
)
The pieces either side of the CB are only that wide to accommodate the curves that will harmonise the overall shapes
-
30th May 2010, 07:03 PM #111
SENIOR MEMBER
- Join Date
- Oct 2008
- Location
- Victoria
- Age
- 71
- Posts
- 631
-
30th May 2010, 07:13 PM #112
Grumpy old Bugga
- Join Date
- May 2003
- Location
- South Oz, the big smokey bit in the middle
- Age
- 67
- Posts
- 4,377
I know people don't like arguing with the designer, but do you reckon the gaps between the 'planks' might let in a wee bit too much water


Are you gluing the seats in at this stage or just fitting them? The old balancing act of access - you get good access to one bit at the expense of access to another. At least with a planked boat, you'll have a gap above each plank to reach through.
Richard
-
30th May 2010, 07:27 PM #113
SENIOR MEMBER
- Join Date
- Oct 2008
- Location
- Victoria
- Age
- 71
- Posts
- 631
Yeah, but it flows out the other side! Originally Posted by Daddles
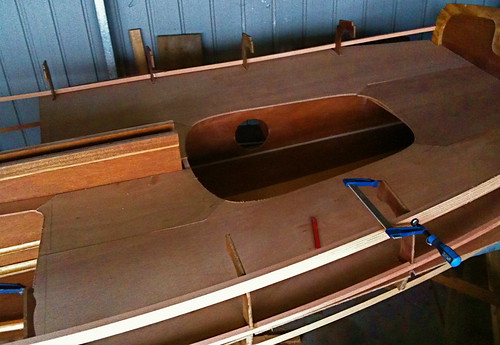
Great to hear from you Richard. All this stuff is down to a thing I'm not very good at: delayed gratification. They will be taken off and stashed until later, but I just knew once I started planking it would get harder to reach inside to fit them. I've even fitted the bottom of the anchor well (for later gluing too) before getting the gunwales on. I have begun to fit gunwales, but am resisting gluing them for a bit, until a few more details are done.
-
30th May 2010, 10:49 PM #114
Novice
- Join Date
- May 2010
- Location
- Victoria
- Posts
- 18
G'day Rob
Saw the most recent bit of work on your Flickr set. The compression beam seems to make a little more sense than having a step, and associated drainage. I'll be interested to see how she rigs. Might be well worth it when first faced by one of the low bridges up the Yarra (mizzen mast notwithstanding)
I should add by way of introduction that I have limited boat building skills, other than spending six months every weekend helping a mate build a Farrier Tri, which featured almost no wood whatsoever.
I'd be interested to know if you ever considered Welsfords Sweet Pea as a design?
-
30th May 2010, 11:01 PM #115
SENIOR MEMBER
- Join Date
- Oct 2008
- Location
- Victoria
- Age
- 71
- Posts
- 631
Hi Dale, thanks for your input, and welcome to the forum!
As it happens I did have a good look at Sweet Pea before I started my first boat, but chose the Waller 540 over it and Navigator and several others, trying to find a design that would fit the needs of my whole family.
Navigator wasn't right for me then, but I think it is now...
Enjoyed your photos too Dale, especially the wildflowers.
Cheers
Rob
-
31st May 2010, 12:36 AM #116
Senior Member
- Join Date
- Nov 2007
- Location
- Fremantle
- Age
- 56
- Posts
- 125
Geeze Rob,
Here I am telling all my mates how hard it is building a boat, and that its a slow laborious process. And then you go and make a liar out of me.
I love that seat pattern. Its very different to what you did on the Waller.
Can't wait to see how you finish it off.
It seems that you are overcoming some of the limitations with the plans and instructions quite easily. There is no substitute for wisdom and experience.
Take care
Mick
-
31st May 2010, 05:21 AM #117
AJ
- Join Date
- Jun 2007
- Location
- Aberfoyle Park SA
- Age
- 63
- Posts
- 1,787
G'day Rob
Love the curves.
a thought regarding the overhanging seat edges in straight plywood - Daddles found
them a brute in Redback. Finished up snapping a part off whilst acquiring bruising to
his person. Any plans to thicken the edges with reinforcing timber, to make them less
'sharp' to careless movement, and less prone to damage?
cheers
AJ
-
31st May 2010, 10:37 AM #118
GOLD MEMBER
- Join Date
- Mar 2007
- Location
- Adelaide
- Posts
- 2,139
My sentiments exactly. Originally Posted by Mickj

Mike
-
31st May 2010, 04:35 PM #119
SENIOR MEMBER
- Join Date
- Oct 2008
- Location
- Victoria
- Age
- 71
- Posts
- 631
Maybe you've still got mates, Mick (and Mike), because you haven't gone beserk building a boat! Nothing wrong in keeping things in perspective, for those who can!
AJ, yes it would be disastrous not to increase the edge thickness of those seats. John specifies 6mm ply doublers, well rounded. I'm going to use either 9mm ply or 18mm softwood doublers, rounded top and bottom, for those 'hanging-on-to-the-edge-of-your-seat-moments'. Wouldn't do to cut your fingers off the first time you were caught in a gust.
The doublers are one of the reasons I made that little set-back tool ( post 109) so that I can easily find the curved back edge for the doubler, from above. A nice fitted rear edge on the doublers will add enormous strength to the cockpit with very little weight added. Although a messy gap under there would be a great place to stash your chewing gum....

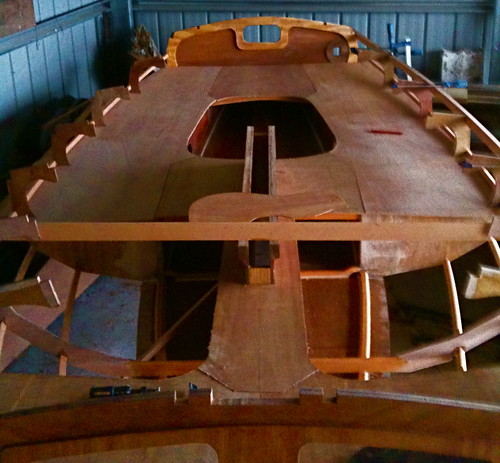
This is the compression post Dale was referring to. The mast is designed as stepped from the keelson, but John has sanctioned other builds having the step up at seat level. Makes sense to me. I'm still sometimes tempted to go the whole hog and build a wooden deck-mounted tabernacle....the major drawback, I think is the rig then becomes more dependent on the side stays, and a failure will have more consequences. But that's the way most modern rigs are.
Anyway this post takes the downward load of the new step above it, but will also add considerable longitudinal stiffness as it braces the bulkheads nicely along with the CB case. It also means I have some nice meaty members in front of the step for mounting rigging details and blocks, and the tackle for the CB.
-
31st May 2010, 07:02 PM #120
Senior Member
- Join Date
- Nov 2007
- Location
- Fremantle
- Age
- 56
- Posts
- 125
I think i remember reading a post from JW once, he said that the mast is strong enough to go unstayed, and the stays were there to ensure decent tension in the Jib.
So I guess if you were to setup a Lug Sail(No Jib), then you could do away with the side stays and have your Tabernacle.
I wish I had gone down this path. In fact I might do it some time in the future, as I think the rigging is over complicated for the type of sailing that I'm wanting to do.
I've been practicing my setup, and it takes me about 30-40mins to setup...and thats only in my driveway.
I'd be happy to hear what other people with more experience have to say about the performance differences between Lug Sails and Sliding Gunters.
Cheers
Mick


 Reply With Quote


Similar Threads
-
GIS Yawl
By CCBB in forum Michael Storer Wooden Boat PlansReplies: 512Last Post: 8th February 2015, 12:30 PM -
Navigator
By Resination in forum WOODTURNING - PEN TURNINGReplies: 12Last Post: 6th January 2010, 02:04 PM -
Magma Navigator
By Resination in forum WOODTURNING - PEN TURNINGReplies: 14Last Post: 30th December 2009, 12:04 PM -
Figured Pink Ivory on a Gold Navigator
By Matt88s in forum WOODTURNING - PEN TURNINGReplies: 15Last Post: 17th May 2008, 10:24 PM -
Caledonian Yawl Plans
By Donald in forum BOAT BUILDING / REPAIRINGReplies: 1Last Post: 9th February 2004, 10:10 AM
