

 Thanks:
  Likes:
  Needs Pictures: 0
 Picture(s) thanks:
Results 1 to 15 of 22
Thread: Church cabinet WIP
-
9th October 2018, 10:31 PM #1
 Dehydrated Hydrographer


- Join Date
- Jun 1999
- Location
- Westleigh, Sydney
- Age
- 77
- Posts
- 9,549
 Church cabinet WIP
My latest commission is an interesting one. It's a cabinet to hold holy oils for a church. The interesting part of it is that it is to go through a brick wall from one side to the other. On the church side (the back of the cabinet), it has a glass panel, and on the other side, which is in the priest's office, is the door. It has two shelves and is to be internally lit from above.
My final design looks like this.Screen Shot 2018-10-09 at 9.51.38 pm.png
I've decided to make it in three sections - four if you count the door separately. There is the church side moulding, the main carcass with its lighting and shelves and the vestry side moulding. The door will be inset into the carcass.
The problem is, how to get a cabinet with mouldings to go from one side of the wall to the other. My solution is to fit 'grommets' to the wall side of each moulding. The carcass will be a snug fit inside the grommets, and the grommets will be a loose fit in the hole to allow for imprecision. The carcass will butt up to the church side moulding, but because the carcass must have 140mm internal front to rear and the wall is ~ 110mm thick, the vestry side grommet will slide over the carcass so the moulding is against the wall. At the top, there is room between the grommet and the bricks for the driver and wiring for an LED light.
Progress so far...
Church side mouldings cut ready to glue.
Frame ready to glue.JPG
Church side moulding glued up
Church side frame_.jpg
Gluing grommet to moulding
Grommet being glued.JPG
Completed moulding with grommet.
Grommet in place.JPG
The cabinet will be secured by hidden screws through the grommets into rawl plugs in the wall.
-
9th October 2018 10:31 PM # ADSGoogle Adsense Advertisement
- Join Date
- Always
- Location
- Advertising world
- Age
- 2010
- Posts
- Many
-
17th October 2018, 06:30 PM #2
Dehydrated Hydrographer
- Join Date
- Jun 1999
- Location
- Westleigh, Sydney
- Age
- 77
- Posts
- 9,549
My drum sander is out of action at present, so I've had to hand scrape the carcass sides before finish sanding. All done, now, and today I glued up the carcass. All the cut-outs for the hinges and holes for shelf fittings & light were done before gluing up.
The carcass was fitted to the church-side grommet, and the vestry-side grommet will be glued up around the carcass so it's a good fit.
Glue up carcass 1.JPG
Glue up carcass 2.JPG
-
18th October 2018, 01:36 PM #3
GOLD MEMBER
- Join Date
- Feb 2003
- Location
- back in Alberta for a while
- Age
- 68
- Posts
- 12,006
Hi Alex
an interesting project.
I may have missed it in your description, but how are you connecting the church and vestry sides of the cabinet?regards from Alberta, Canada
ian
-
18th October 2018, 02:27 PM #4
GOLD MEMBER
- Join Date
- Nov 2003
- Location
- Sydney
- Age
- 53
- Posts
- 8,879
Don't stuff this one up Alex if you want to go to heaven.
Visit my website at www.myFineWoodWork.com
-
18th October 2018, 05:40 PM #5
Deceased 18/12/2020
- Join Date
- Aug 2007
- Location
- Melbourne
- Posts
- 2,178
It sounds like a great project, Alex, but fitting of a man of your caliber and skills.
Regards,
Rob
-
22nd October 2018, 07:55 AM #6
Dehydrated Hydrographer
- Join Date
- Jun 1999
- Location
- Westleigh, Sydney
- Age
- 77
- Posts
- 9,549
The two mouldings are attached to 'grommets' - rectangles of timber that fit inside the aperture in the brick wall. The cabinet walls, top and bottom (the carcass) fit inside these grommets. They butt against the church side moulding, and the vestry side grommet and moulding fits over the carcass to fit flush against the brick wall. The carcass protrudes through the moulding on the vestry side. Screws concealed by wooden plugs will go through the carcass and grommet sides, into rawl plugs in the brick wall. Originally Posted by ian

Hope this is clear. Future photos should help.
-
22nd October 2018, 12:12 PM #7
GOLD MEMBER
- Join Date
- Feb 2003
- Location
- back in Alberta for a while
- Age
- 68
- Posts
- 12,006
Alex, thanks for the description.
I was sort of wondering if you had considered using knock down fittings to attach the church side molding to the carcass. Once done up and pushed back into the recess the fittings would be invisible.regards from Alberta, Canada
ian
-
26th October 2018, 02:00 PM #8
Dehydrated Hydrographer
- Join Date
- Jun 1999
- Location
- Westleigh, Sydney
- Age
- 77
- Posts
- 9,549
Hadn't thought of that Ian. what sort of fittings do you mean? I'll go googling for them.
Mouldings & grommets for both sides, and the carcass, are all glued up ready to oil. Next step is to make the door.
Church side frame_.jpg
Church side moulding.
Assembled-Church side 3.jpg
Assembled - Church side
Assembled-Office side 1.jpg
Assembled - Vestry side
-
27th October 2018, 02:15 PM #9
GOLD MEMBER
- Join Date
- Feb 2003
- Location
- back in Alberta for a while
- Age
- 68
- Posts
- 12,006
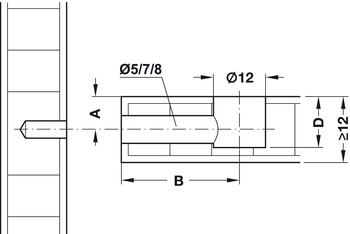
something like this Originally Posted by AlexS

The version made by Hafele doesn't need an insert for the screw
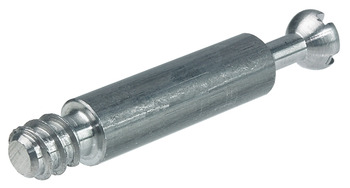
https://www.hafele.com.au/en/product...ze=96&PDP=true
the matching "nut" https://www.hafele.com.au/en/product...0ac2700020023/ goes into a blind hole
 regards from Alberta, Canada
ian
-
1st November 2018, 06:32 PM #10
Dehydrated Hydrographer
- Join Date
- Jun 1999
- Location
- Westleigh, Sydney
- Age
- 77
- Posts
- 9,549
The door is now glued up. I think the cathedral grain on the panel is appropriate.
Door glue up 1.jpg
-
2nd November 2018, 09:13 PM #11
Dehydrated Hydrographer
- Join Date
- Jun 1999
- Location
- Westleigh, Sydney
- Age
- 77
- Posts
- 9,549
Door fitted today, and glass collected from the glazier. Once the hinges and lock are fitted, all that remains is to oil the cabinet before installing.
IMG_2328.jpg
-
5th November 2018, 06:10 PM #12
Dehydrated Hydrographer
- Join Date
- Jun 1999
- Location
- Westleigh, Sydney
- Age
- 77
- Posts
- 9,549
Today I hung the door temporarily and did the final fit. All I have to do now is some final detailing then oil the unit ready for installation.
20181105-First fit 9.jpg
20181105-First fit 8.jpg
20181105-First fit 7.jpg
20181105-First fit 5.jpg
20181105-First fit 3.JPG
20181105-First fit 1.JPG
-
15th November 2018, 04:23 PM #13
Dehydrated Hydrographer
- Join Date
- Jun 1999
- Location
- Westleigh, Sydney
- Age
- 77
- Posts
- 9,549
I disassembled the cabinet and oiled it - two coats of Livos Kunos oil 50/50 mahogany & walnut, followed by a couple of buffing coats of clear Kunos. It's the first time I've used the tinted oil, which was necessary to tone down the silver ash. Found it easy to use, and it will bring the timber down to a comparable level to the other timbers in the church.
Once it was completely oiled, I started to re-assemble it. All went well until one of the hinge screws broke. The following photos show how I handled it. (I didn't show the screwdriver impaled in the brick wall, the dog cringing in the corner or the haze of blue air over my head.)😉
I drilled four small holes around the screw, which enabled me to loosen the broken screw and remove it. Then I drilled a 1/4" hole and glued in a plug cut from the same timber.
20181113-Broken Screw plugged & drilled-2.jpg20181113-Broken Screw removed-2.jpg20181113-Broken Screw 2-2.jpg20181113-Broken Screw - removal holes-2.jpg
-
16th November 2018, 12:12 PM #14
Dehydrated Hydrographer
- Join Date
- Jun 1999
- Location
- Westleigh, Sydney
- Age
- 77
- Posts
- 9,549
Finally assembled the finished cabinet to make sure it all worked. Now it has to be disassembled ready for installation. Also have to oil & fit the door pull, which is an afterthought.
Complete 10-2.jpg Complete 9-2.jpg Complete 1-2.jpg
-
16th November 2018, 01:56 PM #15
GOLD MEMBER
- Join Date
- Feb 2003
- Location
- back in Alberta for a while
- Age
- 68
- Posts
- 12,006
Hi Alex
is the light mains powered? and if so how do you plan on concealing the cord?
or a LED powered by a long life battery?regards from Alberta, Canada
ian


 Reply With Quote


Similar Threads
-
Church Pew
By swcape in forum WOODWORK - GENERALReplies: 6Last Post: 23rd May 2012, 10:26 PM -
After Church
By Rodgera in forum WOODIES JOKESReplies: 0Last Post: 18th December 2009, 11:59 AM -
for the church
By weisyboy in forum WOODWORK - GENERALReplies: 7Last Post: 30th October 2008, 09:07 PM -
After church
By coastie in forum WOODIES JOKESReplies: 1Last Post: 14th February 2002, 08:00 AM
