

 Thanks:
  Likes:
  Needs Pictures:
  Picture(s) thanks:
Results 31 to 45 of 52
Thread: Drill bit sharpening.
-
20th January 2008, 02:12 PM #31
 Builder, Joiner, Father


- Join Date
- Jan 2006
- Location
- Blue Mountains NSW Australia
- Posts
- 592

I agree with sharpening by hand. I have also been doing it this way for all of my working life, on sizes ranging from 1/8" to over 1".
I can't remember what it was like to not have the skill, as it was too long ago, but I say it is a skill very worth while acquiring.
I do that too Rod. Why stop?Hi Grahame
No worries I sharpen my bits regularly. By hand if I am in a hurry or I drag out the Drill Doctor if I want precision.
I have to stop having a few drinks when I read the forum.
-
20th January 2008 02:12 PM # ADSGoogle Adsense Advertisement
- Join Date
- Always
- Location
- Advertising world
- Posts
- Many
-
20th January 2008, 06:13 PM #32
Old Boy
- Join Date
- Feb 2007
- Location
- Katherine ,Northern Territory
- Age
- 69
- Posts
- 1,977
They're flogging these on TV at the moment ,saw the add yesterday ,but didn't see the price. Originally Posted by Paddy

I'll just stick to sharpening by hand ,why change after 38 years.
I bought a 1/2 Makita power drill 20 odd years ago , I think its the model 1050 , any way I got a drill sharpener with it as a bonus .It fits over the front of the drill and is driven by the chuck .I have never used it ,in fact its still in the original box ,I came across it the other day during a clean up.
Kev"Outside of a dog a book is man's best friend ,inside a dog it's too dark to read"
Groucho Marx
-
20th January 2008, 06:52 PM #33
Hewer of wood
- Join Date
- Jan 2002
- Location
- Melbourne, Aus.
- Age
- 71
- Posts
- 12,746
I use a cheap jig like the one Derek pictured; side - on to the wheel. Good for larger bits; angles wrong for small ones.
Yeah, I was taught to do it by hand by a pro but forgot the technique. Replacing small bits is small beer is what I figure now.Cheers, Ern
-
20th January 2008, 06:59 PM #34
Banned
- Join Date
- Apr 2005
- Location
- kyogle N.S.W
- Age
- 50
- Posts
- 4,844
Well,,,,I'm proud to report...I can now sharpen bits freehand....Piece of cake. It turned out I was just holding my tongue the wrong way.
-
20th January 2008, 08:48 PM #35
Dehydrated Hydrographer
- Join Date
- Jun 1999
- Location
- Westleigh, Sydney
- Age
- 77
- Posts
- 9,555
-
20th January 2008, 11:13 PM #36
Be inspired. Be creative. Be bold.
- Join Date
- Apr 2001
- Location
- Perth
- Posts
- 10,831
This thread is over 2 years old. I now sharpen drills bits freehand on a disk sander. Takes a couple of seconds. As Jake reports, its all in the tongue.
Regards from Perth
DerekVisit www.inthewoodshop.com for tutorials on constructing handtools, handtool reviews, and my trials and tribulations with furniture builds.
-
6th February 2008, 06:50 AM #37
Senior Member
- Join Date
- May 2004
- Location
- California USA
- Age
- 73
- Posts
- 133
This is the old standard gage and measuring tool used here in the US by tool makers. The key is to have each flute length exactly the same length. The first job I had was in a mchine shop drilling and taping thousands of wholes a day. I learned how to sharpen the bits by hand by the end of the first week. It did help when the old timer showed me how. I never use a stedy rest or jig. I have a nice a comercial bit sharpener for my larger bits.
http://catalog.starrett.com/catalog/...sp?groupid=211
-
27th December 2008, 08:23 AM #38
New Member
- Join Date
- Dec 2008
- Location
- Phalaborwa South Africa
- Posts
- 1
PLEASE EMAIL ME THE PICTURE THANKS THEUNS thatting5 <at> gmail dot com Originally Posted by derekcohen
<a href="mailto:[email protected]"><at>
</at>Last edited by Big Shed; 27th December 2008 at 04:14 PM. Reason: edited email address
-
29th December 2008, 02:59 AM #39
Cabernet Merlot
- Join Date
- Aug 2008
- Location
- Melbourne
- Age
- 69
- Posts
- 61
Cheap and Accurate
Not being too skillful at the hand held stuff and not doing it often enough to become proficient anyway, I built an adjustable jig which handles drills, hand plane blades and the 13 inch resharpenable blades of my Ryobi thicknesser.
High speed dry grinding spooks me a bit. I have a tendency to burn more metal than I sharpen. Slow and with water (Tormek etc) seems the way to go but those beautiful units are just a bit too $$$$ for me and then they want you to cough up more for the extras which seem to me to be essential basics. Sheeeesh!.
The basis here, as you can see, is a GMC waterwheel which did require tinkering with to reduce the play in the shaft. Yes, I know it's got nasty plastic gears but it will probably last me many years before trouble sets in and besides it only cost $35 courtesy of an incorrect delivery batch to a local hardware store's sale (GMC sent the big water wheels instead of the small dry grinders and then couldn't be bothered taking them back -"sell 'em for the same price"! - Thankyou!). The wheel now runs very true and is easy to set up with the three adjusters on each side.
The drill head is a Bosch unit with an appropriate bolt (I think from memory it's a 3/8 UNF) in it for locking to the drill holder. I find this a superior way of holding the bit and getting the correct rotation for the opposing face.
The horizontal slide channel is made of two pieces of 3mm aluminium glued together then screwed to the horizontal wooden plate.
Cheap and cheerful and very functional. I've salvaged all those drill bits which could barely cut their way through hardened cheddar cheese.
-
29th December 2008, 03:57 PM #40
 Knicker Twister
- Join Date
- Dec 2005
- Location
- Perth, WA
- Posts
- 36
An oldie but a goldie. I now have another job lined up, namely the 10 gallon bucket of old bits I inherited off of the old man when he decided to go live on his boat.
Cheers
-
23rd January 2011, 11:55 AM #41
Intermediate Member
- Join Date
- Jul 2010
- Location
- perth wa
- Posts
- 45
i am only 15 and i have the 'engineers black book' it came with a template in the back for sharpning drill btts. i ONLY sharpen them by hand because i go to the markets and buy buckets of drill bits for $5 and i sand blast them then sharpen them. i have never spent money on a new drill bit
. before i had a bench gringer i would put them in my vice and use my angle grindet and a cutting disc because it is flat (not like a gringing disc) . i am looking to buy my dad a drill bit sharpner for his b day. i like the look of thr bench grinder style one. what are the requiorments for the wheel? and where can i buy the sharpner in perth?
thanks
tom/wodstok
-
24th January 2011, 02:40 PM #42
Master of the obvious
- Join Date
- Aug 2006
- Location
- Melbourne
- Age
- 47
- Posts
- 978
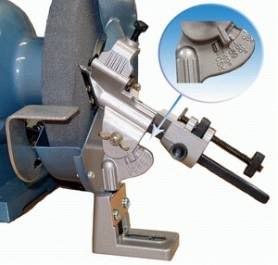
I reckon the best option is a Multi-Sharp. Reasonably priced, very effective and doesn't require a bench grinder, just a power drill. I purchased one a while back and it has payed for itself a few time over when you consider the cost of new drill bits.
It's suitable for 3-13mm bits, which makes a lot of sense; small ones can be replaced cheaply and larger ones can be sharpened by hand on a bench grider fairly easily anyway."Human beings, who are almost unique in having the ability to learn from the experience of others, are also remarkable for their apparent disinclination to do so."
- Douglas Adams
-
24th January 2011, 03:02 PM #43
Hewer of wood
- Join Date
- Jan 2002
- Location
- Melbourne, Aus.
- Age
- 71
- Posts
- 12,746
A tip from The Bible of sharpening: just get a small conical grind wheel into the flute for a touch up.
Cheers, Ern
-
26th January 2011, 09:37 PM #44
Old Boy
- Join Date
- Feb 2007
- Location
- Katherine ,Northern Territory
- Age
- 69
- Posts
- 1,977
Never been guilty of using a jig for sharpening drills ,I was taught In the very first months of my apprenticeship to sharpen them by hand ,along with tools for turning metal .
The included angle for drilling steel is 118deg s ,two hex nuts welded together will get you 120deg which is close enough .
The important part is getting both cutting edges the same length.
It's very hard to describe the process to sharpen a drill , much easier to show someone .
But let me borrow a description from a tradesman who used to frequent the metal working groups on USENET ,Known as Tnut .
Sadly TNUT has passed onto the big workshop in the sky and he will not mind if I post his description here .
As follows :
The drill was ground, freehand, on the FACE of the wheel (not the flat side)...care being taken to keep the POINT
angle as equal as possible on both sides..I'll tell you how to do THAT in a moment..
Lets do that now in fact..
Jim, You are dead right about not being able to grind a drill without mechanical help! Well here's how you create your own "6 Million Dollar Bionic Darex"
;^)
Let's assume we are going to sharpen a 3/8" diameter, 2MT shank drill..it is about 8" long (these figures are arbitrary..I just want every one to have the same mental picture of what I am describing. We approach the wheel,
which has been dressed on its face, dead straight across with no grooves..(Ve SHOOT anyone ve catch putting grooves in ze drill wheel!!..No Pity..No
Prisoners..Ya!
Verdampt!)
(Sorry)...
The drill shank is held firmly in the RIGHT hand...ALL the movement and control is imparted by the RIGHT hand. For the purposes of drill grinding, the left hand could be...with benefit..a LUMP OF CLAY!!
It is from this "lump of clay" that we fashion the Bionic Darex".
Place your left hand thumb and finger tips LIGHTLY together..Relax the other three fingers and let them naturally curl against the palm of your hand.
Let the drill flute drop into the vee between thumb and fore finger and let the tip of the finger "Find" the curve of the flute where it fits comfortably.
The tip of the thumb rests on the sharp junction ot the land and the flute,about an inch back from the drill tip.
Now...SQUEEZE HARD!!! YOUCH!...I said it would be easier if it were clay!
Lift the drill from your fingers...see the GROOVE?...Drop the drill back in.It locates within a thou or two! Magic?..Bionic at least! Squeeze again
to set the groove. You have created a customised drill guide that fits better than that on any machine ever built! You can relax your grip now..feel how
smoothly the drill will ride back and forth, guided by the groove you have created for it.
Place the knuckles of your left hand, LIGHTLY on the grinding wheel tool rest,and swing the drill shank, from left to right (using ONLY your right hand)and
push the drill lengthways though that groove in your fingers back or forth using the groove to make the drill twist or "rifle" in your fingers. Do NOT move your
left hand in any way..it is made of clay remember!
UNTIL....
A) The drill axis is "eyeballed" to be at half the required point angle to the wheel face...You can scribe or chalk reference lines on your grinder bench top to
help you line this up..at least until it become almost second nature.
B) The drill axis is dropped JUUUst below horizontal. This will ensure that your soon to be ground drill lip will start with a "smidgin" of cutting clearance.
(Ideally, and certainly for a beginner, the grinder rest should be set dead radially to the wheel center and about half the drill diameter below the true center of the wheel)
C) The two cutting edges of the drill..the straight, sharp bits,formed by the junction of the flute and the back face (the only bit you grind),should be
horizontally disposed..with the edge uppermost on the side closest to your left hand..the other sharp bit of course, pointing downwards (Jeeze this would be a
lot easier with a sketch pad)
This I will call the SET or START position!
NOW, move your left hand for the first, last, and ONLY time during this whole exercise. GENTLY ease the cutting edge towards the spinning wheel, carefully
maintaining all the angles and orientations of the SET position..until the cutting edge is JUST shy of touching the wheel. If you listen carefully you will hear the tone of the entrained air, whistling through the narrowing gap.
You will hear a subtle but distinct change of tone JUST, I mean Just...a couple tenths of a thou BEFORE the edge touches the wheel. STOP!!! FREEZE!!
DO NOT MOVE!!
Now, press the knuckles of your lump of clay..sorry, your left hand FIRMLY down onto, into and around the grinding rest..establish a "Groove" on the back of
your hand as well as between your fingers.
We are now ready to grind, Your left hand locked to the drill and grinding rest is otherwise quite relaxed..letting the drill slide, twist and tilt
wherever your right hand and the groove in your fingers tell it to go.
The actual grinding is a bit of an anticlimax.
You have previously studied a new drill point, you have read about clearance, and cutting angles, and rakes and......
With the RIGHT hand in control, gently, kinda, lean forward... bending or squeezing your arms hands and body..rather than actually moving
them..until you take up that last couple of tenths and the wheel begins to cut. Let it cut..don't force it, and don't rush it..it really won't hurt anything
if you take a full minute Per pass per face. YOU and your "Bionic Darex" are totally in control of that drill and the wheel..Forget the times when, close to panic,
you swung the drill wildly past the wheel, hoping to get "the dirty deed" over with as quickly as possible.
Take your time, enjoy the moment, THINK about the shape you are trying to generate. Just the one face is left to "Interpretation"...every other aspect,angle, facet, what have you...Has ALREADY BEEN TAKEN CARE OF!!
and is locked in place under your control!
The right hand should perform a "Lower Quadrant sweep" for want of a better term..An observer behind you would see your hand move from about 17 minutes past the hour on a clock face, to roughly 25 minutes past. But it isn't a smooth arc of a circle, more a sector of an elipse..You see, as your hand starts to drop slowly, you are also rotating the drill in "the groove"..the first
third of the turn needs to maintain that very slight clearance angle on the cutting edge, and not increase it too rapidly.
You need the clearance to cut..But too much at that point will WEAKEN the edge, and cause the drill to snatch and chip...So the first part of the rotation
is ALMOST but not quite, just as though you were grinding a straight cone point on the end of your drill. Only as you approach the second third, does
your right hand start to noticeably drop..kinda Catching Up" on the rotary motion...increasing the clearance as it does.
In the last third of the rotation the right hand drops quite rapidly..Though not enough to catch the OTHER drill lip on the wheel..that lip is coming around quite rapidly by now.
Above all, take your time, if it helps, move the drill one degree at a time, and think ahead what shape or angle the next degree of cutting face needs...Remember, you have control, and IT ain't going nowhere 'til you
decide.
After a pass on one face, flip the drill in your "Bionic Darex" DO NOT MOVE THAT LEFT HAND!!, return to SET position and repeat, the pass on the other face.
Having done a couple of passes on each face..it is now time to check the results on our home made "Optical Comparator"
Rest the center hole in back end of the drill shank, on the center point of the "Comparator" and use, first one and then the other drill lip to scribe a light line on your whitewashed (OK Blue or red dyed) surface.
You will readily see if the lines coincide..if the lips are even..or not, as the case may be.
Lets assume they are..Now look directly DOWN on the end of the drill to check the clearances. HUH? How can you check radial clearance by looking it straight in the face? Surely you need to look at it sideways?
Well no you don't...for once all those interacting and confusing angle and faces and clearances are going to work together in YOUR favor and make what could be a
tricky bit of metrology..quite simple. While we are looking at the end of the drill, we will also check that the POINT ANGLE is correct too!!!
(Ok guys, leave quietly..teenut has finally lost it!!)
No really, trust me. IF you look straight down on the point of a well sharpened, standard drill, you will see
the two cutting edges, joined by the CHISEL edge which crosses over the web of the drill The angle formed by the chisel edge to each cutting edge,should be ABOUT 50 deg...anywhere between 40 and sixty is ok for a first
attempt. (I can hear the purists and theorists screaming and lighting up their flame throwers)
But believe me, get it in that ball park and your drill will CUT. If the angle is too steep..you don't have enough clearance...negative clearance will give you
an angle event greater than 90 deg. Too MUCH clearance and the angle will appear too shallow!
While looking at the end, check the point angle, How? Look down the axis of the drill at the cutting edges. Are they straight? If so, your point is pretty close to the right angle (As designed for that drill, by its
manufacturer when he set the helix angle and the cross section of the flute) If the edges appear CONCAVE the point is too flat and if they appear CONVEX, the point is
too "Pointy"
If your drill passes all these tests, which take but a second or two to perform, THEN IT WILL CUT..pretty close to size, without chattering, chipping, overheating, wandering or seizing. I guarantee it!
Hey, that's a pretty good start for the first drill you ever ground! All it takes now is a bit of practice for it to become second nature and almost as easy with a little 'un or a big 'un!
Hey guys!
My apologies for "goin'on" but If it helps just one person to pluck up the courage and go hand sharpen his (or Her) first drill, by hand...
Then I hope you will bear with me.
It is late, I am tired and I am not even going to proof or spell check this, g'night all .
teenut
</pre>"Outside of a dog a book is man's best friend ,inside a dog it's too dark to read"
Groucho Marx
-
20th February 2011, 10:49 PM #45
 Super Moderator
- Join Date
- Jan 2004
- Location
- Mackay Qld
- Posts
- 3,466
Fellas
I teach engineering to YR11 &12 high school students.
For those who are interested I have taught them how to hand sharpen a twist drill bit.If the kids can get it I am sure many here can manage it it as well.
It is all about correct location on the wheel face,and twist and dip of the drill bit shank to gain the angle s and clearance.
I don't know if it is the textbook description but i teach the following:
Using you edge to be sharpened,held horizontally,Hold the bit about 20mm back from the cutting edge with your right hand thumb and fore finger.Hold the rear of the shank with your left hand .
Engage the cutting edge with the stone and twist about a 1/4 of a turn.
Hold the cutting edge at a level just above the spindle line of the grinder. As you twist the drill bit while it is being ground ,also drop the the rear of the drill bit shank with your left hand just a bit.The amount to drop will come with practice and it is this that sets the clearance.
Theres some fairly good graphics about it if you google it up in an article on the Autospeed website.
Grahame


 Reply With Quote


Similar Threads
-
Impact Drill - Damaging drill bits
By BassTeQ in forum HAND TOOLS - POWEREDReplies: 18Last Post: 9th September 2005, 10:16 PM -
Preparing chisel mortice drill and bit
By numbat in forum HAND TOOLS - POWEREDReplies: 6Last Post: 7th September 2005, 09:13 AM -
Bit Disgruntled.........
By IanW in forum HAND TOOLS - UNPOWEREDReplies: 0Last Post: 17th May 2004, 11:04 AM -
Sash window bit.
By Joshua in forum ROUTING FORUMReplies: 3Last Post: 6th February 2004, 07:08 PM
