

 Thanks: 0
 Likes: 0
 Needs Pictures: 0
 Picture(s) thanks: 0
Results 1 to 14 of 14
-
14th April 2007, 03:28 AM #1
 Be inspired. Be creative. Be bold.


- Join Date
- Apr 2001
- Location
- Perth
- Posts
- 10,826
 Making Lever Caps and Lever Cap Screws in the Backyard
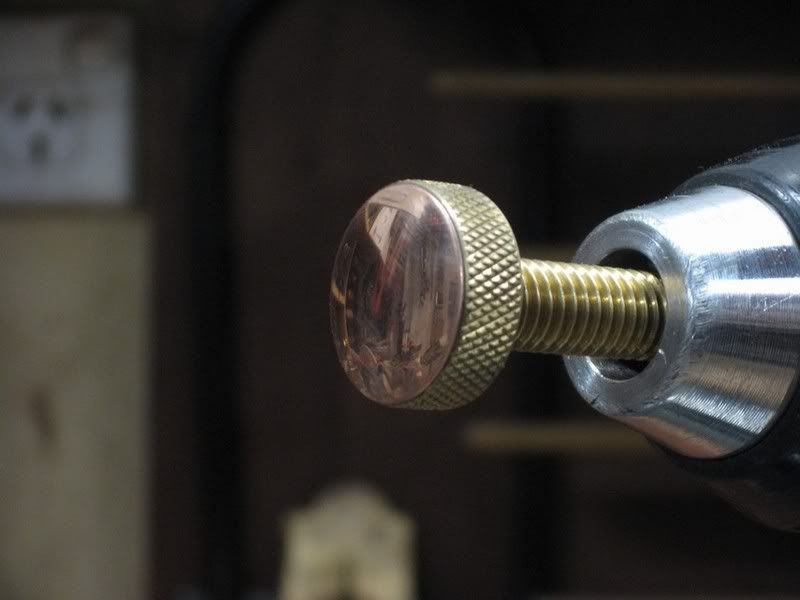
As mentioned in my recent post on building a jointer, here is a link to an article I have completed on building lever caps and cap screws with basic tools.
http://www.wkfinetools.com/contrib/d...rCap/lCap1.asp
I hope this is useful.
Regards from Perth
DerekVisit www.inthewoodshop.com for tutorials on constructing handtools, handtool reviews, and my trials and tribulations with furniture builds.
-
14th April 2007 03:28 AM # ADSGoogle Adsense Advertisement
- Join Date
- Always
- Location
- Advertising world
- Posts
- Many
-
14th April 2007, 11:09 AM #2
timber ninja
- Join Date
- Aug 2006
- Location
- Hills District, Sydney
- Age
- 51
- Posts
- 602
you da man

Another excellent article Derek. I was looking forward to seeing how you made the knobs after seeing the thread on your jointer. Now I have seen the process....how freakin easy is that ....and such fantastic results.
I will defenately be having a crack at making a couple of those.
very clever
cheers
BD
-
15th April 2007, 12:06 AM #3

Super Moderator
Dodgy brother
- Join Date
- May 2004
- Location
- Pakenham, outer Melb SE suburb, Vic
- Age
- 54
- Posts
- 4,158
Excellent tute, Derek, thanks for that.

The beatings will continue until morale improves.
-
15th April 2007, 12:19 AM #4
Neander Normite
- Join Date
- Jan 2005
- Location
- Melbourne
- Age
- 65
- Posts
- 11,997
-
15th April 2007, 02:19 AM #5
Moderate Moderater
- Join Date
- Feb 2006
- Location
- Lindfield N.S.W.
- Age
- 62
- Posts
- 5,643
Great stuff, Derek. Greenie on its way (if I can).
Cheers
Jeremy
If it were done when 'tis done, then 'twere well it were done quickly
-
15th April 2007, 07:50 PM #6
Dust maker
- Join Date
- Jan 2004
- Location
- Sunshine Coast. Qld
- Age
- 78
- Posts
- 356
Excellent idea Derek thank you for the tuit.
David L
One of the great crowd beyond the bloom of youth on the Sunshine Coast
-
15th April 2007, 11:40 PM #7
 .
.
- Join Date
- Feb 2006
- Location
- Perth
- Posts
- 27,794
Great Ideas Derek, The only thing I would do different is use silver solder instead of epoxy and that's because I have a MAP gas torch handy and wouldn't have to wait for the epoxy to dry..
Cheers
-
16th April 2007, 12:20 AM #8
SENIOR MEMBER
- Join Date
- Apr 2003
- Location
- Tolmie - Victoria
- Age
- 68
- Posts
- 4,010
I admire your skills and patience Derek - thanks for the article.
- Wood Borer
-
16th April 2007, 02:10 PM #9
SENIOR MEMBER
- Join Date
- Apr 2006
- Location
- Melbourne Victoria
- Posts
- 621
Well done Derek.
Before following the link and just looking at the final result I would never have figured out how it was done. (Have a greenie on me)
-
16th April 2007, 03:01 PM #10
SENIOR MEMBER
- Join Date
- Aug 2003
- Location
- Pambula
- Age
- 58
- Posts
- 12,779
Top effort Derek.
Umm, you do realise it's illegal to deface current Australian currency coins? The 2 cent piece is OK but the $1 coin is $5,000 fine or 2 years imprisonment
-
16th April 2007, 04:00 PM #11
Be inspired. Be creative. Be bold.
- Join Date
- Apr 2001
- Location
- Perth
- Posts
- 10,826
Mmm did I say Australian $1 coin? Of course I meant to say Zimbabwean!

Regards from Perth
DerekVisit www.inthewoodshop.com for tutorials on constructing handtools, handtool reviews, and my trials and tribulations with furniture builds.
-
16th April 2007, 04:11 PM #12
SENIOR MEMBER
- Join Date
- Aug 2003
- Location
- Pambula
- Age
- 58
- Posts
- 12,779
Of course the laws are MUCH harsher over there

Anyway, they look great no matter how you made them. Perhaps people can pick up foreign coins to use, or even disks of metal would do. Seeing as you shape the blank anyway, I don't suppose it has to be perfectly round to begin with, if you blend it into the knurled nut?
-
18th April 2007, 03:58 PM #13
Dextrophobe

- Join Date
- Mar 2004
- Location
- Perth hills
- Age
- 45
- Posts
- 1,060
Nothin's changed round here. Derek's still posting fantatsic articles and the same old crew still pats him on the back!
Last edited by LineLefty; 18th April 2007 at 04:00 PM. Reason: And I still can't spell!
Cheers,
Adam
------------------------------------------
I can cure you of your Sinistrophobia
-
18th April 2007, 04:08 PM #14
The Goldfish
- Join Date
- Mar 2006
- Location
- Bowral
- Posts
- 837
No, I'm sorry. It couldn't be that easy. Metalwork is harder than that - everytime I've tried it the results are still scrap metal. Hmmm, maybe I'll have to give it another try. Thanks for this Derek. I think I'll start with a marking gauge though, and work my way up to a plane via a shave.
Bob C.
Never give up.


 Reply With Quote


