

 Thanks: 0
 Likes: 0
 Needs Pictures: 0
 Picture(s) thanks: 0
Results 31 to 40 of 40
-
7th November 2008, 11:21 PM #31
 Toolmaker Extraordinaire


- Join Date
- Jun 2007
- Location
- Toowoomba, Qld
- Age
- 31
- Posts
- 2,520
 Ah yes I've also caught the bug
 Originally Posted by lightwood

-
7th November 2008 11:21 PM # ADSGoogle Adsense Advertisement
- Join Date
- Always
- Location
- Advertising world
- Age
- 2010
- Posts
- Many
-
8th November 2008, 02:03 PM #32
GOLD MEMBER
- Join Date
- Jun 2008
- Location
- Victoria, Australia
- Age
- 74
- Posts
- 6,132
but burnt out my cheap linnisher, so I'm in the market for bigger one,
Regards,
Peter
Outch, sorry to hear that... I have one of these from Hafco... I think carbatec have a similar one. Belts last a reasonable time (longer belts last better) belt changes are easy, I swap from 80 to 120, only drawback is that the 2260mm long belts seem to be a non standard size.
On the infill smoother front, I now have some 6mm 01 tool steel to make some blades
Regards
Ray
-
8th November 2008, 05:16 PM #33
Toolmaker Extraordinaire
- Join Date
- Jun 2007
- Location
- Toowoomba, Qld
- Age
- 31
- Posts
- 2,520
Where'd you get that then? Originally Posted by RayG

-
9th November 2008, 06:22 PM #34
Luban White
- Join Date
- Jan 2006
- Location
- Victoria
- Posts
- 999
I was lucky enough to have a quick fondle of the plane today, even though it is just the sides and sole I was surprised how heavy it was.
While the photo's and descriptions have been great fun, for an infill novice like myself a quick hands on filled all the gaps.
Peters dovetails really are that pretty too, it's not trick photography after all
Crisp and clean, it struck as quite interesting how three unfinished sheets of metal can look so good with just two lines of exceptional joinery.
A thing of beauty even in its current form.
I can see the infill bug gnawing away at the skin on my fore arm.. I really should shoo it off before the little blighter gets in and lays its eggs
Pleasure to meet you Peter, I hope to catch you without the crowd one day
-
15th November 2008, 04:48 PM #35
Peter McBride
- Join Date
- Nov 2007
- Location
- Melbourne
- Posts
- 1,139
Was a pleasure to meet a few blokes from the forum last weekend at the HTPAA tool sale, including scoobs6170 and Slow6, good to put a few faces to names. Any more brass and steel mashers out there getting started????.......I'm just so thrilled with what RayG has done with his plane, if he and I can do it together, lets get more started, and run them the same way as Ray with work in progress posts. What you learn by making a plane like these is hard to explain. It really makes almost all other hand tool making a breeze. Originally Posted by Slow6
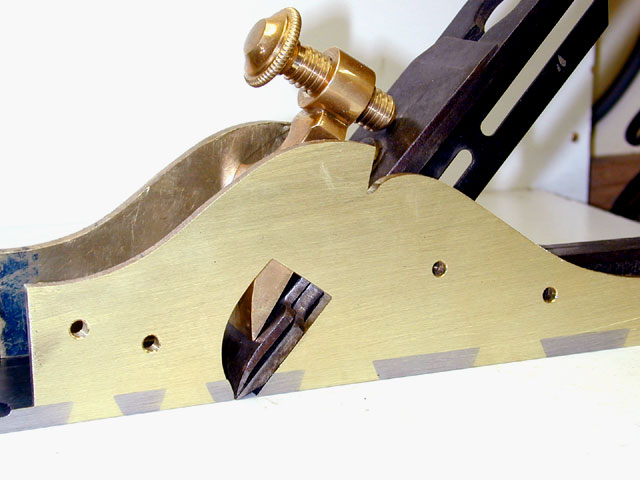
Got the crappy belt and disc sander going with a blow out using compressed air. Still need more power though. Next big purchase will be a new linisher....after a nice little bedrock 602 with a busted lever cap, which the spare parts box will give up a correct lever to fit.....back to the work at hand....The pics are thumbnails so click on them for a larger image.
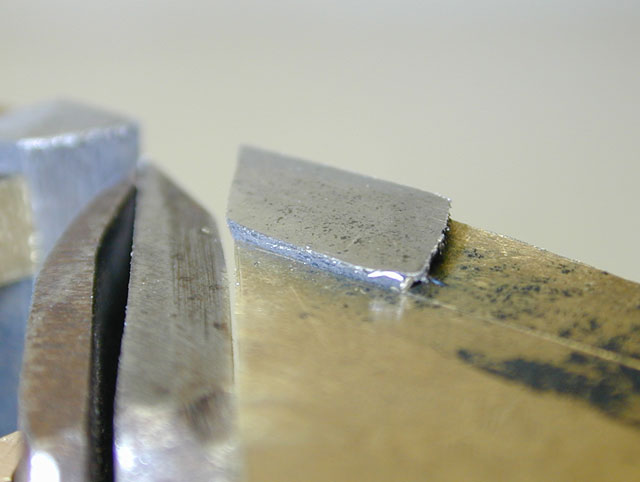
<table border="0" cellpadding="3" width="100%" height="67"><tbody><tr><td colspan="4" align="center" width="100%" height="10">To make certain I got all the small corners of the dovetails filled, I peened the corners of the steel base into the corners of the brass. This has an undesired effect, especially on a rebate plane, of drawing the top of the sides in a little </td> </tr> <tr> <td colspan="4" align="center" width="100%" height="10">

</td> </tr> <tr> <td colspan="4" align="center" width="100%" height="10"> I haven't started the infill yet, and thought about making a temporary infill to hold it all square while filing and linishing the waste off, but then realised I already had the hardwood buck to use....so back into the buck, and into the vice for more filing. </td> </tr> <tr> <td colspan="4" align="center" width="100%" height="10">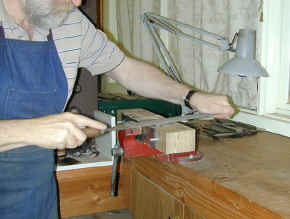
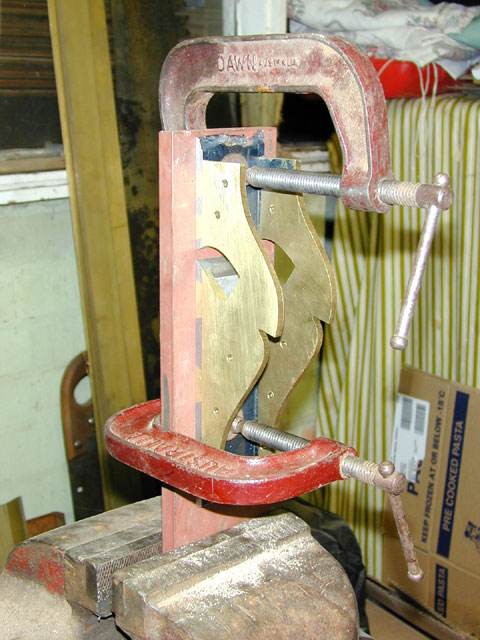
</td> </tr> <tr> <td colspan="4" align="center" width="100%" height="10"> To get the sides square again I used the 12mm (1/2 inch) thick steel plate in the vice, and "G" clamped the base to the steel and used a couple of large adjustable spanners ( wrenches) to bend it out near to square again. Using a straight edge, I also found I had a small bow in the base. So with the same piece of steel I placed a jointer blade under the throat as a pivot and bent it using a couple brass blocks and the "G" clamps again. Both these steps were very successful. </td> </tr> <tr> <td colspan="4" align="center" width="100%" height="10">
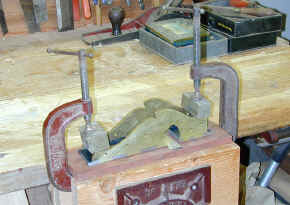
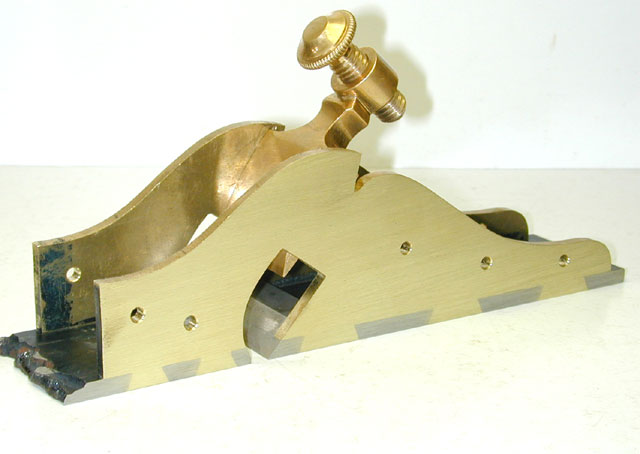
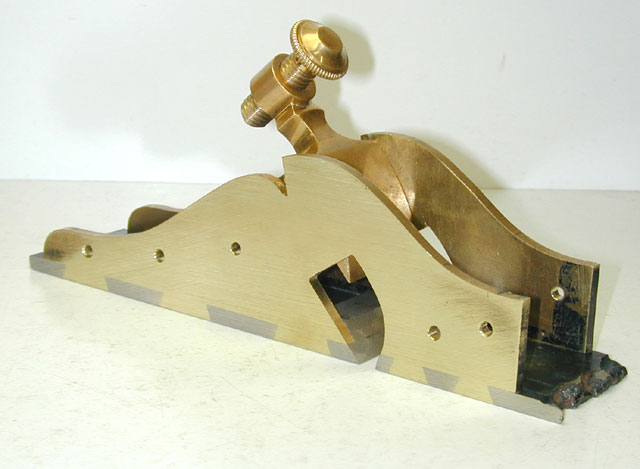
</td> </tr> <tr> <td colspan="4" align="center" width="100%" height="10"> Back to the dodgy linisher that trips the earth leakage switch...off with all the covers and a blast out with compressed air seems to have delayed its inevitable demise for a while. I used a 40 grit belt some more and got the body cleaned up nicely. The sides are close to square to the base and I've got the surfaces nice and clean. I had the body on my Tool Sale table last weekend, and some tool people picked it up and recognised it, and I was fascinated by the number of people who's attention was drawn to the rough front end. This base is an off-cut from the scrap metal merchant, and I could cut it square, but I never work something twice if I don't have to. I just don't see it when I'm working on it knowing it will be cut off later, and I haven't decided if I will do a curved front and rear on the base under the infill. The principle of never cutting something away until the last minute to preserve future options is a cardinal rule for me, but one bloke looked at it and commented on the careless rough work at the front... he must have been in that "fault finding mode" as he scanned the tools on display. </td> </tr> <tr> <td colspan="4" align="center" width="100%" height="10">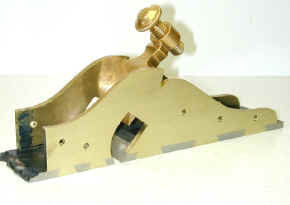


</td> </tr> <tr> <td colspan="4" align="center" width="100%" height="10"> With a bevel gauge behind the blade, I can see my lever cap is too short. I want it to go further down to the hump on the back iron, and I need the pivot pins higher up so I don't cut away the strength in the side. So the next step will be to make another lever cap. </td> </tr> <tr> <td colspan="4" align="center" width="100%" height="10">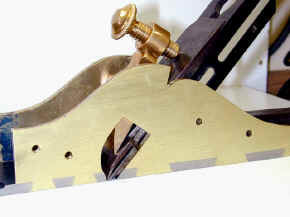 </td> </tr> <tr> <td colspan="4" align="center" width="100%" height="10">
</td></tr></tbody></table>
-
15th November 2008, 06:14 PM #36
GOLD MEMBER
- Join Date
- Apr 2006
- Location
- near Mackay
- Age
- 59
- Posts
- 4,635
It's looking good Peter.
Thanks very much for the detailed WIP.
Great inspiration
-
15th November 2008, 10:54 PM #37
Toolmaker Extraordinaire
- Join Date
- Jun 2007
- Location
- Toowoomba, Qld
- Age
- 31
- Posts
- 2,520
Looking good
I'll be getting my brass soon!
-
16th November 2008, 06:49 PM #38
GOLD MEMBER
- Join Date
- Jun 2008
- Location
- Victoria, Australia
- Age
- 74
- Posts
- 6,132
Hi Peter,
Good to see work has resumed, it's looking better all the time, I was going to mention
the rough finish on the front, but I'm pleased to see that someone else has already picked up on it.
Looking forward to the next installment. There is something new to learn everytime.
It's really looking good!
Regards
Ray
-
11th December 2008, 01:45 PM #39
 Knicker Twister
- Join Date
- Dec 2005
- Location
- Perth, WA
- Posts
- 36
Mate, where has this thread been hiding??? Im not a new member by any means, but my contributions and time to look at the net has been moderated (read sporadic at best.)
So, when having a look through my fave section of Ubeaut I was stumped why only 15 threads were listed... Quickly found the archive button and viola. Instant abandonment of all senses as I sit here in absolute astonishment. Full hours tick by as I sit here in amazed speechlessness.
Not only by the incredible workmanship on display in the threads I have gotten through, but also the comraderie and generosity in terms of time to make the WIP's and guides. Fantastic effort.
Peter, you've done a spectacular job. Cant wait to see the final product in action. Congrats.
Justin.
-
11th December 2008, 02:26 PM #40
Peter McBride
- Join Date
- Nov 2007
- Location
- Melbourne
- Posts
- 1,139
Hello Justin,
Thanks for your kind words.
The plane making came to a screaming halt back in mid November with a wedding in the family, a beautiful couple of grandchildren to baby sit, and then Xmas time in a jewellery workshop is just chaos.
On to the wood work, and a better lever cap early next year. One thing that might slow it down is a silly commitment I gave to RayG that I would be making a dovetail saw VERY soon and a friend put one of the sweetest little rebate planes in my hand a few weeks ago, so I traced around that one onto a piece of paper...too little time, and too many things to do. Thanks again for the kind words, I get a real thrill to see other tool making...it is the alter I worship at
Regards,
Peter


 Reply With Quote


Similar Threads
-
Infill Shoulder plane
By Zsteve in forum ANTIQUE AND COLLECTABLE TOOLSReplies: 5Last Post: 4th April 2008, 01:11 PM -
infill plane
By John Saxton in forum HAND TOOLS - UNPOWEREDReplies: 1Last Post: 24th October 2006, 04:25 PM -
Renovation of an infill plane
By derekcohen in forum HAND TOOLS - UNPOWEREDReplies: 14Last Post: 19th April 2006, 11:57 PM -
Building an Infill Plane
By sam63 in forum HAND TOOLS - UNPOWEREDReplies: 23Last Post: 18th January 2006, 02:31 PM -
My Stanley #4 Infill plane
By derekcohen in forum WOODWORK PICSReplies: 5Last Post: 21st June 2003, 11:10 PM
