

 Thanks: 0
 Likes: 0
 Needs Pictures: 0
 Picture(s) thanks: 0
Results 1 to 15 of 26
Thread: DIY powder coating.
-
4th May 2011, 05:30 PM #1
 Product designer retired


- Join Date
- Nov 2006
- Location
- Heidelberg, Victoria
- Age
- 79
- Posts
- 2,251
 DIY powder coating.
This could be an interesting topic, so following AB's lead, let's hear from Pete on this subject.
Ken
-
4th May 2011 05:30 PM # ADSGoogle Adsense Advertisement
- Join Date
- Always
- Location
- Advertising world
- Age
- 2010
- Posts
- Many
-
4th May 2011, 06:41 PM #2
Why is it so?
- Join Date
- May 2002
- Location
- in the outer reaches of Sth Oz
- Age
- 75
- Posts
- 1,604
count me in as well

PeteWhat this country needs are more unemployed politicians.
Edward Langley, Artist (1928-1995)
-
4th May 2011, 07:51 PM #3
Product designer retired
- Join Date
- Nov 2006
- Location
- Heidelberg, Victoria
- Age
- 79
- Posts
- 2,251
C'mon Pete, woof yer tea down, jump back on the forum, and answer your admirers.
Ken
-
4th May 2011, 08:05 PM #4
SENIOR MEMBER
- Join Date
- Oct 2007
- Location
- Sydney
- Posts
- 2,340
Ok ok, standby. I was about to do a part and take photos of the process but the kids screaming upstairs suggested I should probably put it on hold until after dinner. Bob will be pleased to know I'm taking a better camera down with me ... as much as I know he appreciates the artistic bent of Pete's "expressionist era", guessing what the photo is actually of probably isn't in the spirit of the board. Should have them up later tonight.
Pete
-
4th May 2011, 09:01 PM #5
Product designer retired
- Join Date
- Nov 2006
- Location
- Heidelberg, Victoria
- Age
- 79
- Posts
- 2,251
Pete,
We do not want pictures of screaming kids, we want to know how you powder coat bits and pieces, then cure them.
There's no doubt that powder coating is a great process, but is probably not ideal for applying to machined surfaces that engage with other machined surfaces. For example, dovetails, table tops etc.
Dinner is over Pete, now back to work.
Ken
-
4th May 2011, 09:12 PM #6
SENIOR MEMBER
- Join Date
- Oct 2007
- Location
- Sydney
- Posts
- 2,340
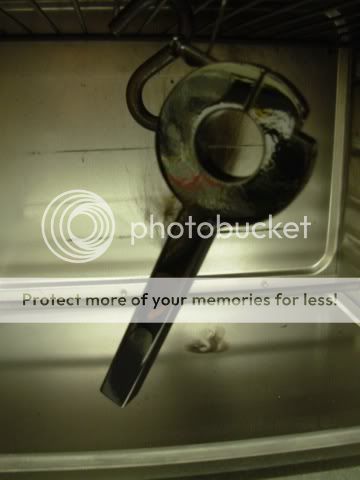
Right, here we go. This is the part we're doing, it a fixture to hold my Proxxon drill on the QCTP. Nothing fancy but it will hopefully work ok. I think I can only post 4 images per post right? Multi-post entry then.
After TIG welding the part need to be cleaned again, I use scotchbrite belts on my linisher for this.

An auto paint shop will be able to sell you some wax and grease remover. Powder coating is really no different to other painting processes; it's all in the prep. However because it's baked at 200C it CANNOT go over the top of other painted surfaces, so it MUST be bare metal only.

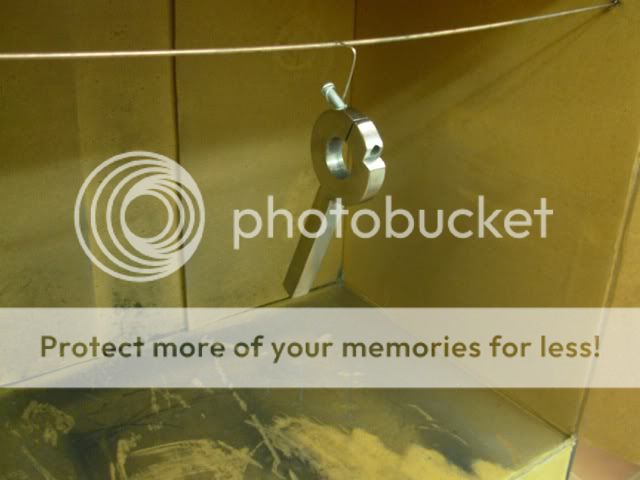
Hanging in the "booth" ready for coating. The powder is like talc but the good thing is overspray really doesn't matter, just blow it off/sweep it up/etc. However you absolutely cannot touch the powder once it's on the part. The good thing is if you do, just blow off the powder and start again. The metal wire it's hanging from is important as the part is grounded and a static charge is applied to the powder, thus attracting it to the part. After I took this photo I actually hung it from a fishing line swivel so it could rotate fully.
Sieve the powder to break up any lumps. The only reason I wear gloves is simply habit, and also to keep greasy fingerprints off the clean part. As I mentioned, it's really not that different to other painting processes, but I figure why half do something, hence why I use wax and grease remover and wear gloves.

-
4th May 2011, 09:24 PM #7
SENIOR MEMBER
- Join Date
- Oct 2007
- Location
- Sydney
- Posts
- 2,340
This is the gun that's used. VERY little air is used and the powder just wafts out of the end of the gun. The box behind it is the power supply which imparts a static charge to the powder, the amount depends on the gun, but anywhere from 25 to 100 thousand volts. The higher the voltage the better it's attracted.
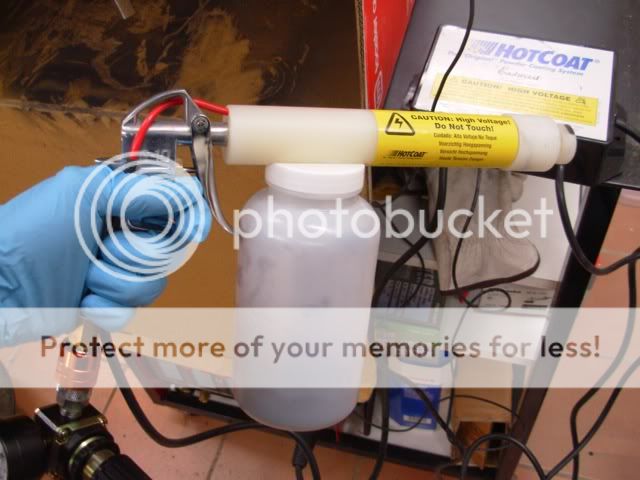
I couldn't take photos while applying the powder as you need to also push a button shown below to energise the gun, but this is about the distance the gun will be from the part. It's actually quite bizarre seeing the powder waft out and seemingly magically get attracted just to the part. Done carefully there's not a lot of overspray.

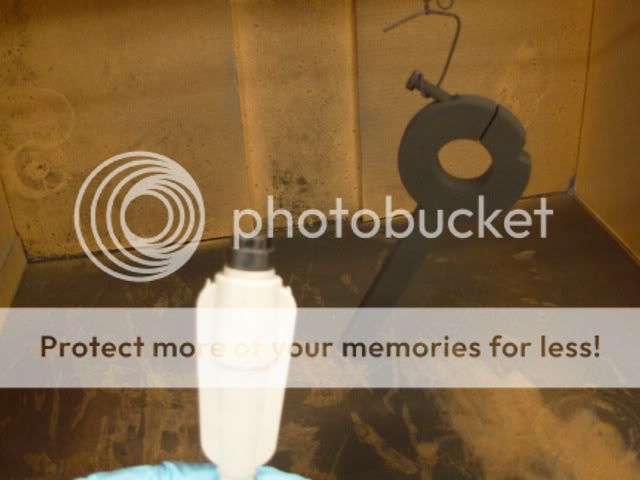
The part and the button I mentioned, the part is now coated and ready to be moved to the oven. It's generally a good idea to do a dummy run of how you will do this because at this stage nothing can touch the powder.
In the oven set to just over 200C, you CANNOT use the kitchen oven, so this is just a little toaster oven from K-mart. Apparently the powder gives off a very slight toxic product when curing, hence why you can't use a food prep oven. Toaster ovens are very cheap though. When I get time I will build a much larger oen to take big projects.

-
4th May 2011, 09:36 PM #8
Product designer retired
- Join Date
- Nov 2006
- Location
- Heidelberg, Victoria
- Age
- 79
- Posts
- 2,251
Pete,
Is it possible to apply the powder without a gun. For example, is it possible to chuck the part in a bag with some powder, shake it up, and wallah?
Roughly, what sort of buildup is produced on the part, ie. how thick is the coating, are we talking 0.1mm or less?
Ken
-
4th May 2011, 09:49 PM #9
SENIOR MEMBER
- Join Date
- Oct 2007
- Location
- Sydney
- Posts
- 2,340
No the paint powder is attracted by the static charge. You may be thinking of plastic coating, I did that at school but the process is completely different. The gun is the heart of the process I'm afraid, but they're not that expensive in the US, more on that later. Originally Posted by neksmerj

I use a cheap digital thermometer to measure the PART temperature, as that's what really matters, not the oven temp. It takes around 15 minutes to bake, but that depends on powder manufacturers and effects.

This is the part about half way through the bake. It may not show too well in the photograph, indeed it's not all that obvious in the flesh unless you know what to look for, however there's a definite "orange peel" effect still there as the paint flows out (BTW I may refer to it as paint or powder in these posts. The powder is simply specially ground paint, just without solvents, that flows under heat and cures.
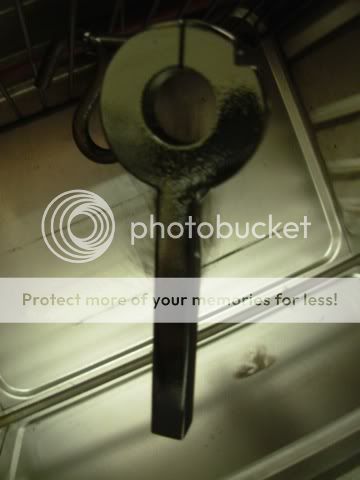
Finished curing, now simply open the oven door, let the part cool and it's good to go.
Cooled and ready to be fitted.

-
4th May 2011, 09:49 PM #10
GOLD MEMBER
- Join Date
- Jun 2007
- Location
- sydney
- Age
- 64
- Posts
- 3,566
Ken to give you a better understanding do a search for Electrostatic Spray Painting.
-
4th May 2011, 09:57 PM #11
SENIOR MEMBER
- Join Date
- Oct 2007
- Location
- Sydney
- Posts
- 2,340
Well yes and no. I believe BIG users of paints (ie cars manufacturers) electrostatically charge their systems to reduce overspray, but conventional solvent based paints are used. If you're looking for more information Google, unremarkably, "Powder Coating". Originally Posted by pipeclay
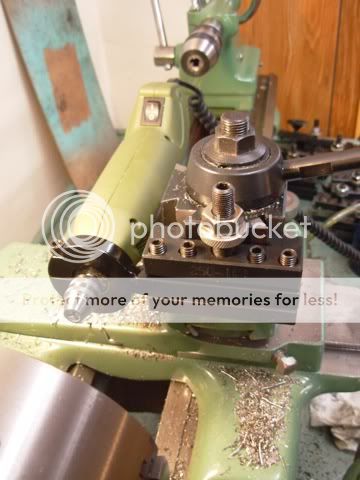
This is what I was coating, the finished part installed on the QCTP


-
4th May 2011, 10:09 PM #12
Product designer retired
- Join Date
- Nov 2006
- Location
- Heidelberg, Victoria
- Age
- 79
- Posts
- 2,251
Pete,
That's great. You have done well to answer many questions under pressure, now you can put the kids to bed, unless they are on fridge duty.
Ken
-
4th May 2011, 10:11 PM #13
SENIOR MEMBER
- Join Date
- Oct 2007
- Location
- Sydney
- Posts
- 2,340
The whole process took MUCH longer to write up than to actually do it, the best thing is that cleanup means blowing the gun etc out with compressed air; simply blow the dust off! MUCH nicer than stinking solvents and sucking through a respirator for hours. It's a one coat process, so no primer to worry about, and we probably all know how durable the finish is.
This is something similar to the kit I use.
Elite HotCoat Powder Coating Kit - Stainless Steel Wire - Powder Coating Handbook - Eastwood
A friend bought that kit back from the US for me so I'm not sure how their shipping rates go. However when I was after more colours of powders they didn't seem too interested, nevertheless that was a while back so maybe things have changed. Have a scrounge through their site and it should be possible to find a list of powders they sell. They're not expensive, there's very little overspray so they last a while, and won't go off. Another source of powders is Columbia Coatings ColumbiaCoatings.com - Best Powders - Best Service - Best Price! They are cheaper and have a better range than Eastwood. It's also possible to get effects such as crinkle etc etc, indeed the motor cover in another post I did in black crinkle and it came out extremely well. The black we used tonight was a standard gloss black, there's another gloss level above that called mirror black. In this case had I not been doing this for the board I would have done it in satin as the part wasn't especially well prepped in terms of buffing the imperfections etc out, and the higher the gloss the more they'll show. I didn't think satin would photograph very well so used gloss. Since it's just a tool it really doesn't matter.
Hopefully that's enough to get started in the search. There's a stack of information on the net if you search under powder coating. Eastwood do a book that comes in that kit which also explains things quite well.
Pete
-
4th May 2011, 11:18 PM #14
.
- Join Date
- Nov 2008
- Location
- Perth WA
- Age
- 71
- Posts
- 5,650
Thank you Pete.
That was extremely informative. Now that you have made your drill support bracket, what are you intending doing with the drill? Have you devised a means of indexing the headstock spindle?
Bob.
p.s. The clarity of the photos is appreciated but I was warming to the evocative soft focus shots.
-
4th May 2011, 11:27 PM #15
.
- Join Date
- Nov 2008
- Location
- Perth WA
- Age
- 71
- Posts
- 5,650
Lathe Query
Another question Pete, How old is the Model C? I notice that it has plain spindle bearings and a late model cross slide.


Similar Threads
-
Powder Coating MDF
By Pete F in forum FINISHINGReplies: 0Last Post: 20th June 2010, 10:00 AM -
Powder coating DIY?
By neksmerj in forum METALWORK FORUMReplies: 5Last Post: 16th March 2009, 11:54 PM -
1st Powder Coat
By PenTurner in forum WOODTURNING - PEN TURNINGReplies: 22Last Post: 11th March 2009, 07:32 PM -
Butternut Powder Box
By OGYT in forum WOODTURNING - GENERALReplies: 21Last Post: 26th July 2007, 07:07 AM
