

 Thanks:
  Likes:
  Needs Pictures: 0
 Picture(s) thanks: 0
Results 571 to 585 of 1571
Thread: Your latest project
-
22nd October 2012, 02:19 PM #571
 Senior Member


- Join Date
- Apr 2009
- Location
- Ballina N.S.W.
- Posts
- 371
 BS-5S Bandsaw modifications
A little while ago I had a job to do that required cutting a lot of 50mm*50mm*2mm RHS tubing, most cuts were on angles and needed to fit accurately together so I purchased one of Hare & Forbes BS-5S band saws as this model has a much easier and sturdy angle adjustable head. The saw preformed fairly well after I had spent quite a bit of time to get it to cut square in both plains. I did the usual modifications of stiffening up the legs and fitted a set of swivel casters all round to it.
I have now just done some further modifications to the blade guide fittings to make setting it up a whole lot easier and more accurate. The first change were to the two bearing carrier locking bolts, the heads of the bolts are too close to the bearings and you cannot use a ring spanner on them. I replaced them with 6mm longer bolts and made up two 6mm thick heavy washers, this makes for easy ring spanner use. I then removed the entire bearing carrier assemblies machined the raw castings where needed and made up two "L" shaped fittings that could be bolted on to the bearing carriers and had an adjustable and locking screw incorporated in them. After drilling and tapping and fitting the "L" brackets I reassembled the saw and adjusted it until it cuts square in both directions. I scribed an index mark on both heads for future reference. Cutting nice and square should increase the blade life as well. A few photos to help understand it.
If I were to do it again I would use 3mm Cap screws instead of the 4mm ones I used to hold the bracket in place as you do not have a lot of metal thickness in the bearing carriers.
Bob
-
22nd October 2012 02:19 PM # ADSGoogle Adsense Advertisement
- Join Date
- Always
- Location
- Advertising world
- Posts
- Many
-
22nd October 2012, 11:10 PM #572
Blacksmith, Cabinetmaker, Machinist, Messmaker
- Join Date
- Dec 2011
- Location
- Canberra
- Age
- 40
- Posts
- 4,467
Hi Bob,
Very neatly done One of the three bottom end H&F bandsaws is now at the top of my to get list, and seeing mods like this is great. I take it the adjustment bolts control the twist of the blade guides?
1915 17"x50" LeBlond heavy duty Lathe, 24" Queen city shaper, 1970's G Vernier FV.3.TO Universal Mill, 1958 Blohm HFS 6 surface grinder, 1942 Rivett 715 Lathe, 14"x40" Antrac Lathe, Startrite H225 Bandsaw, 1949 Hercus Camelback Drill press, 1947 Holbrook C10 Lathe.
One of the three bottom end H&F bandsaws is now at the top of my to get list, and seeing mods like this is great. I take it the adjustment bolts control the twist of the blade guides?
1915 17"x50" LeBlond heavy duty Lathe, 24" Queen city shaper, 1970's G Vernier FV.3.TO Universal Mill, 1958 Blohm HFS 6 surface grinder, 1942 Rivett 715 Lathe, 14"x40" Antrac Lathe, Startrite H225 Bandsaw, 1949 Hercus Camelback Drill press, 1947 Holbrook C10 Lathe.
-
22nd October 2012, 11:38 PM #573
GOLD MEMBER
- Join Date
- Jul 2010
- Location
- Melbourne
- Posts
- 7,775
Hi Bob,
Good idea, I should have made myself something like that, they can be painful to adjust.
Stuart
-
23rd October 2012, 08:12 AM #574
Senior Member
- Join Date
- Apr 2009
- Location
- Ballina N.S.W.
- Posts
- 371
BS-5S Bandsaw modifications
Hi Ewan, Stuart
Thanks for your reply's.Ewan you are correct the bolt does control the blade twist. As you can see the design of the saw has at each end individually controlled bearing holders.This results in the blade nearly always cutting through the job on a twist,not good for blade life or an accurate cut. On the 50mm * 50mm RHS I was cutting and needing a nice square even cut it was very difficult to adjust it. If you can visualize the tube in the vise the angle of the blade when it first starts the cut means that only front edge (closest to the vices fixed jaw) makes contact, the angle of that bearing carrier determines the angle of that cut. When the cut has progressed across the top of the job the rear bearing carrier is keeping the blade at a different angle, you end up with two entirely different angles on your cut. With the modification in place you can do a cut, check your angles and make vernier like adjustments at either or both ends, very nice. Stuart this little modification is a frustration fixer, you will enjoy it.
Bob
-
25th October 2012, 11:24 AM #575
SENIOR MEMBER
- Join Date
- Mar 2007
- Location
- Melbourne - Mexico
- Posts
- 655
Simple Jig fixture for the X4 Mill
Not as elaborate or complex as some project in this thread, but this jig plate took 3 weeks to make.
So many holes and then i decided to surface grind both sides - atleast it is flat and has a really nice shine to it
Jig2.JPG Jig1.JPG
Basic idea is that the front of the Jig lines up with the bed front.
I have a number of 10mm bolt holes which can be used to clamp the work down and the 6mm reamed holes have dowels inserted and provide a square reference point relative to the front face of the bed. So i can then change material in and out of the mill knowing it is square everytime to the X and Y axis. The Jig plate is held down with clamps on the ends, but i may change this by drilling out two of the 10mm bolt threads so i can insert a bolt through it into a t-slot underneath. Lets see if i hit the clamps!!!!
-
25th October 2012, 05:01 PM #576
Senior Member
- Join Date
- Dec 2011
- Location
- Sydney
- Posts
- 178
Seafurymike's Jig Plate
And a very nice job too! Originally Posted by seafurymike

I presume you started with black steel plate and went from there, or was it something else? Also, how thick is the plate?
I need to make one of these because my Arboga mill-drill has only two T-slots, with 120mm of unslotted surface between them. Without fastening points down the centre of the table many jobs end up attached inconveniently at the front or back.
However I am still working on the Douglas project, and when that is working Job No 1 will be to flatten a piece of black MS plate as a to serve as a jig plate for the Arboga.
Cheers,
Bill
-
25th October 2012, 07:49 PM #577
SENIOR MEMBER
- Join Date
- Mar 2007
- Location
- Melbourne - Mexico
- Posts
- 655
Hi Bill,
Yes its boiler plate. I think it started out as 1/2" and is closer to 10mm now that I milled and the surfaced each side.
-
31st October 2012, 09:31 PM #578
Blacksmith, Cabinetmaker, Machinist, Messmaker
- Join Date
- Dec 2011
- Location
- Canberra
- Age
- 40
- Posts
- 4,467
Mobile tool trolley
I've had the (not so pleasant) joy of working nights for the last week and a half doing a "defit" for a shop in a local shopping center. I have had to remove all the fixtures, flooring, ceiling and replaster the walls ready for the next tenant. Of course it was up to me to dispose of all the waste, most of which went in a skip, but a few cabinets with drawers, casters, a decent bench top and some large pigeon hole type shelving all found its way into the shed.
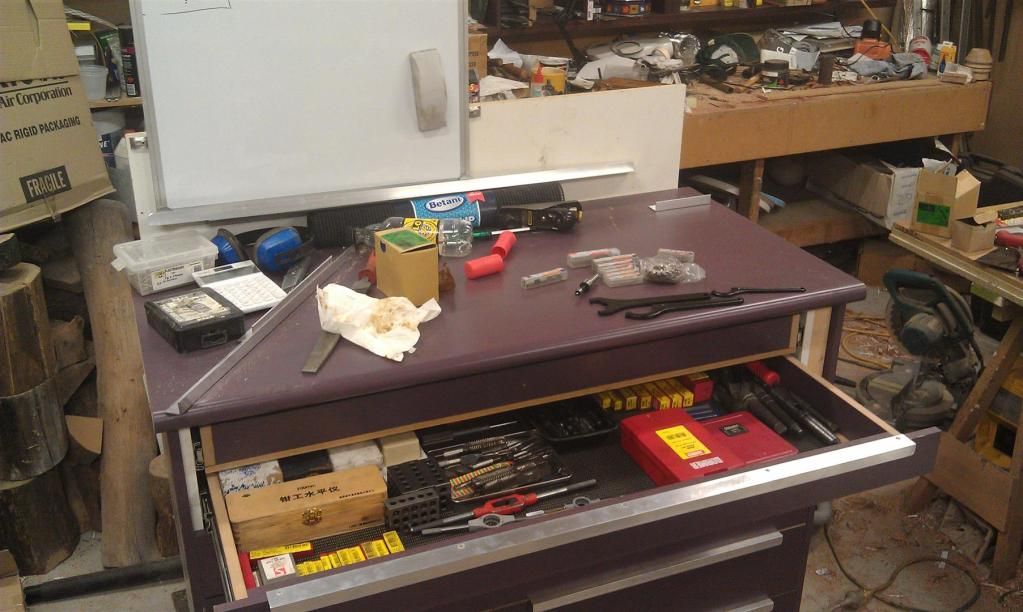
Out of all the bits i have put together a mobile set of 8 drawers with a solid top, in which i am putting all my measuring gear, drills, taps dies, bolts etc etc. The plan is that it can be moved to whatever machine i'm working at so everything i could possibly need is at hand, as well as having a small whiteboard close by. I just have to make a mic stand to go on the top and i'm done.
The only things i had to buy were some decent runners, extra ally for the handles and some non slip drawer liner.
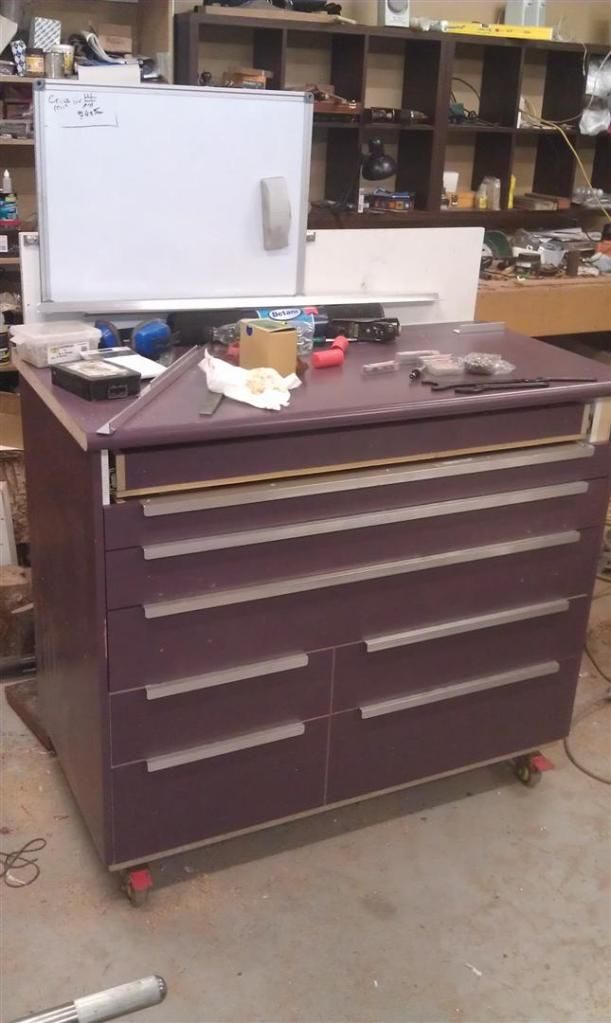
And some of the pigeon holes, i have another that is 4x4 that will go in the metal area.
 1915 17"x50" LeBlond heavy duty Lathe, 24" Queen city shaper, 1970's G Vernier FV.3.TO Universal Mill, 1958 Blohm HFS 6 surface grinder, 1942 Rivett 715 Lathe, 14"x40" Antrac Lathe, Startrite H225 Bandsaw, 1949 Hercus Camelback Drill press, 1947 Holbrook C10 Lathe.
-
31st October 2012, 10:08 PM #579
SENIOR MEMBER
- Join Date
- Jun 2012
- Location
- SA
- Posts
- 1,478
Nice drawers Ewan.
Yes, I like that.
Are they wood ? They look like it. I prefer wood to metal - less noise and condensation risk. Plus the oil soaks in and gives it that homely feel and smell
Cheers
Rob
-
31st October 2012, 10:24 PM #580
 Super Moderator
- Join Date
- Jan 2004
- Location
- Mackay Qld
- Posts
- 3,466
Very nice indeed,but theres a problem.
One can see bits of benchtop between the clutter. Dear, Oh dear! This will never do.
Do you realize the position you have placed the rest of us in?
Our SWMBO,s could walk by our computer screens at any moment and see your relatively clean bench and all of a sudden,this becomes the bench mark standard
for the rest of us,
Seriously, it is a great pick up and earns the recycling merit badge as well.
Grahame
-
7th November 2012, 10:36 AM #581
GOLD MEMBER
- Join Date
- Jul 2006
- Location
- Adelaide
- Posts
- 2,680
ditto...we'll be blaming you Ueee if we are made to follow suit Originally Posted by Grahame Collins
those mobile draws look the go....mmmm? another idea for me
-
7th November 2012, 09:05 PM #582
Blacksmith, Cabinetmaker, Machinist, Messmaker
- Join Date
- Dec 2011
- Location
- Canberra
- Age
- 40
- Posts
- 4,467
Don't worry, if you looked at them now you wouldn't be seeing any benchtop......
Its working well so far, i just need to get used to where everything is. I still thing i will run out of room in another year or 2 of tool buying....1915 17"x50" LeBlond heavy duty Lathe, 24" Queen city shaper, 1970's G Vernier FV.3.TO Universal Mill, 1958 Blohm HFS 6 surface grinder, 1942 Rivett 715 Lathe, 14"x40" Antrac Lathe, Startrite H225 Bandsaw, 1949 Hercus Camelback Drill press, 1947 Holbrook C10 Lathe.
-
25th November 2012, 07:31 PM #583
Pink 10EE owner
- Join Date
- Aug 2008
- Location
- near Rockhampton
- Posts
- 4,304
A quickie here...
Had to remove valves out of a stuffed head, had no tool to do the job...
Got some alum, drilled a hole in it.... Milled a slot to allow access.... Used it in a G-Clamp.. Hey presto quick and dirty valve spring compressor.Light red, the colour of choice for the discerning man.
-
25th November 2012, 08:46 PM #584
.
- Join Date
- Nov 2008
- Location
- Perth WA
- Age
- 71
- Posts
- 5,650
There's a way if there's a will RC. Nice improvisation.
-
25th November 2012, 09:13 PM #585
SENIOR MEMBER
- Join Date
- Sep 2011
- Location
- Ballarat
- Age
- 65
- Posts
- 2,659
Your latest project
Nice bit of lateral thinking .RC.
Phil


Similar Threads
-
latest little project
By wayno60 in forum WELDINGReplies: 3Last Post: 12th July 2008, 03:40 PM -
My Latest Project
By cypher in forum WOODTURNING - GENERALReplies: 7Last Post: 26th June 2006, 05:22 PM -
my latest project
By sedaps in forum WOODWORK PICSReplies: 4Last Post: 12th July 2005, 12:05 PM -
Latest project
By Different in forum WOODWORK PICSReplies: 14Last Post: 12th July 2005, 11:15 AM
