

 Thanks: 0
 Likes: 0
 Needs Pictures: 0
 Picture(s) thanks: 0
Results 1 to 15 of 20
Thread: insert
-
9th February 2012, 01:50 PM #1
 SENIOR MEMBER


- Join Date
- Nov 2008
- Location
- Houston Texas USA
- Age
- 65
- Posts
- 839
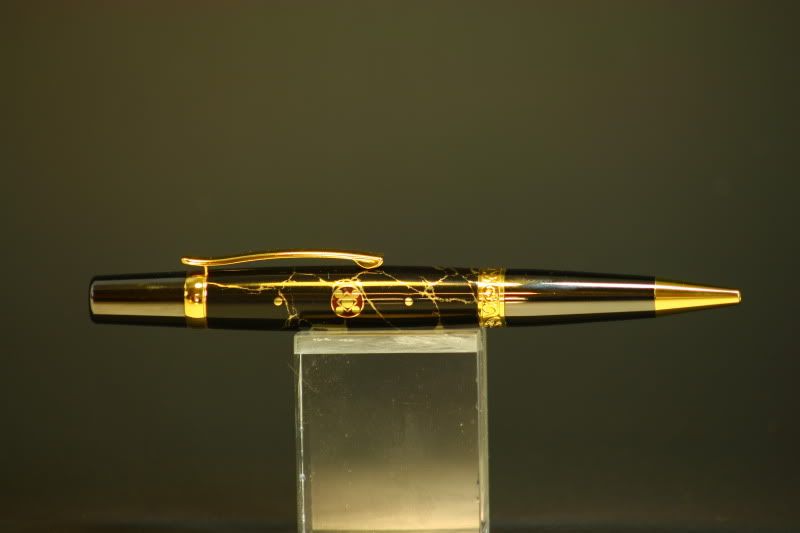
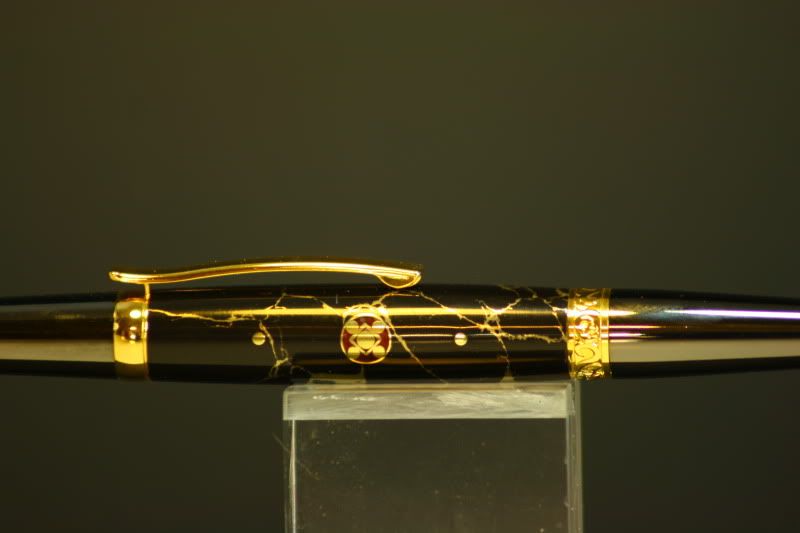
 insert
Playing with inserts, the idea blatantly swiped from Southern pen turner.
Insert is simple brass stock, a 7mm tube with a square tube and brass rods, 1/16" on the edges and 3/32" for the center.
Filled with epoxy dyed ruby red, on Black and Gold Truestone, with Elegant Beauty hardware.
"That's why I love my computer,,,,,,,, my friends live in it."
- Colin Greg, Barnsley, South Yorkshire, England
Pen Turner Extraordinary and Accidental Philosopher.
-
9th February 2012 01:50 PM # ADSGoogle Adsense Advertisement
- Join Date
- Always
- Location
- Advertising world
- Age
- 2010
- Posts
- Many
-
9th February 2012, 02:19 PM #2
Skwair2rownd
- Join Date
- Nov 2007
- Location
- Dundowran Beach
- Age
- 76
- Posts
- 19,922

Very sparkly and very swish there Ed.Love it.

Your admission of "borrowing" is much appreciated!!")
-
9th February 2012, 02:32 PM #3
SENIOR MEMBER
- Join Date
- Nov 2008
- Location
- Houston Texas USA
- Age
- 65
- Posts
- 839
Always belived in giving credit where credit is due, and thats the idea of these forums, isn'"t it?
We share info and ideas to help each other become better and more skilled at this, and to have more fun at it.
I spend more time here and on the Canadian site, PenturnersParadise, than all other pen site together simply because of the quality of the people.
By the way, while writting the original post, SWMBO walked over, glanced down at the pen, picked it up and put it in the bottomless purse....another one bites the dust!"That's why I love my computer,,,,,,,, my friends live in it."
- Colin Greg, Barnsley, South Yorkshire, England
Pen Turner Extraordinary and Accidental Philosopher.
-
9th February 2012, 07:39 PM #4
GOLD MEMBER
- Join Date
- Apr 2006
- Location
- near Mackay
- Age
- 59
- Posts
- 4,635
That's a very attractive looking pen Ed. Up there with the best of them. Have you put a finish on it for the brass or left it as is ? I will put that one in the memory bank for later, too many other things on the go at the moment.
-
9th February 2012, 08:14 PM #5
SENIOR MEMBER
- Join Date
- Jul 2008
- Location
- gold coast
- Posts
- 3,956
Very smart ,simple but time consuming and patience , all things needed to advance the art of penmaking hehe. well done . Here's something you might want to give some thought to ,small brass rods lengthwise along the barrel to form the body
 . I have not had time to play with this one yet cheers ~ John .
G'day all !Enjoy your stay !!!
. I have not had time to play with this one yet cheers ~ John .
G'day all !Enjoy your stay !!!
-
9th February 2012, 09:21 PM #6
Lignum Vexator
- Join Date
- May 2007
- Location
- North of the coathanger, Sydney
- Age
- 68
- Posts
- 9,417
Noice
so simple in concept but then again very novel idea
now in back of mind with the rest of the clutter - it may resurface at some time in the future
thanks for sharingregards
Nick
veni, vidi, tornavi
Without wood it's just ...
-
9th February 2012, 10:16 PM #7
Wandering in search of timber
- Join Date
- Apr 2005
- Location
- Nerang Queensland
- Age
- 66
- Posts
- 10,766
Beautiful effect

So is the insert like a dowel inserted into a drill hole into a blank before you turn?Neil____________________________________________Every day presents an opportunity to learn something new
-
9th February 2012, 11:22 PM #8
SENIOR MEMBER
- Join Date
- Oct 2008
- Location
- new jersey
- Posts
- 531
 Originally Posted by gawdelpus

HeHeHe working on it as we speak.
-
9th February 2012, 11:25 PM #9
SENIOR MEMBER
- Join Date
- Oct 2008
- Location
- new jersey
- Posts
- 531
Ed
Another finely crafted pen and idea. Those inserts are used alot in the knife building hobby. There are so many diofferent designs and just by changing the color of epoxy you get even more looks. I may have to give some a try myself. Thanks for showing.
-
9th February 2012, 11:26 PM #10
SENIOR MEMBER
- Join Date
- Nov 2008
- Location
- Houston Texas USA
- Age
- 65
- Posts
- 839
Thats it exactly Neil.
I made up a short piece, ½ long, and then drilled 7mm holes in the blank prior to drilling the kit tube hole.
Glue in the kit tube, cut a pair of slices from the insert about 1/8long and glued them in, turned and polished as normal, although a little slower with shallow cuts to prevent snagging the inserts."That's why I love my computer,,,,,,,, my friends live in it."
- Colin Greg, Barnsley, South Yorkshire, England
Pen Turner Extraordinary and Accidental Philosopher.
-
9th February 2012, 11:45 PM #11
GOLD MEMBER
- Join Date
- Mar 2007
- Location
- Munruben, Qld
- Age
- 83
- Posts
- 10,027
Very attractive pen.
Reality is no background music.
Cheers John
-
10th February 2012, 09:52 PM #12
 GOLD MEMBER
- Join Date
- Jan 2011
- Location
- Cairns Qld Australia
- Age
- 69
- Posts
- 1,229
Re: insert
The finished article was well worth the effort you applied to it Ed. Congrats on a wonderfully crafted pen.
I never forget anything I remember !!
-
10th February 2012, 10:35 PM #13
GOLD MEMBER
- Join Date
- Nov 2010
- Location
- Brisbane
- Age
- 68
- Posts
- 2,061
Very, very nice pen Ed
I can see I am going to have to travel to the States for some hints some time in the future
-
11th February 2012, 12:17 AM #14
Senior Member
- Join Date
- Feb 2009
- Location
- Arizona USA
- Posts
- 144
Here is a link on how to make your own mosaic pins.
[ame=http://www.youtube.com/watch?v=Pa_psUXHJGM]Homemade Mosaic Pins - YouTube[/ame]Remember the Blood that all men bleed has no race, sex or creed in the land of the truly free.
John Williamson
cabinfevercreations.com
-
11th February 2012, 10:24 AM #15
SENIOR MEMBER
- Join Date
- Nov 2008
- Location
- Houston Texas USA
- Age
- 65
- Posts
- 839
Somewhat the same process I used, but I went with shorter length because the epoxy I use is thick and would leave big air bubbles in a long tube no matter how careful you are..
Used Transtint dye instead of paint."That's why I love my computer,,,,,,,, my friends live in it."
- Colin Greg, Barnsley, South Yorkshire, England
Pen Turner Extraordinary and Accidental Philosopher.


 Reply With Quote


Similar Threads
-
An Insert, Please.
By issatree in forum WOODTURNING - GENERALReplies: 4Last Post: 15th June 2011, 09:52 AM -
Router Insert
By tergar37 in forum WOODWORK - GENERALReplies: 0Last Post: 29th March 2010, 08:37 PM -
Positioning router on insert, installing insert
By Johncs in forum ROUTING FORUMReplies: 4Last Post: 26th March 2009, 09:20 PM -
Sextant Box Insert
By Gadgetman in forum BOX MAKINGReplies: 3Last Post: 7th December 2008, 05:21 PM -
zero clearance insert
By tonysa in forum HAND TOOLS - POWEREDReplies: 5Last Post: 15th June 2006, 12:21 AM
