

 Thanks: 0
 Likes: 0
 Needs Pictures: 0
 Picture(s) thanks: 0
Results 1 to 15 of 17
Thread: Timber floor got wet
-
7th November 2007, 07:56 AM #1
 SENIOR MEMBER


- Join Date
- Jan 2006
- Location
- Melbourne
- Posts
- 722
 Timber floor got wet
Hi All
It rained over the weekend and some water got under my back doors (has never happend before so it must have been driving from an unusual direction). Anyway, it happened overnight so there was a puddle of water on the floor boards in the morning.
We immedtaitle mopped it up and then got the sun on it when that came back to try and dry it out. However they appear to have cupped slightly or swelled at the edges. A couple of boards are raised maybe 1mm on the edge, which is obvious when the sun shines across them.
The pics attached show the issue ... they make it look a lot worse than it does in reality though. Is there anything I can do aside from sand, which I don't want to do yet ... 'cause it's only just gone down?
It's 80mm Karri floor, glued and secret nailed onto yellow tongue.
-
7th November 2007 07:56 AM # ADSGoogle Adsense Advertisement
- Join Date
- Always
- Location
- Advertising world
- Posts
- Many
-
7th November 2007, 08:11 AM #2
Hwd Flooring Manufacturer
- Join Date
- Jun 2004
- Location
- Grafton, N.S.W.
- Age
- 63
- Posts
- 1,330
G'day.
Do Nothing !...Not yet anyway.
If the wetting was localised to a small area, let it dry out naturally.
You could apply a little bit of heat to it. A fan heater blowing across the floor for an hour. No more or you will go too far.
The floor will go back down. It may take a few weeks to a few months depending on the insitu conditions. Don't be in a hurry to re-sand. If you re-sand now, you will have crowning of the boards when they loose the excess moisture.
As they say in the classics....Hurry up and wait.Hooroo.
Regards, Trevor
Grafton
-
7th November 2007, 08:14 AM #3
SENIOR MEMBER
- Join Date
- Jan 2006
- Location
- Melbourne
- Posts
- 722
Thanks for the quick reply. Like I said it isn't that obvious BUT I can see it
 . I will wait and see what happens over time.
-
7th November 2007, 01:37 PM #4
SENIOR MEMBER
- Join Date
- Apr 2005
- Location
- Sydney
- Age
- 63
- Posts
- 1,619
Always a hassle to weatherproof external doors that swing inwards. There should be a step down in the threshold underneath the middle of the door, and a drip groove cut in the bottom, outside the step down.
You can get door seals from Raven that automatically drop down as the door closes. If you set it up to drop over the step down, then no water should ever get in again, except for maybe a few drops around the edges of the seal, but it would have to be in a very driving rain for that to happen. Their more expensive storm seals involve a track that fits to the floor that integrates with the door seal giving a virtual airtight seal when incorporated with jamb and head seals. Originally Posted by glock40sw

-
7th November 2007, 01:51 PM #5
SENIOR MEMBER
- Join Date
- Jan 2006
- Location
- Melbourne
- Posts
- 722
Thanks John
Normally those raven things rely on a cam on the jamb to push the flap down as it closes. I think this on the openning rather than the hinge side because it is a very tight radius on the hinge side ... correct? If this is teh case, do you know if they have one that can be used on double doors?
Actually its a bit of a screw up, because I went to the trouble of putting a rebate on the bottom of each door to close against the bottom plate of the jamb but if the rain drives toward the door it can just run down the door and into the house! I was thinking about putting a rubber weather seal strip on the rebate to compress between the door and the jamb base plate ... but not sure if this would actually do enough?
-
7th November 2007, 04:05 PM #6
TIMBER FLOOR CONTRACTOR
- Join Date
- May 2006
- Location
- sydney
- Age
- 64
- Posts
- 364
It always is a pain when that happens. I agree with trevor on leaving it for a while. The problem is that there is most likley moisture on the surface of the yellow tounge. From your photos , it looks like it is a far way in the room. When i see this , it tells me that water has either entered at that point or that capilary action has taken the water to that site. The yellow tounge will take some time to dry out. Water dries from evaporation. If the water is traped it will eventually dry out through it being dispursed in the timber it is trapep in. That means that the surrounding area will become damp including the timber floor. The cupping you see will increase to the area that is damp affected. This will happen. Over the next couple of days you will see the increase. However you can elliminate it somewhat by providing a airflow across the floor. now this also can have a adverse effect, as the timber dries out more on the top surface and a distortion occures and the boards cup as if it was wet. The cupping happens when excess moistrure enters the fibre and expands. The edges of the timber are more susuptable to the penertration. Now the best thing to do is replace the affected area, Your insurance will pay for it. I got to go out , but when i return i will tell you why it is best to replace it.
-
7th November 2007, 04:22 PM #7
SENIOR MEMBER
- Join Date
- Jan 2006
- Location
- Melbourne
- Posts
- 722
I think I prefer the first answer ... but I will look forward to your comments.
Also, John ... a better look at the Reven website indicates they have version for double doors too, so there should be a way. Maybe that plus my idea of weather strip rubber on the rebate!
-
7th November 2007, 05:29 PM #8
TIMBER FLOOR CONTRACTOR
- Join Date
- May 2006
- Location
- sydney
- Age
- 64
- Posts
- 364
OK i am back. Why replace rather than re sand to fix ?
When the fiber gets wet it expands as it draws in the water into the cell. The cell of timber resembles the same texture as the pith of an orange, but much smaller and empty. As the cell walls expand they stretch and slightly tear,resulting in a perminate state. As the cell dries out it then reduces in size , but reduces only to its new dimension. When this happens then the boards will retain there cup shape. If the timber only receives a small amount of direct water contact, then the expansion and contraction effect is not as much ,and in that case the fiber will return to its original shape resulting in no cupping or little cupping. The longer the presence of direct contact with water the more fiber saturation will occur.with the natural oils and resins in timber, will to a degree repel water, so getting to it quick is of a advantage. As well there is a action that happens called Cell crushing. As the timber expands it outgrows its resting place and the pressure on the walls of the timber against each other causes the cells to crush and break down in there holding power.Over the next couple of days will give you a good indication of the extent of the damage. In the next month or two , you will see the effect of the drying out of the timber. Ideally you need to get the water out as fast as you can. In my experience it is better to have a low heat suspended above the timber and not directly on it. Room heat is better than direct heat. have the heat aimed across the floor at about 1 mt above the floor. The heat in the air will rise drawing the cool air across the floor causing a mechanical airflow drawing the moisture out of the timber with it. Now remember the moisture will only come from the sides of the board , because the top has a coating of floor finish and water will not penetrate through the coat. The yellow tongue is also wet so it will also need to dry. In your case the drying process could take a couple of months. I have seen ply wet 3-4 months after a flood damage. If you can provide direct airflow on the underside of the yellow tongue then the water will disperse much quicker. In large areas a carpet dryer is ideal. Do not use it on top of the floor. aim the airflow so that the joists channel the air along the surface .
Because the timber will retain the cupping, even after it dries. When you sand it flat, you will take of excessive wear surface and reduce the life of the timber greatly. In these cases it is always better to replace rather than repair.
-
7th November 2007, 07:10 PM #9
A1 Floor Sander
- Join Date
- Dec 2003
- Location
- Frankston-Langwarrin VIC
- Age
- 60
- Posts
- 477
^^Excellent post, Larry.^^ Great information for everyone. Well done.
Bob, what a bummer. We all want, and, need the rain, but not in the house. Following the advice already submitted will certainly steer you in the right direction.
Good luck with it all.
-
7th November 2007, 09:29 PM #10
SENIOR MEMBER
- Join Date
- Apr 2005
- Location
- Sydney
- Age
- 63
- Posts
- 1,619
Those doors look like they open inwards. If they're closing against a rebate, then you're saying that the outside is higher than the inside. Not a good set up when water runs down the door, or blows across the jamb underneath it. I've never seen anything like it. Originally Posted by OBBob

-
7th November 2007, 09:46 PM #11
SENIOR MEMBER
- Join Date
- Jan 2006
- Location
- Melbourne
- Posts
- 722
Yeah ... my fault, it was a good idea to stop drafts but bad idea for water. Live and learn. I may just trim off the rebate and fit a proper raven seal. Originally Posted by pawnhead
There is only so much I can do about the floor and with kids around more damage is anticipated, so I'll hang onto my spare boards and see how we go over time.
I would have thought it would be quite difficult to replace the boards and re-finish just that area anayway (certainly not prepare to re-do the whole floor just yet).
Thanks for the comments.
-
7th November 2007, 10:38 PM #12
TIMBER FLOOR CONTRACTOR
- Join Date
- May 2006
- Location
- sydney
- Age
- 64
- Posts
- 364
Thanks dusty, As you and i know, its is the understanding of wood.
OBBOB, replace is easy, all you do is chop out the bad bits and fill in with good bits. Then resand. What i would do is to remove the bad bits, and that way the yellow tongue will dry faster. It will only take a day or two with ventalation. Then with new boards , repair the damage. When it comes time to do all that , we can talk you through it with you. ok
-
8th November 2007, 12:54 AM #13
SENIOR MEMBER
- Join Date
- Apr 2005
- Location
- Sydney
- Age
- 63
- Posts
- 1,619
It's usually only front entry doors that swing inwards. Originally Posted by OBBob
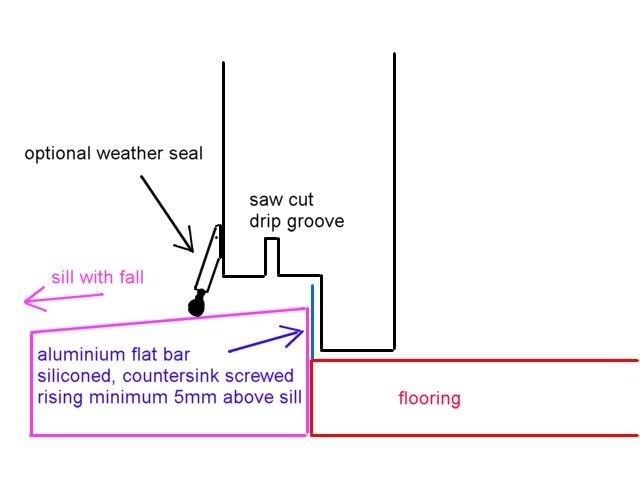
Here's how I would have set it up:
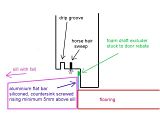
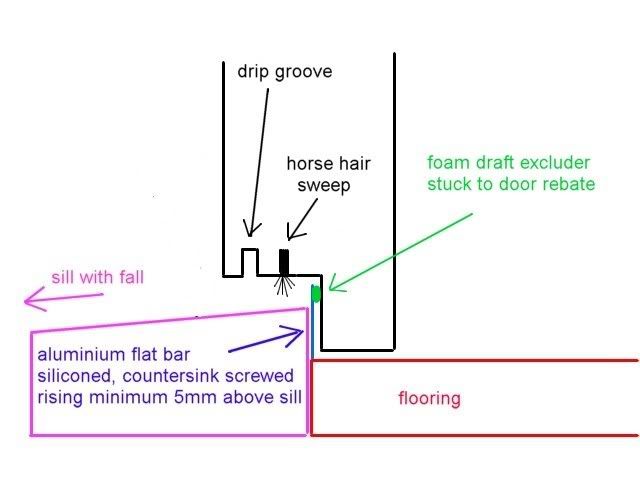
You could also cut in a mohair/horse hair 'sweep' draft excluder behind the drip groove. It would sweep against the flooring, and you wouldn't need the self closing seal. The self closers look a bit obtrusive screwed to the bottom of the door, and a mohair strip is cheaper. (I'm always penny pinching)You'd still be relying totally on a mechanical seal, which is not good. I don't know what your rebate set up looks like, but I'd do something like this: Originally Posted by OBBob
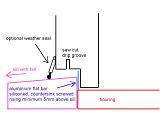
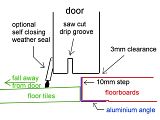
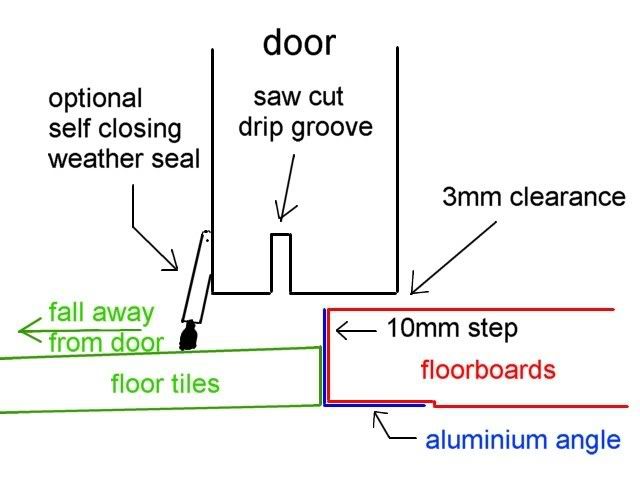
Cut the rebate in the bottom of the door deeper so you can fix a piece of aluminium flat bar that protrudes above the sill at least 5mm, preferably 10mm if you're not putting a self closing seal on it as well. Whilst the door is off, run a saw cut drip groove in it in the position as shown, making sure that when closed, it will be past the aluminium bar.
Isaac Newton has determined where the water will travel, so if you can bevel the sill to fall away from the doors, then it will help shed the water that's flowing down the door, dripping from the drip groove.
-
8th November 2007, 01:35 AM #14
SENIOR MEMBER
- Join Date
- Apr 2005
- Location
- Sydney
- Age
- 63
- Posts
- 1,619
Yeh, the single door ones are hinged, and they rely on a cam screwed to the lock side of the jamb so you can't use them on a pair. You want the type that drops down vertically by means of a pushrod that depresses as it hits the hinged side of the jamb. Here's a couple more examples: Originally Posted by OBBob
http://www.improvementscatalog.com/h...oor-sweep.html
http://hardware.hardwarestore.com/73...ep-108072.aspx
The automatic seal on my front door is a pushrod type that's about thirty years old and made of timber.
Here's another option that would be cheaper than a self closing seal, it would look better (because you won't see it), and it would give you three layers of protection:
I can’t locate an example of a door sweep for insertion in a saw cut, but I know you can get them somewhere. I’ve seen them installed in joinery doors many a time, so a joinery shop might sell you some if you rang around. Here’s a face mounted example that you could slide the strip out of if you wanted to. It looks pretty deep, but you could adjust the depth by changing the depth that you made your saw cut.
I've also installed a pushrod, drop down type that sits concealed in a slot in the bottom of the door, but it was a long time ago and I don't know where you'd get one if they're still made.
It's also a good idea to stick foam seals up the sides and across the top for draft exclusion. Put them on the edge of the door at the sides, and on the face of the door (or the rebate of the jamb) at the top. This way they'll compress (and won't tear off), rather than slide sideways across the jamb as the door closes. Another one in the rebate where the two doors meet, and you're covered.
I've got double foam strips around my six leaf bifold doors, and there's no rebates except for where the two central doors engage each other. They close with a reassuring 'squish', and you could hose them from the outside without any water getting in.
-
8th November 2007, 07:29 AM #15
SENIOR MEMBER
- Join Date
- Jan 2006
- Location
- Melbourne
- Posts
- 722
Thanks Pawnhead and Larry for the advice ... I really appreciate it. I've cetainly learnt a lot on this place, unfortunately some of the lessons are a little harder to swallow than others!
The doors open inward to allow for fly screens on the outside, which I haven't made yet.
I would have to re-sand the whole floor (70sqm) wouldn't I ... there is no trick to just do a small area?


 Reply With Quote

Similar Threads
-
Timber extensions for a brick fence
By Rond50 in forum LANDSCAPING, GARDENING, OUTDOORSReplies: 0Last Post: 5th February 2007, 09:51 PM -
Model T Ford Restoration - Timber for Floor and Door Frames
By QldWoodie in forum TIMBERReplies: 15Last Post: 20th November 2005, 08:46 PM -
Deceptive timber
By Suresh in forum HAVE YOUR SAYReplies: 1Last Post: 17th September 2005, 12:42 AM -
Timber for the Triton Reclining Verandah Chair
By robert in forum TIMBERReplies: 1Last Post: 26th May 2004, 07:11 PM
