

 Thanks: 0
 Likes:
  Needs Pictures: 0
 Picture(s) thanks: 0
Results 16 to 30 of 33
Thread: boring long holes
-
15th December 2014, 10:01 PM #16
 Most Valued Member


- Join Date
- Aug 2010
- Location
- Horsham Victoria
- Posts
- 5,713
 boring long holes
If you decide to go with your 100x100 and not use the router I would bore from each end and then use your hole as centre each end to turn your post.
You got me tempted to try one just for the sake of it. Pity I have to drive to Sydney in the morning
Keep us 'posted' how you go
Dave the turning cowboy
turning wood into art
-
15th December 2014 10:01 PM # ADSGoogle Adsense Advertisement
- Join Date
- Always
- Location
- Advertising world
- Posts
- Many
-
15th December 2014, 10:32 PM #17
aka The Wooden Potter
- Join Date
- Jul 2005
- Location
- Flinders Shellharbour
- Posts
- 5,692
 Originally Posted by jabell

Shame some of the old lathes had a hollow tailstock quill. Which allowed you to run your extended drill bit through, making whatever the travel of the quill was of no matter.Inspiration exists, but it has to find you working. � Pablo Picasso
-
16th December 2014, 10:25 AM #18
Wandering in search of timber
- Join Date
- Apr 2005
- Location
- Nerang Queensland
- Age
- 66
- Posts
- 10,766
3 rocker switch normally needs extra wires, but is it needed for the lamp, or just the switch you have? Do you need more than switch it off and on? Perhaps multiple brightness? Originally Posted by jabell
Neil____________________________________________Every day presents an opportunity to learn something new
-
16th December 2014, 10:50 AM #19
Senior Member
- Join Date
- Sep 2012
- Location
- Ex Nr Carcassonne S France Now NW Wiltshire, Blighty.
- Posts
- 497
I had to do a long hole jobbie for a standard type angle poise lamp I wanted to make. I just got the 2 pieces on 2" square oak, cut them down the middle on my band saw, routed out the center hole on each side, glued them back together and turned them down as I wanted them and finished up with what I think is a goodie
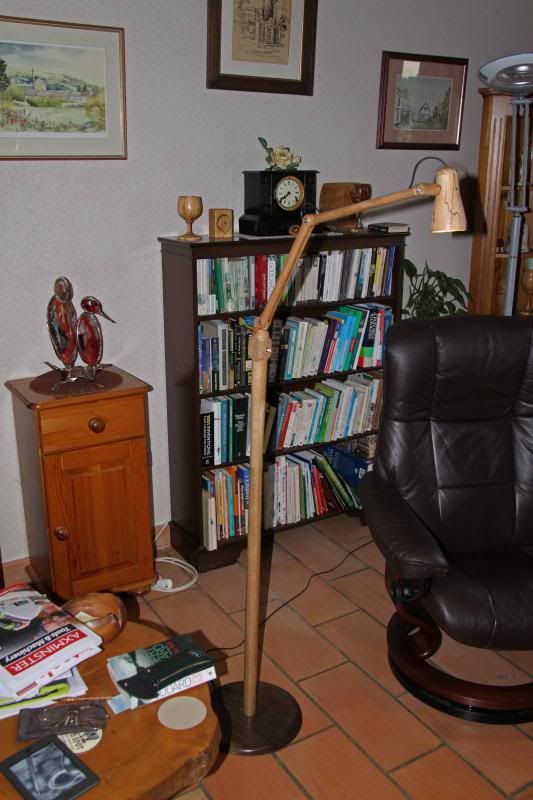
I also have the hollow tailstock and a couple of augers for long hole boring, but they so easily go out of line and unless I have to use them splitting, routing, etc is by far the easiest and most accurate way to go and on a newal post it isn't going to show..My ambition is to grow old disgracefully. So far my ywife recons that I'm doing quite well! John.
http://johnamandiers.wixsite.com/johns-w-o-w-1
-
17th December 2014, 10:10 AM #20
Senior Member
- Join Date
- Feb 2009
- Location
- Forest Range, SA
- Posts
- 165
The one switch plate controls 3 separate lights, two of which are two-way switching. Originally Posted by dai sensei
-
17th December 2014, 11:26 AM #21
Retired Chippy
- Join Date
- Jun 2004
- Location
- Mareeba Far Nth Qld
- Age
- 83
- Posts
- 3,070
Split it, router a groove down both pieces, re-join it and glue two squares of 12mm ply to both ends and turn to shape.
JimSometimes in the daily challenges that life gives us, we miss what is really important...
-
17th December 2014, 09:01 PM #22
Senior Member
- Join Date
- Feb 2009
- Location
- Forest Range, SA
- Posts
- 165
No point fighting City Hall I think, so I will route and laminate as the consensus recommends. I will however machine up a 25mm steel shaft later on and see how effective it is at preventing a wandering bore hole. Many thanks for all your tips, they have really helped me decide which way to go. Originally Posted by Jonzjob
-
19th December 2014, 03:42 PM #23
Most Valued Member
- Join Date
- Aug 2010
- Location
- Horsham Victoria
- Posts
- 5,713
We'll be looking for progress pics
Dave the turning cowboy
turning wood into art
-
2nd January 2015, 02:48 PM #24
Senior Member
- Join Date
- Feb 2009
- Location
- Forest Range, SA
- Posts
- 165
Well here goes. After a bit of procrastinating(about 20years actually) and advice from here, I decided to laminate rather than attempting a long bore which at best would probably be 10mm off centre. Originally Posted by DaveTTC
Where to get some timber? This bit has been leaning against the back of the shed in the rain for 15 years or more...

Missed a step or two here, but the gist is I cut the big piece down to a size I could put through the planer.

Planed down one side

Out with the V bit

Glue it up

I decided to make this post in 4 sections, the base that gets bolted to the floor joist, the tall spindle thingo bit with the hole in it, the head that has the 3 clicker light switch plate, and a finial on top.
Here is the laminated section taking shape. Not fantastically done, but then I've only been using a lathe for one week, so hopefully I'll get better and quicker.

The finial

Loosely assembled in the shed.

And here is why all the procrastination. Well apart from kids, a few wives, a job, and most distractingly, a BMW F650GS!
The base is bolted to the floor joist here.

Ha! Its up!

And with the switch plate wired up. So now to paint it to match in with the one at the bottom of the stairs, fill in the old nail holes (remember it was from old scrap behind the shed). All up cost zilch, plus countless hours thinking about how the hell was I going to get it work.

cheers
John
-
2nd January 2015, 02:57 PM #25
Most Valued Member
- Join Date
- Aug 2010
- Location
- Horsham Victoria
- Posts
- 5,713
Great looking job there.

Nothing wrong with your turning abilities or wood work what so ever.
Wives? is that all at once or over the years lol
-
2nd January 2015, 03:04 PM #26
Senior Member
- Join Date
- Feb 2009
- Location
- Forest Range, SA
- Posts
- 165
Sequentially! Originally Posted by DaveTTC

-
2nd January 2015, 07:12 PM #27
Senior Member
- Join Date
- Sep 2012
- Location
- Ex Nr Carcassonne S France Now NW Wiltshire, Blighty.
- Posts
- 497
If that's what you can produce after just a week on the lathe then I look forward to what comes along after a couple of weeks!!!

That turned ourt really well, congratulations!! hat lamp I showed earlier was done exactly the same way other than that the upright was done in two bits. Routing the hole make totally sure that yer 'ole is where you want it. Long hole boring a hole that size would have been difficult to say the very least!
If you had used the shiny bit wouldn't there have been a hole down the middle already?
I'll get me 'at an' coat My ambition is to grow old disgracefully. So far my ywife recons that I'm doing quite well! John.
http://johnamandiers.wixsite.com/johns-w-o-w-1
-
3rd January 2015, 09:54 AM #28
GOLD MEMBER
- Join Date
- Sep 2008
- Location
- North Carolina, USA
- Posts
- 2,327
John,
Very nice work. I really like the shape of the post with the gentle swelling in the middle.So much timber, so little time.
Paul
-
3rd January 2015, 11:01 AM #29
SENIOR MEMBER
- Join Date
- Oct 2007
- Location
- Horsham Victoria
- Posts
- 901
I did a video on this subject.
Hope it helps.
https://www.youtube.com/watch?v=NCrE...GJQjJvfmVUcE-Q
-
4th January 2015, 01:36 PM #30
Senior Member
- Join Date
- Feb 2009
- Location
- Forest Range, SA
- Posts
- 165
And it did! Very useful - thanks! Originally Posted by brendan stemp


 Reply With Quote


Similar Threads
-
boring holes in posts. auger bits.
By weisyboy in forum WOODWORK - GENERALReplies: 0Last Post: 14th March 2009, 07:26 PM -
Long hole boring
By nunanman in forum WOODTURNING - GENERALReplies: 16Last Post: 19th December 2008, 12:08 AM -
Long hole boring?
By RETIRED in forum WOODTURNING - GENERALReplies: 46Last Post: 22nd November 2008, 07:49 PM -
Long hole boring
By rsser in forum WOODTURNING - GENERALReplies: 12Last Post: 9th August 2002, 12:06 AM -
Long hole boring
By Woodchuck2 in forum WOODTURNING - GENERALReplies: 9Last Post: 25th August 2000, 07:09 PM
