

 Thanks: 0
 Likes:
  Needs Pictures: 0
 Picture(s) thanks: 0
Results 1 to 15 of 16
Thread: Celtic Knots
-
29th April 2017, 05:23 PM #1
 Intermediate Member


- Join Date
- Feb 2013
- Location
- Hervey Bay, Queensland
- Posts
- 36
 Celtic Knots
Hi Folks
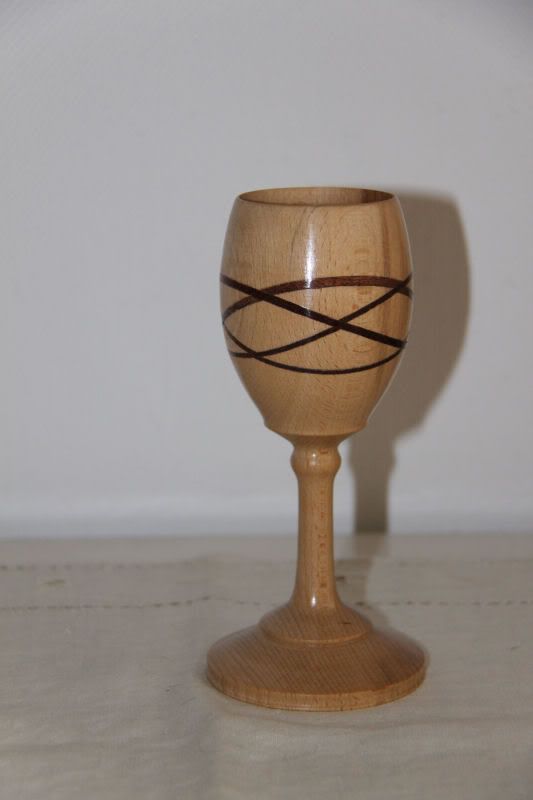
Been having a play making a bud vase with a Celtic Knot in the large diameter.
This is my first attempt.
All went well but I am a little dissapointed with how the knot shows.
The form of the knot is fine but some of the areas of the insert show lighter than others.
I used Western Red Cedar for the knot and Huon Pine for the body.
My only conclusion is that the cedar has rather open pores and the end grain is the lighter part.
Has anyone else come across this problem?
The inserts were all inserted from the top in the same plane with the end grain at the top so I would have expected the end grain to show at the top, not the sides.
All thoughts appreciated.
-
29th April 2017 05:23 PM # ADSGoogle Adsense Advertisement
- Join Date
- Always
- Location
- Advertising world
- Posts
- Many
-
29th April 2017, 05:26 PM #2
Intermediate Member
- Join Date
- Feb 2013
- Location
- Hervey Bay, Queensland
- Posts
- 36

Having now looked closer at the photo, I will change the design on the next one having a better transition from the lage diameter to the neck etc.
-
29th April 2017, 06:55 PM #3
 Dances with splinters
- Join Date
- Jul 2005
- Location
- Oberon, NSW
- Age
- 63
- Posts
- 13,363
Good job on building up the knot, the joints align quite nicely.

As to the colour difference, it's difficult to see in the photo but it looks like the end-grain of the WRC has 'filled' with sawdust (from sanding, perhaps?) and that can cause just such an effect. Typically the colour variance is the other way around, with the end-grain being darker.
One way to visually minimise this is to, instead of using one timber for the inserts, make up a sandwiched laminate of contrasting coloured timbers.
eg. if you're cutting a 5mm kerf, build up a laminate of 3mm 'feature' wood sandwiched between 1mm veneers of a much darker or lighter material. Unlike 'proper' ply I like to keep the grain direction aligned in the same way.
- Andy Mc
-
29th April 2017, 08:39 PM #4
Intermediate Member
- Join Date
- Feb 2013
- Location
- Hervey Bay, Queensland
- Posts
- 36
Thanks for reply.
I have noticed two different ways of setting up the Celtic knot.
The way I did these i had X on each side. The other way has one diagonal on each side.
Any thoughts?
-
29th April 2017, 09:37 PM #5
Skwair2rownd
- Join Date
- Nov 2007
- Location
- Dundowran Beach
- Age
- 76
- Posts
- 19,922
Nice one!! Good to see Knots on items other than pens!!
-
30th April 2017, 09:39 AM #6
Intermediate Member
- Join Date
- Feb 2013
- Location
- Hervey Bay, Queensland
- Posts
- 36
Been thinking about my question here. Suddenly the penny dropped....The Youtube videos showing the diagonals only were cut on a table saw whereas mine with the X were cut on a bandsaw. Duuh...... Originally Posted by Brianne163

-
1st May 2017, 07:40 AM #7
In An Instant Your Life Can Change Forever
- Join Date
- Jul 2012
- Location
- "Brownsville" Nth QLD
- Age
- 66
- Posts
- 4,438
Personally, I prefer the table saw cut blanks, much crisper joints, but requires good jigs and hold down clamps. X's - 180 degree flips; or diags with 90 degree rotations - is a personal preference thing. For a 4 cut Celtic knot I use 180 flips. However if doing a 6 cut the continuous rotation seems to work better for cutting, the last cut will always be "off pattern". I prefer the 180 flip method, the cuts seem to look symmetrical and methodical.
Nice looking knot btw. What are the dimensions of the piece?
an after thought - the grain in the infill will always "look different" due to it always having its grain alignment diagonal to the axis of the main blanks grain, so will reflect / absorb light differently to it and the adjacent infills. Contamination with sanding dust is a another story and requires good tool work, sanding sealers and minimal sanding on open pored woods like WRC.Mobyturns
In An Instant Your Life CanChange Forever
-
1st May 2017, 09:24 AM #8
Intermediate Member
- Join Date
- Feb 2013
- Location
- Hervey Bay, Queensland
- Posts
- 36
Thanks Originally Posted by Mobyturns
4 1/2" high and approx. 1 5/8" max diameter. 7/16" hole for tube, fits perfectly. Tubes from China.Plastic. 50 for $9.95 Free Postage
-
3rd May 2017, 06:19 AM #9
Senior Member
- Join Date
- Sep 2012
- Location
- Ex Nr Carcassonne S France Now NW Wiltshire, Blighty.
- Posts
- 497
If that's your first try at a Celtic knot then it's a dammed site better than mine Originally Posted by Brianne163
That was all done, cutting wise, on my band saw and I obviously didn't get the inserts quite right. That one of yours looks really good, but if you really want the inserts to look the same all round you could always use plactic! Or otherwise cut the inserts across the grain to match the angle they are inserted!
No way! Wood has a grain and that grain is totally natural and is unique because of that. Your vase looks great to me and the difference in the grain, end to side, is natural. You want indentical, then use plastic. You want good then use natural.
The alignment that I can see on the vase is very good and obviously carefully done. Keep it up mate! My ambition is to grow old disgracefully. So far my ywife recons that I'm doing quite well! John.
http://johnamandiers.wixsite.com/johns-w-o-w-1
-
5th May 2017, 12:46 PM #10
Intermediate Member
- Join Date
- Feb 2013
- Location
- Hervey Bay, Queensland
- Posts
- 36
I reshaped the neck on my first one. Looks better. Did another one using Yellow Wattle and pine. The third one is just yellow Wattle.
I cut my slots on a band saw too, use a setup jig on the slide to make sure the cut is always at the same distance from one end. I think one of the most important aspects after that is to make sure the insert is the correct thickness so that when glued up under clamp pressure, the sides are still flat and in line. I always saw 9/10ths through to make sure all stays in place when glueing. Make sure glue is all over the insert, remove and reinsert to make sure the spread is even. If you miss any spot, there is likely to be a tear out when cutting as that spot not glued to the rest. Thanks for all the likes and comments.
-
5th May 2017, 12:49 PM #11
Intermediate Member
- Join Date
- Feb 2013
- Location
- Hervey Bay, Queensland
- Posts
- 36
Forgot to add the photo of the latest three.
DSC_8096.jpg
-
5th May 2017, 08:55 PM #12
Intermediate Member
- Join Date
- Feb 2013
- Location
- Hervey Bay, Queensland
- Posts
- 36
Your goblet looks pretty good. Originally Posted by Jonzjob
-
5th May 2017, 09:28 PM #13
Senior Member
- Join Date
- Sep 2012
- Location
- Ex Nr Carcassonne S France Now NW Wiltshire, Blighty.
- Posts
- 497
Thank you, but it isn't quite even Originally Posted by Brianne163

I came up with an incredibly complicated jig for doing the knots on pens
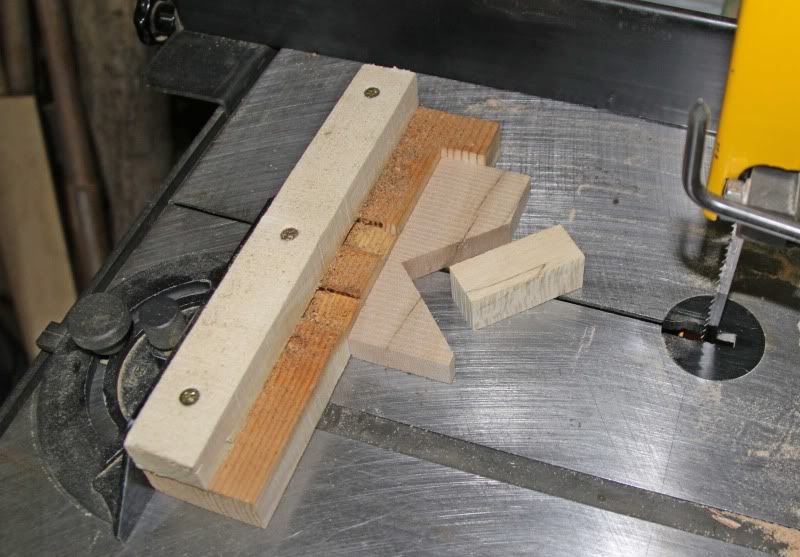
The bit screwed onto the square is the correct length for the blank and the 90� is for the cut. It works a treat and took about 5 minutes to make. I cut to about 1/16" from the end and that gives some flexibility so that I can open the cut slightly to put the insert in. That stops the glue from being pushed off of the insert. I do the same for any knot I do. It's a relativly easy thing to do and it looks very impressive me-thinks..
This was the first pen with it
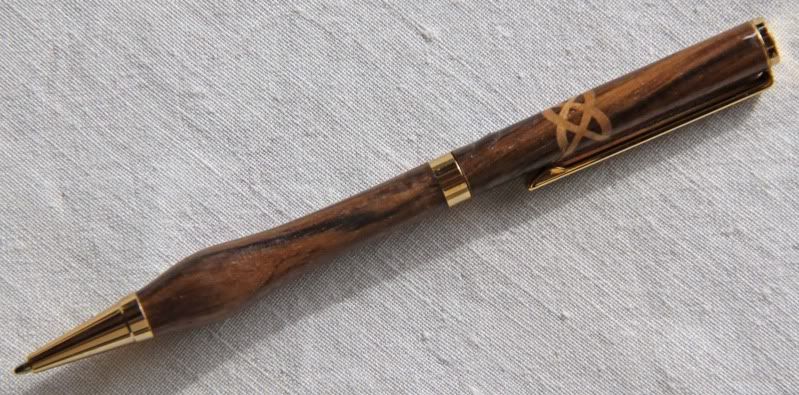
I decided on the shape because I find it easier to use with the arthritis in my hands My ambition is to grow old disgracefully. So far my ywife recons that I'm doing quite well! John.
http://johnamandiers.wixsite.com/johns-w-o-w-1
-
5th May 2017, 10:03 PM #14
Senior Member
- Join Date
- Sep 2012
- Location
- Ex Nr Carcassonne S France Now NW Wiltshire, Blighty.
- Posts
- 497
I missed your post here Brianne, a senior moment??? But I have always cut a diagonal, glued the insert in, left it to dry. Then turn 90� and repeat and usinf the jig above you will finish up with the cuts at exaclty the same place. So as long as the blank is then mounted centrally it must be even. Originally Posted by Brianne163
My ambition is to grow old disgracefully. So far my ywife recons that I'm doing quite well! John.
http://johnamandiers.wixsite.com/johns-w-o-w-1
-
8th May 2017, 01:26 AM #15
Senior Member
- Join Date
- Sep 2016
- Location
- Melbourne
- Age
- 63
- Posts
- 145
Use a drop saw and a jig for glueing much easier.
Mick

 Reply With Quote


Similar Threads
-
Info On Celtic Knots Needed
By Nai84 in forum WOODTURNING - PEN TURNINGReplies: 10Last Post: 22nd March 2011, 10:31 AM -
Knots
By Tim Preston in forum NON WOODWORKReplies: 3Last Post: 2nd November 2010, 12:43 AM -
Dealing with knots
By Tiger in forum WOODTURNING - GENERALReplies: 9Last Post: 14th June 2010, 10:18 PM -
1st go at Celtic Knots
By Stu in Tokyo in forum WOODTURNING - GENERALReplies: 33Last Post: 4th November 2008, 08:46 AM
