

 Thanks: 0
 Likes: 0
 Needs Pictures: 0
 Picture(s) thanks: 0
Results 46 to 60 of 74
Thread: A type of lazy susan
-
24th September 2007, 06:07 PM #46
 GOLD MEMBER


- Join Date
- Sep 2002
- Location
- Paignton. Devon. U.K.
- Posts
- 6,062

Taken a photograph of lazy susan out of the direct sunlight of earlier pictures shown above to display the timber colours without glare.
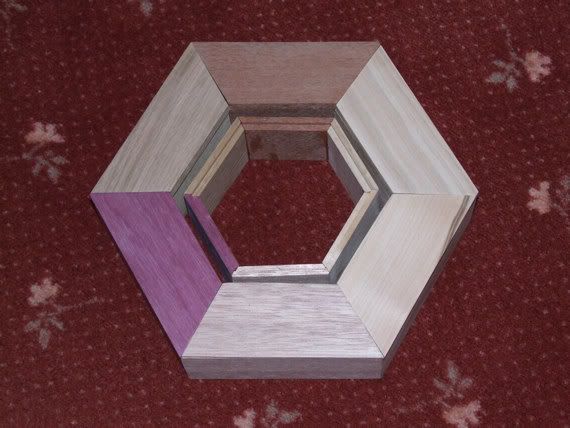
There is a gap on the lacewood lid which might mean I will have to remake a new piece for this section.
But I am keen to get going again and start making a cover for the centre section. This is also creating problems because I want to maintain the slope, however I will try a session today.
Any comments appreciated.woody U.K.
"Common looking people are the best in the world: that is the reason the Lord makes so many of them." ~ Abraham Lincoln
-
24th September 2007 06:07 PM # ADSGoogle Adsense Advertisement
- Join Date
- Always
- Location
- Advertising world
- Posts
- Many
-
24th September 2007, 07:25 PM #47
Hoarder of Timber
- Join Date
- Jun 2006
- Location
- East Warburton, Vic
- Age
- 54
- Posts
- 14,189
Coming along very nicely John
 , shame about the gap hey.
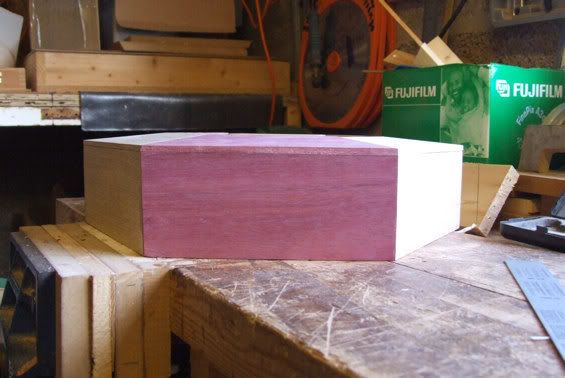
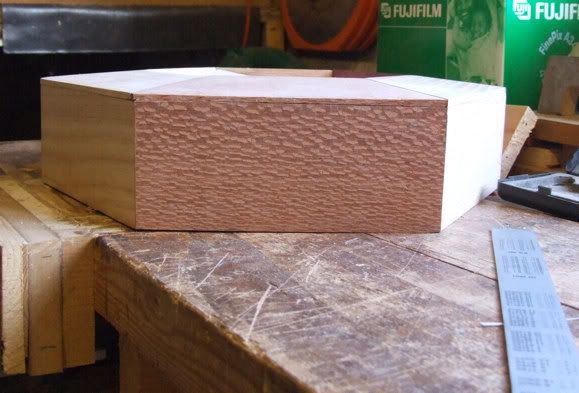
Do you have a picture of it side on, so we can see the profile of it.Cheers
DJ
ADMIN
-
24th September 2007, 07:33 PM #48
GOLD MEMBER
- Join Date
- Sep 2002
- Location
- Paignton. Devon. U.K.
- Posts
- 6,062
 Originally Posted by djstimber

Do you mean the lid or the project?woody U.K.
"Common looking people are the best in the world: that is the reason the Lord makes so many of them." ~ Abraham Lincoln
-
24th September 2007, 07:49 PM #49
Hoarder of Timber
- Join Date
- Jun 2006
- Location
- East Warburton, Vic
- Age
- 54
- Posts
- 14,189
The project with the lids on Originally Posted by jow104
Cheers
DJ
ADMIN
-
24th September 2007, 08:18 PM #50
GOLD MEMBER
- Join Date
- Sep 2002
- Location
- Paignton. Devon. U.K.
- Posts
- 6,062
The wife says she is hungary and we have got to eat so going up the supermarket, post some more pics when you are in bed.
woody U.K.
"Common looking people are the best in the world: that is the reason the Lord makes so many of them." ~ Abraham Lincoln
-
25th September 2007, 05:15 AM #51
GOLD MEMBER
- Join Date
- Sep 2002
- Location
- Paignton. Devon. U.K.
- Posts
- 6,062
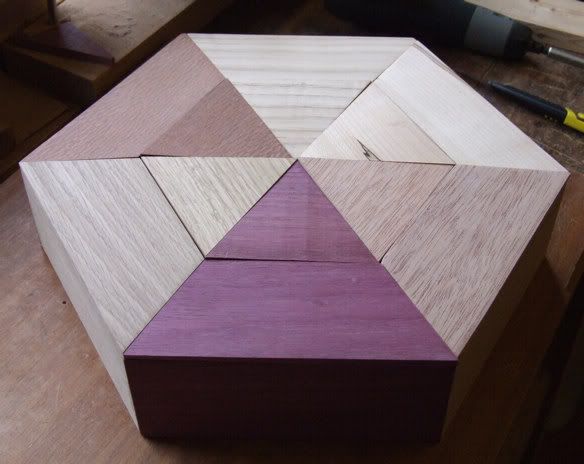
The frontal view requested by DJ.
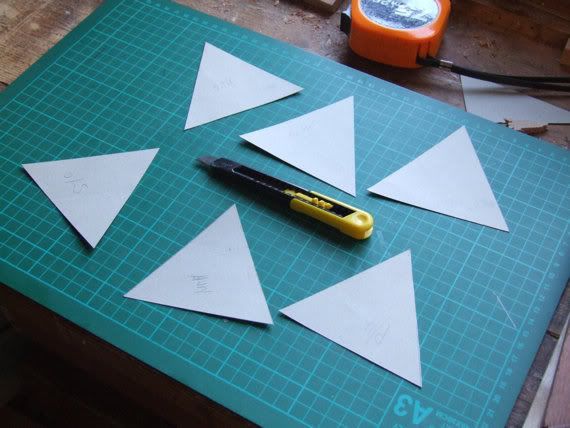
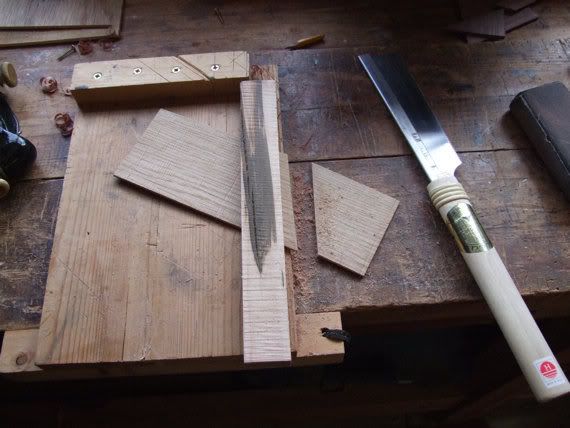
Decided to change tactics for the centre and make a one piece lid , compound angles drove me frantic and also realising that they would have to be cut by hand because of the small size.
Made a paper template as per picture and then sharpened my Stanley knife blade on the wet & dry sanding block ( I do that these days and I havent had to change or brake off any blade for sometime). Cut the six paper segments and marked the outside edges and timber variety, otherwise I thought I might have a large sort out puzzle at the end of the day.
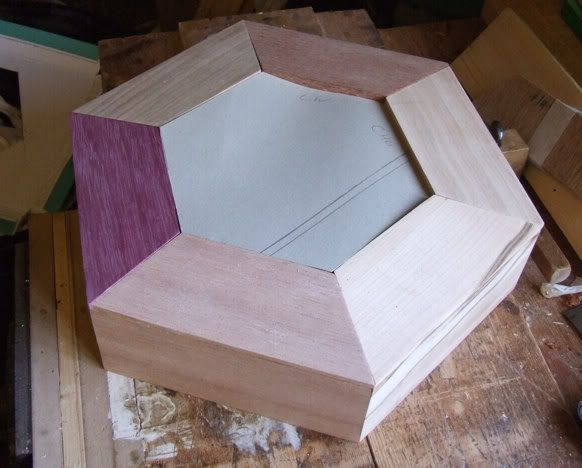
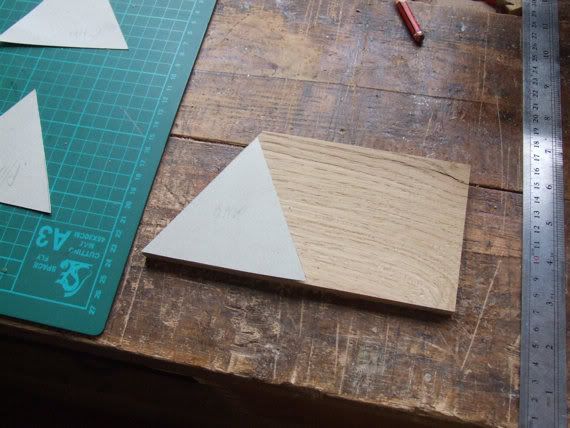
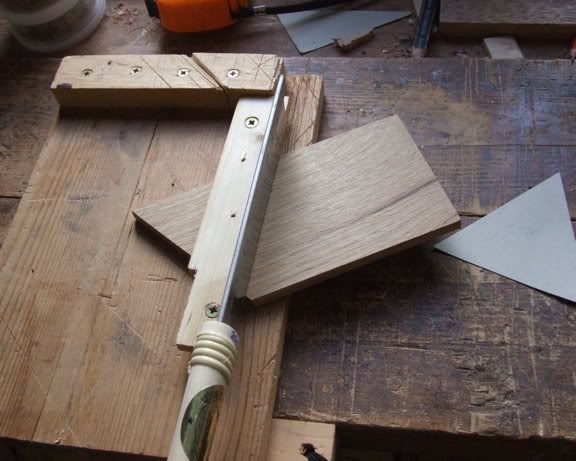
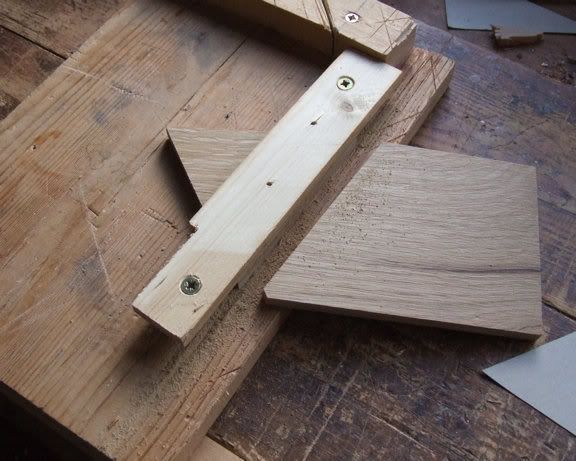
Cut to the first to line on the SCMS saw;; but when needing to cut the other angle my fingers started to tingle, so I knocked up this idea for cutting the second side, I screwed a batten on my sawing board tightened it down tight on the timber and used it as a straight edge for cutting line. I can tell you using a Japanese saw the cut was super, equal or better than the SCMS cut.
The end is in sight, usually my boxes are 5 day jobs, but this one is stretching out, perhaps because it is 7 boxes.woody U.K.
"Common looking people are the best in the world: that is the reason the Lord makes so many of them." ~ Abraham Lincoln
-
25th September 2007, 08:23 AM #52
GOLD MEMBER
- Join Date
- Apr 2005
- Location
- Aberglassly,NSW
- Age
- 80
- Posts
- 4,983
Nice stuff John
Great project and your posts are fantastic I wish I had that sort of patience
-
25th September 2007, 12:23 PM #53
Hoarder of Timber
- Join Date
- Jun 2006
- Location
- East Warburton, Vic
- Age
- 54
- Posts
- 14,189
Thanks John, it gives me a better perspective of the box and also the angles of the lid
Cheers
DJ
ADMIN
-
25th September 2007, 05:37 PM #54
GOLD MEMBER
- Join Date
- Sep 2002
- Location
- Paignton. Devon. U.K.
- Posts
- 6,062
Bad news from last evening, the autumn temperatures have dropped here in the UK and three of the lids needed more timber to build up to size and the glue had not set (titebond3) in the usual 30 mins.
I went out to put the pieces of timber away and a piece fell off. So only have 5 lids available this morning.
But I have got the domino box or my table saw to play with today!woody U.K.
"Common looking people are the best in the world: that is the reason the Lord makes so many of them." ~ Abraham Lincoln
-
26th September 2007, 03:35 AM #55
GOLD MEMBER
- Join Date
- Sep 2002
- Location
- Paignton. Devon. U.K.
- Posts
- 6,062
Two of the lid pieces are short on width so I have built up to accommodate the triangle.
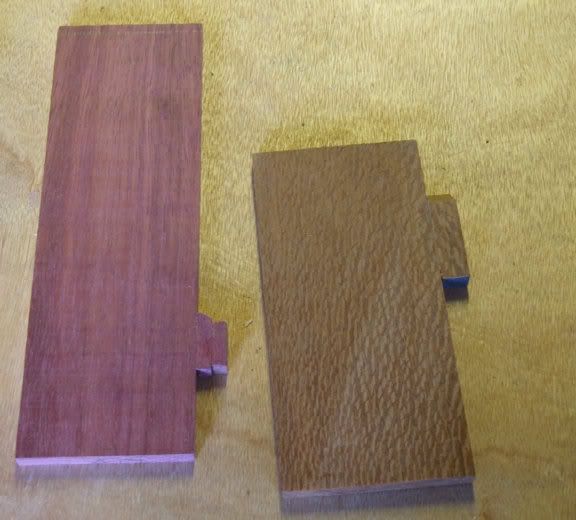
I have now got all 6 pieces cut and roughly fitted to centre space, did need some recuts and further attention is going to be required but will give it a rest for a few days just incase something springs to mind that might be missed if I go straight for a glue up. Thinking knobs, beadings etc.
 woody U.K.
"Common looking people are the best in the world: that is the reason the Lord makes so many of them." ~ Abraham Lincoln
-
26th September 2007, 09:38 AM #56
Head Moderator
Sister of the DarkSide
- Join Date
- Dec 2004
- Location
- Toowoomba Q 4350
- Posts
- 9,217
WOW!!!!!!!!!!!!!!!!!!!!!!!!!!!!!!!!!!!!!!!
 Box Challenge 2011 - Check out the amazing Boxes!
Twist One - Wooden Hinge/Latch/Catch/Handle
Twist Two - Found Object
Twist Three - Anything Goes
-
26th September 2007, 09:54 AM #57
Moderate Moderater
- Join Date
- Feb 2006
- Location
- Lindfield N.S.W.
- Age
- 62
- Posts
- 5,643
I agree with Wendy - I think it is looking great!
FWIW I wouldn't put any beading on inlay on it - the contrast from the variety of the timbers could be undermined by something like that.
Are you going to put knobs on the lids? I was just thinking that they could be somewhat dificult to lift (esp the centre one) without something on top to grab.Cheers
Jeremy
If it were done when 'tis done, then 'twere well it were done quickly
-
26th September 2007, 06:03 PM #58
GOLD MEMBER
- Join Date
- Sep 2002
- Location
- Paignton. Devon. U.K.
- Posts
- 6,062
Jeremy, you are giving me problems, knobs for all those lids!
woody U.K.
"Common looking people are the best in the world: that is the reason the Lord makes so many of them." ~ Abraham Lincoln
-
27th September 2007, 10:54 AM #59
Senior Member
- Join Date
- Dec 2006
- Location
- Council Bluffs, Iowa
- Posts
- 297
You have 2 great interesting projects going here. This is turning out nicely and some very pretty stock!
Corey
-
27th September 2007, 05:16 PM #60
Dances with splinters
- Join Date
- Jul 2005
- Location
- Oberon, NSW
- Age
- 63
- Posts
- 13,360
JOW, it looks like the middle box is removable?
If so, I'll 'bump' a suggestion I made earlier... drill a hole through the lid and fasten the handle to the bottom of the box instead, sorta like a tent pole.
This'd allow you to lift the box out of the outer ring by the handle, then remove the lid by grasping it's edges.
- Andy Mc


 Reply With Quote


Similar Threads
-
Sturdee's Lazy Susan
By Sturdee in forum HOMEMADE TOOLS AND JIGS ETC.Replies: 4Last Post: 16th April 2007, 04:26 AM -
lazy susan finally finished
By paul collins in forum WOODWORK PICSReplies: 3Last Post: 9th January 2007, 03:31 PM -
Lazy Susan Finishing
By Happy Chappy in forum WOODTURNING - GENERALReplies: 10Last Post: 18th July 2006, 04:28 PM -
Lazy Susan
By stu_g18 in forum WOODWORK - GENERALReplies: 11Last Post: 24th May 2005, 08:41 PM -
lazy susan
By Agro in forum TIMBERReplies: 2Last Post: 28th February 2005, 07:39 PM
