

 Thanks:
  Likes:
  Needs Pictures: 0
 Picture(s) thanks: 0
Results 1 to 8 of 8
-
18th February 2018, 01:00 PM #1
 Senior Member


- Join Date
- Jan 2015
- Location
- Australia, Sydney
- Posts
- 110
 A little guidance on how to achieve this joint
Hi all, instead of a bench screwed through the top as Ive made before I found this pic online and wonder how hard it is to turn a hand held router into something that could make this.
Sort of a V bit on a jig run twice through the right depth on a straight track to make the slot in the bench top.
Then somehow an inverse half cut on each side of the leg - but thats on an angle. I cant quite visualise it.
Thanks in advance gurus!

Sent from my iPhone using Tapatalk
-
18th February 2018 01:00 PM # ADSGoogle Adsense Advertisement
- Join Date
- Always
- Location
- Advertising world
- Posts
- Many
-
18th February 2018, 02:19 PM #2
Be inspired. Be creative. Be bold.
- Join Date
- Apr 2001
- Location
- Perth
- Posts
- 10,820
Notch, that is called a sliding dovetail. To make it with the router one uses a dovetail bit, which cuts the angled sides of the dado. It shoud be used in combination with a straight bit, which is first used to clear away most of the waste (so not to over stress the dovetail bit).
Search for this on YouTube. You will find many demonstrations. I do this joint with hand tools, but when I used a router, it was against a fence/straight edge.
Regards from Perth
DerekVisit www.inthewoodshop.com for tutorials on constructing handtools, handtool reviews, and my trials and tribulations with furniture builds.
-
19th February 2018, 09:28 AM #3
Butcher of wood
- Join Date
- Jun 2010
- Location
- Bundaberg
- Age
- 54
- Posts
- 3,426
What Derek said.
Before blindly rushing out to purchase a dovetail bit have a look at THIS chart from CMT; dovetail bits come in a wide variety of angles. Probably the most common angle would be 14 degrees; these are used in just about every half-blind dovetail jig known to man and look really coarse. Traditional handcut dovetails use a shallower angle normally expressed as a ratio; ie 1:8 for hardwood & 1:6 for softwood. The shallower angle just looks better.
I would draw your joint full size and pick whichever angle looks the most aesthetically pleasing to you; then find the bit to fit. CMT are my preferred OEM for router bits but cheaper Carbitool bits will be good enough for this and have the advantage of being easier to get as they are made in Australia.Nothing succeeds like a budgie without a beak.
-
19th February 2018, 12:44 PM #4
On a journey
- Join Date
- Oct 2008
- Location
- Leopold, Victoria
- Age
- 65
- Posts
- 4,681
Here is a quick video to explain the operation. As Derek says, take the centre out with a straight bit first to reduce stress on the dovetail bit which was not done in the video.
-
19th February 2018, 04:50 PM #5
SENIOR MEMBER
- Join Date
- Jul 2010
- Location
- melbourne
- Posts
- 382
without wishing to hijack a thread I would ask a pertinent question.
I was thinking of doing the same thing and au fait with the routing the dovetail section.
My question is about making shaping the wood to act as the piece that slides through.
Don't know what its called.
Can it be done on a jointer o by hand with hand plane
thanks
Frank
-
19th February 2018, 05:17 PM #6
Be inspired. Be creative. Be bold.
- Join Date
- Apr 2001
- Location
- Perth
- Posts
- 10,820
Frank, the male section might also be referred to as the tail section.
I use hand planes for this task, not a power router. I use a hand saw and chisels for the female or pin section.
Here is a tutorial from my website: http://www.inthewoodshop.com/Furnitu...lsByHand1.html
That was written 9 years ago. I have created a cheapish plane that you can easily purchase and modify to make both joints. This is based on a Stanley #79. Article here: http://www.inthewoodshop.com/ShopMad...Stanley79.html
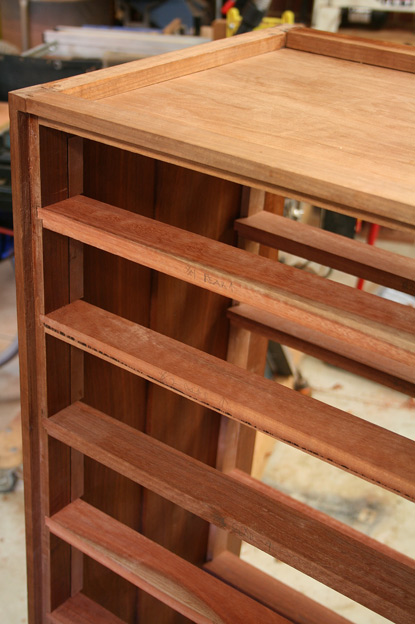
This chest is entirely made up of sliding dovetails ...

Regards from Perth
DerekVisit www.inthewoodshop.com for tutorials on constructing handtools, handtool reviews, and my trials and tribulations with furniture builds.
-
19th February 2018, 08:50 PM #7
GOLD MEMBER
- Join Date
- Oct 2007
- Location
- Alexandra Vic
- Age
- 69
- Posts
- 2,810
A common method for forming the tails on the legs is to set the bit (same one used to form the dovetails in the bench to match the angles) into a router mounted in a router table with a fence offset slightly in front of the bit and the bit raised to match the depth of the dovetail. The component to be 'tailed' is passed across the bit while sliding on the table and against the fence. The portion of the bit protruding beyond the fence will cut the tail as the timber passes. Varying the amount of protrusion varies the depth of the tail, it is usual to make and test fit samples first to get the setup right and a good match with the dovetail.
I used to be an engineer, I'm not an engineer any more, but on the really good days I can remember when I was.
-
20th February 2018, 03:18 PM #8
SENIOR MEMBER
- Join Date
- Jul 2010
- Location
- melbourne
- Posts
- 382
thanks a lot Derek,
very instructive


 Reply With Quote


Similar Threads
-
Antique Patina How to Achieve
By SHEETMETAL in forum RESTORATIONReplies: 3Last Post: 7th January 2015, 07:49 PM -
How to achieve that polished look
By morrisman in forum METALWORK FORUMReplies: 11Last Post: 27th October 2011, 11:02 PM -
How to Achieve This Color with Stain
By JGarver in forum FINISHINGReplies: 2Last Post: 19th March 2010, 02:04 PM -
How to achieve this finish
By musicmick1966 in forum FINISHINGReplies: 7Last Post: 26th February 2010, 11:16 PM -
How achieve slope on a deck
By oseagram in forum DECKINGReplies: 6Last Post: 21st August 2007, 11:38 PM
