

 Thanks:
  Likes:
  Needs Pictures: 0
 Picture(s) thanks:
Results 1 to 15 of 17
Thread: How to finish burl for clock?
-
14th December 2017, 06:47 PM #1
 GOLD MEMBER

- Join Date
- Aug 2016
- Location
- Brisbane
- Age
- 57
- Posts
- 1,315
 How to finish burl for clock?
This might be a dumb question but what the best way to finish a burl slab for a clock? I want that deep glossy look and I'm a bit clueless how to achieve this.
I have some shellac but I get the impression I'm supposed to do something with epoxy for some reason to get that deep glossy look.
Is this one of those things with 20 correct answers?
Thanks in advance for your advise.
Sent from my SM-G935F using TapatalkMy YouTube channel: https://youtu.be/2_KPRN6I9SE
-
14th December 2017 06:47 PM # ADSGoogle Adsense Advertisement
- Join Date
- Always
- Location
- Advertising world
- Age
- 2010
- Posts
- Many
-
14th December 2017, 07:32 PM #2
GOLD MEMBER
- Join Date
- Nov 2011
- Location
- Melbourne
- Posts
- 7,008
Dave,
Yes it's one of those things with 30 correct answers.
And 300 opinions a bit like the best way to sharpen a chisel[emoji849].
Shellac was the old favourite, and is still amongst many(French polishing).
Epoxy will do it if you like the look, I personally don't I think it builds to thick.
But that is only my humble view.
And many seem to like it.
If your a beginner some off the spray can finishes can be easy to apply tho they may yellow with time.
I've used some off the auto clears that come in spray cans from the auto stores with good results.
Just follow the instructions.
But again not everyone's cup of tea.
I my self have yet to look into waxes and polishing but I'm sure you will get a response here soon from that camp.
Also don't forget to look at Neil's book
From Ubeat finishes.
Cheers Matt
-
14th December 2017, 09:14 PM #3
Mildly Moderate


- Join Date
- Nov 2007
- Location
- Albury Well Just Outside
- Posts
- 13,315
My friend has one of those clocks and it seems it was finished with painting on epoxy. My guess is the clock was painted flat and the holes filled up a little bit as they seem to be very thick and smooth to the touch.
-
14th December 2017, 09:29 PM #4
GOLD MEMBER
- Join Date
- Aug 2016
- Location
- Brisbane
- Age
- 57
- Posts
- 1,315
Rather than brushed on, I wonder if it is simply poured on then put under a blow torch to remove bubbles?
Not sure how its made flat and even.
Should I shellac it first to give it a glow and then pour epoxy all over it?
And if this is the procedure, what kind of epoxy do I get?
As I say, its all guess work for me.
Sent from my SM-G935F using TapatalkMy YouTube channel: https://youtu.be/2_KPRN6I9SE
-
15th December 2017, 06:47 AM #5
Mildly Moderate
- Join Date
- Nov 2007
- Location
- Albury Well Just Outside
- Posts
- 13,315
Maybe a photo of the burl is needed. The clock that I have seen is flat on both sides so was thinking that it was bandsaw then sanded to remove the bandsaw marks.
There are holes in the burl which are very dark compared to the flat part of the clock and that is where the most light it being reflected when you walk past it. I would think if you are going to pour this on then you would need an epoxy that has the viscoscy of honey. I have used a hair dryer to remove bubbles as I don't have access to a blow torch. If you do use a torch it will heat up the epoxy and make it more runny. I don't know about giving it a coat of shellac is necessary.
-
15th December 2017, 07:55 AM #6
Member
- Join Date
- Aug 2016
- Location
- WA
- Posts
- 54
This is about 20 coats of Shellac rubbed with scotch brite every few coats and then polished with Ubueat traditional wax. It has more gloss than shows in the photos.
 2017-12-15_07-04-20 by Isithombe Photographic, on Flickr
This is another one done with Feast Watson French Polish
 2017-12-15_07-03-41 by Isithombe Photographic, on Flickr
Youtube is full of tutorials like this for whatever finish you want
https://youtu.be/rIGV5qugAqg
This one shows how to French Polish an item its very time consuming but the finish is amazing.
https://youtu.be/MxRIPkzgUTM
-
15th December 2017, 08:41 AM #7
Member
- Join Date
- Aug 2016
- Location
- WA
- Posts
- 54
These are Satin spray can poly from the bug green shed. Rubbed smooth with 0000 Steel Wool and finished with Ubeaut traditional wax.


-
15th December 2017, 06:45 PM #8
GOLD MEMBER
- Join Date
- Aug 2016
- Location
- Brisbane
- Age
- 57
- Posts
- 1,315
Thank you very much. Originally Posted by Canisbellum

The photo of 20 coats of shellac isn't working and that's the one I'd like a closer look at.
Sent from my SM-G935F using TapatalkMy YouTube channel: https://youtu.be/2_KPRN6I9SE
-
15th December 2017, 08:02 PM #9
Member
- Join Date
- Aug 2016
- Location
- WA
- Posts
- 54
Now? Originally Posted by DaveVman

-
16th December 2017, 10:21 AM #10
GOLD MEMBER
- Join Date
- Aug 2016
- Location
- Brisbane
- Age
- 57
- Posts
- 1,315
Thanks again. Originally Posted by Canisbellum
What kind of shellac is that?
I have the kind that turns things a little yellowish which I like when used on cheap timber like pine. I'm not sure it's the thing to use on a hardwood burl but probably it would be OK.
That Feast Watson example is beautiful.
I do have a divit on the face of the burl so I'm still thinking about the epoxy.
It seems I'm spoilt for choice.
I'll take a photo of the burl.
Sent from my SM-G935F using TapatalkMy YouTube channel: https://youtu.be/2_KPRN6I9SE
-
16th December 2017, 10:27 AM #11
GOLD MEMBER
- Join Date
- Aug 2016
- Location
- Brisbane
- Age
- 57
- Posts
- 1,315
The wife has a hair dryer. Wink wink. I wonder if I can arrange for her to be out of the house at the appropriate time. What she doesn't know can't hurt me. Lol. Originally Posted by Christos
Sent from my SM-G935F using TapatalkMy YouTube channel: https://youtu.be/2_KPRN6I9SE
-
16th December 2017, 11:33 AM #12
GOLD MEMBER
- Join Date
- Aug 2016
- Location
- Brisbane
- Age
- 57
- Posts
- 1,315
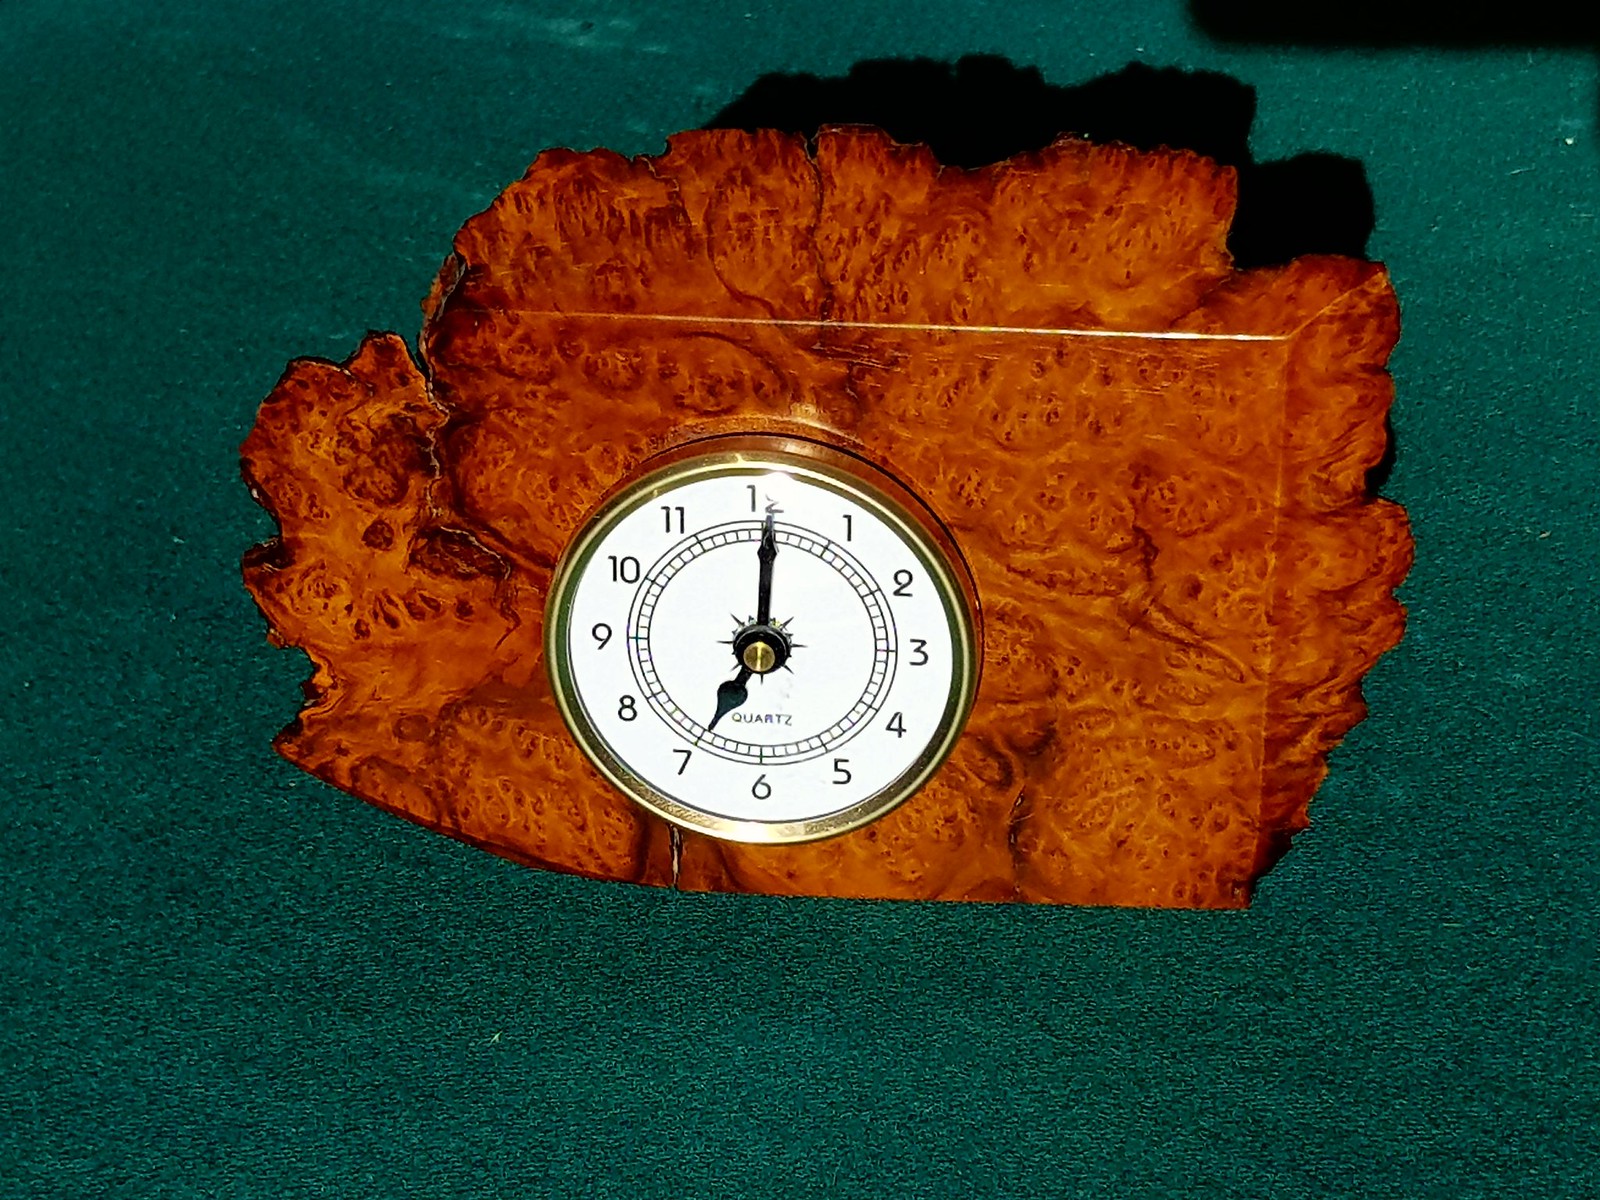
OK here is the beast. Sorry about the dark brown background.
It's 50mm thick and heavy. I wish I could saw it in half but I don't have the equipment for that.
I'm not sure it's clear in the photo but there is a depression around the middle.
The second photo is the rear side but that gives you a better idea of the grain and colour.
I have been planning to make a wall clock but it's very heavy.
I could bore out part of the rear side to reduce the mass a little.
I suppose that's a subject for the clock forum.

Sent from my SM-G935F using TapatalkMy YouTube channel: https://youtu.be/2_KPRN6I9SE
-
16th December 2017, 02:37 PM #13
Member
- Join Date
- Aug 2016
- Location
- WA
- Posts
- 54
It seems a bit of a waste to only make a clock out of that. Is there no one in town that could rip that into 2 for you?
The cracks and voids I have been using 5 minute epoxy and casting resin with mixed success. The epoxy isn't clear enough and the resin is a pain to work with and isn't as effective as I thought it would be.
I will be buying some West systems epoxy for that purpose
You will have to fill everything before final finishing as and dips dents etc will stand out like a sore thumb if you dont.
I just bought shellac at the big green shed but will be trying some of the Ubeaut stuff next.
-
20th December 2017, 03:09 PM #14
GOLD MEMBER
- Join Date
- Nov 2012
- Location
- Brisbane
- Posts
- 1,809
Best ways to fill voids
That title is a bit pretentious as I'm quite sure that I do not know the absolute best way - partly as there is no perfect solution for every situation. It depends on what you want the voids to look like. It can be very difficult to get them the exact colour of the timber and, IMHO and bitter experience, when you get the colour too light it looks awful. Too dark or very dark seems to look fine.
If I am French Polishing with my favourite Brown Button shellac I fill small voids by melting some of the button into the void using a soldering iron. That gives a rich brown, somewhat translucent colour. I have even done that for very large voids, but have used a blow torch (being careful not to ignite the button, just melt it).
However, my usual method is to use Epox-E-Glue, a two-part epoxy that is very thick and paste-like (from Bote-Cote Pacific - no affiliation, just a user. The great things about it are that it is very stable, very low-slump and can be coloured with spirit stains or dry powders to get the colour that you want. I use Crafstman spirit stains in cedar or walnut colour mostly, or mic a couple of colours. I have also used it with Craftsman black to fill holes in Ebony.
AFAIK you can use any finish over both of these fillers.
My personal favourite finish is shellac. As I said, the brown buttons for darker timbers like Cedar and Blackwood, but for lighter timbers I use UBeaut's white shellac or their Hard Shellac, which is white shellac that sets to be heat and moisture resistant. With shellac you can choose your gloss level. Apply lots of very thin coats with a rubber or cloth and rub back in between every five or so coats (I use 1000 grit wet and dry). If it begins to be too glossy leave it for a few days and it may settle back to what you want, or just wax it (not beeswax it stays sticky, shows marks and attracts dirt). As above state the UBeaut Traditional Wax is a really good one. If still too glossy just cut back with 0000 steel wool to desired matt and wax over for that soft lustre.
-
20th December 2017, 03:19 PM #15
GOLD MEMBER
- Join Date
- Nov 2012
- Location
- Brisbane
- Posts
- 1,809
If this is not an urgent Christmas present (and already done and dusted) we could arrange to slice it on my bandsaw either over the Christmas-New Year period or in January. PM me if interested. Uneven shapes are difficult and can be dangerous to cut but I think my ugly, shop-made log-cutting-jig could be modified to work.
Also, have you thought of putting a large clock where the depression is? Then you would not have to fill the depression/void.

 Reply With Quote

Similar Threads
-
Looking for someone to refurbish a damaged burl clock - poured glass resin finish.
By BrendanJ in forum CLOCKSReplies: 11Last Post: 15th December 2014, 10:38 PM -
Burl Clock
By j&j in forum CLOCKSReplies: 4Last Post: 15th December 2014, 05:30 PM -
Burl clock
By surfdabbler in forum CLOCKSReplies: 4Last Post: 30th April 2014, 05:35 PM -
Burl Clock
By bowl-basher in forum WOODTURNING - GENERALReplies: 6Last Post: 25th November 2013, 07:58 PM -
blue gum burl clock
By smiife in forum WOODTURNING - GENERALReplies: 4Last Post: 10th May 2011, 07:25 PM
