

 Thanks: 0
 Likes: 0
 Needs Pictures: 0
 Picture(s) thanks: 0
Results 1 to 6 of 6
Thread: finish for a kalimba
-
27th February 2011, 08:33 AM #1
 Member


- Join Date
- Jul 2006
- Location
- Australia
- Posts
- 64
 finish for a kalimba
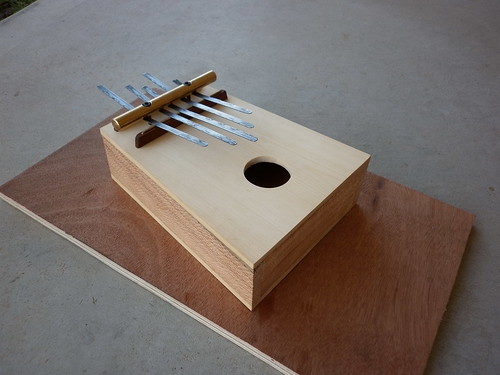
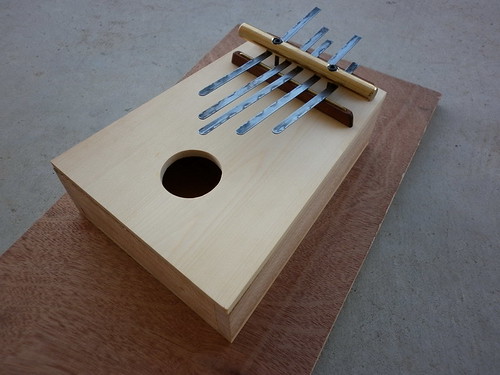
Here's my first attempt at building a kalimba with a soundbox, rather than just attaching some tines to a lump of wood. The top and back are celery top pine and the carcase is silky oak. The keys are from a bandsaw blade - obviously a few more are needed. I have just un-clamped the thing from having the top glued on and am about to plane the little overhangs flush. I think I'll put a bit of a radius on all of the edges.
My question is, what is a suitable finish product and method for something like this? Right now I have orange shellac flakes and some traditional wax. I'm worried the shellac will turn the very blonde pine yellow.
Also, is there any reason to glue down the bridge to the soundboard? Pressure from the clamp bar is holding it pretty firmly as is.
Thanks,
Leon.
-
27th February 2011 08:33 AM # ADSGoogle Adsense Advertisement
- Join Date
- Always
- Location
- Advertising world
- Posts
- Many
-
27th February 2011, 11:28 AM #2
GOLD MEMBER
- Join Date
- May 2007
- Location
- Sth Gippsland Vic
- Posts
- 4,412
The Orange shellac will change the colour,you can mix with bleached or blonde shellac or the UB hard. If you want to minimize it and get a nice thin polish job with the orange shellac
Sand the wood to 400 grit
Prep the timber with a wipe over with water, this will make the grain rise a little, dry with a heat gun,
I think drying it quickly is important to stop the moisture soaking deeper and possibly swelling things
lightly sand the wood which will now have the grain slightly standing with a worn or old 400 grit ,you can lightly rub 2 new bit's of 400 together,
then wipe over with a glue size, I use Hide glue, or whte PVA or Tite Bond, the ratio would be roughly 15 or 20% glue to warm water
wipe this on then heat gun dry ,then lightly cut back again with the 400 grit paper,
now you can apply polish and wax when finished,
I did this method yesterday to my pine guitar top, this is the third time I have polished it,the other two polish jobs were to protect while I finished the woodwork,each time I changed the polish mix,First was a lot of blonde and a little orange, next was 50 /50
I think ,I thought it still looked to pale, yesterday was almost a straight orange mix,
I know it wont look as yellow as this picture in day light because the two incandesant globes in the lights I use make things a lot more yellow in pictures
cheers Rob
-
27th February 2011, 11:37 AM #3
GOLD MEMBER
- Join Date
- May 2007
- Location
- Sth Gippsland Vic
- Posts
- 4,412
Same top,no lights, previous polish job which was the 50/ 50 mix over the size mix,
Just the fluoro lights, not the incandesants
-
27th February 2011, 12:27 PM #4
Member
- Join Date
- Jul 2006
- Location
- Australia
- Posts
- 64
Very interesting. My timber has all been smoothed very finely by handplaning. 400 grit paper would make the wood rougher than the current glossy surface. Is the sanding/grain raising still necessary?
What is the purpose of the glue size? I'm new to instrument making and I haven't heard of this before.
Anyway I'll order some blonde/bleached shellac, sounds like a useful thing to have on hand.
Leon.
-
27th February 2011, 12:29 PM #5
Member
- Join Date
- Jul 2006
- Location
- Australia
- Posts
- 64
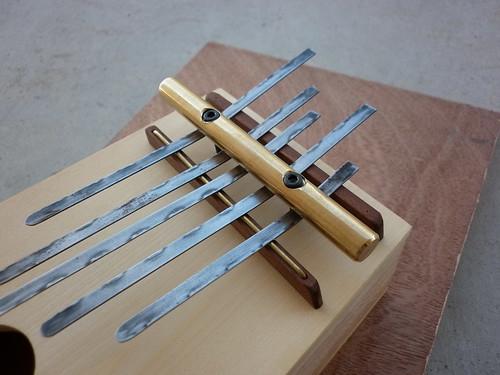
By the way, what's the object that looks like a bent chisel blade in your photo?
-
27th February 2011, 02:23 PM #6
GOLD MEMBER
- Join Date
- May 2007
- Location
- Sth Gippsland Vic
- Posts
- 4,412
I'm new to instrument making too but getting old in the furniture and restoration side,
Glue size is a way of sealing the timber, and gives it a barrier to coloured soloutions being absorbed to deep .
I mainly use it as a tool for staining ,and when using straight orange shellac, If you have ever glued up a table and left glue dry arround the joints and then gone to stain you will see what a pain it can be,
If you make a soloution of size like I said before and do two stronger mixes and get a board of radiata pine , do the water prep and dry ,cut back ,then wipe the size on in three seperate places ,cut back, then give a wipe over with straight wattyl cedar stain ,you see what a tool size is for adjusting colour
If you are going to size , it is a water based step on the raw wood , and like any water based step on raw, like bleaching or water based stains, it has to be wet to raise the grain ,and then be fine sanded, other wise in that cedar stain example if you went on and started to polish ,when you cut back after a coat or two you would cut off the tops of the raised grain , and ruin your colour , it goes all spotty
Another good thing about size is it makes for a really quick polish job, that guitar top took 30 minutes,and I will have to do it two more times,probably at fifteen minutes, also after you size and cut back you will have a new understanding of the word smooth, nothing feels as smooth as a cut back size job on a fine grained timber [Pine]
I use it for the smoothest running drawers possible, do the wet prep, size and cut back, then a rub with paraffin wax,
And that object is a chisel ,a cheap chinese one, that I bent arround a pipe in a vice using an oxy torch and a hammer,it allowed me to prise off the bridge patch that I had glued in the wrong spot, after warming the patch I could reach in and slide it along the under side of the top with my fingers,,like I said I'm new at intruments, bridge patch done twice ,fret board done twice, frets done twice the only way to learn
cheers Rob

 Reply With Quote
Similar Threads
-
Kalimba
By Scally in forum MUSICAL INSTRUMENTSReplies: 17Last Post: 14th July 2013, 07:27 PM -
Cutting 2-Pac Matt Finish to get a satin finish
By Brendon5374 in forum FINISHINGReplies: 8Last Post: 1st February 2011, 11:55 PM -
kalimba build
By Mungo Park in forum MUSICAL INSTRUMENTSReplies: 2Last Post: 25th October 2009, 12:57 PM -
what finish?
By Torre in forum FINISHINGReplies: 3Last Post: 17th June 2008, 08:31 PM -
Best Pen Finish?
By funkychicken in forum WOODTURNING - PEN TURNINGReplies: 34Last Post: 14th March 2008, 08:46 AM
