

 Thanks: 0
 Likes: 0
 Needs Pictures: 0
 Picture(s) thanks: 0
Results 1 to 15 of 29
Thread: my thicknessing jig
-
1st November 2007, 09:51 PM #1
 SENIOR MEMBER


- Join Date
- Feb 2007
- Location
- sydney
- Age
- 35
- Posts
- 580
 my thicknessing jig
i made a thicknessing jig a while ago so i could do virtually everything myself for guitarbuilding (i dont have a bandsaw, but i borrow one from a butcher shop i work at on saturdays for some things every once in a while).
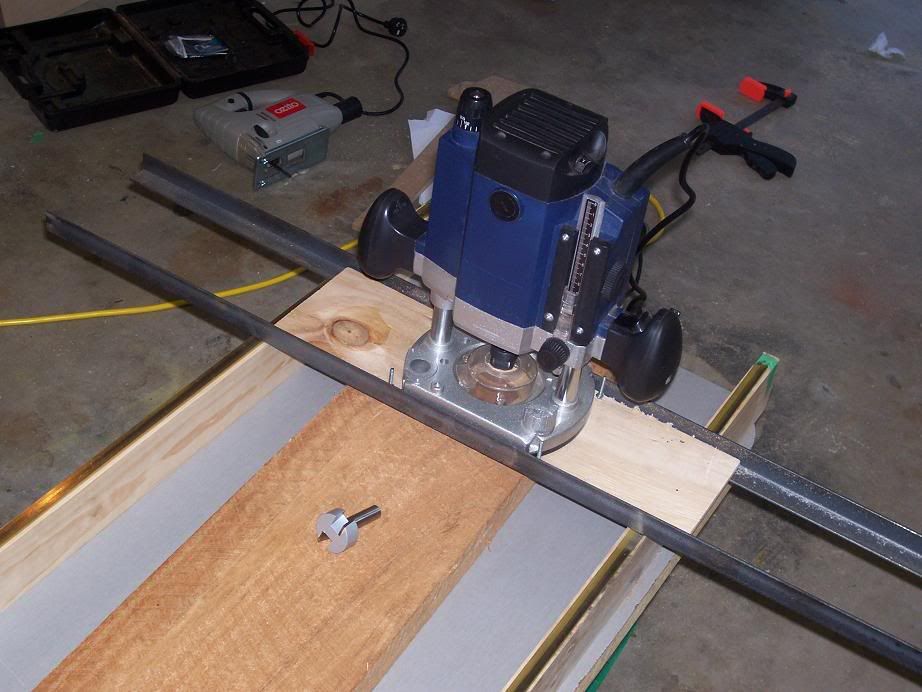
the jig consists of some rails on the edges of a piece of chipboard (was a cutout from the kitchen sink) i made the rails by screwing some pine there and then topping them off with a brass strip (had it laying around). the router is then mounted on some rails.
the router is mounted on some L shaped steel extrusions from bunnings, and a piece of plywood where the router goes (with a hole cut for the router bit to pass through). these are all bolted together to make a solid connection, which is then passed over the wood that is between the rails.
this is a handy tool as it works well for
- thicknessing
- putting angles on things (neck pocket jigs, scarf joints) by proping the workpiece up at the right angle (found using trigenometry) before thicknessing it
- making veneers
- making the recessed headstock on a fender style headstock
- preparing a butt joint
it is even more useful when you consider that you can choose what you want to thickness, for example thicknessing a body of a neckthrough instrument after the wings have been glued on. this way you can make sure that the wings are flush with the centrebit without trying to plane with a piece sticking up from the neck. or leaving a straight edge where you want to have the fretboard on the headstock of a guitar (ie fenderstyle neck)
i know there are plenty of tools that do some of these things but its a great tool for me, someone who doesnt want to spend alot of money on the many tools to make a guitar and would rather work with the bare essentials. i keep finding new uses for it too.
heres the jig, with some qld maple underneath it

heres it from above, with the dado bit i use for this
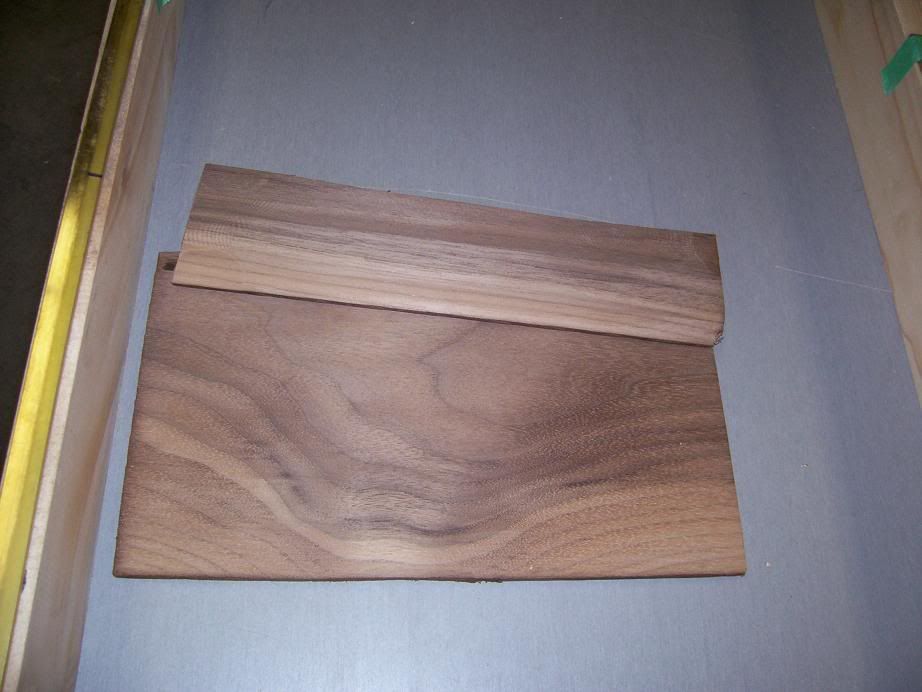
heres a some walnut (body offcut) i thicknessed into sizes for the headstock veneers (no sure if i should call it a veneer, the thicker is 4mm or so thick)
also thought id post the clamps i made, there just threaded rod and a bit of pine that i tighten up with a spanner
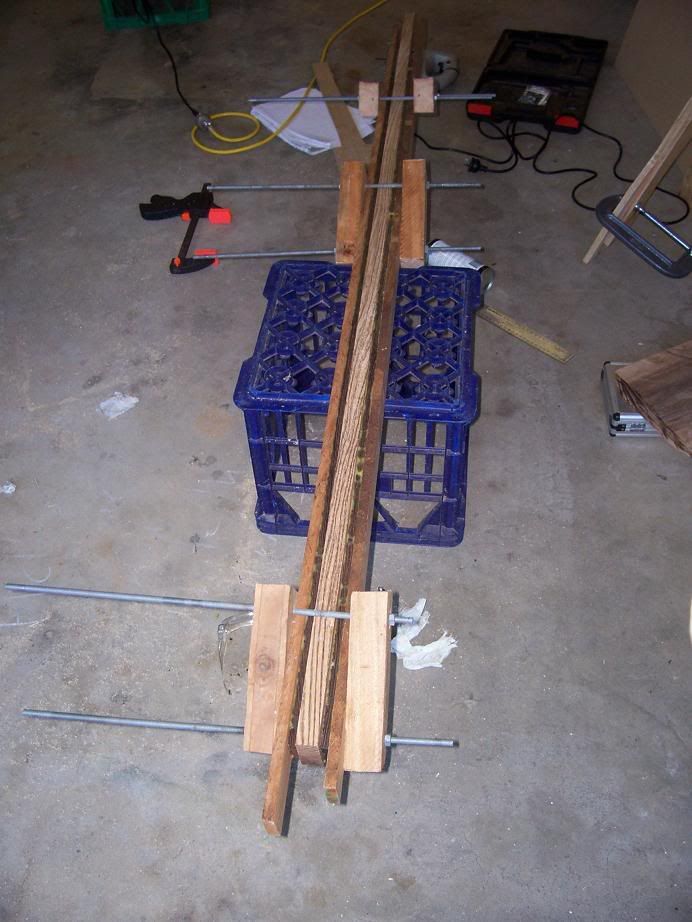
i had 3 other clamps on the neck if you were worried thats all i had for such a long piece.
-
1st November 2007 09:51 PM # ADSGoogle Adsense Advertisement
- Join Date
- Always
- Location
- Advertising world
- Age
- 2010
- Posts
- Many
-
1st November 2007, 10:23 PM #2
Member
- Join Date
- Nov 2006
- Location
- Adelaide
- Posts
- 79
Nice work black_labb. Shows what can be done when you want to. I was thinking of making something very similar for routing contours of an archtop / carvetop. Do you think it would work for that? Can you let us in on what its like to control - ie. could it follow the contour line freehand?
Anything about the jig you would do different if you built it again?
Would it also be any good for routing binding rebates with a rebate and bearing bit for those bodies that have an archtop, but the binding is flat and parallel to the back?
Cheers
Archer
-
1st November 2007, 11:00 PM #3
SENIOR MEMBER
- Join Date
- Feb 2007
- Location
- sydney
- Age
- 35
- Posts
- 580
 Originally Posted by Archer

i can see it being great for that, a bit of doublesided tape underneath to keep it steady and off you go.
i forgot to mention that you need to use double sided tape or a clamp for most bits of wood, if i was thicknessing a big bit of wood like the qld maple in the pic then i doubt you would have to clamp, but when it goes off the end clamping is no issue.
i cant think of anything i would have done differently, i was planning on making a side mounted clamp system so i wouldnt have to put clamps on the end, but its too much of a hassle, and double sided tape works for most things that cant be clamped easily. its such a simple design that its easily adaptable, so if i need to change something it wont be an issue.
-
2nd November 2007, 12:27 AM #4
Guitarzzz
- Join Date
- Aug 2007
- Location
- Melb
- Posts
- 162
You and your milk crates... better be careful or the dairy farmers union will be on to you

Neat and very simple looking jig mate. I shall put something like this together in the near future myself.
-
2nd November 2007, 01:06 AM #5
Blood letter extraudinair
- Join Date
- May 2003
- Location
- Broome West Aussie
- Age
- 67
- Posts
- 3,683
Great stuff mate!!

Tell me what do you put under the timber to keep it from moving when your routing? do you clamp it to the workbench top? dont tell me you use double sided tape to hold it still????
Cheers!Believe me there IS life beyond marriage!!! Relax breathe and smile learn to laugh again from the heart so it reaches the eyes!!
-
2nd November 2007, 01:18 AM #6
SENIOR MEMBER
- Join Date
- Feb 2007
- Location
- sydney
- Age
- 35
- Posts
- 580
Originally Posted by Wild Dingo
i clamp some things (if its something that i can clamp without getting in the way of the routing)
the double sided tape actually works very well. all you need is some small strips at either end, then stand on the thingfor a sec, doesnt need any more than that. the only issue is when im doing somehting on a piece that isnt smoothe enough for the tape to stick to, but ive been able to work around that usually, with more tape
-
2nd November 2007, 07:44 AM #7
???????
- Join Date
- Mar 2007
- Location
- Adelaide Hills
- Posts
- 242
I find it awesome for template routing guitar bodies, takes 10 minutes to pry it from the timber! Originally Posted by black_labb
-
2nd November 2007, 04:35 PM #8
Senior Member
- Join Date
- Oct 2007
- Location
- Dandenong Ranges
- Age
- 51
- Posts
- 235
Good work Black Labb!! I like these tools, shows what is possible without spending squillions! I will definitely be making the thicknesser set up in the future, I have a thickness planer however the SNIPE it leaves behind is not always desirable....I reckon your setup would be better for figured timbers also with less chance of tearout. Those clmps are beauties....no rocket science, just good practical stuff, I like it
-
2nd November 2007, 05:16 PM #9
 Manager tool buying
- Join Date
- Apr 2005
- Location
- Melbourne Outer East right next to mount dande
- Age
- 73
- Posts
- 1,859
i have a similar setup and merely put a spacer block on one side and tap wedges in the other side - usually begin with flattest side down or if cupped convex side up - works a treat - can reuse the wedges and pulls apart in seconds. you need to have your side rails pretty solid Originally Posted by Wild Dingo
ray c
dunno what's more fun, buyin' the tools or usin' em'
-
2nd November 2007, 08:01 PM #10
triple platinum umm .... thingo
- Join Date
- Sep 2006
- Location
- Melbourne, 'bushy' Donvale
- Age
- 52
- Posts
- 912
Very nice, Blacklabb.
A very simple idea , yet so effective.
You don't mind me making one of my own I hope.
cheers, Stu
-
2nd November 2007, 11:50 PM #11
Senior Member
- Join Date
- Sep 2006
- Location
- Sydney
- Age
- 62
- Posts
- 423
-
3rd November 2007, 01:47 AM #12
SENIOR MEMBER
- Join Date
- Feb 2007
- Location
- sydney
- Age
- 35
- Posts
- 580
thanks for the responses. thats a good idea old picker, if i start having any issues ill give wedges a go. i dont know if you could get enough leverage with wingnuts, but i have dented the wood about 5mm in where the washers go so maybe im going a bit overboard. id rather be safe than sorry with a neck laminate. even if it does take a bit extra clamping time. i usually use some other clamps to get the wood in place then go for these, as they take longer to tighten.
speaking of spending small amounts, i use the router for nearly everything, but i got it for 65$ on ebay from some guy who imports tools. seems to be the same model as a gmc 1800 watt, so it cant be that bad. been working for me for a while too surprisingly just hope that it doesnt fail on me by taking out days worth of work at the same time.
-
3rd November 2007, 06:44 PM #13
SENIOR MEMBER
- Join Date
- Feb 2007
- Location
- sydney
- Age
- 35
- Posts
- 580
to avoid making another thread i have been considering binding the 12 string im planning (nothing has been done other than gluing up the neck blank, its been glued for 4 months or so)
was thinking of making the template to be followed for the inside of the binding cut, and leaving the rest a bit wider. then i would do all the nessisary carving and then install the binding. then i would use a laminate trimmer followng the binding to trim the rest of the body, doing so from below. ill keep thinking about it.
the problems i can think of are.
- holding the binding against the body will probably be a bit more difficult as there would be a lip below the binding. this could be solved by sawing closer to the edge, or using a strip of something outside of the binding that will make it larger and allow it to be pushed into the channel more easily
- installing the binding that early may have some complications/have to be more careful
-is the binding spongy enough that it would compress under a bit of pressure from the bearing on the flush trim? ive never used it before so im not sure.
-
4th November 2007, 11:35 AM #14
Manager tool buying
- Join Date
- Apr 2005
- Location
- Melbourne Outer East right next to mount dande
- Age
- 73
- Posts
- 1,859
binding is quite stiff so would not yield
dunno why you want to do it this way as it will, AFAICS, potentially make a lot of problem - more than doing it the trad wayray c
dunno what's more fun, buyin' the tools or usin' em'
-
4th November 2007, 09:29 PM #15
SENIOR MEMBER
- Join Date
- Feb 2007
- Location
- sydney
- Age
- 35
- Posts
- 580
Originally Posted by old_picker
the main reason is i dont want to buy one of those router bits from stumac as they seem pretty expensive for something just so i can put binding on a guitar. maybe ill see wether i can get a suitable flush trim and get a different sized bearing to fit it to do the same thing, but i dont know if i can. might end up just getting it from stewmac.
decided to put this in here as its not so much about making instruments, but i won a 200watt australian tube amp from around 1970 (its a bass amp, might convert it to be used for both though, maybe with only 2 as opposed to 4 6550's)
here it is
http://cgi.ebay.com.au/ws/eBayISAPI....MEWA:IT&ih=004

 Reply With Quote


Similar Threads
-
Mounting Systems!
By BANNED in forum WOODTURNING - GENERALReplies: 30Last Post: 2nd September 2007, 05:04 PM -
Leigh Super Jig
By WillyInBris in forum ROUTER JIGSReplies: 13Last Post: 14th August 2007, 03:35 PM -
Precision Morticing Jig (Lite)
By Rocker in forum HOMEMADE TOOLS AND JIGS ETC.Replies: 9Last Post: 18th April 2007, 10:56 AM -
The Veritas Skew Jig
By derekcohen in forum HAND TOOLS - UNPOWEREDReplies: 6Last Post: 28th April 2006, 10:01 PM -
Modifying the Veritas Honing Jig
By derekcohen in forum SHARPENINGReplies: 13Last Post: 18th September 2004, 12:09 PM
