

 Thanks: 0
 Likes:
  Needs Pictures:
  Picture(s) thanks:
Results 76 to 90 of 154
Thread: Golf Ball carving WIP
-
7th November 2009, 06:28 AM #76
 GOLD MEMBER


- Join Date
- Aug 2007
- Location
- St Georges Basin
- Posts
- 1,017

Not up to the standards of you blokes,
but a bit of fun for a mug with a Stanley knife for half an hour. Still got all my fingers too!
-
7th November 2009 06:28 AM # ADSGoogle Adsense Advertisement
- Join Date
- Always
- Location
- Advertising world
- Posts
- Many
-
7th November 2009, 10:27 PM #77
Member
- Join Date
- Apr 2009
- Location
- Hervey Bay
- Posts
- 84
Hey Burraboy
That is a pretty nifty job just using a stanley knife.
My last experience with a stanley knife nearly removed two fingers when I slipped trying to fix one of my kids toys years ago. I was lucky it was only a lino blade and not the normal one.
Keep it up mate
Cheers
Grant
-
7th November 2009, 11:58 PM #78
SENIOR MEMBER
- Join Date
- Jul 2009
- Location
- Waitpinga
- Posts
- 835
Hi Grant,
Sorry for the delay in getting back to you... been snowed under. As usual had to wait for a lull while exhibiting at a local craft fair.
I think you've just about got it nailed mate. Fantastic mouth and eyes with much 'cleaner' lines. A few small suggestions below, but nothing major. You will work it out with a bit of practice.
Had a look at your eye planes. I think maybe you might benefit from making them closer to 90 degrees. The first three attached photos illustrate what I mean. The first is straight on, the second taken from underneath the ball and the third from the top. You'll note the angle of the face planes relative to each other is about 90 degrees. Any greater than that and the eye/forehead area becomes too flat... hence the eyes appear as though carved into a flat surface rather than a curved/rounded surface. I hope that makes sense...
I steepen this even more by removing a section on the side of the head about where the temples would be. (see photos 4 and 5)
Finally, the last three photos show the eye sockets are now situated to give the eyes a slight angle to follow the curve of the head.
The last photo in this set also shows the mouth mound from the side. The mouth on your guy was brilliant by the way, but you'll get an even better over all look to the bottom half of the face if you define the mouth mound more deeply on its edges giving it a more rounded shape before you start to carve the mouth. Also, cut the underside of the bottom lip in quickly to leave yourself room to form a more clearly defined chin. This can also be seen on some of the earlier photos from previous postings.
Once again, thanks for persevering with this. I learn stuff to when I get to study how others approach this project. And thanks to Burra too. Well done mate. Keep at it.
-
9th November 2009, 05:17 AM #79
GOLD MEMBER
- Join Date
- Aug 2007
- Location
- St Georges Basin
- Posts
- 1,017
[QUOTE=Whittling;1061068]
Once again, thanks for persevering with this. I learn stuff to when I get to study how others approach this project.QUOTE]
Indeed. Having gone at this like a bull at a gate, it was most interesting to see the first few steps that you take in a carving. If I hadn't done one myself and picked up something from my own experience then your post probably would have been lost on me, I may do another one, just for fun, and follow your technique. It will produce a very different result I think.
-
9th November 2009, 09:09 AM #80
SENIOR MEMBER
- Join Date
- Jul 2009
- Location
- Waitpinga
- Posts
- 835
I may do another one, just for fun, and follow your technique. It will produce a very different result I think.[/QUOTE]
Its amazing how much the final outcome is effected by decisions made at the very beginning.
I'll look forward to seeing your results if and when....
-
9th November 2009, 09:37 PM #81
Member
- Join Date
- Apr 2009
- Location
- Hervey Bay
- Posts
- 84
G'day Whittling and Everyone
Whittling, it is wonderful to get such productive advice. Thankyou again very much.
I had just started another effort when I read your suggestions.
I had already noticed the flat face appearance when taking the images from the side trying to demonstrate the eye-lid planes. Also my initial eye planes when beginning a face were much smaller and flatter than those you have shown us with the latest images (definitely not 90 degrees). I will attempt to carve in the mouth mound more sharply too, as you have suggested.
Will post the next effort once complete for further assessment.
Cheers
Grant
-
11th November 2009, 08:05 PM #82
GOLD MEMBER
- Join Date
- Aug 2007
- Location
- St Georges Basin
- Posts
- 1,017
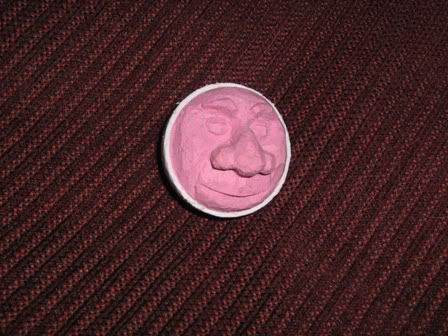
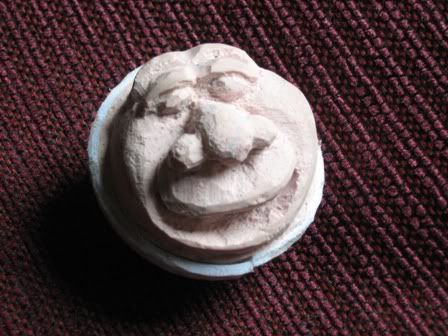
Face #2, not a good pic I'm afraid! If ever I did any more of these I would spend a lot more time with the eyes and mouth and use a decent tool for the job. I don't think so though, been there, done that! Thanks Whittling, your posts were inspirational!
-
12th November 2009, 07:55 AM #83
SENIOR MEMBER
- Join Date
- Jul 2009
- Location
- Waitpinga
- Posts
- 835
Thanks for the post Burra. Interesting treatment of the brow line. Must try that.
The whole point of this exercise is to practice control of facial features until you can manipulate them deliberately in ways that give you the facial expressions that you want to acheive. On golf balls it doesn't matter so much if you don't acheive the expression you're after... you just note what you did and the outcome you got and try again. On other larger carvings, you have a lot of work invested in the piece already before you get to the face. This is where understanding how the face and its components work, really is benificial.
As I've said before, learning to carve a face, caraciture or realistic, is one thing... doing so while producing a predictable expression is a whole different skill level. I don't know any way of getting there except to practice. For me, the golf balls are as good a way as any. They're kinda like a 3D equivilant of the little 'smile' faces you can insert in these posts.


-
18th December 2009, 07:15 AM #84
Novice
- Join Date
- Dec 2009
- Location
- south wales. UK
- Posts
- 11
whittling you really started something here. i've never come across this idea of carving before and it looks great fun. cant wait to get my hands on a couple of golf balls and have a go myself. before i even start i'll have to go to the begining of this post though.
its amazing that it seems the deeper you cut the eyes in the larger the nose seems , even seems to protrude past the edge of where the ball would be.
have you ever painted any? if so what paint would you use?
-
18th December 2009, 08:46 AM #85
SENIOR MEMBER
- Join Date
- Jul 2009
- Location
- Waitpinga
- Posts
- 835
Hi Kev,
Glad to have you 'on board' as it were. Hope you like the site. I stumbled across it a while back and have really enjoyed interacting with carvers with all kinds of tips and techniques to share. I've learned quite a bit here.
The golf balls are filled with some sort of rubbery-plastic stuff. Don't know what it is and have never tried to paint it. I've never been one for painting carvings much anyway. I prefer to let the beauty of the wood show. In this case of course it ain't wood but they do come in a vast array of nice colours.
I think from memory, somebody tried painting one in this or another similarly named thread. You might find out who it was and ask him what he used.
Good luck with it all anyway, and don't forget to post your results. We all learn from each other.
-
18th December 2009, 09:27 PM #86
Novice
- Join Date
- Dec 2009
- Location
- south wales. UK
- Posts
- 11
i think i'll try a few carvings on a clay ball first, if i make a mess of it i can just roll it back up and start again to worries. i'd like to try and capture the characteristics of the facial features just as you have. thanks for the tutorial on carving the eye...very good, i learnt a lot on that one especially.
kev
-
19th December 2009, 10:12 PM #87
Novice
- Join Date
- Dec 2009
- Location
- south wales. UK
- Posts
- 11
if anyone interested if found this link the interesting world of golf ball carving.
Golf Ball Carving - the Ultimate Guide Book
-
19th December 2009, 11:26 PM #88
SENIOR MEMBER
- Join Date
- Jul 2009
- Location
- Waitpinga
- Posts
- 835
Now that's a first for me... I never knew there was a book on the subject. Had a quick look but the style is completely different to what I do. Interesting all the same. Might be an idea or two I can use..
-
19th December 2009, 11:55 PM #89
Intermediate Member
- Join Date
- Aug 2008
- Location
- Barossa Valley, South Australia
- Age
- 73
- Posts
- 26
Google golf ball carving.
There are many pages to look at & another book available on Amazon. [ame="http://www.amazon.com/gp/product/0972442804?ie=UTF8&tag=castlevonretzer&linkCode=as2&camp=1789&creative=9325&creativeASIN=0972442804"]Amazon.com: The Carving Range - A Guide To Carving Golf Balls: Justin Jepsen: Books[/ame]
You can even buy pre-cut balls, can get a golf ball carving kit & convert PVC pipe cutters to a case removal tool.
There are all sorts of carvings you can try, not just faces.
Must try this.
PS there are even youtube videos so you can see how its done!!!
-
20th December 2009, 08:18 AM #90
Novice
- Join Date
- Dec 2009
- Location
- south wales. UK
- Posts
- 11
seems theres a whole world of golf ball carving out there that i've never heard about. Thanks whittling for introducing it to me.


 Reply With Quote
Similar Threads
-
After The Golf At The Munruben Golf Course
By echnidna in forum WOODIES JOKESReplies: 2Last Post: 26th January 2008, 07:43 PM -
golf
By doug the slug in forum WOODIES JOKESReplies: 7Last Post: 6th July 2006, 09:35 PM -
Golf
By Iain in forum WOODIES JOKESReplies: 9Last Post: 3rd September 2005, 12:55 PM -
Golf 2
By Gino in forum WOODIES JOKESReplies: 1Last Post: 16th January 2001, 07:23 AM -
Golf
By Gino in forum WOODIES JOKESReplies: 0Last Post: 14th January 2001, 07:03 PM
