

 Thanks: 0
 Likes:
  Needs Pictures:
  Picture(s) thanks:
Results 451 to 465 of 724
Thread: Eureka Canoe
-
28th September 2008, 10:38 AM #451
 Happily receives emails.


- Join Date
- Jul 2005
- Location
- 'Delaide, Australia
- Age
- 65
- Posts
- 8,138

Howdy Tom.
Each buoyancy tank is about 50lbs - so 100 lbs for both.
But remember that the hull can easily support its own weight ... timber floats and the hull will provide buoyancy about equal to its own weight.
So you can add about 50 lbs of buoyancy from the hull (about 35 lbs if you build ultralight).
So this gives you about 150lbs of positive buoyancy.
Remember too that unless you are carting housebricks and gravel (like Leigh Hemmings did with his Goat Island Skiff!) that most of the things you carry will have considerable buoyancy too and may very well have negligible weight (near neutral buoyancy) when they are in the water.
So ... you can count on about 140lbs of buoyancy from the hull combined with the tanks.
Best wishes
Michael
-
28th September 2008 10:38 AM # ADSGoogle Adsense Advertisement
- Join Date
- Always
- Location
- Advertising world
- Age
- 2010
- Posts
- Many
-
1st October 2008, 09:09 PM #452
Chalkie
- Join Date
- Aug 2008
- Location
- Gympie, QLD, Australia
- Posts
- 25
My Eureka
My canoe is coming along. I butt strapped the panels and let them set overnight. I checked in the morning and unfortunately one of the joins on one of the sides had not set flat. Typically while most people would not know (after the gunwhales are on you can see it) I decided I would know every time so off with the old butt strap and on with a new one. That little episode put me behind a bit but I now have three coats of Bote Cote on the insides. (Certainly enhances the pattern in the ply)
While the Bote Cote has been curing, I began preparing the timber work from my old pergola material. The Oregan certainly comes up nicely after it has been put through the thicknesser to size it appropriately. I was fortunate because the beams from the pergola were 6m long so I could get the required lengths without having to join any. I have to watch for loose knots though.
Tomorrow I'll drill the holes in the Bilge panels and finish preparing the timber work.
Quick question re fibreglassing.
One of my concerns is debris in the river (branches, stumps etc) damaging the bow.
Has anyone fibreglassed the leading edges or even the front half of the bottom panel? Is it recommended or not necessary? I am used to fibreglass canoes where thay can stand up to a certain amount of "rough stuff". Obviously hitting a submerged stump at speed will damage anything. How does the ply hold up in this sort of situation?
Thanks
Malcolm
-
2nd October 2008, 12:37 AM #453
Happily receives emails.
- Join Date
- Jul 2005
- Location
- 'Delaide, Australia
- Age
- 65
- Posts
- 8,138
Howdy Malcolm,
In general the bow is the area of the boat least likely to suffer damage.
When two racing sailboats have a T-bone collision .. ie nose of one boat into side of the other one - there is usually negligible damage to the one that has hit with its bow and considerable damage to the other one.
What happens to the bow actually relates to what happens with the glassing of the outside of the chines. You fill the vee between panels with the glue mix, let it harden then sand a neat but tight radius on the filled section. This happens with the outside of the nose too.
Then the keel and chines are glass taped. This can go around the nose of the boat too to bind the two sides together. It of course also means that the leading edge of the boat is glassed anyhow.
It is a pretty strong construction. It is possible to break any structure of course, but I think the most you could espect from hitting something really hard with a heavy laden canoe is that it would crack the seams close to the actual point of impact. But usually because of the bow angle it would ride up on the obstacle and be unlikely to impact at all.
A temp fix with duct tape to keep the water out for the rest of the trip and then sand off the glass tape in the damaged area, fill the crack and re-glass tape the area.
Best wishes.
Michael Storer
-
2nd October 2008, 07:28 AM #454
Chalkie
- Join Date
- Aug 2008
- Location
- Gympie, QLD, Australia
- Posts
- 25
"A temp fix with duct tape to keep the water out for the rest of the trip and then sand off the glass tape in the damaged area, fill the crack and re-glass tape the area."
Thanks Michael.
That duct tape (or 100mph tape) is beaut stuff. I do car rally stage control and there are cars that come into my stage control point that are taped up for one reason or another.
Malcolm
-
2nd October 2008, 12:29 PM #455
Chalkie
- Join Date
- Aug 2008
- Location
- Gympie, QLD, Australia
- Posts
- 25
Michael,
When putting the tempory spreaders into the hull, do they need to be fixed in place (ie screw through the ply where the gunwale will be) or do they "jam" in and hold when the gunwale is temporarily clamped in place?
Does the fibreglass tape go over the loops from the copper wire created on the inside? Do you have to work it in under the loops created so that the wire can be removed later? Do you cut little slots in the tape where the copper loops are? (makes easy fitting and removal later)
I'll try to get the canoe twitched together before I have to go back to work Monday, anyway I have to wait for the tape from Boatcraft Pacific because they don't have any at present after the fire. (can't work on it tomorrow, helping my father-in-law move house)
Thanks
Malcolm
-
2nd October 2008, 01:11 PM #456
Happily receives emails.
- Join Date
- Jul 2005
- Location
- 'Delaide, Australia
- Age
- 65
- Posts
- 8,138
Hi Malcolm,
The temporary spreaders do need a single screw in each end. if about 12mm from the top edge the gunwale and inwale will cover the hole so it won't be visible.

The simplest and fastest way of doing the interior of the boat is to use the glass tape as per the plan ... use a screwdriver and a hammer to gently tap the peaks of the copper down into the Vee of the join between panels.
This will loosen the stitching a bit so the stitching will need a twist or two to pull it up again. Then glass tape.
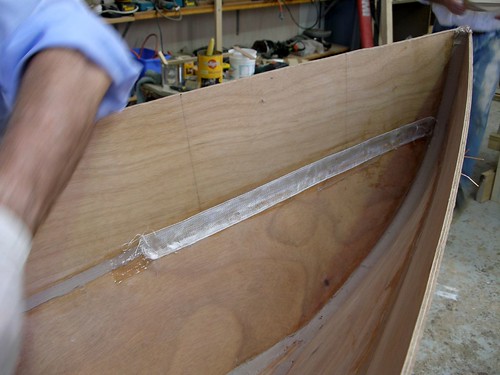
AN ALTERNATIVE - MORE MONEY AND TIME AND YOUR FILLETING METHOD NEEDS TO BE REASONABLE (PRACTICE INSIDE THE BUOYANCY TANK AREAS).
Some of the boats have been done with fillets on the inside instead of glass tape, but they tend to be bumpy unless you do small fillets between the wires first, then remove the wires (CAREFULLY WITHOUT BANGING THE BOAT AROUND) then do a bigger fillet over the small fillets.
You can just see the small fillets here between the wires
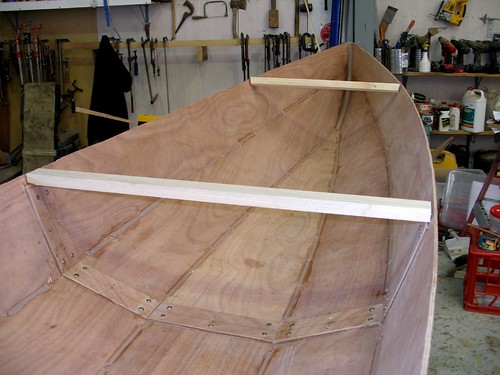
Square backed rather than radiused fillets are best for wide angle joins like these.
Fillets do not work in the ends of the boats where the topside panel and bilge panel butt up with little angle between them so you can change to glass tape - it is inside the tank so you can't see the change. Mark the location of the bulkhead that has to go in later.
Structurally there is nothing to choose between these two methods. Different skill levels, different amounts of labour and materials.
Full set of photos of Bob building his eureka stitch and glue canoe at the duckflat boatbuilding school is here.
Best wishes
Michael
-
2nd October 2008, 10:54 PM #457
Chalkie
- Join Date
- Aug 2008
- Location
- Gympie, QLD, Australia
- Posts
- 25
Thanks Michael.
I think I am starting to get the hang of this canoe building. There are a few things I have learn't along the way and if I was to do it again (possibly at school with a few students next year if they are still interested), I would do things differently.
I'm excited about the canoe project because I can see progress from what seemed a slow (but necessary) start. As I continually point out to my students, the correct and careful marking out of the project makes the cutting out and assembly much better.
Just checking on one thing re the copper wire twitching, where you mentioned tapping the peaks down, doesn't this hinder the remove of the wire later?
Malcolm
-
4th October 2008, 09:42 AM #458
Happily receives emails.
- Join Date
- Jul 2005
- Location
- 'Delaide, Australia
- Age
- 65
- Posts
- 8,138
With the glass tape method the wire stays put. So the point is to minimise its height.
But with the mini fillet plus big fillet over the top method you do take the wire out. So, yes knocking down the crown makes things more difficult.
MIK
-
12th October 2008, 09:57 AM #459
New Member
- Join Date
- Oct 2008
- Location
- Stanwood, WA, USA
- Posts
- 1
Scarf Joints?
I've searched through the forum trying to see if anyone has discussed this yet, but it doesn't appear so...
What's everyone's opinion on using scarf joints rather than the butt-splice joints in the center of the boat? I think it would make the lines of the canoe's interior a bit more sleek (not that it needs it, it's a beautiful boat as-is). I'm not sure about the strength though...
Comments?
-----------------------------
Greg
Stanwood, WA USA
-
12th October 2008, 10:37 AM #460
Happily receives emails.
- Join Date
- Jul 2005
- Location
- 'Delaide, Australia
- Age
- 65
- Posts
- 8,138
Howdy Greg.
The Eureka just fits on the sheets of ply now.
I don't like scarfs because I think they are fiddly, intimidate beginners, are slow and also unsightly.
Yap ... unsightly. It is almost impossible to get scarfs neatly aligned so you end up with a raggedy glue filled join on the inside and outside of the boat ... and it doesn't line up with any structure. Get it round the wrong way and you can get the scarfs on each panel with one toward the front and one toward the back on panels that are beside each other. Not too likely with a boat laid out symmetrically on the sheets like the Eureka.
Compared to butts that provide a perfect flush join on the outside of the boat and a neat line of buttstraps on the inside of the boat ... the scarf does not cut it.
However ... for clinker boats, solid timber or "strength critical" applications my carefully constructed rationale above falls apart!
But if you think you can get a long enough scarf on the Eureka to work ... then it is your option ... I have no concerns from a strength point of view.
Best wishes
Michael
-
22nd October 2008, 05:05 AM #461
New Member
- Join Date
- Aug 2008
- Location
- Onalaska, Texas, USA
- Posts
- 5
Another question about stitching wire
I am at about the same stage as MAL55 and was wondering about wire size. I started with # 12 USG and decided that it would be too big to push down and tape over. So I changed to .042 mil SS safety lock wire. I didn't see any wire size recomendation in the instructions. What size would you use?
Robert
 Originally Posted by Boatmik

-
22nd October 2008, 05:35 AM #462
Senior Member
- Join Date
- Jul 2006
- Location
- Portland, Oregon, USA
- Posts
- 334
More thoughts about scarfs.
A scarfed panel will bend into a fairer curve when laid over bulkheads/frames. Keep in mind, though, that this is only noticeable when the bend starts to get heavier - not generally the case with Mik's designs. The other nice thing about scarfs is that - in solid lumber - the joint tends to disappear, while a butt joint stands out dramatically. Again, not typically an issue with Mik's boats. Scarfs, though, as Mik says, are far more time-consuming and fiddly than a butt strap - esp. in thinner plywood.
If you're making spars, though, and can't find timber long enough, you'd better learn how to scarf, and you'd better not shortchange the angle. Don't be tempted to do a 6:1 ratio. Better 8:1, 10:1, or even 12:1 The longer scarf offers two benefits: more gluing surface; more of a long-grain to long-grain glueup (which is always better for adhesion). Additionally, if the edge will be seen, the longer joint does tend to disappear better than the short one.
"Beautiful young people are accidents of nature, but beautiful old people are works of art" -- Eleanor Roosevelt
-
22nd October 2008, 12:06 PM #463
Happily receives emails.
- Join Date
- Jul 2005
- Location
- 'Delaide, Australia
- Age
- 65
- Posts
- 8,138
Howdy Robert and Welcome!
I don't know what size we use ... it is just salvaged from Automotive Electricians .. it is from the heavy leads that go to the battery.
Oh ... hang on, I am at Duckflat now so will measure some for you.
1.3mm, which is just under 1/16"
MIK
-
22nd October 2008, 08:37 PM #464
Chalkie
- Join Date
- Aug 2008
- Location
- Gympie, QLD, Australia
- Posts
- 25
Robert,
Having a son as an electrician and deciding to use his parents place as a storage facility, I tried a couple of sizes. I tried some about 2.7mm dia but too hard.
I then found some multistrand stuff and after stripping the insulation off, that gave me 7 lengths each 1.6mm dia. Works fine.
The canoe is all twitched up now and just waiting for me to do the tightening of each twitch. I hope to get the fibre glass tape this weekend but the actual fibreglassing will have to wait for a few weeks due my commitments at school.
My son did visit over the weekend and saw the canoe and when he saw all the twitchings said "do you know how much copper is?". I replied "free when your son leaves it at his fathers place!"
Probably check out a building site where they are wiring up a house and offer to take their waste.
Hope that helps
Malcolm
-
23rd October 2008, 12:05 AM #465
AJ
- Join Date
- Jun 2007
- Location
- Aberfoyle Park SA
- Age
- 63
- Posts
- 1,787
Robert, I use 0.9mm insulated telephone jumper (hook-up) wire on 4mm ply.
I leave the insulation on & after tack-gluing my edges, pull out the wires & glue & tape
the joints properly. It's quite a bit more work to do this, but it suits the peculiar order
of my mind to do so.
Are you building in 4mm or 6mm ? 6mm would probably need thicker wire at the turn
of the stems.
cheers
Alan J


 Reply With Quote
Similar Threads
-
Canoe Eureka sailing video
By keyhavenpotter in forum Michael Storer Wooden Boat PlansReplies: 2Last Post: 25th November 2009, 08:06 PM -
Eureka Canoe in the UK ... another seat alternative.
By Boatmik in forum Michael Storer Wooden Boat PlansReplies: 0Last Post: 25th July 2009, 11:01 AM -
Eureka canoe sailing
By koala in forum Michael Storer Wooden Boat PlansReplies: 3Last Post: 18th July 2009, 12:30 AM -
Eureka canoe, outriggers and proper sailing rig
By Stresslesski in forum Michael Storer Wooden Boat PlansReplies: 3Last Post: 25th March 2009, 04:13 PM -
The Moose builds a Eureka Canoe.
By Boatmik in forum KAYAK & CANOE BUILDINGReplies: 6Last Post: 8th June 2008, 12:09 PM
