

 Thanks:
  Likes:
  Needs Pictures: 0
 Picture(s) thanks: 0
Results 31 to 45 of 139
Thread: WIP - Recycled Hardwood Bench
-
12th March 2011, 09:20 PM #31
 The Laird


- Join Date
- Jan 2007
- Location
- Katoomba NSW
- Posts
- 4,772

Got a bit more done today.
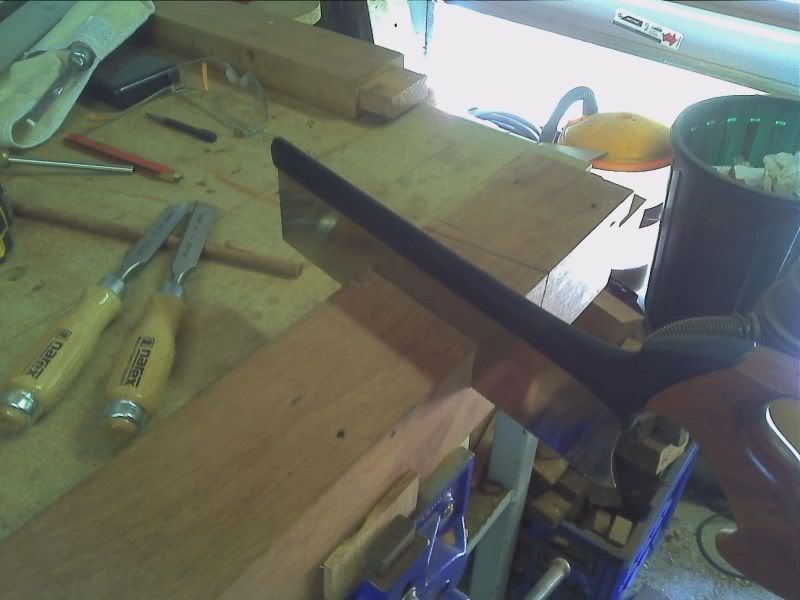
Cut the mortises for the end rails. Didn't take me as long as I thought it would.
Dry fit was good. These will be draw bored to lock then in nice and tight.
I'm going to hand cut the tennons for the long rails/stretchers next. My hand sawing leaves a bit to be desired so hopefully i wont mess these up too much.
-
12th March 2011 09:20 PM # ADSGoogle Adsense Advertisement
- Join Date
- Always
- Location
- Advertising world
- Posts
- Many
-
13th March 2011, 08:14 AM #32
Master of the obvious
- Join Date
- Aug 2006
- Location
- Melbourne
- Age
- 47
- Posts
- 978
Ditto. A shoulder plane was my saviour for this work, without it I'd have no hope. Originally Posted by NCArcher

Looking good fella!"Human beings, who are almost unique in having the ability to learn from the experience of others, are also remarkable for their apparent disinclination to do so."
- Douglas Adams
-
13th March 2011, 08:38 AM #33
Heavy Machinery
- Join Date
- Mar 2008
- Location
- Lambton, Newcastle, NSW, Australia
- Posts
- 4,957
Comming along nicely Tony.
-
2nd April 2011, 07:58 PM #34
The Laird
- Join Date
- Jan 2007
- Location
- Katoomba NSW
- Posts
- 4,772
Like sawdust through the dust extractor, so are the shed days of our lives.

Got a day in the shed today and made some good progress on the bench.
All the frame mortises were finished and holes drilled for draw boring.
An upper stretcher was dovetailed into the front legs. This will be used to clamp longer boards held in the front vice. I'm fairly new to hand tools but I thoroughly enjoyed the day in the shed with no power tools, except for the drill press. I think the neighbours enjoyed it too.
I used the Veritas Carcass Saws, I got the pair, rip and crosscut, to cut the big dovetails.
I was pretty happy with how they turned out.
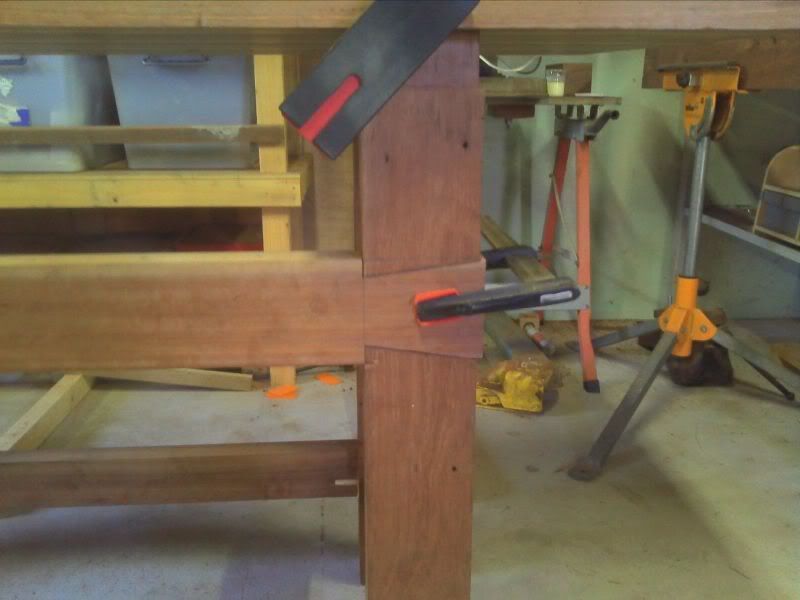
The saws are wonderful to use and I highly recommend them to anyone looking for some quality general purpose saws.
Several dry fit assemblies to make sure everything is ok and then glue up.
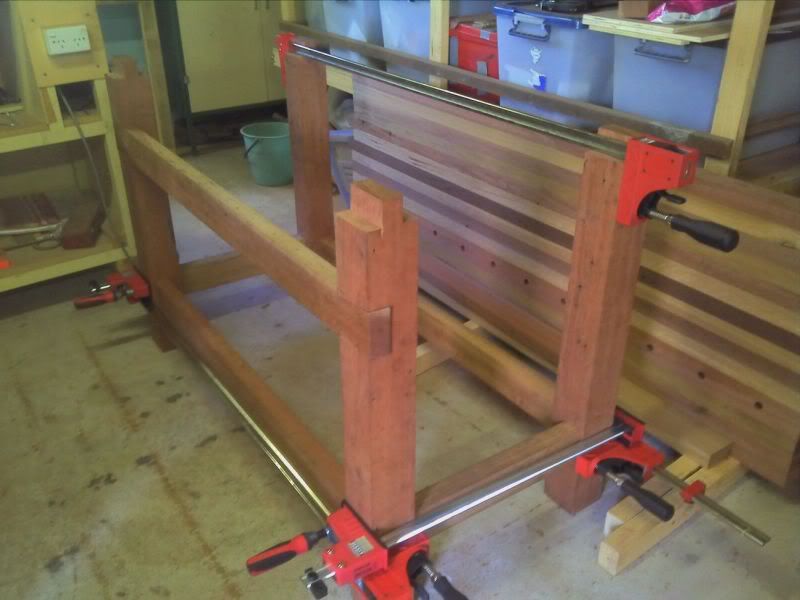
With the drawbored joints I didn't even need clamps, although I erred on the side of caution and put a few on anyway until the glue had gone off. This is not a knock down bench. This bench is now assembled forever. And it is rock solid. Even without the top on.
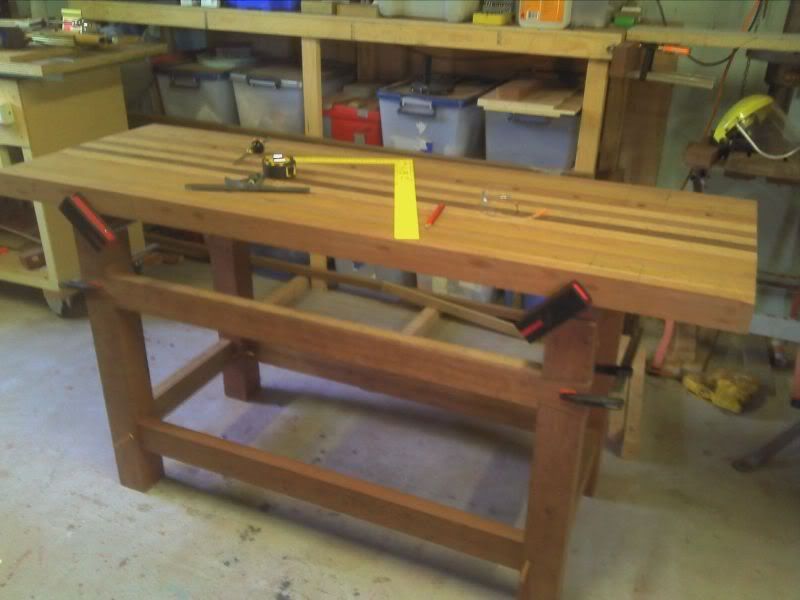
I needed to assemble the frame so that I had somewhere to work on the mortises in the bench top. I managed to get the top on by myself, it's bloody heavy, and laid out the mortises to accept the leg tennons.
I might get time to cut them out tomorrow. I'm going to need someone to help me flip it over though. Not going to attempt that by myself.
I'm undecided about how to attach the top. I was just going to glue the tennons in but does it need more? Suggestions appreciated. I was thinking of pinning the tennons through the edge of the bench. I don't think it will move while in use but if it is picked up by the top the tennons may pop out. Or maybe not.
-
2nd April 2011, 08:07 PM #35
Life's Good, Enjoy each new day & try to encourage
- Join Date
- Dec 2009
- Location
- Faulconbridge, Lower Blue Mountains
- Age
- 68
- Posts
- 11,181
Wow "Archer",
That looks fantastic; too good to use as just a bench.
Well done.
Cheers, Crowie
-
3rd April 2011, 09:22 PM #36
The Laird
- Join Date
- Jan 2007
- Location
- Katoomba NSW
- Posts
- 4,772
Thanks Crowie,
Still got a bit to go. I need to fit the top so i can start working on it, get it flat, fit the ends, install the vices etc
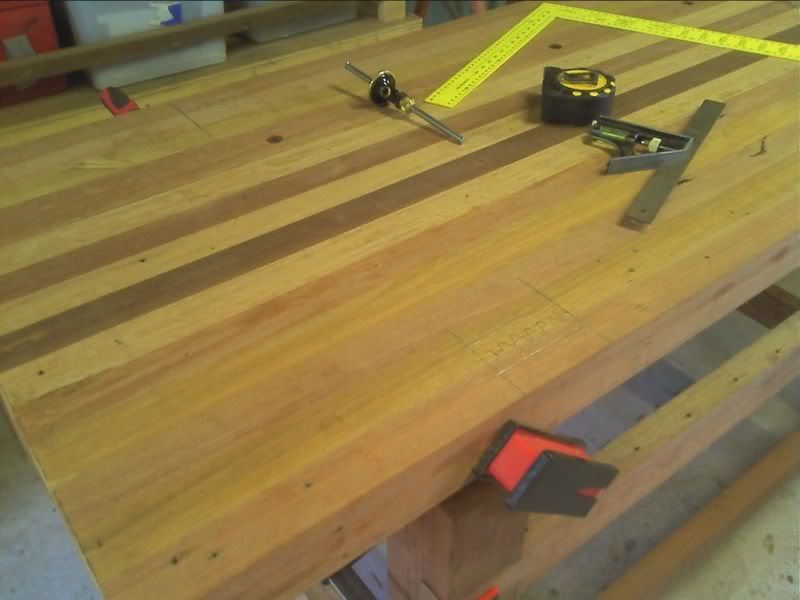
Can anybody have a guess at what type of timber is the second one from the front edge in the last photo? The yellow coloured one. Probably a bit difficult or impossible from the photos. A very yellow, waxy looking timber, seems to fracture rather than slice cleanly across the grain if you know what i mean.
I started to cut these mortises today and that stuff is HARD. A healthy swing of the mallet with a freshly sharpened chisel and it barely made a mark. Even a sharp forstner bit was barely cutting. I got it done but the chisels needed a sharpen before I started the next one.
-
3rd April 2011, 09:55 PM #37
Heavy Machinery
- Join Date
- Mar 2008
- Location
- Lambton, Newcastle, NSW, Australia
- Posts
- 4,957
Hi Tony, looking great mate. My guess at your mistery timber would be Tallowwood, has the right greeninsh tinge and your description sounds pretty close. It has a tight wavey grain that can wander when you try to split it. I was in Branxton thisarvo I could have called up and given you a lift.
How are those new chisels going? up to the punishment?
-
3rd April 2011, 11:47 PM #38
almost a woodworker
- Join Date
- Feb 2007
- Location
- blue mountains
- Posts
- 4,888
Looking like a great bench. Those big dovetails are very buisness like.
Regards
John
-
4th April 2011, 09:34 AM #39
The Laird
- Join Date
- Jan 2007
- Location
- Katoomba NSW
- Posts
- 4,772
Thanks Claw, Originally Posted by Claw Hama
It's good to know what my new nemesis is
You're welcome to drop in any time you're up this way, but be warned, I will utilise your lifting capacity and pick your brain if i need advice. Originally Posted by Claw Hama
 I will however offer refreshments as payment.
Yeah they stood up pretty well, I cut 1 1/2 mortises before I had to sharpen the 1' bevel edged chisel. I only had a 25� bevel on it so i sharpened it and put a 5� secondary bevel to see if it lasts a bit better. Originally Posted by Claw Hama
-
4th April 2011, 10:00 AM #40
The Laird
- Join Date
- Jan 2007
- Location
- Katoomba NSW
- Posts
- 4,772
Thanks John, Originally Posted by orraloon
I was undecided as to how to attach the front 'clamping rail'. A M&T joint wouldn't look right as the front edge was to be flush with the leg, I didn't want a straight rebate because it wouldn't have a shoulder to pull the legs in to and a half lap, to me, looked a bit ordinary. I initially rejected the DT as too difficult for my skill level. I thought it was something that i could make a real hash of. Glad i gave it a go. The fit was "gentle tap with the mallet to seat it" tight. It has been glued in with no other retaining. It should be ok as there will never be much outward pressure on it. I hope.
Still making this up as i go.
-
4th April 2011, 12:24 PM #41
Lignum Vexator
- Join Date
- May 2007
- Location
- North of the coathanger, Sydney
- Age
- 68
- Posts
- 9,417
Lookin Good
 regards
Nick
veni, vidi, tornavi
Without wood it's just ...
-
4th April 2011, 05:05 PM #42
Skwair2rownd
- Join Date
- Nov 2007
- Location
- Dundowran Beach
- Age
- 76
- Posts
- 19,922

I apologise NC. Haven't dropped in for a while!

Good progress!! Will be one very sturdy bench!!
-
5th April 2011, 07:31 PM #43
The Laird
- Join Date
- Jan 2007
- Location
- Katoomba NSW
- Posts
- 4,772
Got home from work a bit early today. Used my 'free' time to finish cutting the mortises for the legs. I was about to call a mate and see if he could help me flip it but i tried a sling type arrangement with ropes over the rafters. Lift each end a little bit at a time while tensioning the ropes. Flip the top over in the slings, lower a bit at a time and on she went.
Fit like a glove, with a couple of gentle taps to get everything aligned.
Even with the top just sitting there, I am really happy with how solid it is. I couldn't make it move even a fraction by pushing and pulling on one end.
I checked it for level and flat with a straight edge and it only needs a tiny bit of work.
I ran the No.6 across the top and then had a go with the 41/2. The different timbers in the top are coming off the smoother very nice. It's very tactile, I find myself running my hand over the top for no reason
I couldn't resist and ran a damp cloth over the top to see how it will look with a finish on.
Still a long way to go but i'm open to suggestions for a finish. I was thinking of plain BLO.
-
5th April 2011, 08:04 PM #44
Neander Normite
- Join Date
- Jan 2005
- Location
- Melbourne
- Age
- 65
- Posts
- 11,997
-
5th April 2011, 08:17 PM #45
Mildly Moderate
- Join Date
- Nov 2007
- Location
- Albury Well Just Outside
- Posts
- 13,315
Always good when you are nearing the end of a project.


 Reply With Quote


Similar Threads
-
filler for recycled hardwood
By s_m in forum FINISHINGReplies: 15Last Post: 10th June 2007, 11:36 AM -
filling recycled hardwood
By s_m in forum WOODWORK - GENERALReplies: 0Last Post: 1st June 2007, 10:52 PM -
Where to get recycled hardwood
By hsc07ww in forum TIMBERReplies: 5Last Post: 12th December 2006, 04:00 PM -
Recycled hardwood
By bobmundy in forum ANNOUNCEMENTSReplies: 0Last Post: 5th September 1999, 05:57 PM
