

 Thanks: 0
 Likes: 0
 Needs Pictures: 0
 Picture(s) thanks: 0
Results 76 to 90 of 127
Thread: Custom fg XR6 Turbo Ute Tray
-
24th May 2011, 10:51 PM #76
 Member


- Join Date
- Mar 2011
- Location
- Carrum
- Age
- 46
- Posts
- 61

-
24th May 2011 10:51 PM # ADSGoogle Adsense Advertisement
- Join Date
- Always
- Location
- Advertising world
- Age
- 2010
- Posts
- Many
-
26th May 2011, 09:42 PM #77
Member
- Join Date
- Mar 2011
- Location
- Carrum
- Age
- 46
- Posts
- 61
how would fibre glass go over timber floor?
-
28th May 2011, 01:03 PM #78
Trailer Bloke & Mild Mannered Moderator
- Join Date
- May 2007
- Location
- Tooradin, Vic.
- Age
- 52
- Posts
- 1,885
As in fibreglassing to the timber?? You need resin design for gluing to timber, such as Boatcote, as normal resin won't stick long term. Originally Posted by ben@SS&A
 Too many projects, so little time, even less money!
 Are you a registered member? Why not? click here to register. It's free and only takes 37 seconds!
 Doing work around the home? Wander over to our sister site, Renovate Forum, for all your renovation queries.
-
5th June 2011, 10:38 PM #79
Member
- Join Date
- Mar 2011
- Location
- Carrum
- Age
- 46
- Posts
- 61
bad woding on my part... i meant would it work? could i fibre glass the timer and make it last longer? or would the fibre glass scratch up even worse than the varnish?
speaking of skid pans....
heres a vid of the tray on the skid pan yesterday...
[ame=http://www.youtube.com/watch?v=vtvOgIsjnxY]YouTube - ‪the STAINLESS ute fg xr6 turbo 327rwkw skid pan‬‏[/ame]
-
7th May 2012, 03:05 PM #80
Member
- Join Date
- Mar 2011
- Location
- Carrum
- Age
- 46
- Posts
- 61
-
7th May 2012, 03:17 PM #81
Member
- Join Date
- Mar 2011
- Location
- Carrum
- Age
- 46
- Posts
- 61
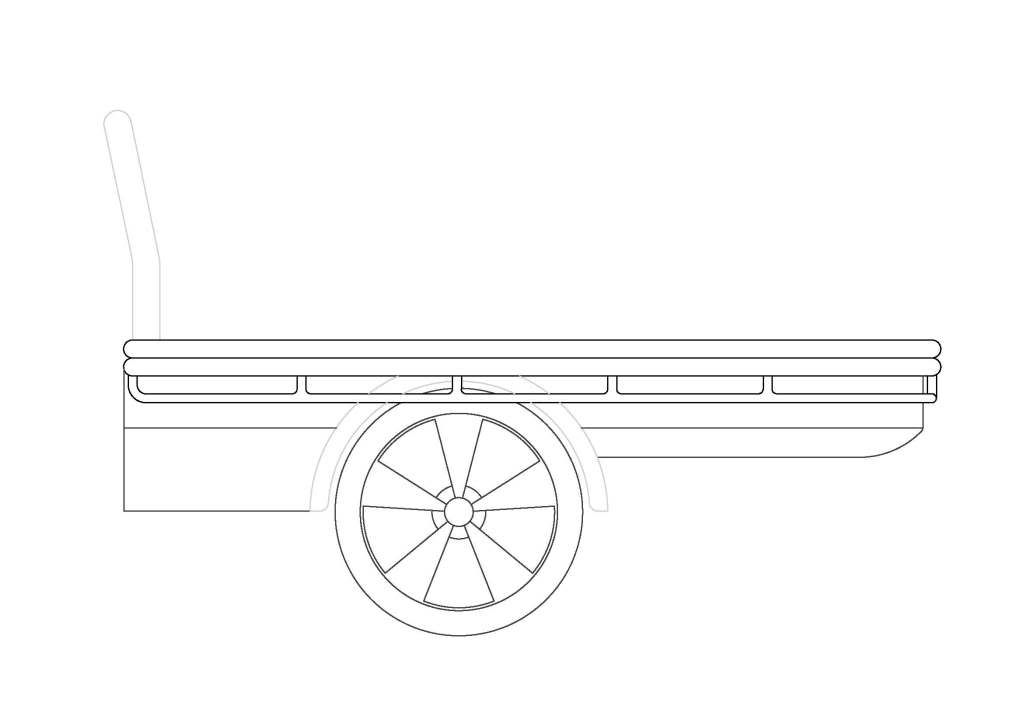
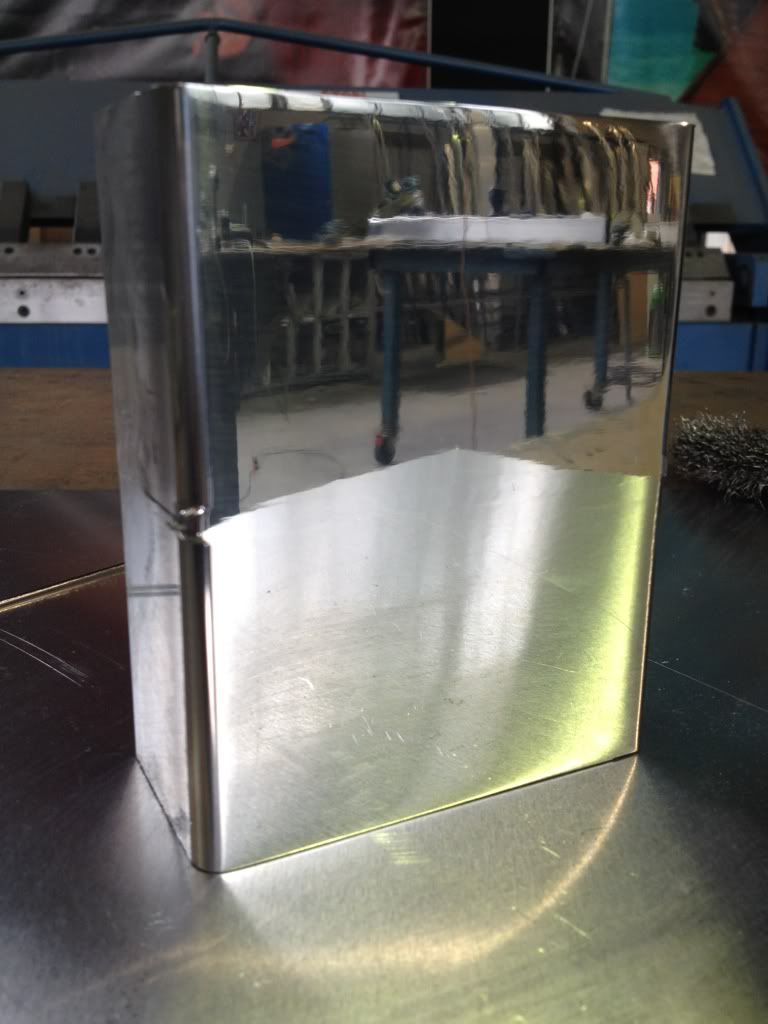
So Ive made a start, however encountered a problem when came to mirror polishing.
The weld material stands out from the rhs
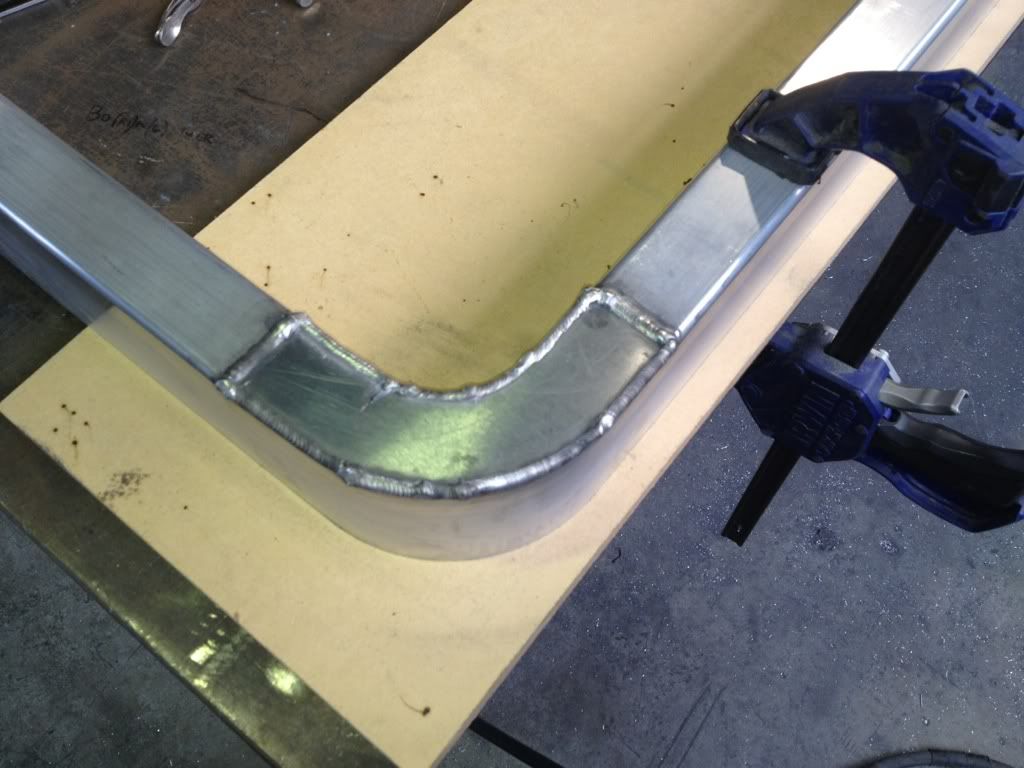
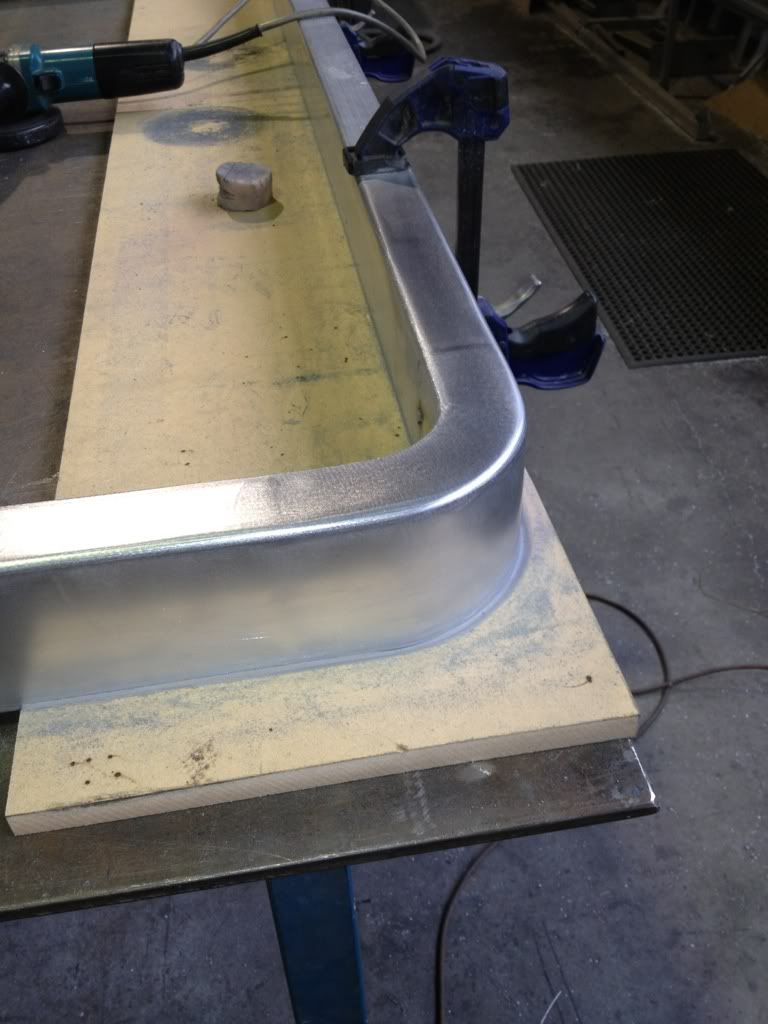
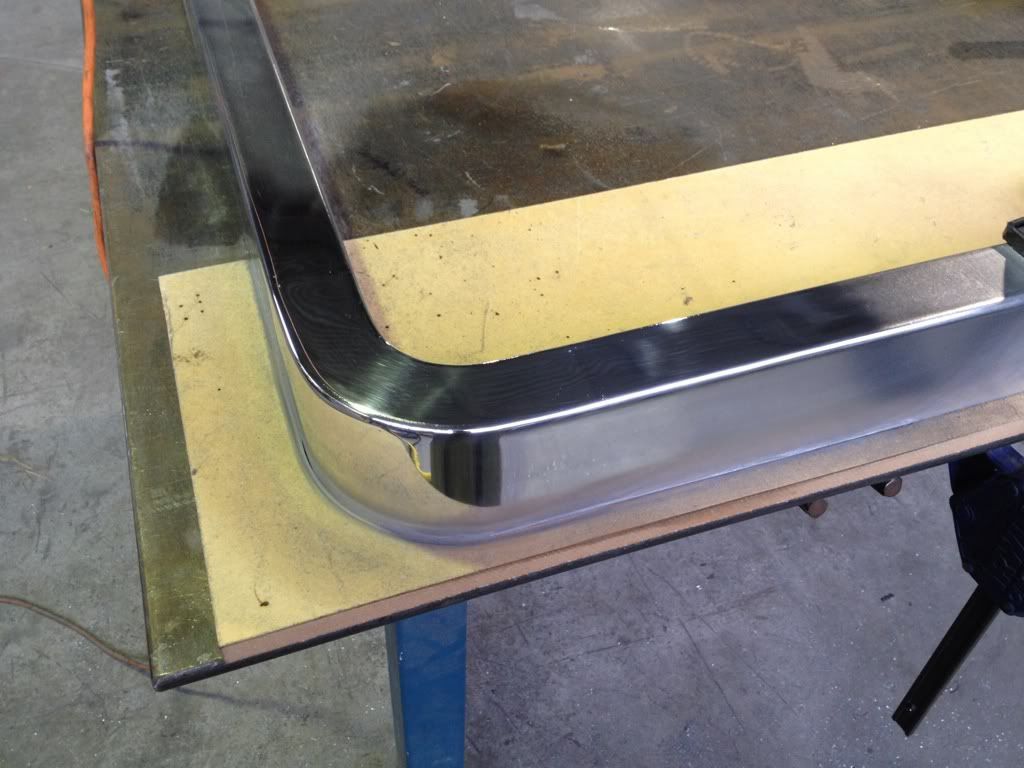
In 2nd pick you can clearly see the weld material. Once i polished it up it was still noticeable.
Is this because differend grade aluminium between wire (5356) and rhs (6060)?
Im no expert in aluminium so hoping someone here can see what im trying to acheive and steer me in the right direction.
-
7th May 2012, 03:28 PM #82
GOLD MEMBER
- Join Date
- Mar 2005
- Location
- In the shed, Melbourne
- Age
- 52
- Posts
- 6,883
I like it all polished aluminium
And remembering too that it'll cop scuffs ect. which I'd reckon would eventually see the paint scratch if it were pained.
This'll look 'beaut.
-
7th May 2012, 08:07 PM #83
GOLD MEMBER

- Join Date
- Sep 2010
- Location
- Lebrina
- Posts
- 1,099
The short answer is that it is due to the differing grades however I don't think you'll find it as noticable as you fear. Originally Posted by ben@SS&A
The most noticable area will be the top face where your radius section meets the rhs and even that is not too bad. Have a close look at a polished bullbar on a truck and you will pick the weld lines, step back a fraction and they disappear.
I have 10+ years experience in the aluminium welding industry and nobody has ever complained about this. Just a thought, but have you considered using 3mm Aluminium propeller plate for the headboard and highlights?
I like this design better than the original steel rhs version by the way.
-
7th May 2012, 08:34 PM #84
Member
- Join Date
- Mar 2011
- Location
- Carrum
- Age
- 46
- Posts
- 61
Cheers Karl.
Just before, I actually set the gilo backstop to 2mm and cut a piece off some 2mm sheet. Used it as filler wire on a test piece and it polished up a treat, was nearly impossible to tell it had been welded.
Next question with this method is weld strength and resistance to cracking. There must be a reason why 5356 is the norm for filler wire and not 6060 matching the parent material yeah?
As for the headboard, i think Ill wing it for now, wait till I can step back and look at it. Most likely run a few ideas through SolidWorks and render some drawings.
-
7th May 2012, 11:53 PM #85
GOLD MEMBER
- Join Date
- Sep 2010
- Location
- Lebrina
- Posts
- 1,099
I doubt that weld cracking will be an issue as the welded area will be soft as the proverbial and this tray is not likely to be tested to any great extent by what you have planned for the vehicle. Originally Posted by ben@SS&A
As for filler wire, my preferred weapon of choice is 5183 for mig wire, due to being harder and thus feeding better than 5356 and as you say for tig work 5356 is the norm. While other grades are available 5356 provides the best all round characteristics for colour match, corrosion resistance, ductility and strength, for example when welding 6061 Aluminium, 4043 filler wire is recommended with the note that 5356 may provide a better colour match. Your 2mm sheet is probably 5356 or 5052 grade.
The 5XXX series are alloyed with magnesium, are not heat treatable and have good strength with a bias towards ductility while the 6XXX series are alloyed with both magnesium and silicon, possessing higher strength but trading off some ductility also gaining the ability to be heat treated. Most structural extrusions are from the 6XXX family and would have a designation something like 6061T6, the T6 relating to the tempering of the material and its tensile properties.
A factor often not taken into account by engineers and those not experienced in aluminium fabrication is the effect that a weld has on the heat treatment of the material. Generally critical products such as loading ramps will be designed so that the welds are not reliant on outright tensile strength.
Happy polishing! (probably one of my least fovourite jobs, although I do like a nice polish job) I suppose you are using a barrel grinder, cloth wheel and wax?
-
8th May 2012, 07:35 AM #86
Member
- Join Date
- Mar 2011
- Location
- Carrum
- Age
- 46
- Posts
- 61
Hey Karl, you want a job?
Sounds like you know your stuff, as you can see Im trying not to miss anything.
Another thing is the guards will be fabricated from 5005 H34 sheet. Im hoping I can do the same trick as above for filler wire. I have 2 dished ends being spun now and plan to roll a cylinder, weld the dishes on each end the split it down the middle to form the 2 tubbs.
Next question, what wire would be best used the weld that material to the rha frame? At this stage im not 100% wether ill leave the stack of dimes effect or grind it smooth before polishing. I doubt any colour difference will be noticeable in this corner fillet weld.
And its a yes on the polishing equipment. Thats one area thats definately under control, although only having done mostly stainless for last 15yrs im open to your advice mate.
I have done some test pieces that came out as desired.
Started with 80 grit on orbital sander, then 120 then 600.
Then a firm sizal type wheel on the barrel grinder with a white cutting compound.
Then a soft mop wheel with green rouge compound to finish off.
-
8th May 2012, 12:08 PM #87
GOLD MEMBER
- Join Date
- Sep 2010
- Location
- Lebrina
- Posts
- 1,099
What you are doing sounds fine to me - if it works its good. Originally Posted by ben@SS&A
I don't use an orbital sander anymore as I have found that a disc sander/polisher with 150mm velcro discs is far quicker and polishes up quicker and easier when you come to that stage. As for grits I go 40 grit flap disc on 5" grinder to flatten welds and blend, 180 grit sanding disc, 400 grit sanding disc, finally 600grit if desired. The inportant point is to use candle wax on your flap disc to prevent clogging and to use good old velvet soap on the sanding discs, (just touch a bar of soap on the revolving sanding disc). Using this process you will find that at about the 400 grit stage you will find that the material is starting to get a semi polish on it. Particularly at the 400 grit and finer stages don't try to prolong the life of the sanding disc too long, if it needs replacement (looks like it is smearing the aluminium rather than cutting) then replace it and keep the velvet soap ut to the discs. For tube work I then move onto a 200mm lambswool buff on a sander polisher with 3M cutting compound, (comes in a 4L tin and looks like coffee coloured whipped cream), finally I finish off with another lambswool buff and a polish called "Purple" which will produce a deep polish that you will be proud of. For flat panels I would use the same method or your barrel grinder method. As you would be well aware I am sure, flat panels are the trickiest to get good even polishes on and even if I used a barrel grinder I would tend to run over the whole job with the lambswool buff and "purple". The lambswool buff will also reach some parts that a barrel grinder will struggle to reach and visa versa.
Over the years I have used these methods on everything from small racecar parts to truck bullbars and fuel tanks, (both building from scratch and smash repairs).
You may find that the aforementioned sanding method may even be worth trying on stainless.
-
8th May 2012, 01:29 PM #88
Member
- Join Date
- Mar 2011
- Location
- Carrum
- Age
- 46
- Posts
- 61
im pretty satisfied with my polishing results at the moment. a little grainy if you really look but the bigger picture it will be fine.
but its sure good to know your around to answer my annoying questions")
when it comes time to do the decking, Ive convinced myself I want it to be black (same colour as car).
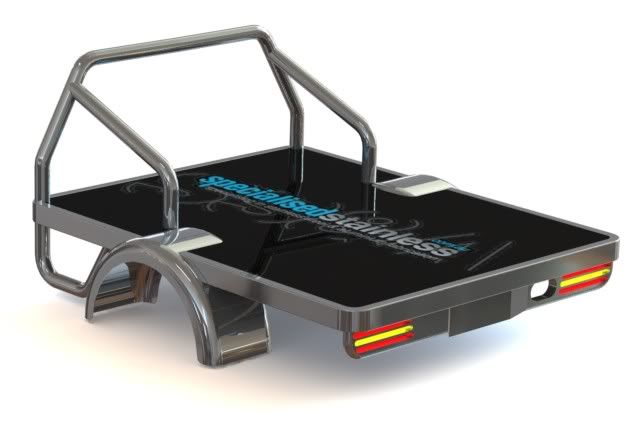
I am still keen to put it up in my new cnc router and cut my company logo into it. Then cut the letters from a mixture of coloured acrylic and polished stainless and recess it into the deck.
very quick and rough pic just to get an idea
So being a complete novice when it comes to timber, and I really do mean complete novice, I present this wonderful forum with a few more questions
what decking should i use if im going to spray it black (2 pac)?
will the paint be enough to seal it from weather?
would a clear coat be advised?
is decking even the right way to go givin what i am trying to accomplish?
Im open to all suggestions and ideas.
in a nutshell whats important to me
- polished frame and bars (under control)
- black floor (help appreciated)
- engraved/recessed company logo in floor. (under control)
-
8th May 2012, 03:41 PM #89
Hammer Head
- Join Date
- Jan 2005
- Location
- Sydney
- Posts
- 1,205
why dont you use 4mm alumium compsite panel thats pre finshed in black.
BUT it will scratch easy.


-
8th May 2012, 07:15 PM #90
Member
- Join Date
- Mar 2011
- Location
- Carrum
- Age
- 46
- Posts
- 61
and dint even easier


Similar Threads
-
Newbie Cigweld Transmig 165 turbo settings help??
By Jonesy_SA in forum WELDINGReplies: 10Last Post: 16th December 2010, 07:57 AM -
BF XR6 Turbo Ute Feedback Required....
By joez in forum MOTOR VEHICLESReplies: 8Last Post: 24th March 2010, 04:01 PM -
SIP Topmig 170 turbo
By abitfishy in forum WELDINGReplies: 17Last Post: 3rd December 2008, 07:11 AM -
Weldskill 140 turbo manual arc welder
By Unit_01 in forum WELDINGReplies: 2Last Post: 14th September 2007, 09:33 PM
