

 Thanks:
  Likes:
  Needs Pictures: 0
 Picture(s) thanks:
Results 166 to 180 of 245
Thread: Roubo Bench Issues and Questions
-
24th February 2012, 11:13 AM #166
 Be inspired. Be creative. Be bold.


- Join Date
- Apr 2001
- Location
- Perth
- Posts
- 10,820

Oy ... that is Aura, my son's bench dog. Be respectful. She is a vicious guard dog in her day job.

Regards from Perth
DerekVisit www.inthewoodshop.com for tutorials on constructing handtools, handtool reviews, and my trials and tribulations with furniture builds.
-
24th February 2012 11:13 AM # ADSGoogle Adsense Advertisement
- Join Date
- Always
- Location
- Advertising world
- Posts
- Many
-
24th February 2012, 11:40 AM #167
The prize lies beneath - hidden in full view
- Join Date
- Oct 2010
- Location
- 1017m up in Katoomba, NSW
- Posts
- 10,657
 Originally Posted by IanW

 Pretty square lookin' dog Derek. Don't know what your problem is with re-doing them. But I wouldn't try a 3/4" round - the fit would be too tight.
-
28th February 2012, 12:33 AM #168
Be inspired. Be creative. Be bold.
- Join Date
- Apr 2001
- Location
- Perth
- Posts
- 10,820
The Phoenix has arisen ....
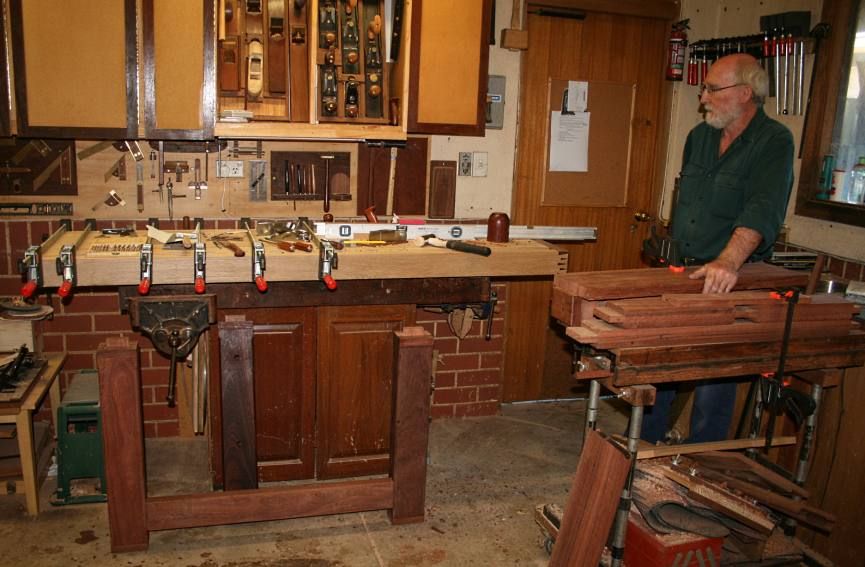
Well I guess it not quite a Phoenix, but the bench build was in threat when I left off at the last report.
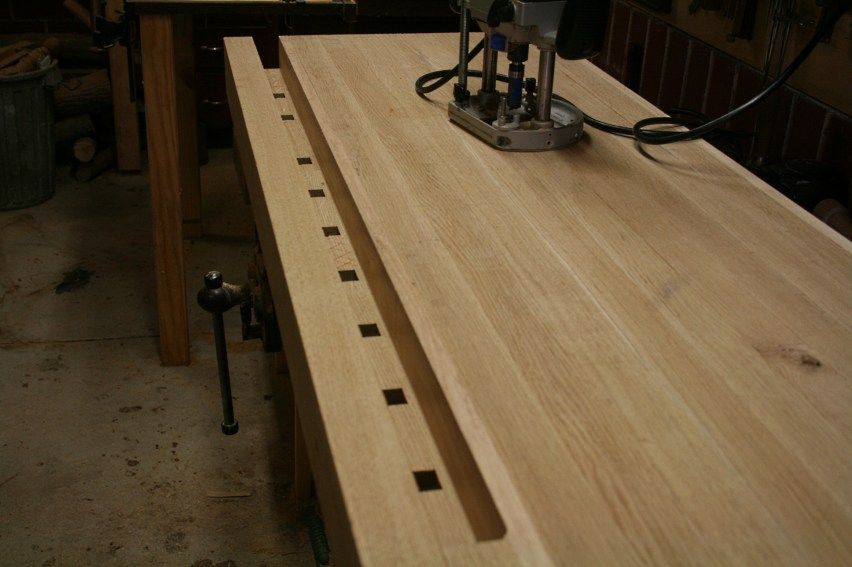
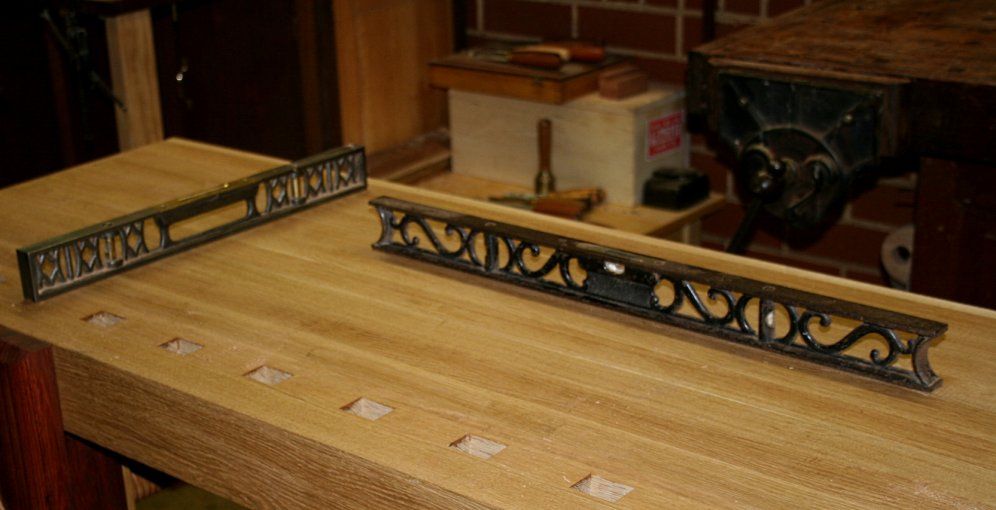
I had reached this point ... the top was looking good, and I was ready to assemble the base.

And then Perry, my ex-friend, discovered that I had inserted the dog strip back-to-front! Bugger. Looking through old photos I realised that the dry run had them the correct way, and I had marked them for the glue-up ... and then misread my markings. Bugger again.
A repair was complicated by the fact that the dogs angled 2 degrees ... now in the opposite direction!
Many on the forums recommended that the best way to deal with this was either to fill in the dogs and drill them for dowels, or to try and insert a shim and re-chisel the dog angle. It struck me that few were willing to start again - to cut out the dog hole strip and re-make it. Modifications as repairs are rarely satisfying. It is far better to have the Real Thing, even if this means pushing the envelope to do so.
Reshaping the dogholes is not practical. It is not just that they slope at 2 degees on both sides of the shaft, but that the head of the dog faces the wrong direction. Even if you turn this around, the support for the dog hole head is now absent. I don't want patches.
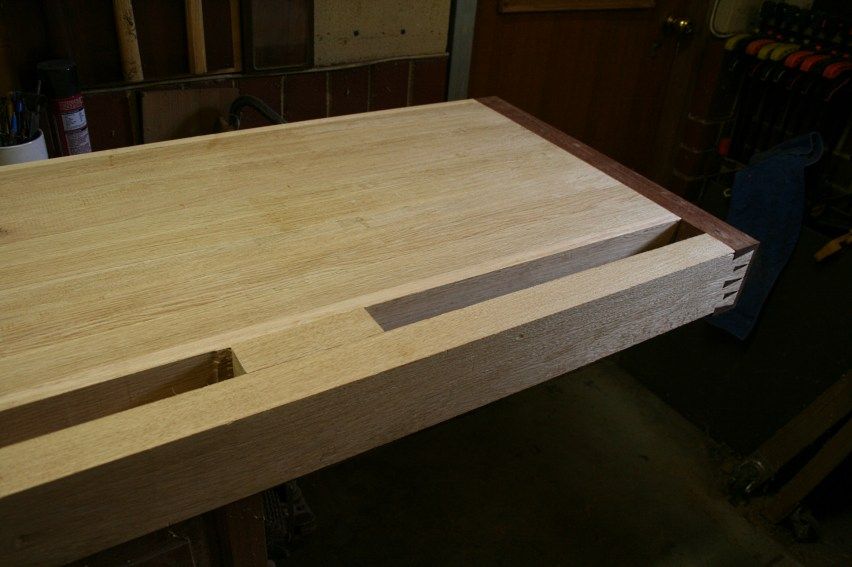
The plan was to remove only the dog hole strip as far as the last dog hole. There is no need to touch the side board or the area for the tail vise, and the latter includes leaving the dovetail well alone.
I must say a big Thank You to Perry who came over this weekend to help. I really could not have done this without him. The bench was rotated several times. Most importantly, Perry made sure I did not get anything back-to-front!
The main working tool here was a powered router. A series of guides were built to use with a bearing bit. The sides were deepened in a progressive manner, working to a few mm of the final dimension for the dog hole strip.
Top ..
Bottom ..
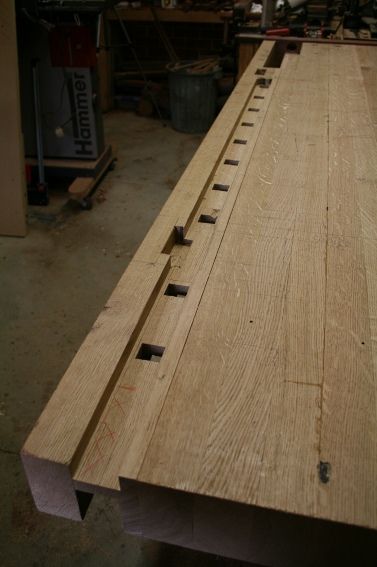
... keeping well away from the tail vise area ..
I had managed to beg another 4"x2" board in European Oak, and this was turned into a new dog strip with dogs 3" apart. This was an upgrade on the previous dog hole strip, where I joined pieces together having run out of this wood. It had look OK, but there were joins if one looked carefully. Now the strip was one continuous piece.

Checking that the strip ran in the correct direction!!!
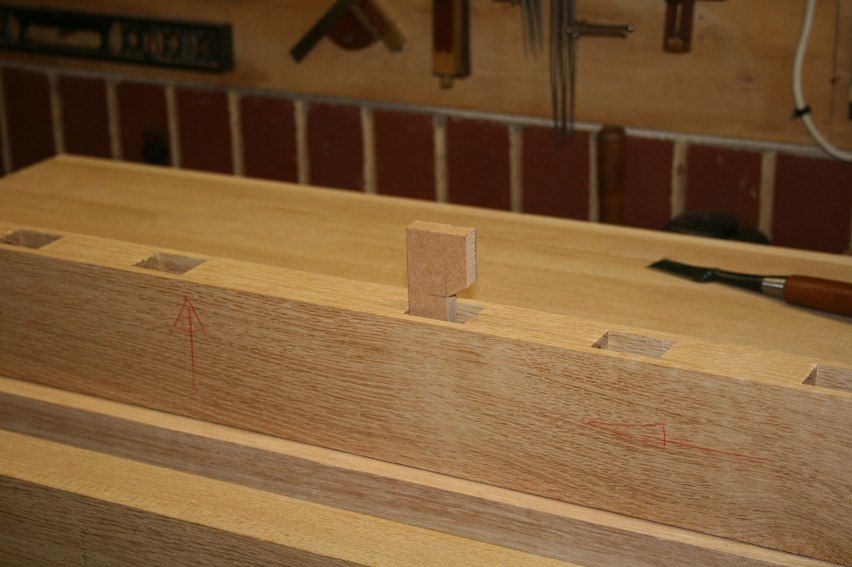
A temporary planing stop while I fine tuned the insert ...
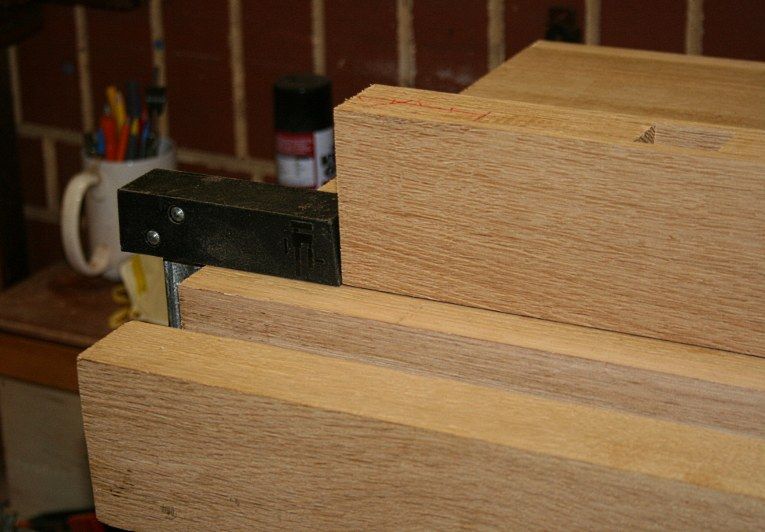
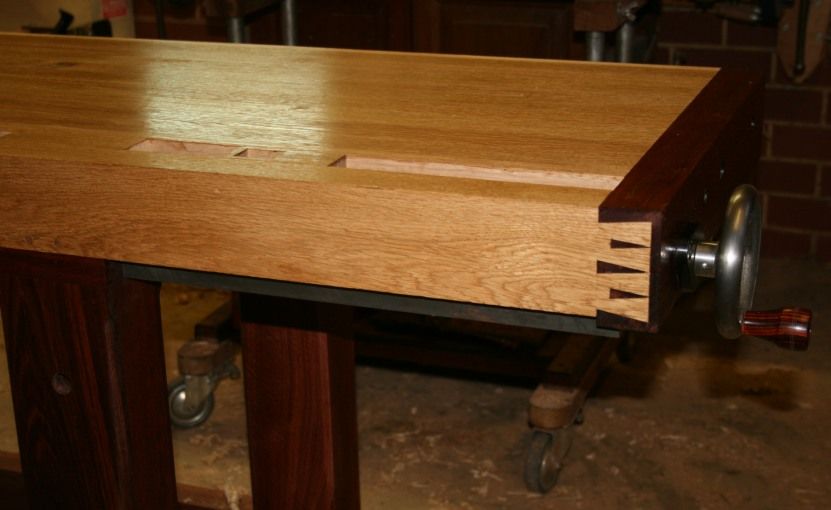
Here we are, glued up, the strip a little proud of the bench ... Perry looking on. Thanks again Perry.
That was Sunday night. I finished work today and had a few hours free. The first thing I did was plane the raised strip flush with the bench ...
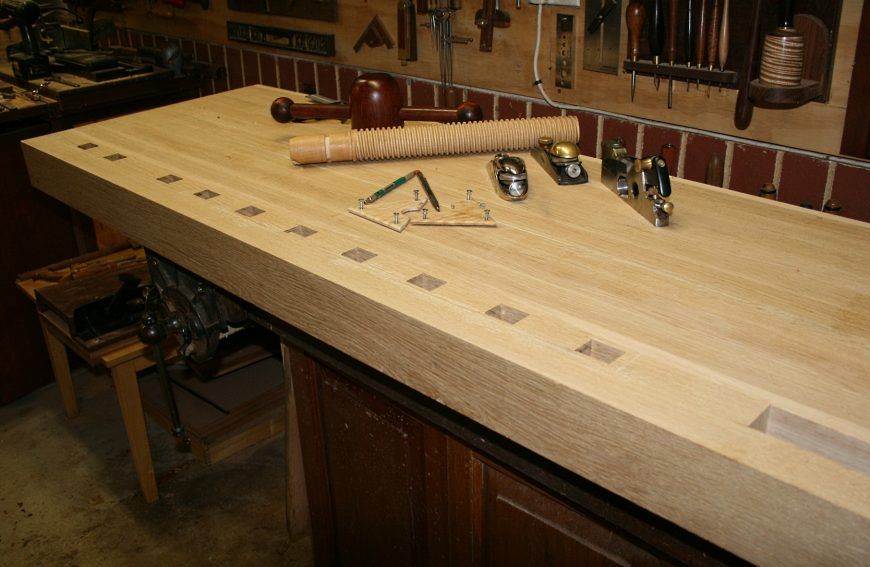
Even with a close inspection it was not possible to see that there had been a repair.

I am delighted with the way it turned out. On a high I decided to nail together the base.Visit www.inthewoodshop.com for tutorials on constructing handtools, handtool reviews, and my trials and tribulations with furniture builds.
-
28th February 2012, 12:34 AM #169
Be inspired. Be creative. Be bold.
- Join Date
- Apr 2001
- Location
- Perth
- Posts
- 10,820
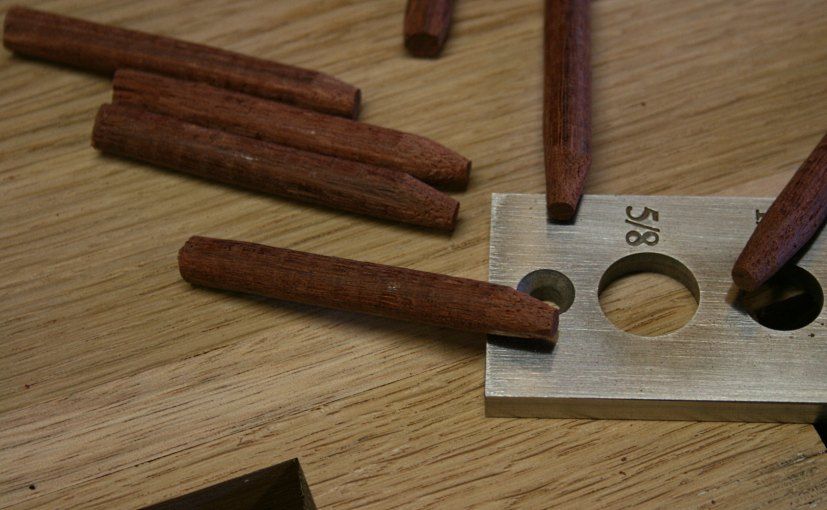
While preparing to draw-bore the stretchers into the legs ...

... a novel way of inserting the draw-bore pins occurred to me. I ran the pins through my pencil sharpener ...
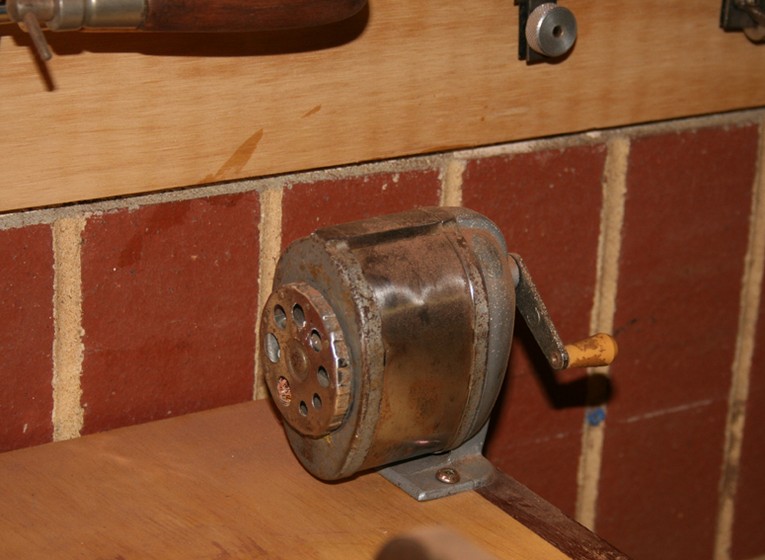
to taper the ends ...
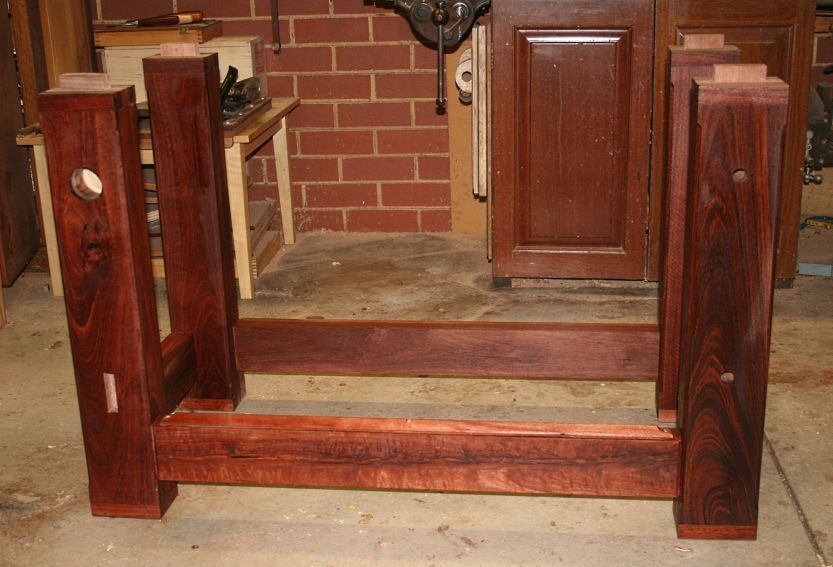
After a coat of oil the base ended up like this (I must point out that the flash does accentuate the figure) ...
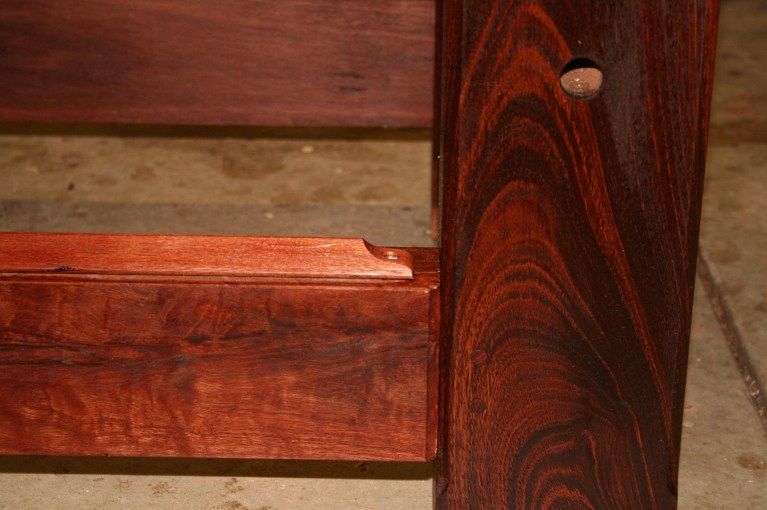
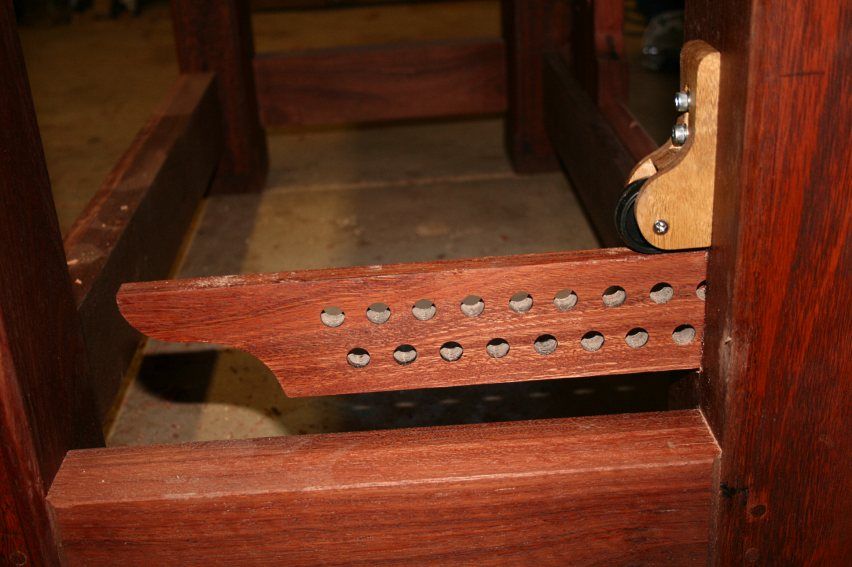
One detail for now - the sliding deadman lower guide. This is screwed on to the stretcher. The idea is that I will not have to lift the deadman over it (when fitting the deadman), and this should translate into a fit with closer tolerances) ...
Next weekend I should finish the bench. Just the leg vise and deadman to complete (80% done) and the tail vise to screw on. Then the dogs to machine. The shelf has to be made. And a few other odds-and-ends.
Regards from Perth
DerekVisit www.inthewoodshop.com for tutorials on constructing handtools, handtool reviews, and my trials and tribulations with furniture builds.
-
28th February 2012, 08:27 AM #170
SENIOR MEMBER
- Join Date
- Jul 2008
- Location
- Aspley, Brisbane
- Age
- 46
- Posts
- 362
Derek,
Glad to see the fix turned out so well. Nice work by the both of you. I also stumbled across the pencil sharpener trick a few weeks back when making some pins for a breadboard end. Makes it just that little bit easier.
The base also looks great and I can't wait to see the top and base put together.
Regards,
Denim.
-
28th February 2012, 08:34 AM #171
Lignum Vexator
- Join Date
- May 2007
- Location
- North of the coathanger, Sydney
- Age
- 68
- Posts
- 9,417
Nice recovery

and that bench top looks superb
looking forward to seeing it all come togetherregards
Nick
veni, vidi, tornavi
Without wood it's just ...
-
28th February 2012, 10:30 AM #172
 Fossil Member
- Join Date
- Jan 2005
- Location
- Perth
- Posts
- 1,181
Hi Derek,
Top job. I dare say that Mk II looks even better than Mk I. Only too happy to have been able to lend a hand, (I knew my skills at lifting heavy objects would be handy one day).
And yes, I could watch people work all day, as I did mostly. Some careful planning on your part got the old strip out very nicely and safely.
What Denim and Nick said, looking forward to seeing the top on the base.
Cheers
Pops
-
28th February 2012, 11:07 AM #173
The Russel Coyte of Woodworking
- Join Date
- Mar 2009
- Location
- Brisbane, Australia
- Age
- 52
- Posts
- 293
Derek
I am very jelous because I have a three week old new born and I am really struggling to get shop time. I sneak downstairs when SWMBO turns her back and as I am just starting to make some saw dust I hear the call...........bugger!
It looks superb! Can't wait to see the finished bench in action.
Milo
-
28th February 2012, 12:27 PM #174
SENIOR MEMBER
- Join Date
- Jul 2008
- Location
- Aspley, Brisbane
- Age
- 46
- Posts
- 362
hahaha... Good luck Milo. My first was born 4 years ago and I'm still sneaking into the shop. Every now and then I feel a pair of red pearcing eyes boring a hole in my back but I'm slowly re-gaining my time back. Originally Posted by Milo
Regards,
Denim.
-
28th February 2012, 01:37 PM #175
The Russel Coyte of Woodworking
- Join Date
- Mar 2009
- Location
- Brisbane, Australia
- Age
- 52
- Posts
- 293
Denim
HOLY MACK! Its taken you 4 yeas to get back into the shop....bwaaaaaaaaaaahaaaaaaa!
 .
.
Oh well I will finish my bench in 4 years time then...........
-
29th February 2012, 11:21 PM #176
GOLD MEMBER
- Join Date
- Feb 2003
- Location
- back in Alberta for a while
- Age
- 68
- Posts
- 12,006
Milo Originally Posted by Milo
practice this mantra
any time, any place, any surface -- make sure SWMBO grabs a bit of sleep whereever and whenever she can
means she's asleep when you sneak into the shed
regards from Alberta, Canada
ian
-
1st March 2012, 08:23 AM #177
Lignum Vexator
- Join Date
- May 2007
- Location
- North of the coathanger, Sydney
- Age
- 68
- Posts
- 9,417
... and use handtools - less likely to wake her up Originally Posted by ian
 regards
Nick
veni, vidi, tornavi
Without wood it's just ...
-
1st March 2012, 01:01 PM #178
Junior Senior Member
- Join Date
- Dec 2008
- Location
- Adelaide, SA
- Posts
- 962
Yes, I'm in the same kiddy situation, & have discovered that hand tools are not only quieter but more fun, & far more rewarding. Originally Posted by Sawdust Maker
-
2nd March 2012, 06:08 AM #179
GOLD MEMBER
- Join Date
- Aug 2009
- Location
- Armadale Perth WA
- Age
- 55
- Posts
- 4,524
That's what got him into this predicament in the first place Originally Posted by ian
Pops:
From Favoured Friend to Most Least Wanted to Essential Assistant
Great recovery/improvement there Derek - lesson to us all - must have felt pretty sickening, at least briefly. But you have elegantly leapt over the reversed dog-holes of disappointment to land confidently in the encompassing lap of thank-god-that's-fixed-oh-christ-I-still-haven't-finished-the-bloody-thing-but-it's-close

Paul
-
6th March 2012, 01:28 AM #180
Be inspired. Be creative. Be bold.
- Join Date
- Apr 2001
- Location
- Perth
- Posts
- 10,820
The bench is basically done. Just a few lesser pieces to build - the dogs (well, you cannot use the tail vise without them), the parallel guide pin (made one in steel ... hated it, and will turn one from Wandoo, a very hard timber), and the tool shelf.
I left off last weekend with the new dog strip installed. First chance I had on Saturday I chopped the last mortice (that the new strip had removed), and drilled the holes for the pegs to attach the top to the legs. I am not draw boring the top as this would make it very difficult to undo should I ever need to break the bench down.
And then I grabbed Jamie, my 19 year old son, and we lifted the top off the old bench, turned it over, and placed it on the base. A little wiggle ... a jiggle ... and the mortices dropped over the legs tenons. I had a bench.
Man, this is one solid construction! Even without the pegs being driven home, it was impossible to move. The pegs, by the way, were made from Oak. I thought that Jarrah would look too busy.
I slapped on a couple of coats of oil ...
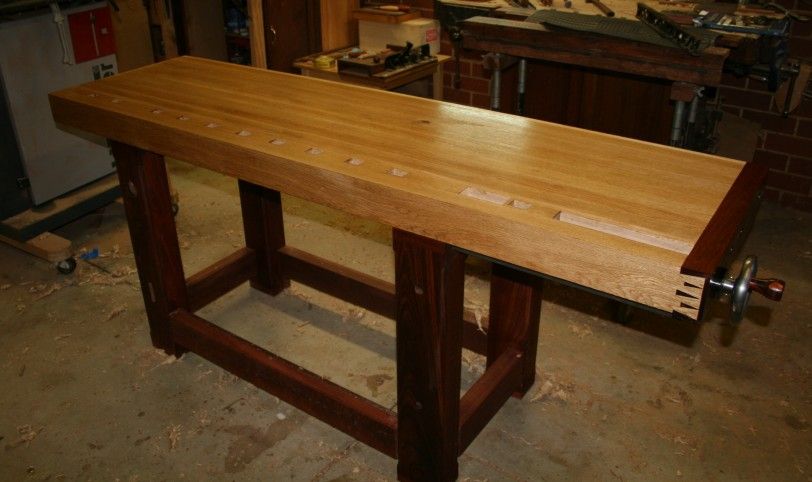
The top is flat .. flat .. flat ..
The Benchcrafted tail vise (wagon vise) ...
Hey Wilbur, this bit is for you. First of all, another Thank You for the vise screw.
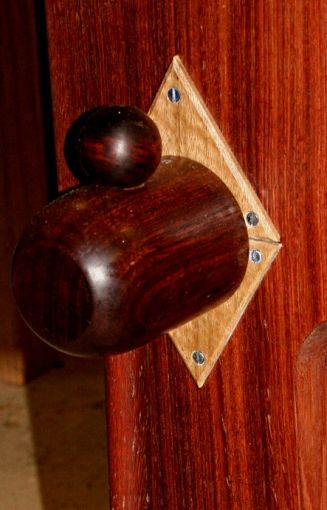
For the information of others, Wilbur purchased a pair of screws from "someone", who made them for him. This was not one of the current vendors, such as Big Wood Vise. The main differences were that the diameter of the screw is 2" and that it is a two-piece construction (the screw and the hub are separate). I decided to personalise the screw by turning my own hub from Jarrah to match the chop. In one of his emails to me, Wilbur pointed out that glueing the hub and screw together did not work well, and that he had added a dowel through the hub. Great idea! I needed to make my dowel removable (to dissemble the legvise), and so I drilled through the hub and screw shaft, then threaded the screw shaft for a bolt ...
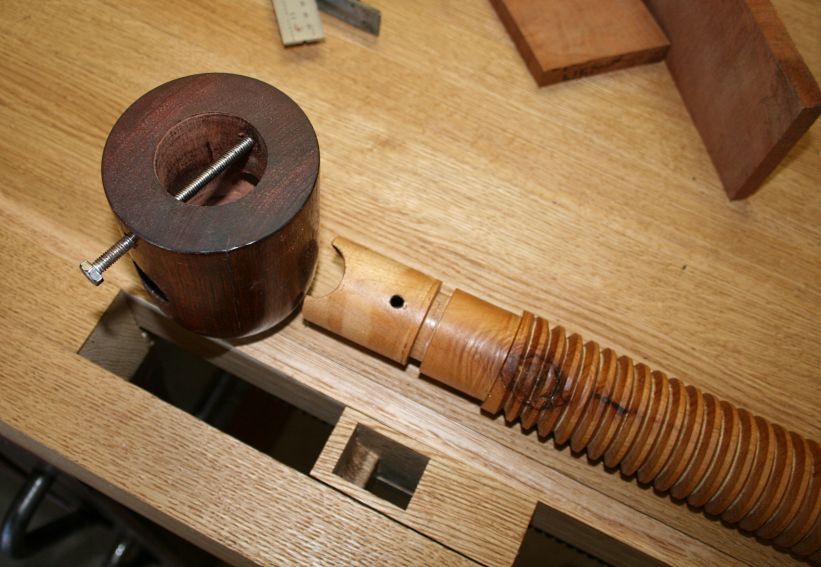
The bolt head was removed and a slot sawn for a screwdriver ...
Here is the legvise complete ...
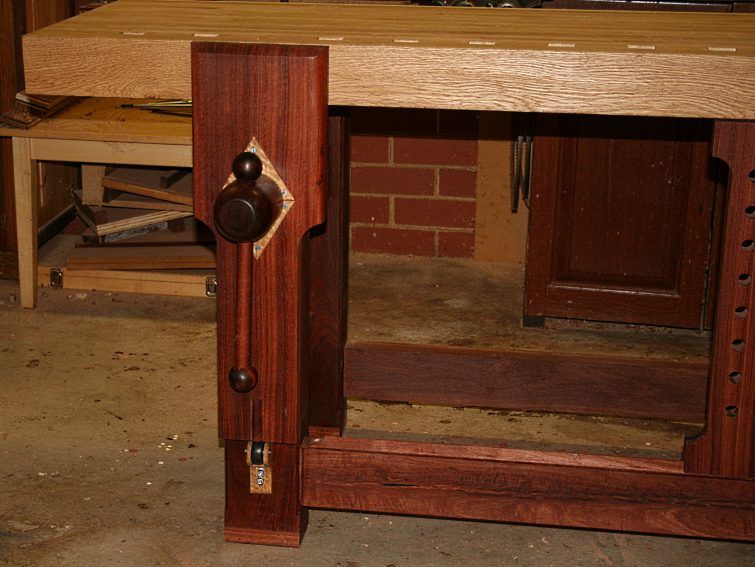
The garter is made from a stunning piece of curly Myrtle, which links to the Oak top.
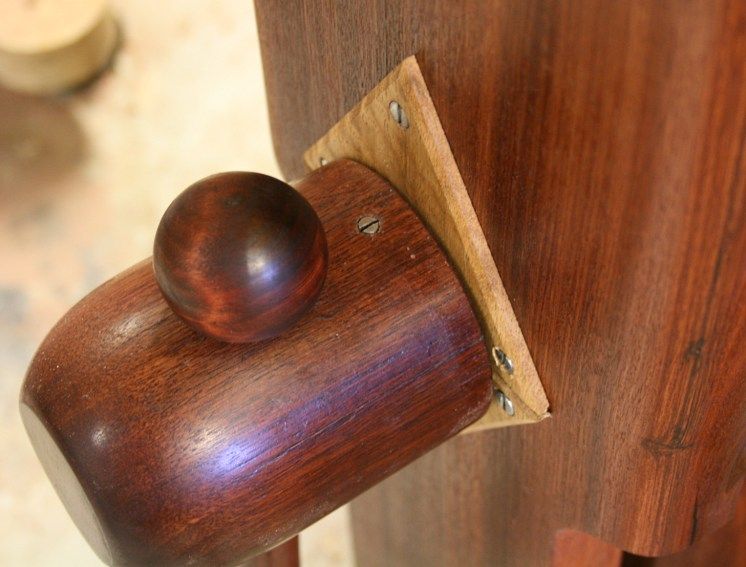
This was also used for the leg glide rollers (I cannot praise highly enough this idea from Jameel. Until they were added, the leg vise was struggling. The rollers transformed the construction. It now slides back-and-forth with ease, and holds thin boards tightly with little force) ..
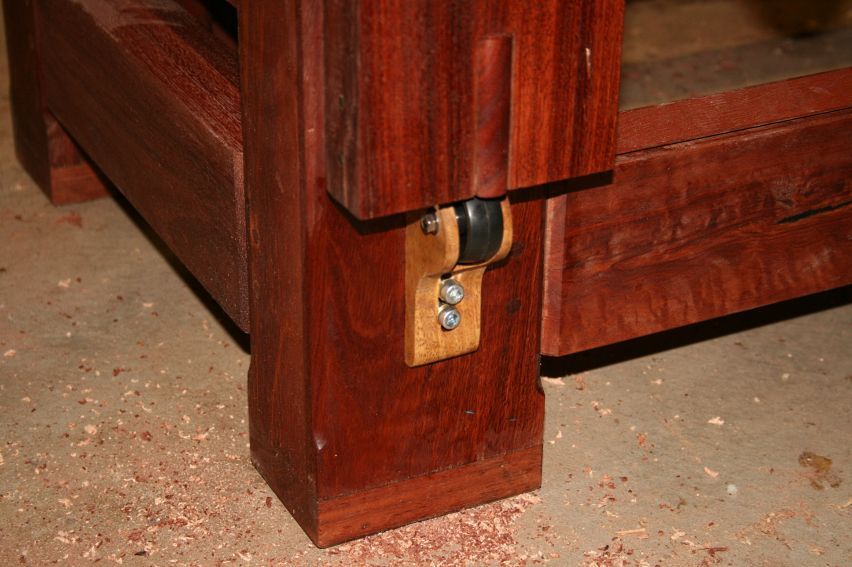
The leg glide begins as a through tenon. This is rounded at the front of the chop ..

The leg glide (from inside the base) ...

 Visit www.inthewoodshop.com for tutorials on constructing handtools, handtool reviews, and my trials and tribulations with furniture builds.


 Reply With Quote


Similar Threads
-
Underhill's Roubo bench
By The Pom in forum THE WORK BENCHReplies: 4Last Post: 14th June 2011, 11:57 AM -
Dan's Blackbutt Roubo Bench
By BozInOz in forum THE WORK BENCHReplies: 215Last Post: 8th April 2011, 08:21 PM -
WIP Roubo bench
By mic-d in forum FURNITURE, JOINERY, CABINETMAKING - formerly BIG STUFFReplies: 48Last Post: 30th January 2009, 04:34 PM -
Bench Questions
By noodle_snacks in forum WOODWORK - GENERALReplies: 89Last Post: 13th March 2006, 11:32 PM -
bench top glue-up questions
By Richie in forum GLUEReplies: 3Last Post: 18th February 2006, 12:00 AM
