

 Thanks:
  Likes:
  Needs Pictures: 0
 Picture(s) thanks:
Results 211 to 225 of 245
Thread: Roubo Bench Issues and Questions
-
13th March 2012, 09:26 AM #211
 GOLD MEMBER


- Join Date
- Mar 2004
- Location
- Brisbane (western suburbs)
- Age
- 77
- Posts
- 12,117
 Evolution of the dog
Once again I see great minds think alike, Derek - at least when it comes to solving the problem of how to make a dog 'sit' on command.

I think I posted on this somewhere else & possibly in this very thread, so forgive me if it's unnecessary repetition - advancing years & all that.
On my first bench I made some wooden dogs that were a firm fit, which worked ok for a month or two, but of course they would get too tight in wet weather & too loose when it was dry, so I tried a different approach. I made the dog a bit wider than the slot and cut a leaf 'spring' in it. That worked ok, but after a while the wood set, & lost its 'spring', so I drove a small countersunk screw into the kerf to re-spring it a bit. I have had to tighten the screw up a bit more from time to time to compensate for lost spring, but it extended their life by many years.
I also made a few with a separate leaf screwed on, like the ones you made. This is a pretty good solution as the spring can be changed if necessary.
A small problem with the wood spring method is that it has a limited working range, & if you need to lift the dog a good height above the surface, it doesn't hold, so I now use method # 3 - a large ball catch placed in one side. If you put the catch in the right spot, you get good holding over a range equal to the depth of the bench top. I was worried this might wear a groove in the dog hole & stop functioning after a while, but have been using them for quite a few years now, with no problems. My bench is hard Maple, which isn't as tough as some of our hardwoods, so ball catches ought to work indefinitely in benches made of Spotted Gum & the like. The advantage of this system is it's very quick & easy to make, and the catch is re-cyclable if the dog happens to have a nasty accident & needs replacement (though I must say, that though many of mine show signs of rough use, I have only badly damaged one or two in all the years I've been using them). The disadvantage is that a ball catch costs much more than a couple of small screws....
Cheers,IW
-
13th March 2012 09:26 AM # ADSGoogle Adsense Advertisement
- Join Date
- Always
- Location
- Advertising world
- Age
- 2010
- Posts
- Many
-
13th March 2012, 11:54 AM #212
 Fossil Member
- Join Date
- Jan 2005
- Location
- Perth
- Posts
- 1,181
Hi Derek,
I like the contrast of the Jarrah dogs in the Oak top, and all smooth, no holes when all fitted with dogs.
Wow !!! What a clean up for that corner of your workshop. So much brighter with the new bench too.
Cheers
Pops
-
13th March 2012, 01:52 PM #213
The prize lies beneath - hidden in full view
- Join Date
- Oct 2010
- Location
- 1017m up in Katoomba, NSW
- Posts
- 10,662
Whilst it does not look as handsome as suede leather I've found that the very cheap perforated rubber mats have enormous gripping power. Where required I glue it to fences etc with polyurethane glue (a very thin layer so that it does not expand out into the perforations). I made some timber clamps for my drill press, and glued a 2x2cm piece on the foot of the clamps with spectacular gripping results. Originally Posted by derekcohen

I know you don't have Aldis in the west (yet) but recently I lucked in on one of their specials which was rolls of this rubber (thicker than usual, 3mm uncompressed). For $5 i got a 2 metre by 0.5 metre roll, so I purchased 10 of them to do all my tool draws (and many to come)! It's a nice off-white colour which is not garish like some of the colours can be, so if you like I can post you a piece to do the job (I have 6 rolls left). They also had it in black and dark, almost charcoal brown which I eschewed as I want no darkness in the draws. I use this stuff for all sorts of things - on the dash board to stop the sunnies et al from flying around, under lamps, ornaments etc for added safety. Best stuff ever.
It stops all movement (except rolling) of the tools when the drawer is opened/shut:

Cheers, Brett
-
13th March 2012, 02:25 PM #214
Be inspired. Be creative. Be bold.
- Join Date
- Apr 2001
- Location
- Perth
- Posts
- 10,820
Thanks Brett
I have that rubber in my workshop - it makes a good surface upon which to hold work as you rout.
However, for a work bench it is not durable enough. The reason for suede leather is that it is tough and I prefer that there is some texture (over a smooth surface).
Regards from Perth
Derek
p.s. Brett, I will reply to your email when I get a chance.Visit www.inthewoodshop.com for tutorials on constructing handtools, handtool reviews, and my trials and tribulations with furniture builds.
-
13th March 2012, 02:34 PM #215
The prize lies beneath - hidden in full view
- Join Date
- Oct 2010
- Location
- 1017m up in Katoomba, NSW
- Posts
- 10,662
Yes I know what you mean about durability, but the poly glue seems to solve that problem - I've given those clamps etc a fair belting over two years and not even an edge or corner has lifted or torn. I was using the thinner stuff, and clamped it flat while the glue dried and that seemed to make it permeate the rubber, and also take the spring out of the rubber.
-
16th March 2012, 12:12 AM #216
GOLD MEMBER
- Join Date
- Feb 2003
- Location
- back in Alberta for a while
- Age
- 68
- Posts
- 12,006
Derek Originally Posted by derekcohen
I meant to ask earlier.
going on your first photo, did you make thsoe dogs one at a time, or did you cut them in batches after milling a boardregards from Alberta, Canada
ian
-
16th March 2012, 03:33 AM #217
Be inspired. Be creative. Be bold.
- Join Date
- Apr 2001
- Location
- Perth
- Posts
- 10,820
Hi Ian
All the dogs were exactly the same size since the same template was used to rout the holes.
The Jarrah section was milled to fit exacty ..
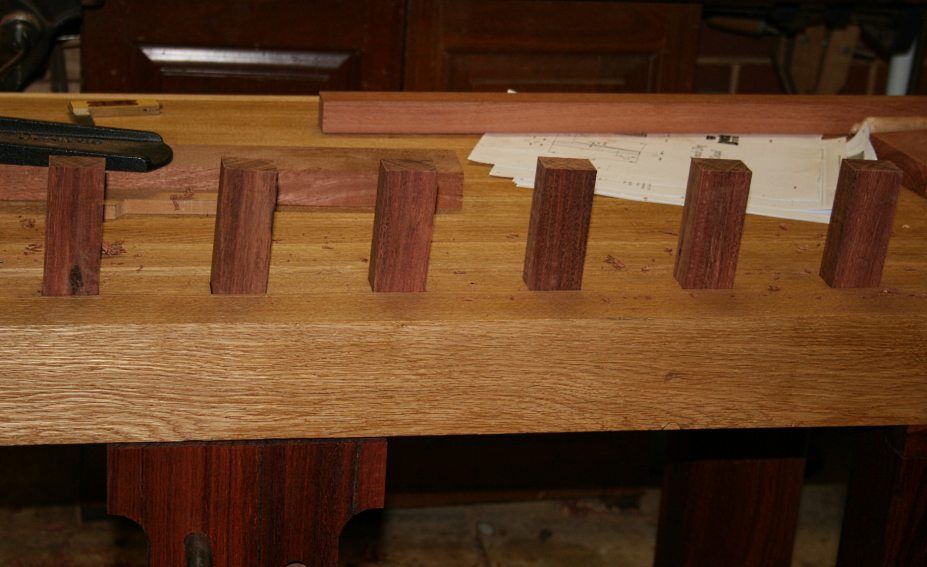
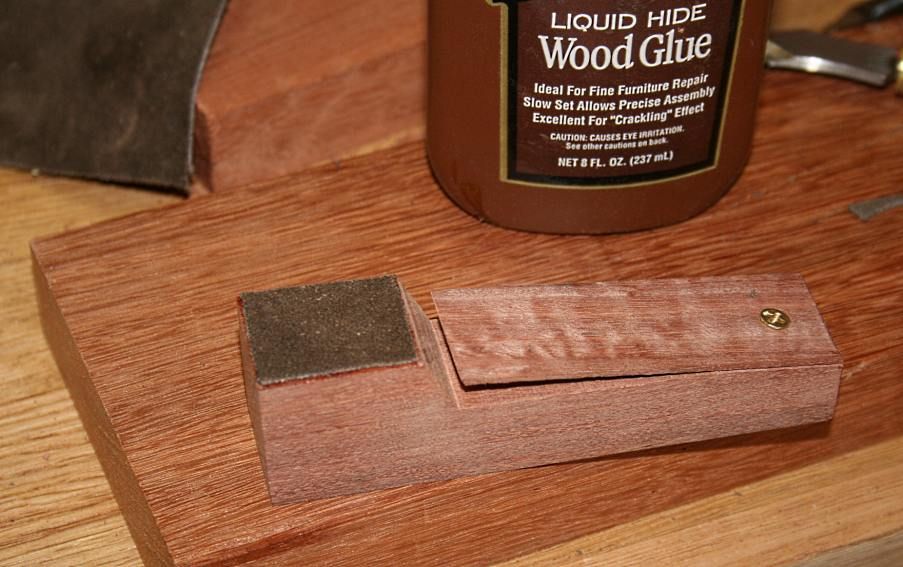
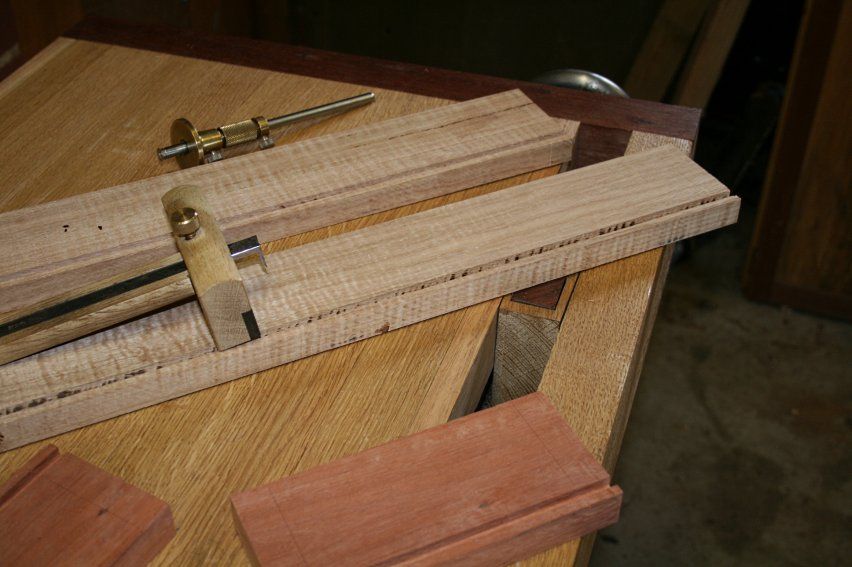
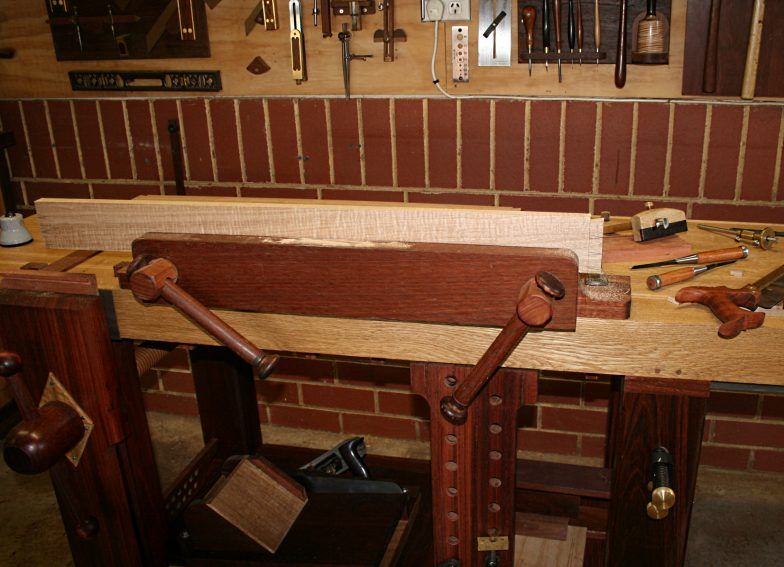
Here is a template alongside a blank ...
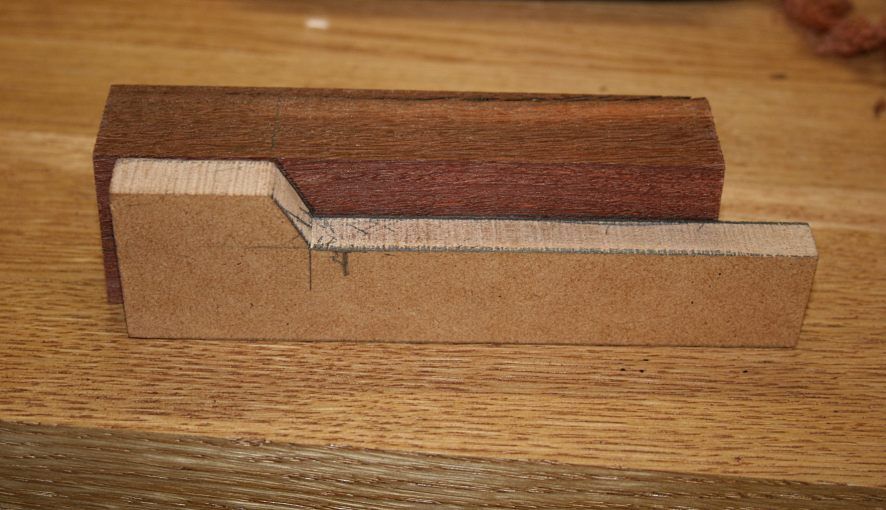
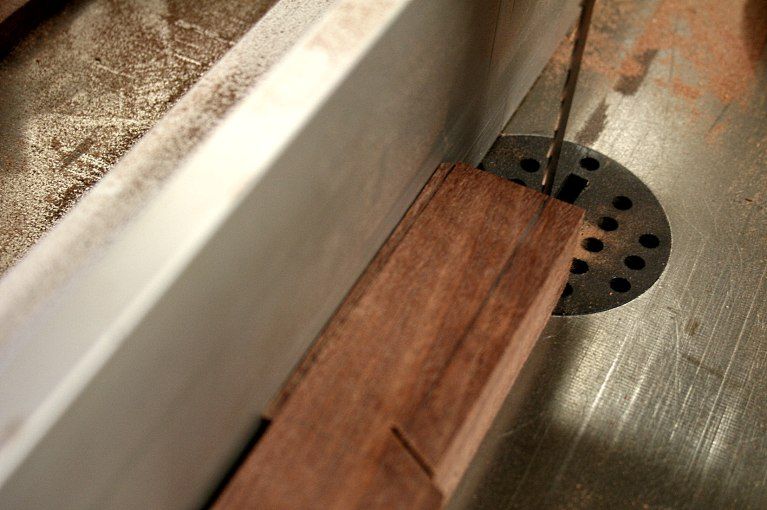
Two cuts were made on a bandsaw, one to remove a 2mm thick strip (to be used for the spring, and the second cut the angle (note that it runs past the mark by the thickness of the spring) ...
The spring was then placed against the fence and the blank sawn. This resulted in the correct width for the hole once the spring was attached ...
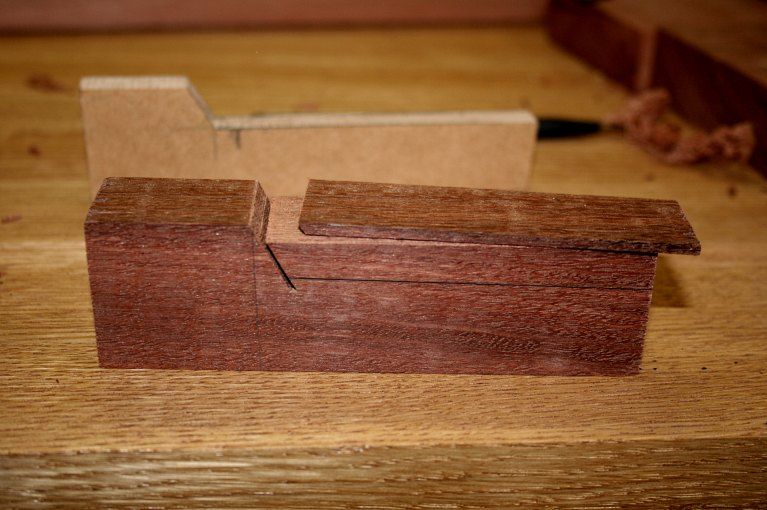
Now chamfer the end with a chisel and screw in the spring ...
Regards from Perth
DerekVisit www.inthewoodshop.com for tutorials on constructing handtools, handtool reviews, and my trials and tribulations with furniture builds.
-
17th March 2012, 10:18 AM #218
SENIOR MEMBER
- Join Date
- Jan 2008
- Location
- NSW southern Highlands
- Posts
- 548
When I made my bench, I made the dogs about 60 mm longer than the bench thickness, which allows the dogs to be pushed up much higher & still provide a sufficient grip from the spring. The spring is made from the same material as the dog, Tas oak. From time to time if the spring loses its grip I undo the screw and flip over the spring & refit. I have not found it necessary to face the dogs with anything.
They are still going strong after 25 years or so, so they must be working.
Regards
-
27th March 2012, 03:15 AM #219
Be inspired. Be creative. Be bold.
- Join Date
- Apr 2001
- Location
- Perth
- Posts
- 10,820
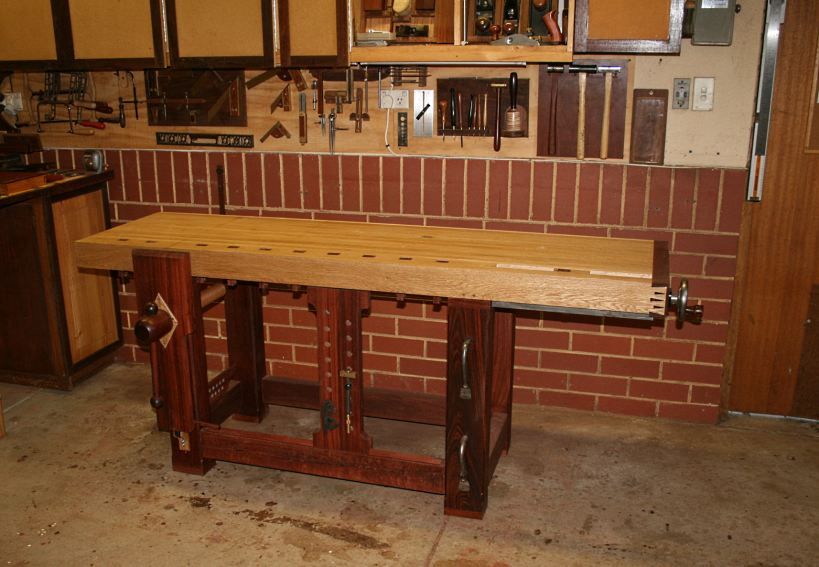
I declare this bench finished.
This bench is done. Time to move on.
I am very happy with the way it has turned out. Somewhat relieved and always a little amazed when things work out. Here are the finishing touches, plus a road test to illustrate the work holding areas.
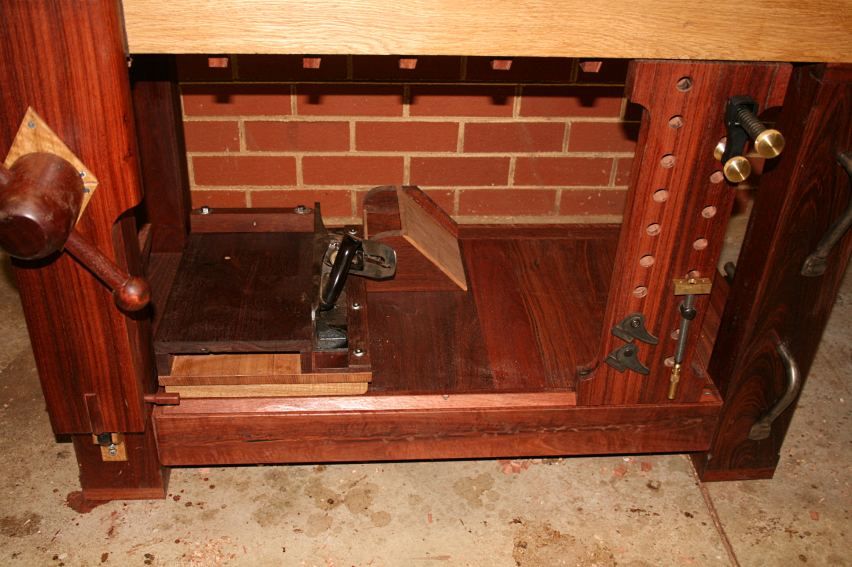
When we left off last the bench had reached this stage ...
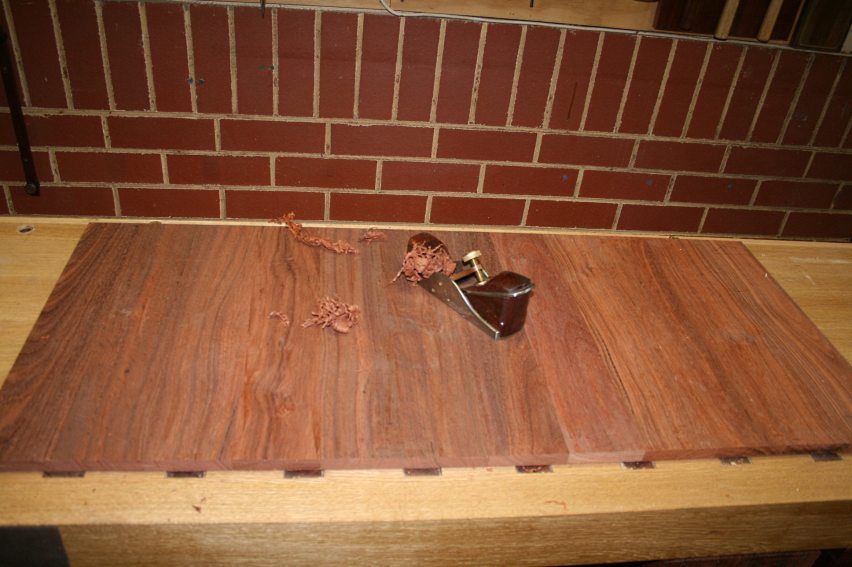
I returned to the fray on the weekend. The first task was to build the shelf. This is made of 5/8" thick (after levelling) Jarrah. I glued the panel up last week. Its weight adds another 10 kg (22 lbs) to the total, bringing the final weight of the bench to 192 kg or 422 lbs.
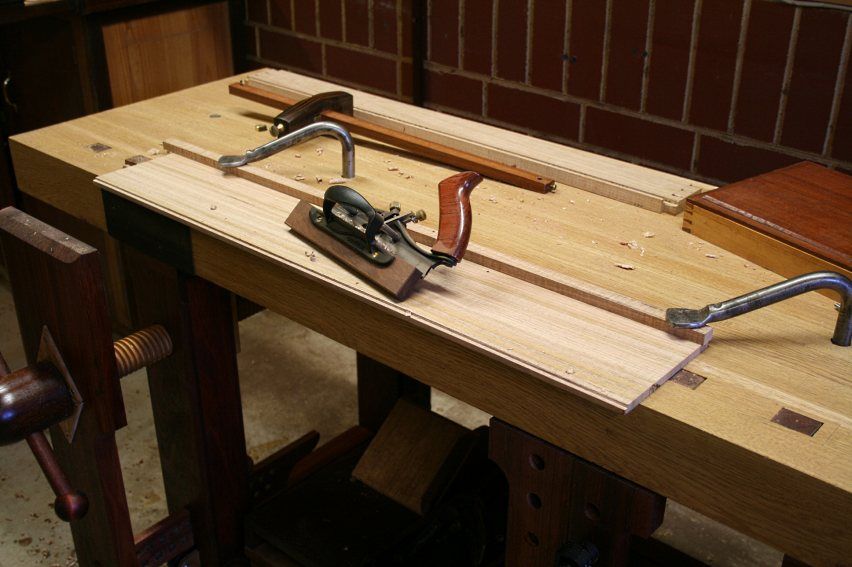
I was planing the panel with The Dreadnought (36" Jarrah jointer). The quickest way to flatten I know ...
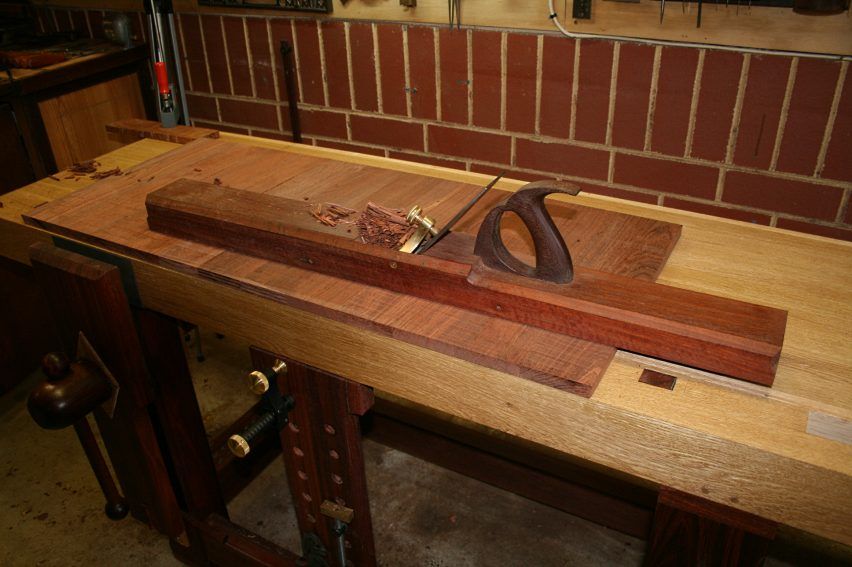
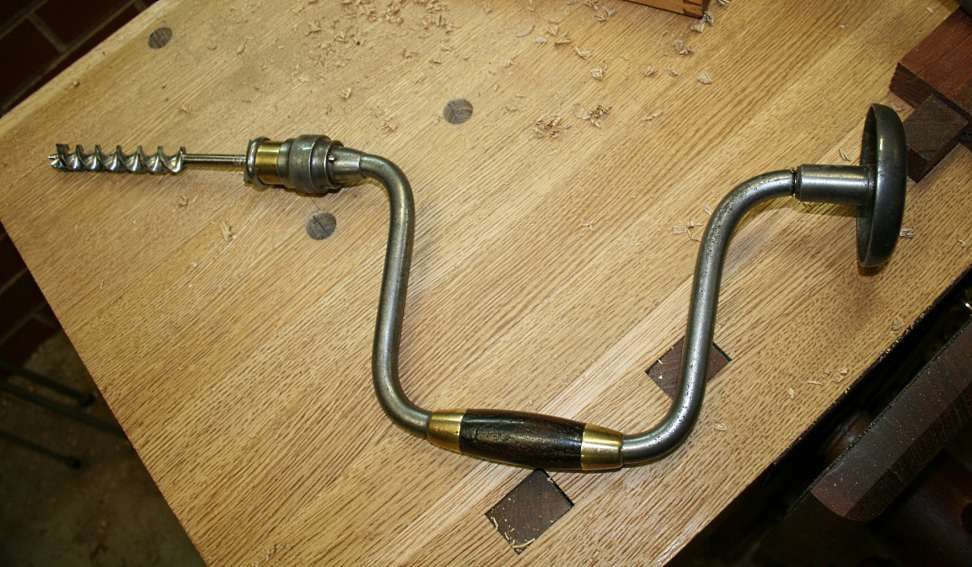
... using one bench dog and a makeshift stop, when I decided I was going about this in the wrong order. Get the round dog holes done! So I sharpened up a 3/4" Jennings bit and brought out the 12" MF brace ...
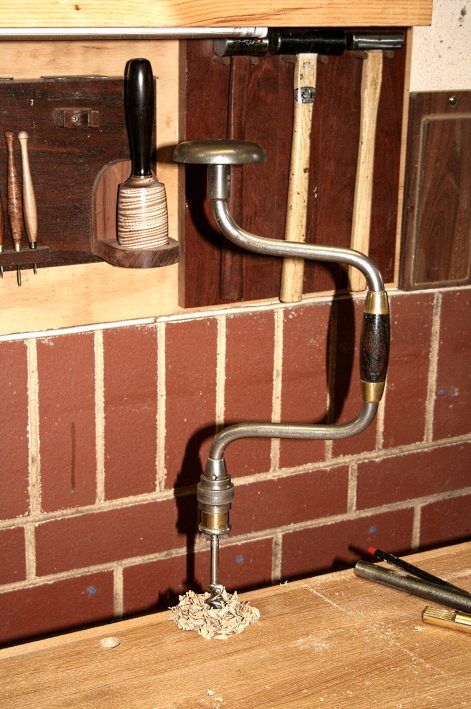
I do like this brace. It has the simplicity of a Spofford, but with bling
Soon I had lined up a series of holes opposite the square dogs, each 1" in from the far side of the bench ...
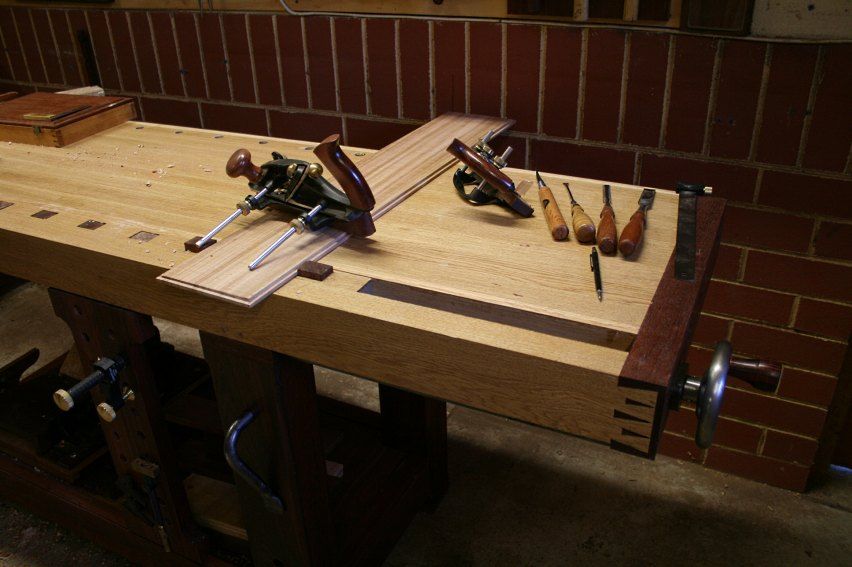
I have chosen to use the brass Veritas dogs. A slight modification is the addition of suede leather on the flat face.
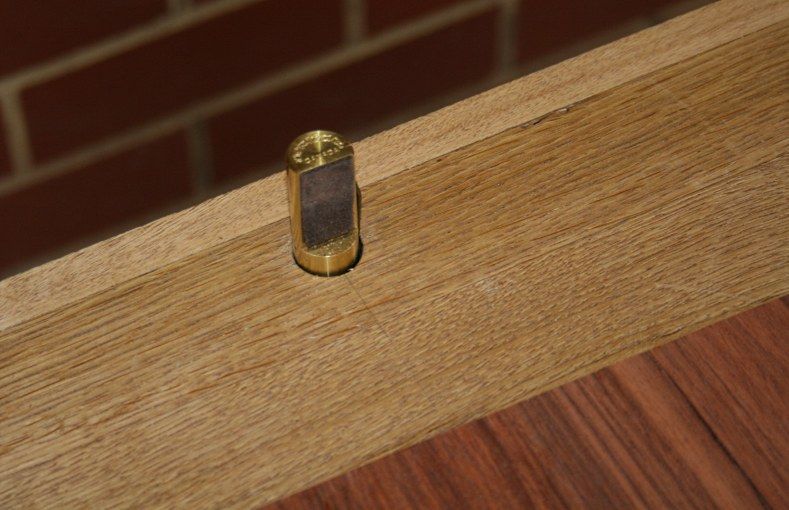
These are long enough to pass through the bench top.
The purpose here is to plane across the bench ...
The bench is now 12" from the far wall. This allows the use of a jointer or jack plane without danger of hitting the wall. It was not possible to work this way when the old bench was attached to the wall.
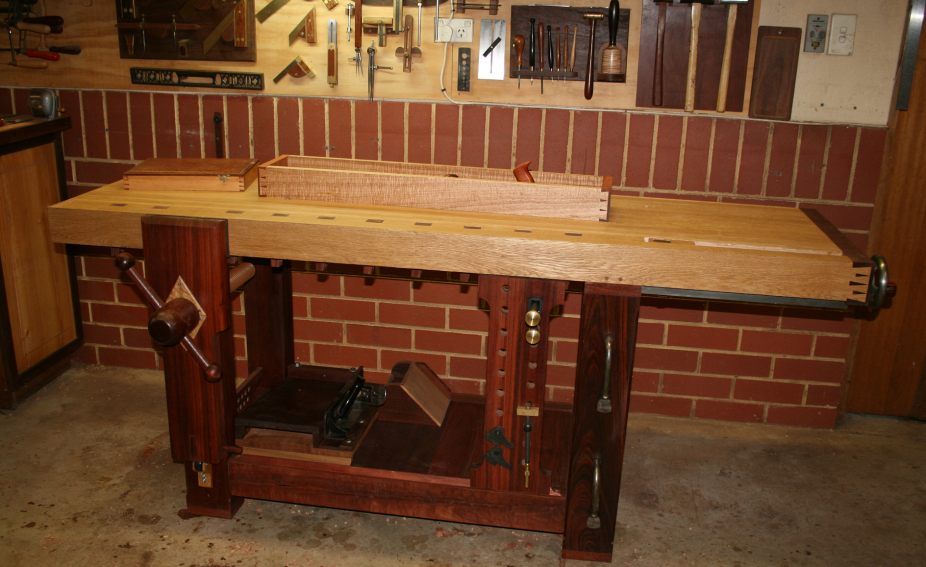
The new shelf ..

It will hold tools such as a shooting board, Moxon vise, and bench hooks.
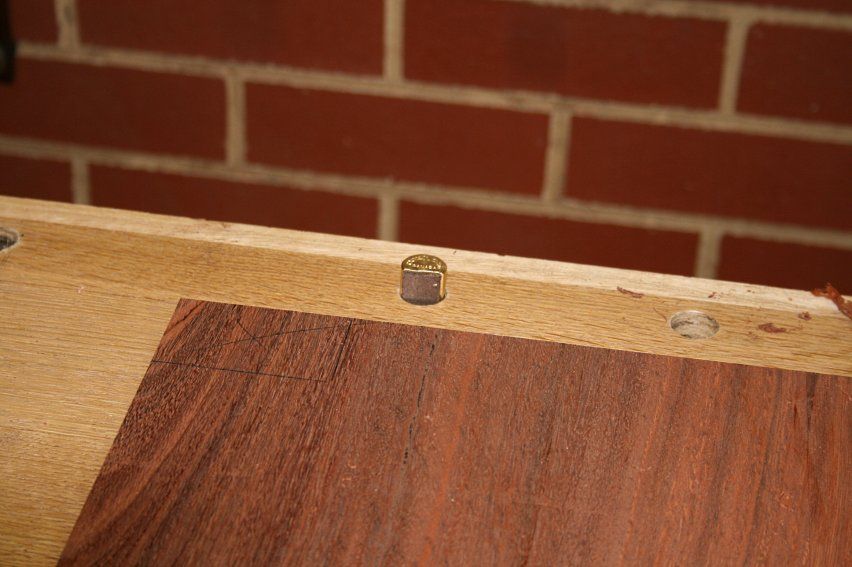
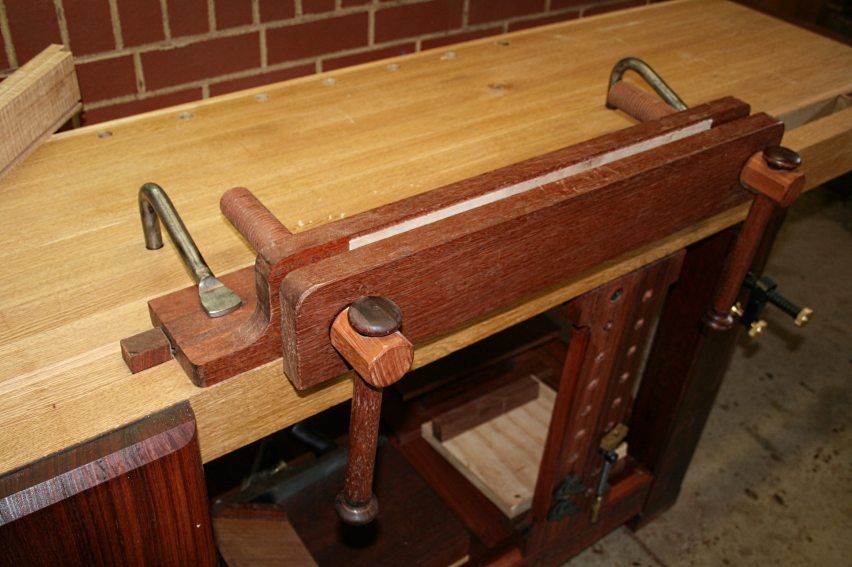
Alongside the last two square dogs I added two rows of round dog holes. These are coplanar, enabling a short or long bench stop to span the bench. I have yet to make a couple of stops that will be clamped in the leg vise. The following one was co-opted into use in the short term ...

The leg vise was given a layer of 2mm thick suede leather on each side. This makes a huge difference to the work holding power of the leg vise. It will now clamp pieces securely with little force.
One other point about the leg vise - add the supporting wheels to the glide, as designed by Jameel Abraham, and this will create a smooth running screw, even the wooden one on this bench. I can spin the handle, and the chop will slide in-or-out freely.
My old bench was 34" high. For my height of 5"10" the "pinky test" of Chris Schwarz would point to a bench height of 30" as ideal for planing. My concern, however, was that there are a number of tasks that need to be done at a bench, not just planing. Would the bench be high enough for marking and other detail work? In the end I decided to compromise on a height of 32".Visit www.inthewoodshop.com for tutorials on constructing handtools, handtool reviews, and my trials and tribulations with furniture builds.
-
27th March 2012, 03:16 AM #220
Be inspired. Be creative. Be bold.
- Join Date
- Apr 2001
- Location
- Perth
- Posts
- 10,820
Marking with a gauge is comfortable ...
The Moxon dovetail vise is positioned against a dog, and clamped down by two holdfasts at the rear (which may assitionally be used in any of the round dog holes)..
Marking dovetails is also fine, but sawing is less comfortable at this height than before. The saw has to angle upward and I can feel my wrist having to cock more than I like ..

Cross-cutting (the tails) is another comfortable position ..
A bench hook clamped into the leg vise allows chopping to take place over a leg ...

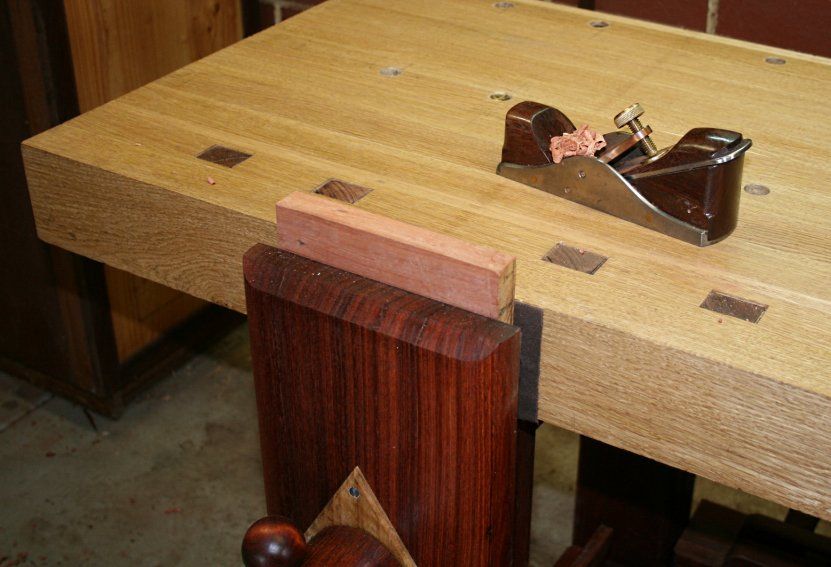
It has never been this easy to hold work to plane a rebate along an edge ...
I scratched my head for a while how to hold the short ends. Then I remembered I had a tail vise! Easy peasy ..
Finally, the sliding deadman, along with the new Veritas surface clamp, made it easy to hold the completed box for planing ..

So what was the first project being built on the new bench? It will become a tool tray, one that will attach to the wall instead of the bench. I want to leave the edges of the bench free for clamps, if needed. To the tool tray I will add a section to hold a few chisels and backsaws that are in current use. That is for a later date.

The completed bench ...
Thanks to all for your suggestions and advise along the way.
Regards from Perth
DerekVisit www.inthewoodshop.com for tutorials on constructing handtools, handtool reviews, and my trials and tribulations with furniture builds.
-
27th March 2012, 08:44 AM #221
GOLD MEMBER
- Join Date
- Mar 2004
- Location
- Brisbane (western suburbs)
- Age
- 77
- Posts
- 12,117
If you were using the saw in this pic, Derek, I'm not surprised your wrist didn't like it. That grip angle is good for sawing at benchtop level, on a bench-stop, but it would need to drop several degrees for comfortable sawing of D/Ts at a height my chronologically-challenged optics can handle. Originally Posted by derekcohen
Now if it had a grip more like THIS (pic), you would be able to both see what you are doing AND saw comfortably.......
P'raps one of the first tasks for you when you get your new handle-maker's rasp will be to fashion a 'proper' handle for that saw.....?
Nice bench, BTW, only improvement I could imagine would be a REAL tail vise...... (Pressing 'send', shutting down, & scuttling off to the shed....)
Avagooday,IW
-
27th March 2012, 09:45 AM #222
SENIOR MEMBER
- Join Date
- Jan 2008
- Location
- NSW southern Highlands
- Posts
- 548
Derek
Nicely done that should give you a few butterflies when you walk in to start work.
Nice bench, BTW, only improvement I could imagine would be a REAL tail vise...... (Pressing 'send', shutting down, & scuttling off to the shed....)
Avagooday,[/QUOTE]
Ian
Although I made my bench may moons ago, I never got around to finishing off the tail vise, partly because I was able to get on without one. Then later I was put off by comments that the traditional tail vise suffered from faults such as sagging and there were much better ( but expensive ) alternatives. I would be interested to hear your comments on the advantages of the traditional tail vise and just how much off a problem the sagging is, as I am intending to now fit a tail vise. However, I would much prefer to avoid the expense of Derek's unREAL vice.
Regards
-
27th March 2012, 12:03 PM #223
GOLD MEMBER
- Join Date
- Mar 2004
- Location
- Brisbane (western suburbs)
- Age
- 77
- Posts
- 12,117
Bas, I also read somewhere about sagging tail vises, but can't remember where that was. Possibly the original article in FWW by Tage Frid on building a "European" style bench. That might also be where I got the idea of including two forms of support for the vise on my main bench. I included a tongue that slides in a rebate on the front edge of the bench as well as the more usual support under the bench. However, I have since come to believe that was quite unnecessary. It doesn't do all that much other than accumulate gunk that needs to be periodically cleaned out, and it complicated matters when I recently dismantled my tail vise to change the dog hole spacing. Other benches I helped build or built around the same time have not got the sags yet. Originally Posted by Basilg
Wear & tear on the support slide is bound to cause some sag over a lifetime or two of use, and I have certainly seen some (very) old vises with a bad case of the droops. How long that takes would depend on the wood used in construction and how many times a day it travels back & forth. The slides on my bench are Rock Maple, and have seen a fair bit of use for 25 years. So far there is virtually no sign of wear. I use a bit of Paraaffin wax on the moving parts from time to time, but apart from that they've had no special attention. But it would not be a terribly taxing job to fix it, by fitting a new slide piece, which would be a 10 minute job on mine.
I guess I have extolled the benefits of tail vises ad nauseum. Apart from the dog system, which I use all the time, I have a set of jaws at right angles to the bench. These are extremely handy for all sorts of jobs, and complement the face vise very well. There are lots of times I want to hold something oriented perpendicular to the bench face rather than left/right in the front vise. I reckon I spend more than 80% of bench time using the tail vise.
As this thread & others have amply demonstrated, there are all sorts of methods for holding a workpiece while you get stuck into it. Perhaps I use my tail vise so much because I've had it for so long, and you could argue that I have evolved work habits based around it rather than it being the best solution to all problems - who knows?
There are several ways to build tail vises, some of which involve expensive bought hardware, through to the virtual zero cost, all-wood (including wooden screw) example I favour (alright, so I had a mate with metalworking skills make me a 2" 4 tpi tap for nix!). If you are really keen, you can make a tap from simple bits, using 17th C techology. Perhaps, though, if you have lived so long without a tail vise, you don't really need it? However, I reckon if you did go ahead & complete it, you would kick yourself for not having done it sooner.....
Cheers,IW
-
27th March 2012, 12:07 PM #224
SENIOR MEMBER
- Join Date
- Jan 2010
- Location
- Range View, Australia
- Posts
- 656
Ian Originally Posted by Basilg
Although I made my bench may moons ago, I never got around to finishing off the tail vise, partly because I was able to get on without one. Then later I was put off by comments that the traditional tail vise suffered from faults such as sagging and there were much better ( but expensive ) alternatives. I would be interested to hear your comments on the advantages of the traditional tail vise and just how much off a problem the sagging is, as I am intending to now fit a tail vise. However, I would much prefer to avoid the expense of Derek's unREAL vice.
Regards[/QUOTE]
Basil, when the tail vise sags make a repair. It will only be the odd bit of veneer. The tail vise has too many advantages. 4-5 dog holes with fractional spaces, three ways of clamping, capped screw and low cost. The dovetailing can be bandsawn and it just looks good. : smileLast edited by Ball Peen; 27th March 2012 at 01:22 PM. Reason: space and smile
Cheers, Bill
-
27th March 2012, 12:11 PM #225
SENIOR MEMBER
- Join Date
- Jan 2010
- Location
- Range View, Australia
- Posts
- 656
Cross post with Ian
Cheers, Bill


 Reply With Quote


Similar Threads
-
Underhill's Roubo bench
By The Pom in forum THE WORK BENCHReplies: 4Last Post: 14th June 2011, 11:57 AM -
Dan's Blackbutt Roubo Bench
By BozInOz in forum THE WORK BENCHReplies: 215Last Post: 8th April 2011, 08:21 PM -
WIP Roubo bench
By mic-d in forum FURNITURE, JOINERY, CABINETMAKING - formerly BIG STUFFReplies: 48Last Post: 30th January 2009, 04:34 PM -
Bench Questions
By noodle_snacks in forum WOODWORK - GENERALReplies: 89Last Post: 13th March 2006, 11:32 PM -
bench top glue-up questions
By Richie in forum GLUEReplies: 3Last Post: 18th February 2006, 12:00 AM
