

 Thanks:
  Likes:
  Needs Pictures: 0
 Picture(s) thanks:
Results 121 to 135 of 245
Thread: Roubo Bench Issues and Questions
-
12th February 2012, 05:00 PM #121
 .
.


- Join Date
- Feb 2006
- Location
- Perth
- Posts
- 27,790
 I'm a big fan of barrel bolts and use them in tasks like joining metal tubing perpendicularly to flat surfaces.
 Originally Posted by IanW

An improvement on putting the barrel under the DP and hoping that perpendicular alignment between the drill and barrel occurs is to make a jig by drilling two holes in a square steel block that has been as accurately marked as possible. One hole holds the barrel firmly and the other is the pilot hole for the drill.
The other neat solution I have seen is using a 4-jaw chuck, a rectangular piece of metal with similar dimensions to the barrel and a MW lathe.
-
12th February 2012 05:00 PM # ADSGoogle Adsense Advertisement
- Join Date
- Always
- Location
- Advertising world
- Posts
- Many
-
12th February 2012, 09:55 PM #122
 Junior Senior Member
- Join Date
- Dec 2008
- Location
- Adelaide, SA
- Posts
- 962
Wow, I've been away from this build for a couple of days...that's a lot of posts relating to nuts that have already been installed!
-
12th February 2012, 11:52 PM #123
Be inspired. Be creative. Be bold.
- Join Date
- Apr 2001
- Location
- Perth
- Posts
- 10,820
Update on the build this weekend.
I did not get as much time in the workshop as I would have liked. Still, there were some important parts completed.
As reported earlier, I replaced the end cap bolts.
Then I stripped the legs (they had a sealer), filled all the nail holes and places where resin had dried and fallen out (this happens a lot with some Jarrah), and then sanded smooth.
The bench was morticed to receive the legs, and the mortice and tenons for the front and rear stretchers were completed. Below is a dry fit. Now it is starting to look like a bench (Australian style - upside down ) ...
) ...
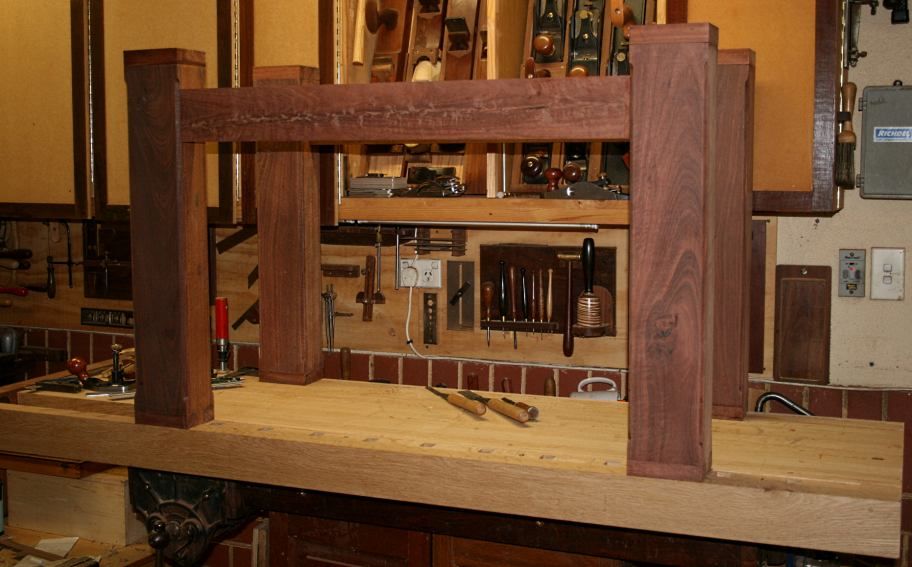
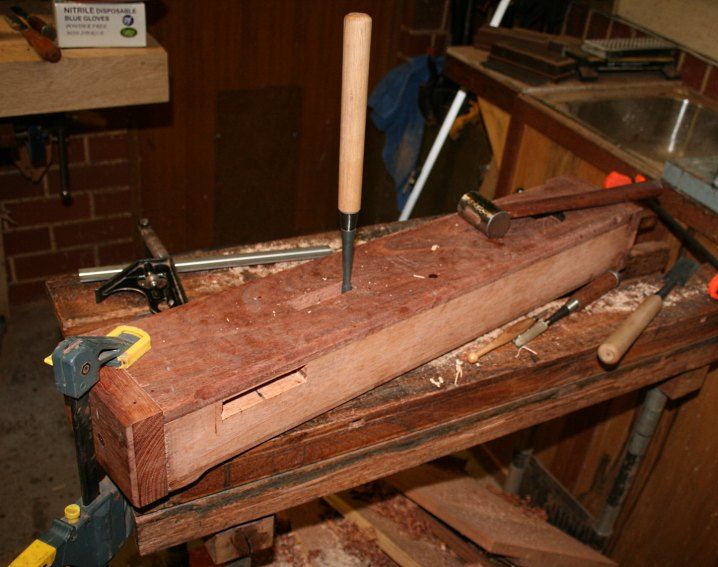
The leg mortices were really hard work. Each is 3" x 3/4" and 2" deep. I drilled out most of the waste, then pared to fit. Exhausting!
I am pleased the way the figure is presented. For ex-roof trusses, these are striking. These pieces were selected to show.
The stopped chamfer on the legs meant that I needed to match this where the stretcher joined. The legs and stretchers are all flush/coplanar.


Regards from Perth
DerekVisit www.inthewoodshop.com for tutorials on constructing handtools, handtool reviews, and my trials and tribulations with furniture builds.
-
13th February 2012, 07:33 AM #124
What... you mean it's not 1792?
- Join Date
- Oct 2006
- Location
- Melbourne
- Posts
- 5,271
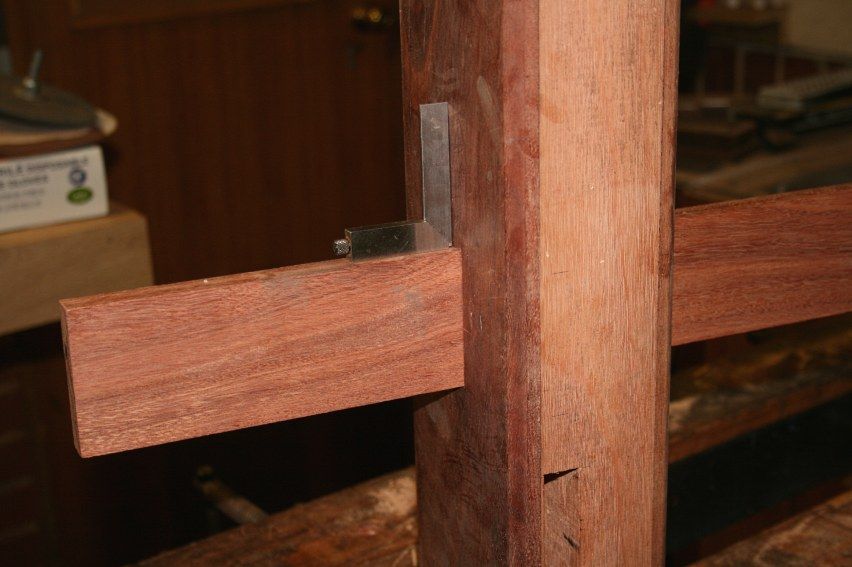
What was the reason for terminating the chamfers so low on the legs?
.
I know you believe you understand what you think I wrote, but I'm not sure you realize that what you just read is not what I meant.
Regards, Woodwould.
-
13th February 2012, 11:22 AM #125
Be inspired. Be creative. Be bold.
- Join Date
- Apr 2001
- Location
- Perth
- Posts
- 10,820
The reason WW? Simple. I screwed up ... completed the chamfers on the legs early on, forgetting that the stretchers would be placed 3" from the bottom of each leg and extend up 4". The chamfer on the strength is a desperate attempt to cover up ... but I think I will tell everyone I designed it like that

Regards from Perth
DerekVisit www.inthewoodshop.com for tutorials on constructing handtools, handtool reviews, and my trials and tribulations with furniture builds.
-
13th February 2012, 11:38 AM #126
What... you mean it's not 1792?
- Join Date
- Oct 2006
- Location
- Melbourne
- Posts
- 5,271
Ah. Poo occurs! Originally Posted by derekcohen
.
I know you believe you understand what you think I wrote, but I'm not sure you realize that what you just read is not what I meant.
Regards, Woodwould.
-
13th February 2012, 12:57 PM #127
GOLD MEMBER
- Join Date
- Mar 2004
- Location
- Brisbane (western suburbs)
- Age
- 77
- Posts
- 12,117
Yes, whether it's just senior moments, or hurrying too much, I seem to be making more silly mistakes lately! Originally Posted by Woodwould
 I did something almost identical a few days ago. I was adding a board below another to make a hanging projection. Got it all fitted up nicely, and carefully chamfered the wrong edge! The screw holes were already drilled, so there was nothing I could do. Didn't think of adding a chamfer to the other piece & making it a feature.
They say real pros know how to cover their mistakes - guess I've a ways to go, still.......
Cheers,IW
-
14th February 2012, 11:42 AM #128
GOLD MEMBER
- Join Date
- Aug 2009
- Location
- Armadale Perth WA
- Age
- 55
- Posts
- 4,524
barrel bolts
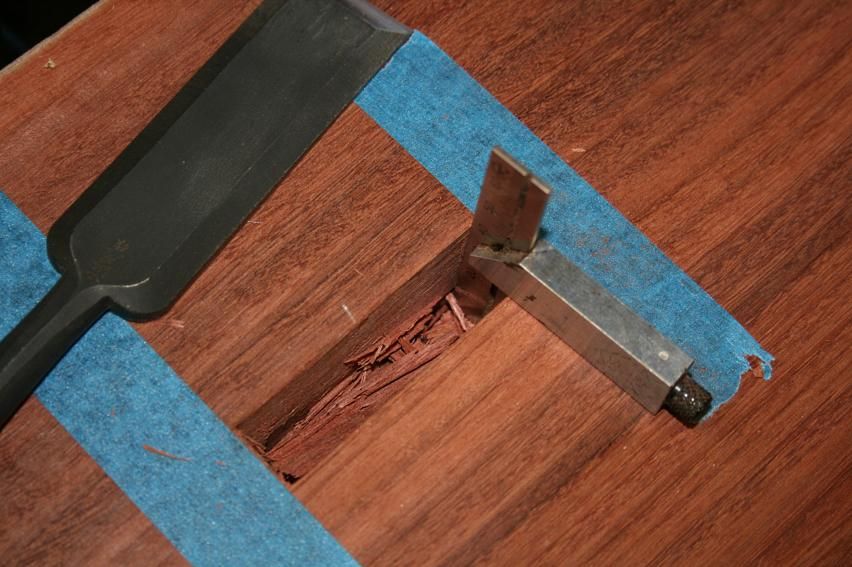
Originally Posted by IanW
I still prefer barrel nuts for stretchers because of their neatness, but I struggle to drill the two holes that intersect perfectly - has anyone got a simple solution to this problem?
---
Installing barrel bolts is discussed here, by TheDustyDeveloper:
[ame=http://www.youtube.com/watch?v=AL0iTarUOlI&feature=mfu_in_order&list=UL]Building a Holtzapffel Inspired Workbench - Part 8 - YouTube[/ame]
And he refers to getting hints from Matt Kenney's Monster Bench Build.
Video Workshop: Matt's Monster Bench
BTW ...
TDD also does an excellent short video on using SketchUp:
(although I'm sure he could have gone with a tape measure and a pencil)
Cheers,
Paul McGee
[ame=http://www.youtube.com/watch?v=zL0YJN2Xjes&feature=mfu_in_order&list=UL]Building a Holtzapffel Inspired Workbench - Part 5 - YouTube[/ame]
-
14th February 2012, 12:34 PM #129
GOLD MEMBER
- Join Date
- Mar 2004
- Location
- Brisbane (western suburbs)
- Age
- 77
- Posts
- 12,117
Thanks Paul. That's a neat little aid to getting the centres to match alright. What I do these days is very similar to what's shown in the video - i.e. drill the hole in the leg on the drill press, then assemble & drill the bolt holes in the stretcher or bed rail or whatever. I use an auger bit & I can finish the hole in one go, though - I'm surprised the bloke in the video doesn't go down the road & buy himself a longer 3/8 drill bit! Originally Posted by pmcgee
After drilling the stretcher holes, I disassemble & use the drill bit to eyeball for straightnes, and adjust the centre of the barrel nut if necesary. As I said, when I make my own barrel nuts, they are sometimes a teeny bit off-centre, so if I do end up with a slightly 'off' nut hole, it can be remedied by inserting one of these nuts so that the offsets match. The disadvantage of this slightly sloppy method is that you need to make sure that nut goes back in that spot when you pull things apart down the track. I am getting better at alignment, though, particularly if I slow down & take more care.....
Cheers,IW
-
21st February 2012, 02:06 AM #130
Be inspired. Be creative. Be bold.
- Join Date
- Apr 2001
- Location
- Perth
- Posts
- 10,820
What's on my bench ... progress report.
This is weekend 5 of the Bench Build.
What's on my bench ..? Well, a bench is on my bench.

If you have been following the reports, you will recall that I was last busy with the stretchers. The mortice and tenons are now complete. You'd be forgiven thinking that, since the legs are done, the stretchers are done, the tail vise is done ... then why do I not simply glue the base together and fit the bench top?
The answer is ... the leg vise and sliding deadman must first be built. The leg vise especially requires work to the associated bench leg, and this cannot be completed after assembly (without great discomfort).
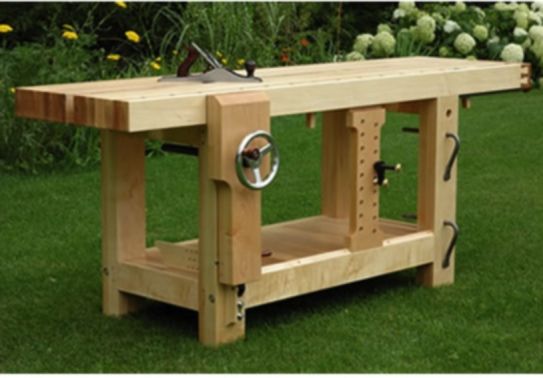
Here is a picture of Jameel's bench to reference the parts under construction in this post:
Most of this post involves constructing the leg vise, so I will first get the sliding deadman out of the way.
Incidentaly, no excuses for the blended woodworking here. There is a time and place for both power and hand work.
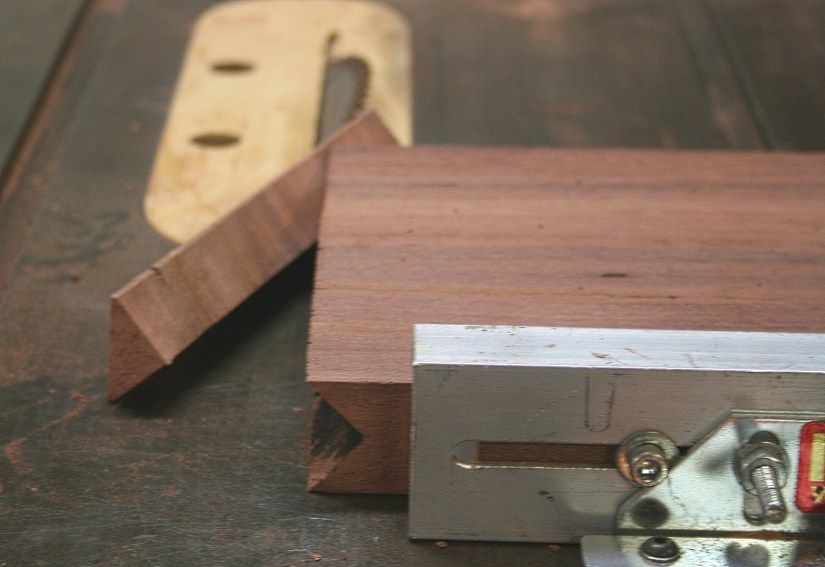
The sliding deadman moves on a triangular section on the stretcher, and needs to mate to this with a V groove at the bottom of the board. Creating this V may be done with a chisel, but the task is easiest as two rip cuts on a tablesaw. In all the pictures I have seen of this being done, the deadman board is held vertically over the tablesaw. A much safer method is to do this with the board flat on the table ...
Raise the blade to the midpoint of the board ..

Mark the start point ...
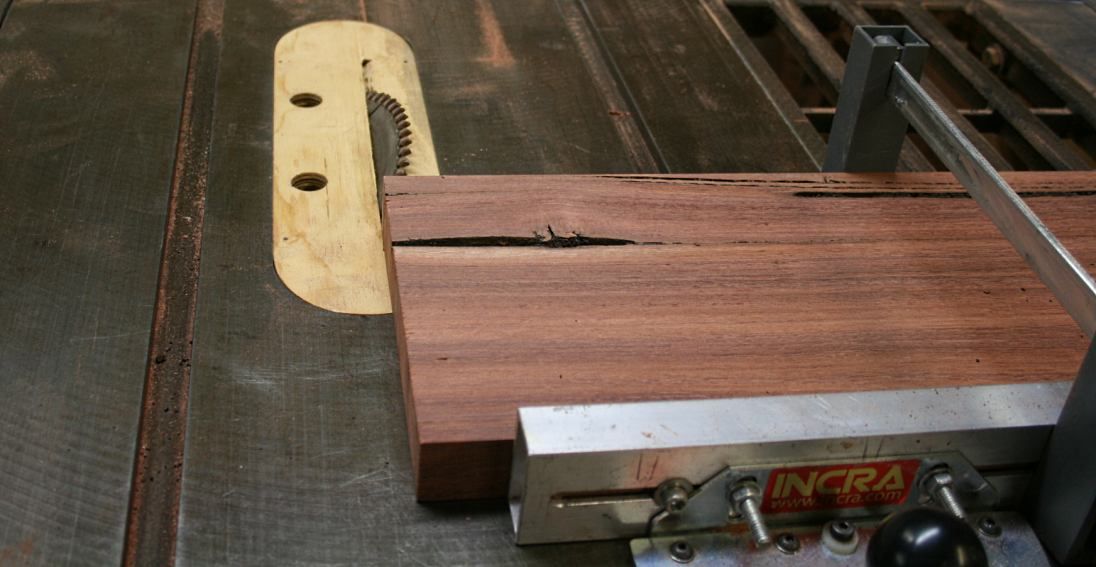
Rip the one side, turn the board over, and rip the other side.
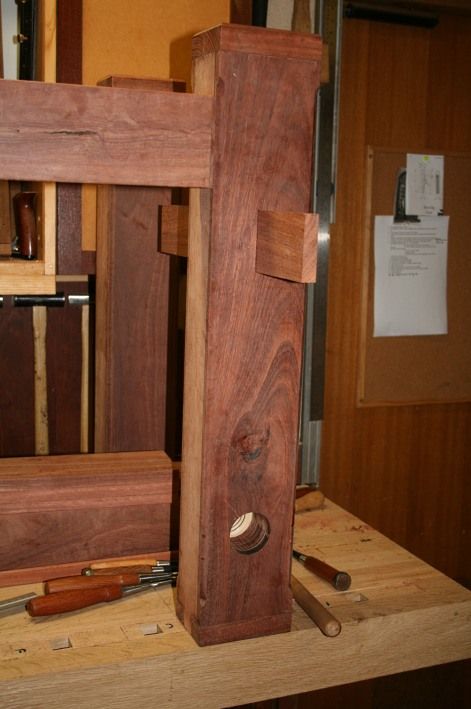
The right-front leg was drilled for hold fasts ...
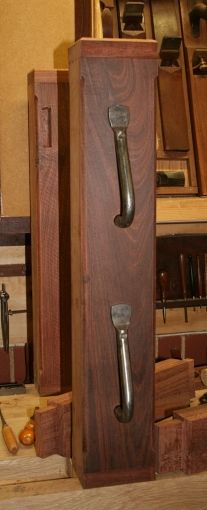
The upper holdfast is positioned to focus pressure at the middle of the bench top, while the lower holdfast will focus pressure at the middle of the stretcher.
Now onto the legvise.
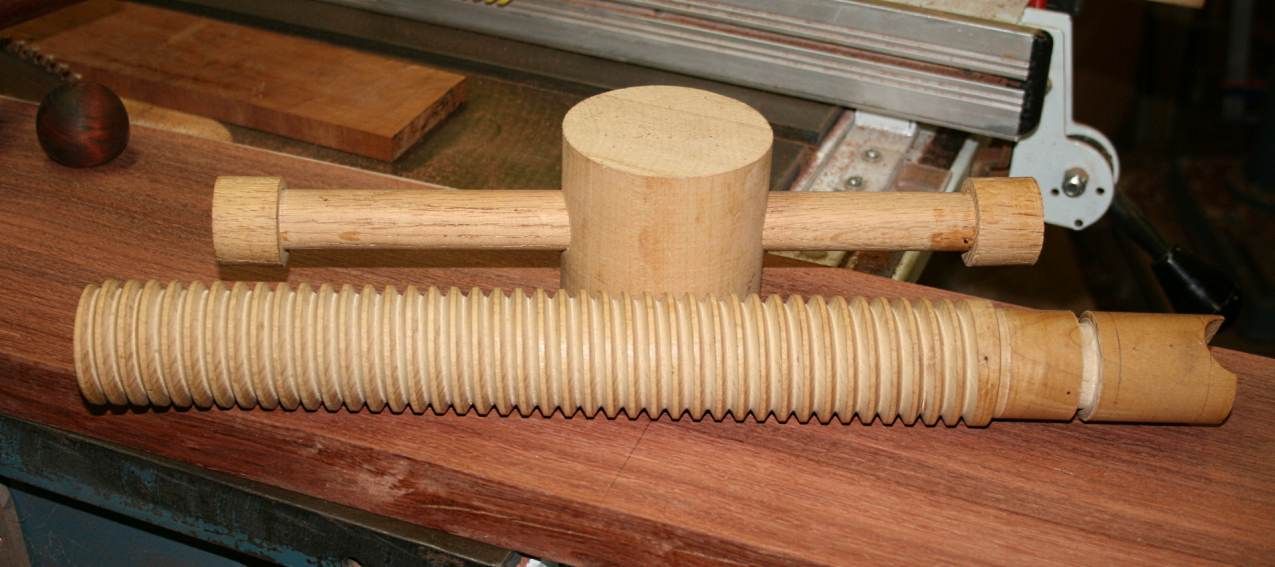
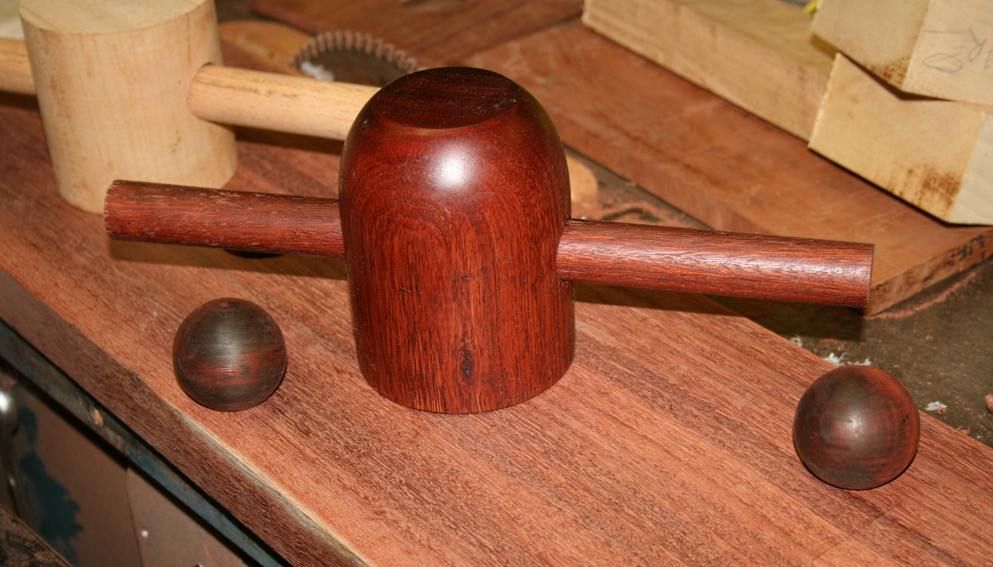
Wilbur (a USA friend) made me a wonderful gift of a legvise screw, the twin of the one he has on his bench ...
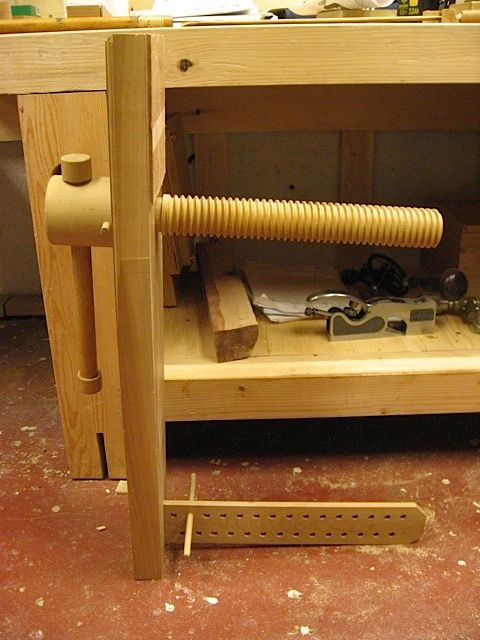
Above you see the screw, handle, and parallel guide. Below is the set he sent me. Note that it did not come with a garter groove, which I have added, since it was not designed to work with a garter.
I had decided to add my stamp to the legvise, and one of the changes was to use a garter. The garter connects the screw to the chop, thus allowing it to move back with the screw. Without a garter, the chop is required to be pulled back by hand.
I will show the garter connection in my next post (as it is not installed yet), but here is the garter prior to being sawn out (it is, in fact, already completed). This is a stunning piece of Myrtle. It just ripples ..
The other change was to turn a new handle and post in Jarrah...
Building the legvise began with installing the screw block in the leg. The block is 2" thick. The leg is 3 5/8" thick. My preference was to mortice the block into the leg to a depth of 1 1/4" rather than simply screwing it behind the led. This effectively provides 1 1/4" additional depth to the legvise in use.Visit www.inthewoodshop.com for tutorials on constructing handtools, handtool reviews, and my trials and tribulations with furniture builds.
-
21st February 2012, 02:07 AM #131
Be inspired. Be creative. Be bold.
- Join Date
- Apr 2001
- Location
- Perth
- Posts
- 10,820
The mortice was drilled out and pared to size ...
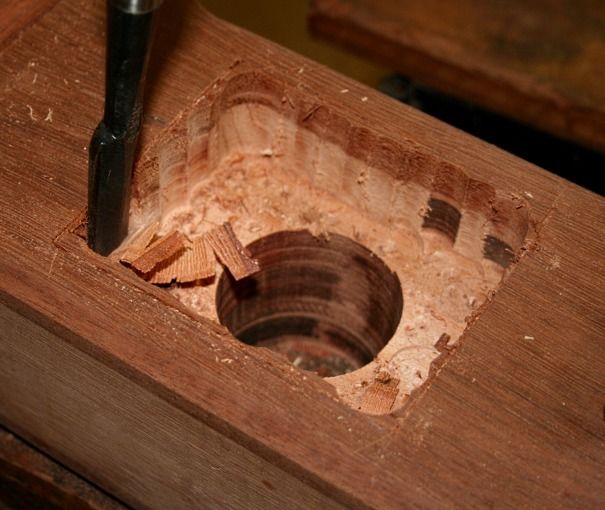
The fit was very tight. No glue is used, but screws will be added. This will enable its removal, if needed.
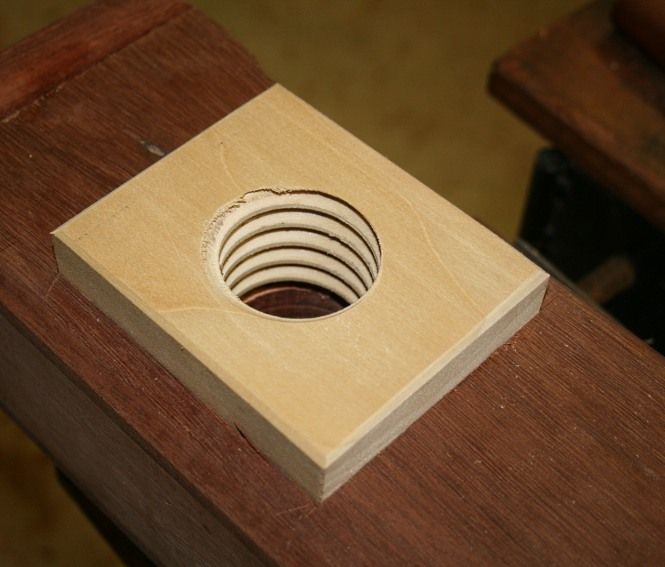
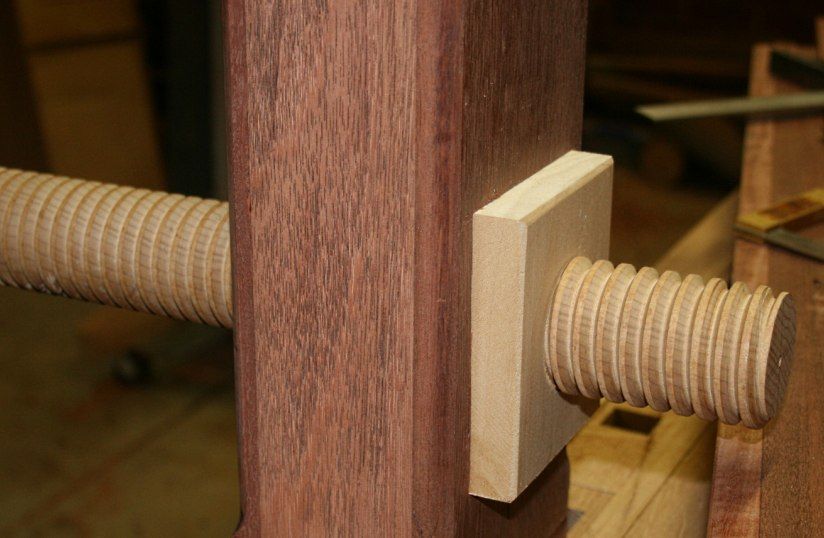
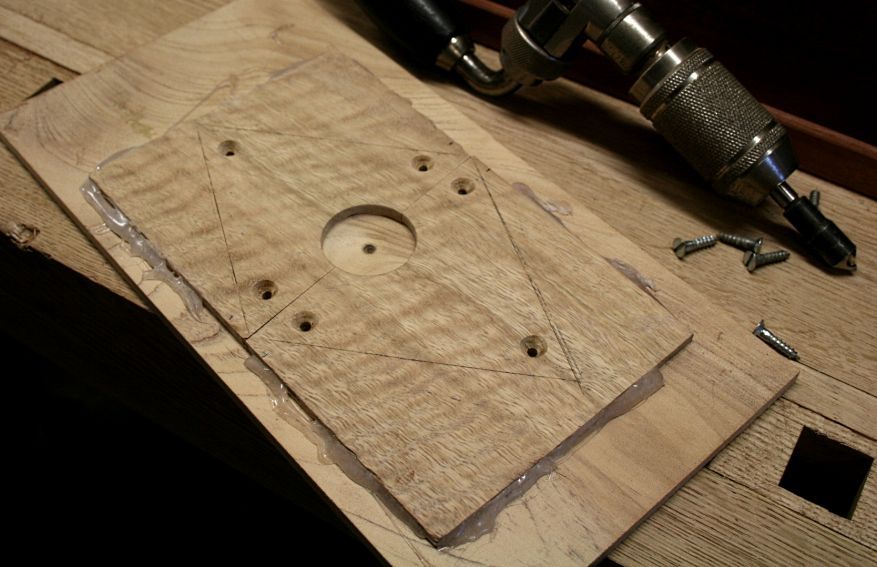
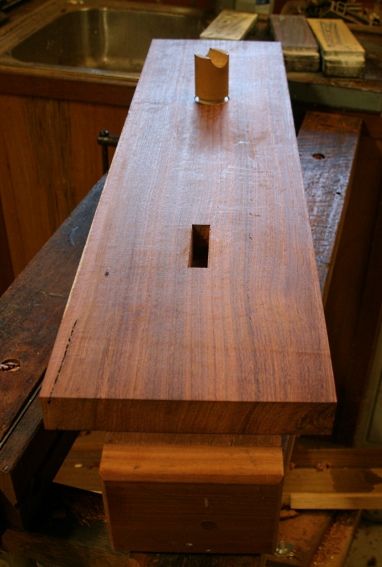
The next step was to attach the parallel guide to the chop. This is positioned a little above the height of the stretcher. The chop will terminate at the parallel guide as I will be adding a roller for the guide to run upon.
Rather than use a blind tenon, I decided to use a through mortice and tenon. It occurred to me that it would be easier to judge the exact position for the matching mortice in the bench leg if I used a through mortice in the chop. This would fixed with a wedge (and possibly pinned - do you think it needs both?).
Of course a through mortice is a more difficult joint than a blind mortice - epecially in a show side ... and I did not have another board that I could use as a chop. I certainly did not was to stuff it up, but I knew I would not forgive myself if I chickened out!
The chop and the sliding deadman come from the same Jarrah board (I bought this at the Perth Woodshow 7 years ago, where it had been freshly slabbed). I like the idea of matching colour and figure on these two pieces. As an aside, they are 1 3/8" thick. Jameel mentions that his chop is about 2 1/2" thick, and does not recommend a chop below 1 3/4" thickness as he is concerned about flex. Well I can assure you that this chop will not flex! At 1 3/8" thickness it is all one can do to lift it!
Here is the mortice for the parallel guide. It was drilled an then pared to shape.
I am happy with this fit ..
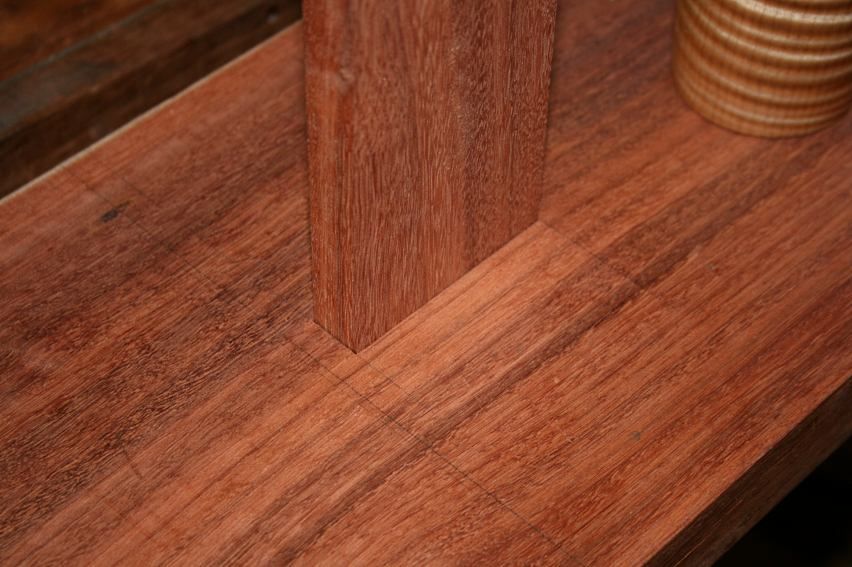
Now you can see how easy it is to transfer the mortice from the chop to the bench leg ..
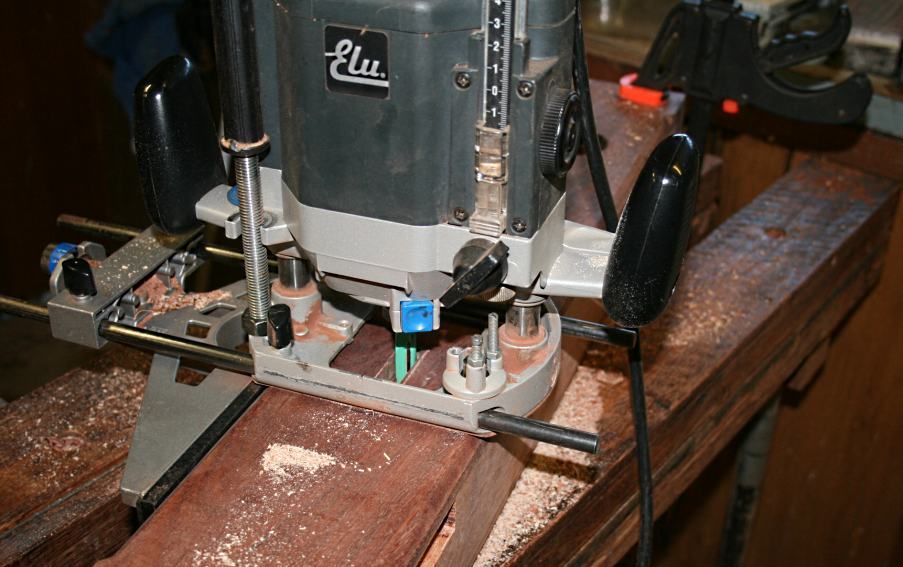
OK, this one I used a router to remove the centre of the waste (You really don't think that I was going to chop out 3 3/8" of hard Jarrah !!!!) ..
... and pared away the remainder ..
.. to fit the parallel guide ...
On the bench ..
(Aside: the light coloured Jarrah on the side of the legs will be stained to match the dark Jarrah on the front and back).
That's where I am up to at this point. Next weekend I need to groove the underside of the bench for the sliding deadman, then drawbore the mortice-and-tenons for the legs, and glue them up. Then fit the tail vise, shape and fit the leg vise, shape and fit the sliding deadman, make dogs .......
Will I make my 6 weekend build deadline?
Regards from Perth
DerekVisit www.inthewoodshop.com for tutorials on constructing handtools, handtool reviews, and my trials and tribulations with furniture builds.
-
21st February 2012, 03:34 AM #132
SENIOR MEMBER
- Join Date
- May 2007
- Location
- Melbourne
- Age
- 58
- Posts
- 832
Love your work Derek.
Kevin
-
22nd February 2012, 12:07 AM #133
GOLD MEMBER
- Join Date
- Feb 2003
- Location
- back in Alberta for a while
- Age
- 68
- Posts
- 12,006
Hi Derek Originally Posted by derekcohen
I couldn't help comparing your decison on the placement of holes in the right leg for Hold Fasts with the decisions made by Jameel.
First, I think it would be better if the holes are offset to one side of the leg -- of course without going too close to the edge of the leg that blow out is a risk.
A hole off-set to one side will give a slightly greater range of holding height compared to a hole in the centre of the leg.
Second, Jamell has gone for three holes.
the upper hole which you have replicated centres the hold fast on the centre of the top's thick edge
the next hole down appears to centre the hold fast's force around the centre of an 8" or 10" board held on edge -- was there a particular reason you decided not to drill for a hold fast in this position?
Lastly, when will the skateboard wheels make an apperance ?
regards from Alberta, Canada
ian
-
22nd February 2012, 01:27 AM #134
Be inspired. Be creative. Be bold.
- Join Date
- Apr 2001
- Location
- Perth
- Posts
- 10,820
Hi Ian
My thoughts on the holdfast holes is that they are largely irrelevant. The only really useful one is for the middle of the bench top.
Why do I say this? Because the sliding deadman is where long boards are supported. This will also use a holdfast, in this case a Veritas Surface Clamp. The sliding deadman has a wider range of settings, all to account for the possibilities in holding wide, long boards.
By comparison, the holdfasts in the leg are to provide clamping for very wide boards, such as doors or tabletops. These then need to clamp against a solid surface. Here there are only two: the benchtop and the stretcher.
I can always add a third hole in the leg, but you will have to convince me it is necessary.
Regards from Perth
DerekVisit www.inthewoodshop.com for tutorials on constructing handtools, handtool reviews, and my trials and tribulations with furniture builds.
-
22nd February 2012, 03:55 AM #135
Be inspired. Be creative. Be bold.
- Join Date
- Apr 2001
- Location
- Perth
- Posts
- 10,820
Oh boy.
Do you get those moments when it dawns on you that you made a really stupid mistake?
This is a doozy but it is repairable. I would like your ideas.
Its the bench (what else?). I have just realised that the dog hole strip is in backwards. Backwards! No, don't ask the question.
If the dogs were vertical, I'd just leave them and use them reversed. But the holes are angled at 2 degrees ... the wrong way.
I have two choices as I see it.
The first is that I saw out the dog hole strip (using my bandsaw), make a new dog hole strip and insert that. This is my preference although it is more work.
The second choice is to fill in the existing dog holes with a plug (contrasting Jarrah?), and drill this for a round dog.
Thoughts?
Regards from Perth
DerekVisit www.inthewoodshop.com for tutorials on constructing handtools, handtool reviews, and my trials and tribulations with furniture builds.

 Reply With Quote


Similar Threads
-
Underhill's Roubo bench
By The Pom in forum THE WORK BENCHReplies: 4Last Post: 14th June 2011, 11:57 AM -
Dan's Blackbutt Roubo Bench
By BozInOz in forum THE WORK BENCHReplies: 215Last Post: 8th April 2011, 08:21 PM -
WIP Roubo bench
By mic-d in forum FURNITURE, JOINERY, CABINETMAKING - formerly BIG STUFFReplies: 48Last Post: 30th January 2009, 04:34 PM -
Bench Questions
By noodle_snacks in forum WOODWORK - GENERALReplies: 89Last Post: 13th March 2006, 11:32 PM -
bench top glue-up questions
By Richie in forum GLUEReplies: 3Last Post: 18th February 2006, 12:00 AM
