

 Thanks: 0
 Likes: 0
 Needs Pictures: 0
 Picture(s) thanks: 0
Results 16 to 23 of 23
Thread: Finishing schedule
-
6th June 2012, 01:06 PM #16
 Senior Member


- Join Date
- Jan 2010
- Location
- North Carolina - USA
- Posts
- 145

For the record it did want to tell you the finishing schedule i used. needless to say my right arm is now bigger than my left are from all the sanding.
Wood was sanded progressively from 40 grit to 320 grit
1 coat of sanding sealer
wait 2 hours
1 coat of grain filler
wait 1 hour
sand smooth to 320
1 coat of grain filler
wait one hour
sand smooth to 400
1 coat of sanding sealer
wait one day
sand smooth to 400
1 coat of sandable auto primer
wait 1 day
sand smooth to 400
1 coat of sandable auto primer
wait 1 day
sand smooth to 400
1 coat of sandable auto primer
wait 1 day
sand smooth to 600
wait 1 day
1 coat acrylic auto paint
wait 1 day
1 coat acrylic auto paint
wait 1 day
1 coat acrylic auto paint spay from a distance to pop the flake
wait 1 day
1 coat high gloss nitrocellulose lacquer
wait 2 hours
1 coat high gloss nitrocellulose lacquer
wait 24 hours
1 coat high gloss nitrocellulose lacquer
wait 2 hours
1 coat high gloss nitrocellulose lacquer
wait 24 hours
1 coat high gloss nitrocellulose lacquer
wait 2 hours
1 coat high gloss nitrocellulose lacquer
wait 24 hours
1 coat high gloss nitrocellulose lacquer
wait 2 hours
1 coat high gloss nitrocellulose lacquer
wait 24 hours
1 coat high gloss nitrocellulose lacquer
wait 2 hours
1 coat high gloss nitrocellulose lacquer
wait 4 weeks
wet sand 400
wet sand 600
wet sand 800
wet sand 1000
wet sand 1500
wet sand 2000
Auto scratch remover
Auto swirl remover
wax
Done
trust me there are better ways to finish a guitar than using auto body paint.Mills Custom sawing - Everyone wants my wood
-
6th June 2012 01:06 PM # ADSGoogle Adsense Advertisement
- Join Date
- Always
- Location
- Advertising world
- Posts
- Many
-
6th June 2012, 04:01 PM #17
Senior Member
- Join Date
- Jan 2006
- Location
- aust
- Posts
- 271
Well, there you go. I didnt mention acrylic (which continues to shrink). I mentioned two pack. Every single coat of the 13 coats you sprayed contains enough thinner to remelt the previous coats (thats how acrylic and nitro bond). In doing so, they soften the primer, which then shrinks back into the grain. And because you've got sanding sealer (basically high solids content nitro) UNDER the grain filler, that sinks back too. Single pack (acrylic) primers absorb the thinners. Originally Posted by Jeff Mills

Nitro gasses off (evaporation of thinners) faster than acrylic. Acrylic skins and traps solvents (thinners), essentually giving it two options... gas out to atmosphere, or gas out the the primer and timber.
Also, modern auto paints are stronger, tougher, and more UV protectant. Acrylic stays "soft". Nitro cures over time to be hard and brittle. If you are top coating acrylic (especially three coats) with a harder finish, and then the wood moves (as it does) it will crack and chip because of the slightly flexible acrylic layer. As per 60's fenders...
No idea why you would go back to 400 grit for the buffing stage. I START at 2000. If you feel the need to use anything coarser than say 1200-1500, then Id suggest you need to look at your spraying technique and air flow versus liquid ratios (and further, lacquer to thinner ratios... although with nitro this isnt as critical).
-
7th June 2012, 05:45 AM #18
Senior Member
- Join Date
- Jan 2010
- Location
- North Carolina - USA
- Posts
- 145
I will be tapping on you for advise during for finishing advise on my next build. I really appreciate your straight to the point honest answers. It's funny that a lot of people who participate in forums, go out of their way to be politically correct in their responses. I think it's out of fear they may insult someone? So what they do is mistakenly lead someone in the wrong direction by their answers, which does more damage, than if they would have just spoke their mind in the first place. I call it PC run a muck.. Look I've been married to the same woman for 26 years... trust me when I say you can't insult me Originally Posted by rhoads56
 I've done been assaulted in ways you will never be able to replicate
Again thanks for the solid straight talking advise - I really do appropriate it. We need more people like you in the world instead of all this pussyfooting around.Mills Custom sawing - Everyone wants my wood
-
10th June 2012, 09:20 AM #19
Senior Member
- Join Date
- Jul 2005
- Location
- Victoria Australia
- Posts
- 116
I just had a bit of a read back through this thread and there's a bit of 2k hate going on from a few people.
2k is good IF you know how to use it.
Perry is right in saying that 2k varies and you can't use one paint method for all, for example I recently tried a Autothane primer as being different to the PPG Prima primer I'm used to using. I sprayed and baked the Autothane the same way I'd normally shoot the Prima and it blistered all over the place. A few trials and I learned the Autothane doesn't like the heat, whereas the Prima loves it.
So what I'm saying is if you don't know the ins and outs if each product in accordance to your spraying environment then you're going to make a mess. Notice I said "your" environment. Reason I say that is the tin you read the instruction from or the pieces of paper with the strict guidelines to follow from the manufacturer are written for a controlled temperature spray booth, not some hobby painter at home, so you can't follow them to the letter.
I was painting a 1970 corvette stingray convertible a couple years ago and was having some trouble with one of the products failing. The PPG tech guy came to my workshop and when I held up the tech sheet saying I'd done this, this and this within the companies guidelines he told me to forget the sheet and they are useless! Long story short he solved my problem and it was as simple as adding an extra 24 hours onto what the tech sheet said was it's maximum flash time.
Now to the guy who posted that epic journey of a paint process... Wow. If that was how paint worked I'd give up!
Here's a close up pic of a guitar I painted with 2k paint. I sprayed thus early this year and it still looks the same. It's hanging in my office as the guy is still paying me off for it.
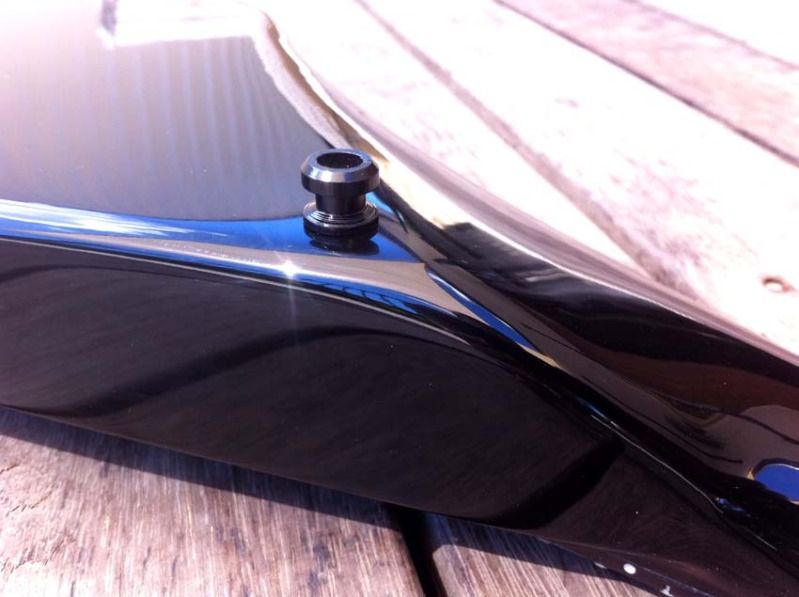
Paint process for this:
Raw timber sanded to 320.
I primed and sanded. Primed and sanded again.
I only did this as I was trialing a new product. It still didn't sand smooth so I sanded back to wood and went to my normal process which is:
Sand timber back to 320, grain fill with either a poly filler or wood grain filler, depending on the needs of the project, wait till it's cured and same day sand back 320 then prime.
Primer: (process for not baking) start with one tack coat then follow up a couple minutes later with a full coat, wait ten to fifteen minutes then full coat. If spraying a third coat I'll wait half an hour before spraying that.
I wait minimum one day then sand primer using 600 , if using clear as a primer I'll wait a week
Color: tack coat - wait few minutes then full coat
Wait ten minutes then second coat, if third is needed I'll spray that after another twenty minutes.
Clear coat after an hour... One full coat, wait fifteen minutes then another full coat, wait 20-30 minutes the last full coat.
I'll let that hang for a week, wet sand starting at 2000 then 3000 before using a 3M polish on an electric buffer.
-
10th June 2012, 10:00 AM #20
GOLD MEMBER
- Join Date
- Dec 2008
- Location
- Bradbury
- Posts
- 1,429
That sounds like a good schedule. And the results speak for themselves. Does all 2k need to be baked? And how does a home hobbyist do that? I definitely wanna try it on the builds I'm working on. Originally Posted by demonx
-
10th June 2012, 10:10 AM #21
Senior Member
- Join Date
- Jul 2005
- Location
- Victoria Australia
- Posts
- 116
It doesn't need to be baked, I at one stage was using heat lamps for everything but now only use them on cold days. As I stated in the above post, sometimes they can do more harm than good, it depends on the products, climate etc.
If I'm airbrushing I use one heat lamp.
All I use is some halogen stands with the hottest globes I could buy. Place them about a meter and a half or more away or it's way too hot.
When spraying 2k you need to look at the temperature range that your hardner etc is rated for as you buy for what climate you are going to spray in.
I always use "fast" hardner in my primers.
Regular hardner/thinners in the product range I use are from memory rated around the 25-30 degree climate, I usually use these for color and clear.
If you go to my Facebook page I have lots of various paint stage pics scattered throughout all the folders (link in my sig)
-
11th June 2012, 11:48 AM #22
GOLD MEMBER
- Join Date
- Dec 2008
- Location
- Bradbury
- Posts
- 1,429
I checked ur facebook. Love ya work man. U seem to have s really good setup going.
How would I go about coloring nitro? I have some clear nitro left over from a previous build. I have two guitars to paint soon. I want one satin white, the other satin black. I've always been stumped on what to use for the colour. I know stewmac sells the stuff I need but they won't ship it to aus.
-
12th June 2012, 11:33 AM #23
Senior Member
- Join Date
- Jul 2005
- Location
- Victoria Australia
- Posts
- 116


 Reply With Quote
Similar Threads
-
Help finishing #1
By Osbojo in forum MUSICAL INSTRUMENTSReplies: 47Last Post: 25th May 2011, 02:47 PM -
Finishing Schedule for Borate treated (TIMBOR) Red Oak Timber
By cahudson42 in forum FINISHINGReplies: 0Last Post: 17th April 2010, 09:07 AM -
Uke Finishing Schedule Using Brushing/Hard Shellac
By cpsmusic in forum MUSICAL INSTRUMENTSReplies: 1Last Post: 22nd October 2009, 07:36 PM -
WW channel schedule times
By niki in forum WOODWORK - GENERALReplies: 0Last Post: 5th April 2006, 03:57 AM -
finishing ash
By Phil Mazey in forum FINISHINGReplies: 4Last Post: 30th September 2003, 11:50 PM
