

 Thanks:
  Likes:
  Needs Pictures:
  Picture(s) thanks:
Results 1 to 15 of 17
Thread: Block Plane Builds
-
30th July 2014, 05:23 PM #1
 Most Valued Member


- Join Date
- Aug 2010
- Location
- Horsham Victoria
- Posts
- 5,713
 Block Plane Builds
G'day all,
I am wanting to make a timber block plane ... something that looks sexy if you know what I mean. I have done a few searches here but cant find anything. Looking for some ideas for a build.
If anyone can help with some pics or links that would be appreciated.
Also some advice on timbers ... I have some figured Red Gum, lemon scented gum, tallow wood, sugar gum. There is probably some other stuff lying around too. The style I had in mind was a laminated style so was thinking lighter centre with redgum on the sides. It is for a gift to someone in the states so wanting to use Aussie timbers.
Thanks
Dave the turning cowboy
turning wood into art
-
30th July 2014 05:23 PM # ADSGoogle Adsense Advertisement
- Join Date
- Always
- Location
- Advertising world
- Posts
- Many
-
30th July 2014, 06:02 PM #2
Member
- Join Date
- Feb 2012
- Location
- Brisbane
- Posts
- 93
What sized plane were you trying to make? Is it for smoothing or something else?
It seems that those getting into plane making start with "krenov" or "laminated" planes and then move into cutting abutments etc out of a solid block.
I just did a quick search and there are a number of build threads on here for krenov planes, my research shows that the one size is used from the size of your little finger to the size of your arm.
-
30th July 2014, 06:09 PM #3
Most Valued Member
- Join Date
- Aug 2010
- Location
- Horsham Victoria
- Posts
- 5,713
Block Plane Builds
like a stanely block plane only wood. The sort you use with just one hand and might typically draw back towards you to take the corner off a sharp edge
a laminated plane sounds like the kind of thing I had in mind
Dave the turning cowboy
turning wood into art
-
30th July 2014, 07:46 PM #4
 GOLD MEMBER
- Join Date
- Mar 2004
- Location
- Brisbane (western suburbs)
- Age
- 77
- Posts
- 12,127
Dave, perhaps you should just call it a small plane - I think the term 'block' makes people think of low-angle, bevel up jobs, although small, bevel-down woodies called 'block planes' were once common enough. Laminated body planes in the style made popular by James Krenov are not difficult to make, but there are a couple of pitfalls to watch out for on your first try - DAMHIK!
I haven't made a plane from Redgum, but I would think it should be quite ok. Any hardwood would do for a laminated job, because you don't have to cut abutments. Some of our harder woods split out too easily when doing that job, but with the Krenov style, the wedge is retained by a cross-pin, so brittle wood isn't much of an issue. It's that cross-pin that tripped me up on my first couple of tries. On his planes, Krenov used a wooden pin carved into a triangular shape, but I found them too bulky, and they blocked the shavings (I either didn't carve them down enough, or started out with them too big). A metal pin can be much finer & not such an obstruction. A 1/4" diameter steel or brass rod will do nicely on a small plane. And deciding just where to place the pin is a bit of a guessing game. You don't want it too high, or it won't be a good fulcrum, but you don't want it too low, either, or it will block shavings. And you need to keep the wedge angle shallow with a metal pin, because they slip loose too easily if the wedge angle is too steep. The shallower the angle, the better a wedge tightens, anyway. On the couple of planes in this style that have worked well for me, I placed the pin just a bit more than half way down the blade ramp.
I suggest before you start, you get the blade you intend to use, if you haven't already got one. That determines the width of the plane, & since wooden sides need to be a bit wider to give enough stiffness, wooden planes are always wider, & therefore bulkier, than a metal one using the same width blades.
Lee Valley do a nice little kit for not a bad price - the blade and adjustment mechanism are straight from one of their block planes. If you follow their suggested dimensions, the finished plane is a bit bulky for one-handed use, but my hand isn't very big, & it would be ok if you have a biggish hand. I am not a big fan of the Norris style adjuster, and it seems a bit like overkill to put one on a woody, but that's just my opinion, and I'm sure lots of people would prefer to have a screw adjuster than have to tap the blade around with a mallet!
Anyways, the best way to learn is to get stuck into it. It takes very little wood & little time to knock out the bits you need, so just make a plane & see how it goes. If it's a dud, try to work out why (with a little help from your friends here ). The next one will be better...
Cheers,IW
-
30th July 2014, 08:01 PM #5
GOLD MEMBER
- Join Date
- Apr 2012
- Location
- Sydney
- Posts
- 1,503
-
30th July 2014, 08:04 PM #6
Be inspired. Be creative. Be bold.
- Join Date
- Apr 2001
- Location
- Perth
- Posts
- 10,824
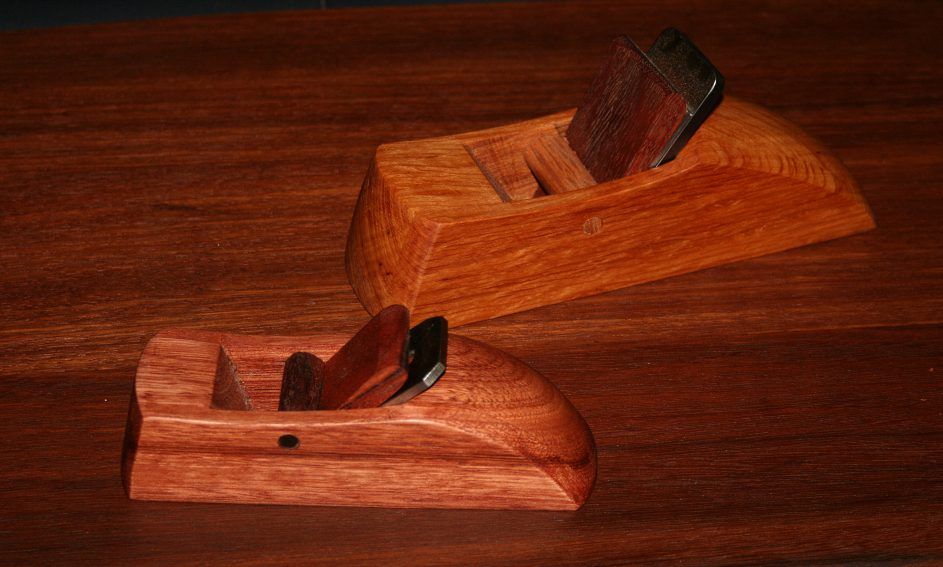
Here's a little Krenov-style block plane. I have made a few of these. This one is in Jarrah and the bed is 40 degrees - which is the same low cutting angle as something like a Stanley/LN 60 1/2. It works very well and is exceptionally comfortable. The blades can be had from HNT Gordon or Hock (both expensive) or the Mujingfang blades via Lee Valley (excellent and cheap - about $8 each).
Block plane in front, smoother at rear ...
Article: http://www.inthewoodshop.com/ShopMad...vSmoother.html
Regards from Perth
DerekVisit www.inthewoodshop.com for tutorials on constructing handtools, handtool reviews, and my trials and tribulations with furniture builds.
-
30th July 2014, 08:07 PM #7
Lignum Vexator
- Join Date
- May 2007
- Location
- North of the coathanger, Sydney
- Age
- 68
- Posts
- 9,417
Lemon scented gum is closely related to spotty gum so should be plenty hard enough
I'm in the process of gluing up some spotty gum from leftover floor boards
the build is taking some time as I'm easily distracted with other glittery things
I was going to say have a look at Derek's site as he's made a couple but I see he's posted picciesregards
Nick
veni, vidi, tornavi
Without wood it's just ...
-
30th July 2014, 09:38 PM #8
Most Valued Member
- Join Date
- Aug 2010
- Location
- Horsham Victoria
- Posts
- 5,713
Hey Guys, thoroughly appreciate all of the above.
Derek, those ones in the picture look to be blade and no cap iron. What are ther fors and againsts for a cap iron?
Dave the turning cowboy
turning wood into art
-
30th July 2014, 10:11 PM #9
Be inspired. Be creative. Be bold.
- Join Date
- Apr 2001
- Location
- Perth
- Posts
- 10,824
Hi Dave
There is a place for planes both with- and without chip breakers. A chip breaker is essential on a Bailey-type smoother, where you can close it up the edge of the blade, which will alter the chip type created. In short, it can improve smoothing performance on interlocked grain. This can be useful as well when edge jointing with a jointer plane. Alternatively, one can use a plane with a high bed angle, such as the 55 degree bed on the smoother in the picture above.
A block plane is really for chamfering (and here a small smoother with a "common" cutting angle is often better) or end grain trimming (which is where the low cutting angle excels). Neither of these situations requires a chip breaker. Certainly, simpler is better.
Regards from Perth
DerekVisit www.inthewoodshop.com for tutorials on constructing handtools, handtool reviews, and my trials and tribulations with furniture builds.
-
31st July 2014, 02:10 AM #10
Deceased
- Join Date
- May 2008
- Location
- Australia
- Posts
- 2,357
Hi Dave. This might help you out with your Krenov Plane.
regards; Stewie.
1-2
How to make a Krenov style plane pt. 1/2 - YouTube
2-2
How to make a Krenov style plane pt. 2/2 - YouTube
-
31st July 2014, 02:26 AM #11
Be inspired. Be creative. Be bold.
- Join Date
- Apr 2001
- Location
- Perth
- Posts
- 10,824
Hi Stewie
I cannot recommend the video you linked to. It is wrong in so many ways. Not only is it pedantic (I skimmed as I quickly became bored), but it uses a Japanese blade (which is short and tapers in the "wrong" direction), and then has a steel rod for the wedge bar. That is just wrong on a wooden wedge ... wrong. It will create a dent and then the blade will be impossible to adjust.
The heart of a Krenov plane is not the laminated sides, as tends to be seen, but the wedge bar. This rotates to fit the angle of the wedge. Correctly made, it is slim enough not to interfere with shavings.
A steel rod is a beginner's corruption in an attempt to build a plane.
I own a plane made for me by Jim Krenov: One little plane, a 9" smoother in Hornbeam
Regards from Perth
DerekVisit www.inthewoodshop.com for tutorials on constructing handtools, handtool reviews, and my trials and tribulations with furniture builds.
-
31st July 2014, 02:58 AM #12
Deceased
- Join Date
- May 2008
- Location
- Australia
- Posts
- 2,357
Hi Derek. You may be right. I just did a quick search and posted without looking at the content of the video's.
I have great admiration for the furniture designs of James Krenov, but never quite understood the fascination with his hand plane's. Visually they appear very amateurish, and to be honest poorly reflect his obvious talents. IMO
regards; Stewie.
-
31st July 2014, 03:10 AM #13
Be inspired. Be creative. Be bold.
- Join Date
- Apr 2001
- Location
- Perth
- Posts
- 10,824
Hi Stewie
I suspect that you and I both feel the same way about using "nice" handplanes. It is interesting that Krenov was only particular about the performance of his planes (the one he sent me looks like a rat has gnawed at it!) and not the way they looked. For a man who had a name for his planes (in addition to his furniture), he was far more lyrical about his machines. He just roughed out the shape on a bandsaw, and that was sufficient. Nevertheless, he made sure that they worked well .. very well.
Regards from Perth
DerekVisit www.inthewoodshop.com for tutorials on constructing handtools, handtool reviews, and my trials and tribulations with furniture builds.
-
31st July 2014, 03:29 AM #14
Deceased
- Join Date
- May 2008
- Location
- Australia
- Posts
- 2,357
And that was a great achievement when you consider his eye sight had deteriorated very badly over the last few years of his working life. Originally Posted by derekcohen

Stewie;
-
31st July 2014, 09:59 AM #15
GOLD MEMBER
- Join Date
- Mar 2004
- Location
- Brisbane (western suburbs)
- Age
- 77
- Posts
- 12,127
Derek, I have to gently disagree with your outright dismissal of a metal retaining bar for the wedge. True, a thin metal bar can indent the wedge, particularly if you use an over-large angle for it, but it does reduce bulk & allow freer egress of shavings, so there are swings & roundabouts. You can minimise the indentation problem by keeping the wedge angle low & using a good, firm piece of wood. Using a shallow angle for your wedge is a good idea in any case, because it will set firmly with a light tap & has better holding power.
There is another alternative, & that is to use a metal pin, but add a thumbscrew to your wedge as LV have done for their kit I linked to above. They include a brass insert for the thumbscrew, which is a nice touch, but it's not absolutely necessary. You can tap a very good & serviceable thread in most hard woods, so one of those knurled head 1/4" brass thumbscrews could do an adequate job on a small plane. If you go this route, it's a good idea to actually make a small indentation for the pin, so that it registers firmly when you tighten the screw, as on the metal 'wedges' of the old block planes.
Krenov's rotating wooden bar is a practical idea, and clearly works, but it does need careful placement, or it will be an obstruction - I can attest to this, to my great disappointment & frustration! There isn't a lot of distance between the 'right' spot & getting in the way, particularly if you are attempting a higher than 'standard' angle blade, so either copy a plane that is working well, or be prepared to experiment a bit. Unfortunately, it isn't something you can adjust once the plane is assembled!
You could reduce the potential indentation problem inherent in metal pins by filing a flat on the pin. In this case, the pin will need to be able to rotate, so don't glue it in. Or, you could buy a couple of brass cam abutments from Terry Gordon, & have the best of both worlds (hmm, just had a look at his web site & they don't appear to be on offer any more, so you'll have to make your own.....)
Cheers,IW


 Reply With Quote


Similar Threads
-
My first block plane
By giddleberry in forum HAND TOOLS - UNPOWEREDReplies: 8Last Post: 18th December 2012, 09:40 PM -
Block plane
By groeneaj in forum HAND TOOLS - UNPOWEREDReplies: 19Last Post: 24th September 2010, 09:19 AM -
A Compendium of Block Planes: The HNT Gordon Block Plane
By derekcohen in forum HAND TOOLS - UNPOWEREDReplies: 8Last Post: 16th August 2008, 09:54 PM -
LN Skew Block Plane or LV Shoulder Plane
By mat in forum HAND TOOLS - UNPOWEREDReplies: 3Last Post: 25th October 2006, 06:46 PM -
Block Plane
By Dan in forum WOODWORK PICSReplies: 7Last Post: 4th April 2004, 08:28 PM
