

 Thanks: 0
 Likes: 0
 Needs Pictures: 0
 Picture(s) thanks: 0
Results 1 to 14 of 14
-
22nd September 2014, 04:38 PM #1
 Senior Member


- Join Date
- Aug 2008
- Location
- Melbourne
- Posts
- 166
 Help me get to know my new (old) Waldown drill press
Hi there,
I just bought a second hand Waldown "type 8sn series III" drill press in pretty worn condition, and I'm just wondering if anyone can give me any info on it?
If if anyone has answers to any of the following questions, that'd be great:
- Are there any service/owners manuals etc. still available for it? I don't have a lot of experience with drill presses, and this is a whole lot more machine than my tired old Ryobi...
- Can replacement parts still be bought? I'm not sure if I need anything yet, but the spindle is a bit sloppy, so perhaps something might need replacing down the track. Or do I just need to tighten the big hex bolt on the front? (It already feels quite tight)
And a couple of questions that go with pictures:
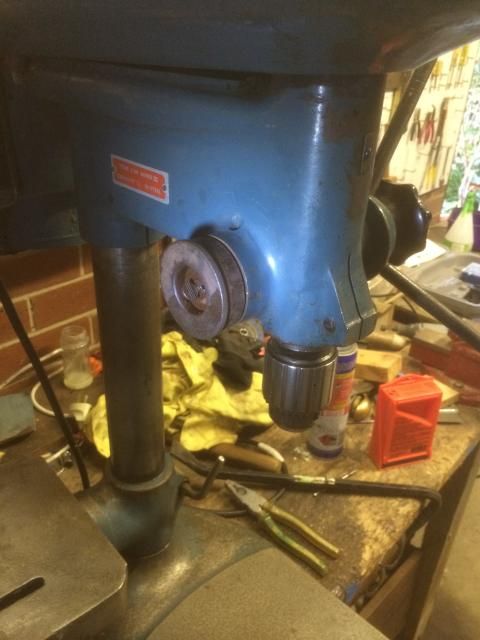
- How can the chuck be removed? There doesn't seem to be a slot for inserting one of those wedge-shaped removal tools. Does it just need a tap with a mallet?
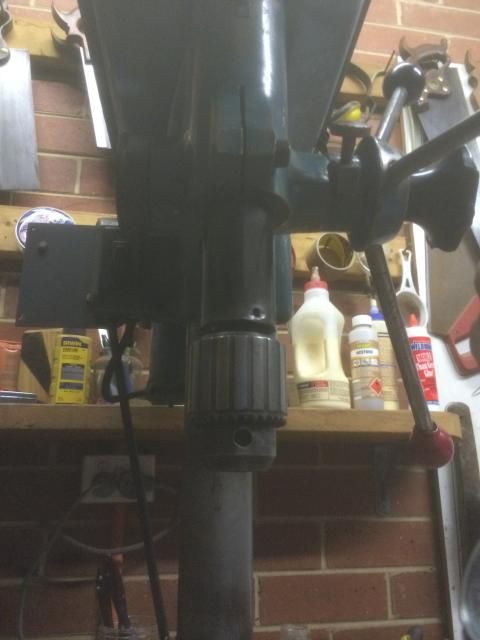
Does the column sticking up here indicate that the whole motor/head assembly could be raised up a lot taller?
What's this rusty old collar thing with the measurement scale all about, and should it be spinning freely (which it is) or fixed?
Cheers
Will
-
22nd September 2014 04:38 PM # ADSGoogle Adsense Advertisement
- Join Date
- Always
- Location
- Advertising world
- Posts
- Many
-
22nd September 2014, 04:43 PM #2
The Goldfish
- Join Date
- Mar 2006
- Location
- Bowral
- Posts
- 837
Will, I'll be interested to see what sort of responses you get. I bought a very old and very large Waldown drill press awhile ago. I still haven't reconditioned it yet, so I'm not going to be much help to you, but any answers you get might be good for me too... Good luck with yours.
Bob C.
Never give up.
-
22nd September 2014, 06:42 PM #3
GOLD MEMBER
- Join Date
- Aug 2010
- Location
- Bendigo
- Age
- 72
- Posts
- 1,986
There is a parts list and exploded drawing here somewhere.
Some parts are still available from Brobo-Walddown.
If the spindle is sloppy, then the bearings need replacement.
If the ram is sloppy, adjust the clamp bolt at the very front.
Your chuck is fitted directly to the spindle with J taper. No Morse taper adapter and therefore no Morse taper drills. You get it off with a pair of forked wedges inserted opposit each other in the gap between the chuck and the end of the spindle.
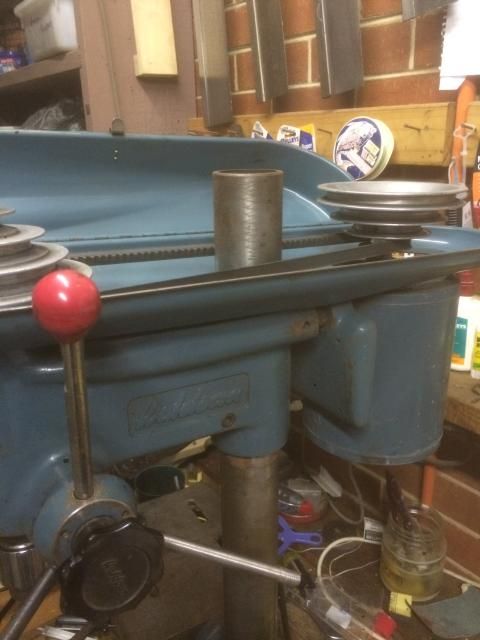
The head can be moved up the column auntil it is flush with the tip of the head casting.
The scale on the side is a depth gauge and should move with the ram but can be turned to zero by hand. The little triangle in front of it is the pointer.
The ram return spring is inside it.
This is the woodwork model with just 4 speeds.
It looks in pretty good nick to me.
Nice find!cheers,
Joe
PS: you will find several resto reports here, including from RayG, AnorakBob, me and others.Cheers,
Joe
9"thicknesser/planer, 12" bench saw, 2Hp Dusty, 5/8" Drill press, 10" Makita drop saw, 2Hp Makita outer, the usual power tools and carpentry hand tools...
-
22nd September 2014, 06:47 PM #4
SENIOR MEMBER
- Join Date
- Aug 2003
- Location
- Christies Beach
- Age
- 59
- Posts
- 972
Correct, it will be an effort though. Perhaps lift the table up high enough and use a car jack to raise it.Does the column sticking up here indicate that the whole motor/head assembly could be raised up a lot taller?
I have a Waldown PDF for it sent to me by another generous forum member if you'd like to PM me your E-mail address.The secret to creativity is knowing how to hide your sources.
Albert Einstein
-
23rd September 2014, 12:50 AM #5
Senior Member
- Join Date
- Aug 2008
- Location
- Melbourne
- Posts
- 166
Just as I posted this thread, a guy at Brobo Waldown emailed me back with pdfs of service manuals and exploded view drawings etc. so I'm all set now. Thanks for the offers
The chuck is really strongly stuck on - my brother and I couldn't get it to budge with a crowbar each! Let alone tapping with a hammer. I'm keen to try the forked wedge idea (although not very optimistic about my chances!) - where can you get them?
The chuck itself is in really bad condition, so it's entirely sacrificial now - are there any other more brutish methods of removal? Could some heat from a blowtorch do the trick?
I'm trying to make sense of the depth gauge - mine is very loose and spinning freely (about 1mm of play between it and the casting). I presume it should be tighter than that? It looks like it's supposed to be held in place by tightening the little thumbscrew in order to split/expand the pinion outwards, if that make sense? I'll add some pictures tomorrow if my description isn't clear...
Cheers
Will
-
23rd September 2014, 11:18 AM #6
GOLD MEMBER
- Join Date
- Jun 2008
- Location
- Victoria, Australia
- Age
- 74
- Posts
- 6,132
Hi Will,
I've posted in the metalwork forum, linking to this thread.
The depth adjustment should pull up tight and lock with the teeth by tightening the black knob on the quill. Then the stop is screw adjustable,
Ray
-
23rd September 2014, 01:46 PM #7
Senior Member
- Join Date
- Aug 2008
- Location
- Melbourne
- Posts
- 166
Here are some pictures of the odd depth gauge assembly:
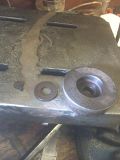
Looks like the thumbscrew tightens the 'thing' outwards to hold it in place. Maybe the fact that my thumbscrew appears broken means it's not screwing in deep enough to properly hold it in place?
-
23rd September 2014, 02:30 PM #8
GOLD MEMBER
- Join Date
- Aug 2010
- Location
- Bendigo
- Age
- 72
- Posts
- 1,986
I've never seen that thumbscrew on a Waldown! There is meant ti be a circlip that holds the depth gauge on.
Ray was talking a.A. bout the depth STOP on the other side of the head. Ray, I think only some models had the depth stop. My NH does, but the 8SN I restored didn't....Cheers,
Joe
9"thicknesser/planer, 12" bench saw, 2Hp Dusty, 5/8" Drill press, 10" Makita drop saw, 2Hp Makita outer, the usual power tools and carpentry hand tools...
-
23rd September 2014, 07:30 PM #9
Senior Member
- Join Date
- Aug 2008
- Location
- Melbourne
- Posts
- 166
Joe, looks like the thumbscrew might have been an 'aftermarket' modification haha. Doesn't bother me that it's there, but it does bother me that it doesn't work...
Even more bothersome is the chuck. I tried again today to remove it with no luck. I'm keen to try the wedge idea, but I'll need to procure/make some first. I reckon removing the quill/spindle would be a good thing to do before I go much further - can anyone who's pulled one of these apart advise on how to do that painlessly?
Cheers
Will
-
23rd September 2014, 09:59 PM #10
GOLD MEMBER
- Join Date
- Aug 2010
- Location
- Bendigo
- Age
- 72
- Posts
- 1,986
Read RayS's and my restoration reports in metalworking. Lots of details and photos there.
Cheers,
Joe
9"thicknesser/planer, 12" bench saw, 2Hp Dusty, 5/8" Drill press, 10" Makita drop saw, 2Hp Makita outer, the usual power tools and carpentry hand tools...
-
29th September 2014, 07:35 PM #11
Senior Member
- Join Date
- Aug 2008
- Location
- Melbourne
- Posts
- 166
Alright, the chuck is free! In the end I removed the quill and realising that the chuck was hollow, a few hammer taps on a bolt held loose in the jaws was all that was needed. In other news, I now have 1 Jacobs No 34 chuck in tatty condition free to a good home for anyone who wants to pay the postage...
One casualty of the whole operation was the quill return spring - it broke. Should I go to Waldown for a replacement, or can better deals be found elsewhere?
Can anyone take some photos of the depth dial assembly is supposed to look, in light of the fact that mine seems to be way off the mark? Jhovel - you mentioned a circlip - where should that be?
Cheers
Will
-
30th September 2014, 04:52 PM #12
GOLD MEMBER
- Join Date
- Aug 2010
- Location
- Bendigo
- Age
- 72
- Posts
- 1,986
The circlip goes on the end of the pinion shaft and holds the depth gauge on. There should be a groove for it there.
Photos are in various places all over the forum. Search for Waldown. My resto log starts here: https://www.woodworkforums.com/showth...88#post1737188 and the first photo shows the gepth gauge and a tiny bit of circlip left after someone attempted to weld the depth gauge on....
Ray's thread also has lots of detail photos for you here: https://www.woodworkforums.com/showth...hlight=Waldown
Read all three pages. This is one where you can see the finished installation: http://www.backsaw.net/pics/waldown/DSCN1647.JPG (from page 3).
This thread https://www.woodworkforums.com/f65/waldown-time-tart-141279 from Bob has even more detailed photos for you....
You can get the spring from Brobo-Waldown if you are wealthy or from eBay with a search for "Drill press quill spring" for a reasonalbe price.
Keep taking photos! You;d be surprised how many people read this thread!
And as we say here: if you didn't photograph it - it didn't happen Cheers,
Joe
9"thicknesser/planer, 12" bench saw, 2Hp Dusty, 5/8" Drill press, 10" Makita drop saw, 2Hp Makita outer, the usual power tools and carpentry hand tools...
-
30th September 2014, 05:57 PM #13
Senior Member
- Join Date
- Aug 2008
- Location
- Melbourne
- Posts
- 166
Thanks Joe,
I've seen most of those threads, although that's the first time I've seen yours - great job with the resto!
http://www.backsaw.net/pics/waldown/DSCN1647.JPG I can't see the circlip in this photo or any of the others you linked (except that funny weld job!) - should I be able to?? Or is it those 2 very faint spots at about 7:00 and 8:00 on the dial?
I've never dealt with circlips before - do you reckon I could easily get a replacement at Bunnings, or are they a bit more bespoke than that?
Doesn't look like any of the ones in these threads have that big washer that came with mine, another aftermarket addition perhaps?
Thanks for all the help!
Will
-
1st October 2014, 05:30 PM #14
Senior Member
- Join Date
- Aug 2008
- Location
- Melbourne
- Posts
- 166
So today I tried out the quill return spring from my old (much smaller) Ryobi drill press, and that did the job at a pinch. I put my nice new keyless chuck on and put in a drill bit, switched it on and wow, RUNOUT! So much runout visible to the naked eye, no dial indicator required - which is really disheartening.
I took the chuck back off and the runout looks to be in the spindle itself. There doesn't seem to be any play in the spindle when trying to wobble it by hand, it's just not running straight.
Can anyone speculate whether this may be due to the spindle itself being out of whack, or perhaps the bearings needing replacement? Or is it possible that with the heavy handedness required to remove the chuck, something is just out of place and needs to be tapped back into place?
Just when I thought I was ready to go...


 Reply With Quote


Similar Threads
-
Waldown drill press
By eskimo in forum EBAY, GUMTREE, AMAZON (and other sale sites) Metalwork ONLYReplies: 1Last Post: 10th September 2014, 10:55 AM -
Waldown Radial Arm Drill Press
By camoz in forum METALWORK FORUMReplies: 2Last Post: 31st December 2013, 09:52 PM -
Waldown drill press
By camoz in forum ANTIQUE AND COLLECTABLE TOOLSReplies: 8Last Post: 26th January 2013, 10:15 PM -
Waldown Drill Press
By KevM in forum METALWORK FORUMReplies: 24Last Post: 1st September 2011, 01:31 AM -
Waldown drill press
By mikm in forum GENERAL & SMALL MACHINERYReplies: 5Last Post: 17th August 2009, 10:35 AM
