

 Thanks:
  Likes:
  Needs Pictures: 0
 Picture(s) thanks: 0
Results 256 to 270 of 377
Thread: 2/3 Harley Davidson 1920 JS
-
1st April 2015, 04:58 PM #256
 GOLD MEMBER


- Join Date
- Apr 2013
- Location
- Torquay
- Posts
- 4,422

Very, very, very nice

-
1st April 2015 04:58 PM # ADSGoogle Adsense Advertisement
- Join Date
- Always
- Location
- Advertising world
- Posts
- Many
-
1st April 2015, 07:31 PM #257
 GOLD MEMBER
- Join Date
- May 2012
- Location
- Woodstock (Cowra)
- Age
- 74
- Posts
- 3,381
recycled oil, yes, recycled silicon....I'd like to see that......
 The person who never made a mistake never made anything
Cheers
Ray
-
2nd April 2015, 09:33 AM #258
Deceased
- Join Date
- Mar 2013
- Location
- St. Helens Tasmania
- Posts
- 2,227
Sorry Ray I couldn't recycle any silicon. Originally Posted by rwbuild

But I did manage to make good use of some plastic from a PlayStation controller box.
The plastic inspection window took a good two hours to shape under a magnifying glass.
The silicon that's holding it in place was applied with the end of a sewing pin.
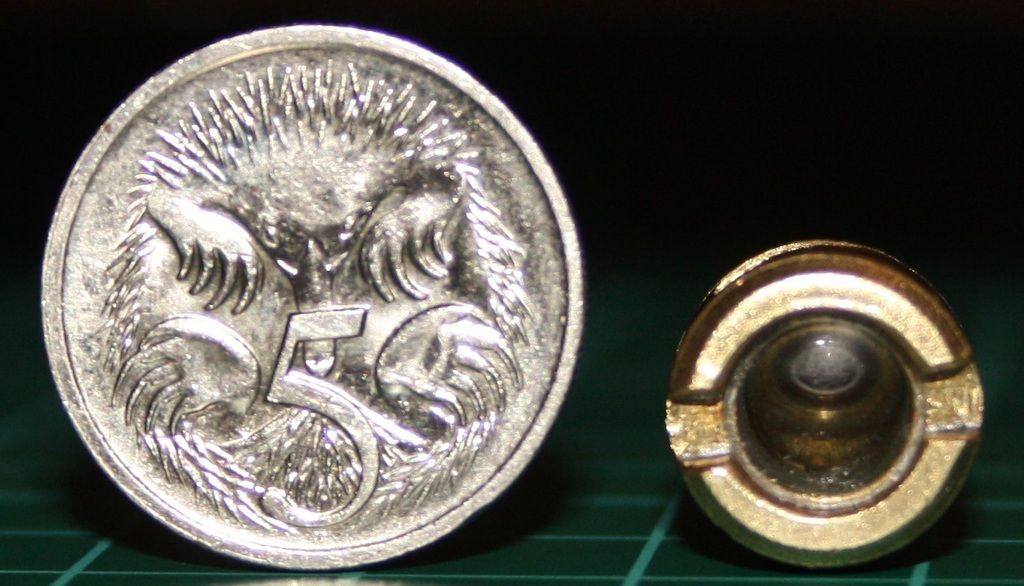
Once it had dried enough I partly filled it with some vegetable oil.
Not quite to Harley specifications I'm sure, But I wont tell if you don't!.
The oil bubble in it looks good, so all I need do now is wait and see if it's going to leak.
If everything's ok I'll put it back in the engine later today.
Cheers
Trev.
-
2nd April 2015, 03:59 PM #259
GOLD MEMBER
- Join Date
- Apr 2013
- Location
- Torquay
- Posts
- 4,422
Looks great. Love the attention to detail. Using a sewing pin - you will soon be into the quilting section Originally Posted by Repliconics
") Good Stuff !!!
Good Stuff !!!
-
2nd April 2015, 05:42 PM #260
Deceased
- Join Date
- Mar 2013
- Location
- St. Helens Tasmania
- Posts
- 2,227
I got the inspection window back in a little while ago.
It's looking pretty good!.
While I was checking it my son asked what I was looking at, and I could honestly say I was checking the engine for oil leaks!.
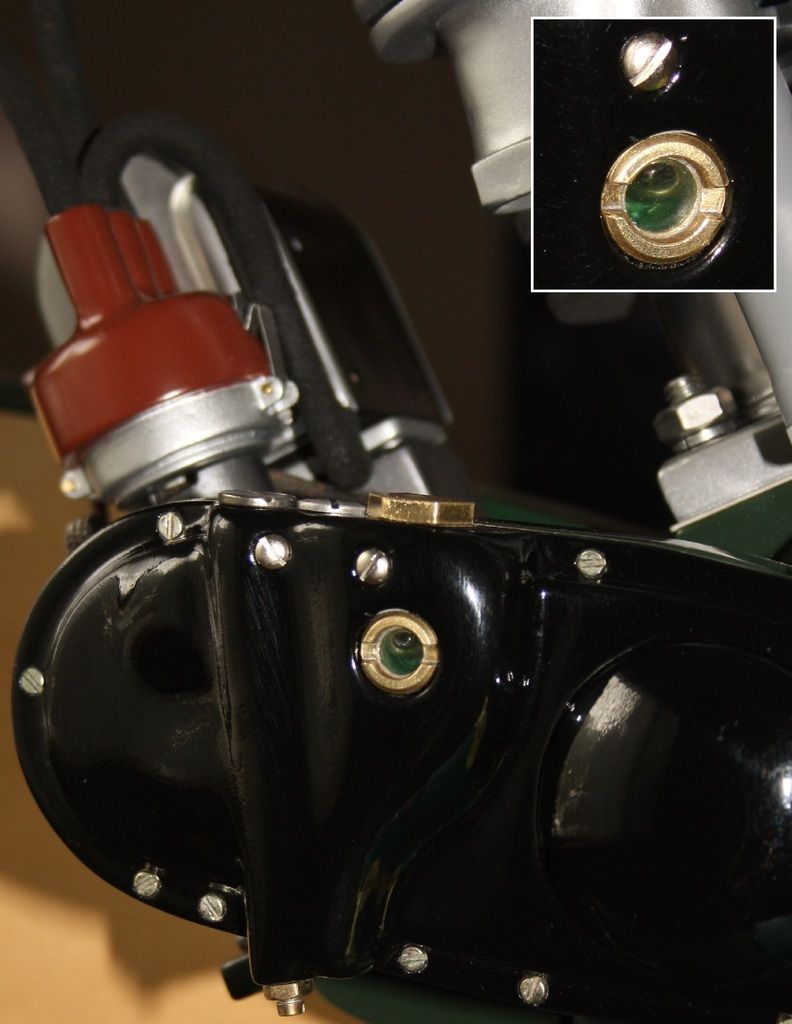
I've still got some work to do in and around the clutch area, which I'll get on with tomorrow.
Cheers
Trev.
-
2nd April 2015, 07:15 PM #261
GOLD MEMBER
- Join Date
- Nov 2008
- Location
- Canterbury UK
- Age
- 67
- Posts
- 3,996
A bit late Trev but look in the pen turning section particularly the bit about casting as there are resins that when dry are clear with the addition of a little dye can be cast even with bubbles. may also have other uses. I am sitting typing this waiting for some to arrive at this moment due in today. Yes I make pens as well and want to make my own blanks take a look at a couple HERE and HERE
-
2nd April 2015, 07:41 PM #262
Deceased
- Join Date
- Mar 2013
- Location
- St. Helens Tasmania
- Posts
- 2,227
Hey mate those pens are some very nice work!.
Your a man of many talents my friend.
I've never really messed about with resins much, I'll have to give it a whirl.
Cheers
Trev.
-
2nd April 2015, 08:05 PM #263
GOLD MEMBER
- Join Date
- Nov 2008
- Location
- Canterbury UK
- Age
- 67
- Posts
- 3,996
-
2nd April 2015, 08:45 PM #264
Retired Member
- Join Date
- Nov 2006
- Location
- Bendigo Victoria
- Age
- 80
- Posts
- 16,560
Trev, I can send you a couple of 19mm clear polyester rods, about 150mm long if that is any good to you.
I do a fair bit of casting with PR, it is easy to turn, especially if you have access to a metal lathe.
It also cuts and files fairly easily and I'm sure you could find plenty of other uses for them (I have black and white as well as other plain colours as well )
)
-
2nd April 2015, 08:51 PM #265
GOLD MEMBER
- Join Date
- Apr 2013
- Location
- Torquay
- Posts
- 4,422
Trev, Originally Posted by Big Shed
As you know I have a metal turning lathe. Pop some in the post and I will do whatever you need to them.
Keith
-
2nd April 2015, 09:49 PM #266
Deceased
- Join Date
- Mar 2013
- Location
- St. Helens Tasmania
- Posts
- 2,227
Sounds great mate!. Originally Posted by Big Shed
I'll send you a PM.
That's a coincident I've gotten access to a metal turning lathe recently, it just happens to be called "Keith"!. Originally Posted by Keith_1
Thanks Guy's
Trev.
-
4th April 2015, 06:59 AM #267
Deceased
- Join Date
- Mar 2013
- Location
- St. Helens Tasmania
- Posts
- 2,227
I was doing some research on the Harley last night and found a good picture of the loop frame.
The picture looks a little odd as I've rotated it to get the frame straight.
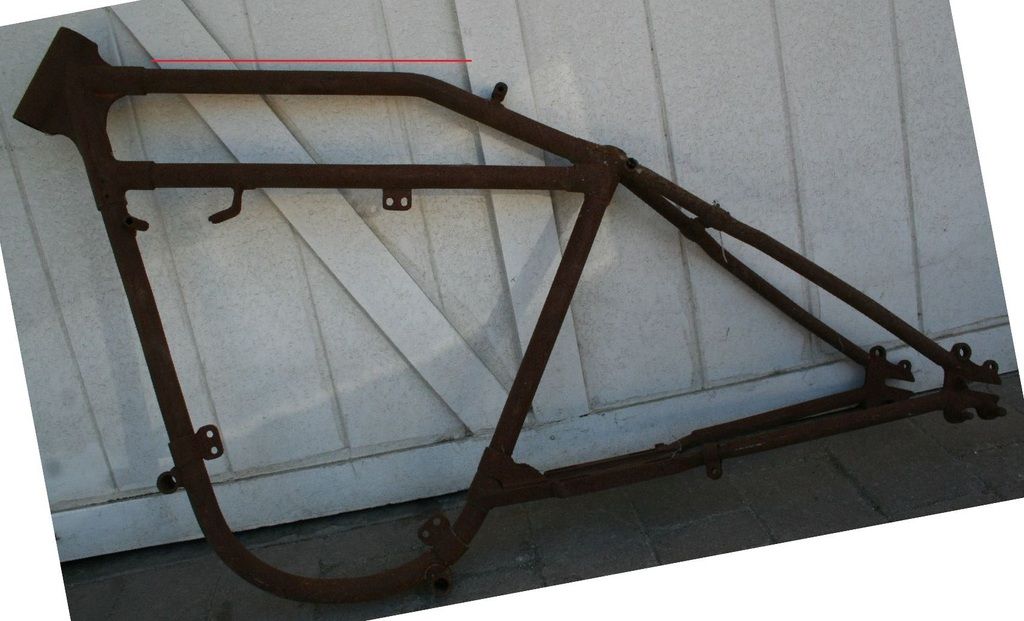
I can see straightaway a few things I've gotten wrong with my first attempt.
The main thing being the pipe I used for the main loop section was far to light.
So I'll need to build a new frame.
Which in a lot of ways is easier than trying to fix what I already have.
Since I shortened the left cylinder to level out the intake manifold, it's changed the angle of the carburettor.
As well as putting the mixing bowl to close to the fins of the cylinder.
So today I'll have to take the Carbie apart and somehow get the bowl off and turn it.
The way things are going I don't think there'll be much left of the original Harley by the time I'm finished apart from the engine.
But all good fun!.
Cheers
Trev.
-
4th April 2015, 08:46 AM #268
GOLD MEMBER
- Join Date
- Apr 2013
- Location
- Torquay
- Posts
- 4,422
Really looking forward to seeing photos of the old Harley versus the new finished Harley (although probably a long way down the track with the amount of detail going into it)
Regards
Keith
-
4th April 2015, 09:38 AM #269
Life's Good, Enjoy each new day & try to encourage
- Join Date
- Dec 2009
- Location
- Faulconbridge, Lower Blue Mountains
- Age
- 68
- Posts
- 11,186
G'Day Trev,
I'm no expert at anything much and my eye for detail is sadly lacking, as I just do, and as long as it works, I'm okay..
My head spins with your attention to detail and exactness....
While I very much appreciate the all time, effort and craftsmanship you put in, if you didn't tell me something wasn't quite right, I'd still be in awe of your workmanship/art just as much.... the results are awesome sir!!
Thank you for the extra time & effort to photograph and note the build....
Cheers, Peter
-
4th April 2015, 06:34 PM #270
Deceased
- Join Date
- Mar 2013
- Location
- St. Helens Tasmania
- Posts
- 2,227
Thanks Peter I appreciate that.
The Harley is definitely proving to be a handful.
I spent most of the day trying to "encourage" the mixing bowl from the bottom of the carbie.
I finally got it apart and turned the bowl further to the front, moving it anyway from the cylinder.
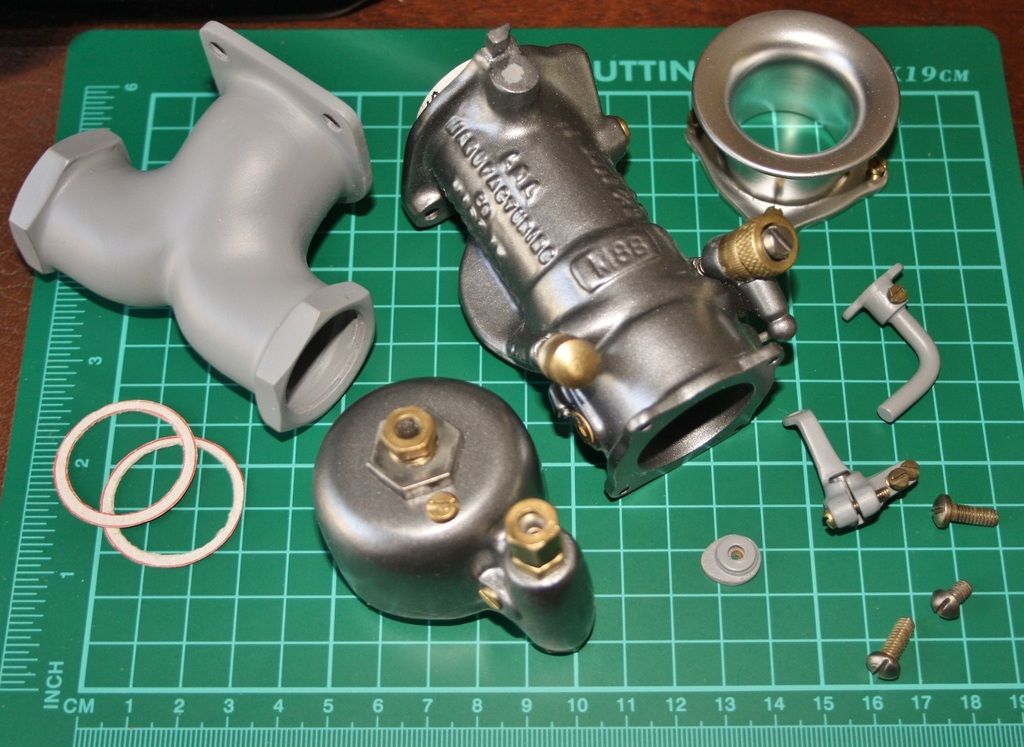
I also shortened the intake manifold a little more and changed it's angle slightly to centre the carbie better.
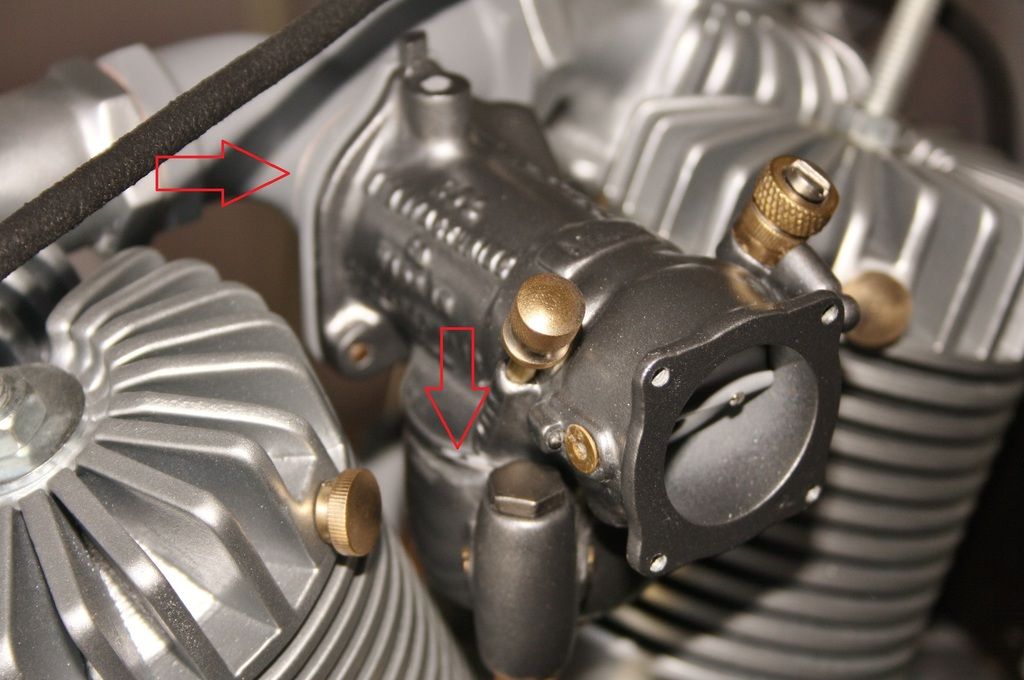
In the picture above I've marked the cut through the manifold which still needs to be repaired.
The second of the arrows shows the previous position of the bowl, that's were the nut that's now next to the throat of the carbie was.
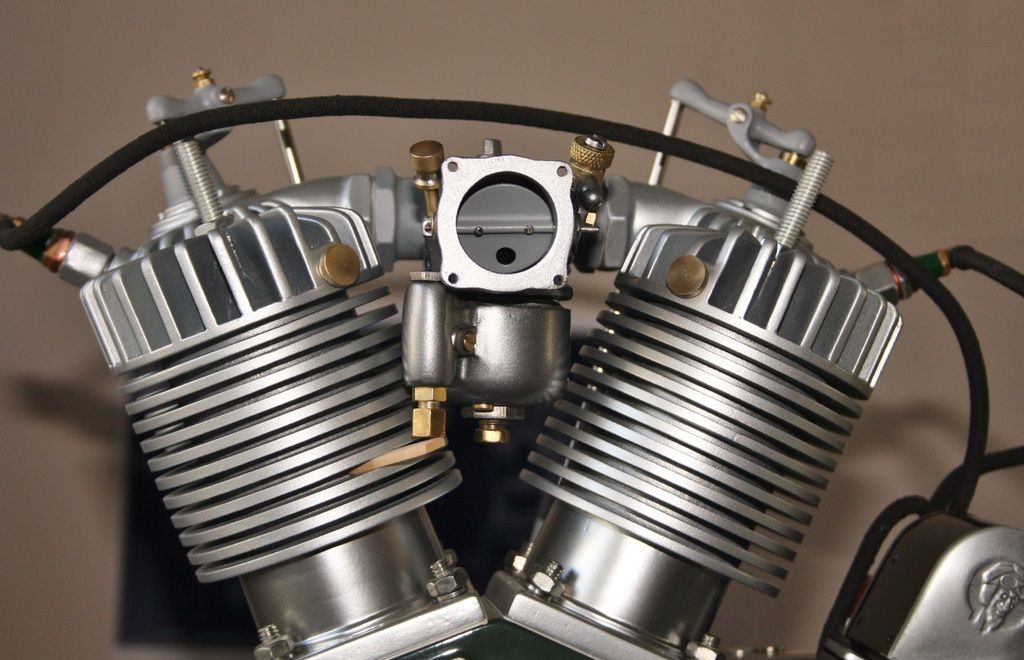
The Carburettor has ended up a lot straighter and more centred than it was before.
The piece of MDF sticking out from the fins is supporting the carbie until it's locked in place.
It was a long day with not a lot to show, but well worth it.
Cheers
Trev.


Similar Threads
-
It's a No.1, but not a Harley
By Bushmiller in forum HAND TOOLS - UNPOWEREDReplies: 19Last Post: 13th October 2014, 11:24 PM -
Harley Davidson chopper
By bobman 58 in forum INTARSIAReplies: 6Last Post: 6th February 2014, 08:26 AM -
Harley Davidson logo
By bobman 58 in forum SCROLLERS FORUMReplies: 4Last Post: 10th August 2013, 09:38 AM -
Harley Davidson
By Rum Pig in forum WOODIES JOKESReplies: 0Last Post: 15th October 2009, 12:10 PM -
Arthur Davidson
By Baz in forum WOODIES JOKESReplies: 5Last Post: 28th December 2005, 11:10 AM
