

 Thanks:
  Likes:
  Needs Pictures: 0
 Picture(s) thanks: 0
Results 16 to 26 of 26
Thread: There's nowt like an OWT
-
16th February 2015, 11:01 PM #16
 GOLD MEMBER


- Join Date
- Dec 2007
- Location
- Melbourne
- Posts
- 3,277

That is very interesting about nails in living trees..
I wonder if you were the artistic type what would happen if you nailed a stipple image into a tree and left it to grow for a few years and harvested the timber??�..Live a Quiet Life & Work with your Hands
-
16th February 2015 11:01 PM # ADSGoogle Adsense Advertisement
- Join Date
- Always
- Location
- Advertising world
- Posts
- Many
-
17th February 2015, 10:09 AM #17
GOLD MEMBER
- Join Date
- Mar 2004
- Location
- Brisbane (western suburbs)
- Age
- 77
- Posts
- 12,127
I think the results could be very interesting, but unpredictable, Dale. And please make sure the tree is somehow well-marked (permanently!) that it contains a lethal quantity of metal - a 4" nail could trash a chainsaw chain quicker than you can say "Oh sh*t!". Chainsaw operators take a bit of a dim view of driving steel into trees they might wish to cut down some day.... Originally Posted by DSEL74


Might be safer (but even more unpredictable) to drill a series of small holes & inject solutions of metal salts - you could create a palette of colours as well as a pattern. I'm surprised someone hasn't tried this already....
Cheers,IW
-
18th February 2015, 09:09 AM #18
Mildly Moderate
- Join Date
- Nov 2007
- Location
- Albury Well Just Outside
- Posts
- 13,315
I recall something similar has been done. A water based dye added to water then the tree was watered normally and the roots of the tree took up the solution producing an interesting patten. Does take a long time. Originally Posted by IanW
-
18th February 2015, 09:19 AM #19
GOLD MEMBER
- Join Date
- Mar 2004
- Location
- Brisbane (western suburbs)
- Age
- 77
- Posts
- 12,127
Yep, I suspect I haven't that many years left to wait, Christos, so I'll leave that technique to the younger set to take up..... Originally Posted by Christos
Cheers,IW
-
19th February 2015, 09:22 AM #20
Luddite Lite
- Join Date
- Jan 2009
- Location
- Brisbane
- Posts
- 800
Looks great, Ian! I keep meaning to cut the front down on my OWT so that it has that nice low front like yours. But time to do those things just disappeared with the arrival of our shiny new human
Sent from my iPhone using Tapatalk...I'll just make the other bits smaller.
-
19th February 2015, 11:04 AM #21
GOLD MEMBER
- Join Date
- Mar 2004
- Location
- Brisbane (western suburbs)
- Age
- 77
- Posts
- 12,127
Yeah, Matt, you've given yourself an impediment to shed time that is going to take a while to pass! I can tell you that though it seems slow for the first few years, the time passes amazingly quickly when you look back. We've been reliving the little human phase with our grand daughter, and seems to all happens even more quickly! Originally Posted by Berlin
Cutting down the front of the woodwork is decorative, and gives it a more streamlined look, but it's also part of the construction process if you use a blade-holding method like Derek's eye bolt - you need to be able get a chisel in, to cut the rebate for the back of the eye. I didn't need to do that for mine, just cut a couple of nicks to allow the brass yolk to come back far enough, but I liked the look of Derek's, so it got the nose job anyway.
I could have made the brass shorter, too, and I wouldn't have needed to make the nicks, but I wanted to keep the two thumb nuts far enough apart to make them easy to get at. In retrospect, they could've been closer without causing any problems, but you live & learn on your first (and subsequent!) attempts at anything.
This was my first try at making a router, & as I said, I'd had ideas of a much more elaborate thing, even contemplating a screw adjuster, but decided for once, to try crawling before I walked. I'm glad I did, this simple device works so well, far better than I expected, and it's so easy to set up & use that I now think a screw depth adjuster would be far more trouble than it's worth. Of course, I should have known this already from the number of 'regular' planes I've made - I've come to much prefer the tappity-tap adjustment method to less than perfect screw mechanisms. Even more so on a tool like this, where the blade is advanced in much larger increment than for a bench plane. Depending on the wood, I can plane off quite thick chips working mostly cross-grain, as you would with a scrub plane, then by slowing to a few finer passes as I reach full depth, end up with a very clean, level surface. It's odd, but years ago, I picked up a Stanley 71 for next to nothing at a garage sale, & after a few attempts at getting it to work, I gave up, put it aside, then sold it to someone else, a while back, in one of my frenzies of getting rid of excess tools. I suspect now that I had just botched the blade sharpening, as I can see no other reason why it shouldn't have worked for me just as well as my 'DC' woodie. I guess I just wasn't ready for it, at the time...
The only thing I don't like about my new toy is my blade-holding mechanism. It works perfectly well, but looks clumsy! I've already made a brass yolk that fits over the blade & needs only a single screw, which I was going to do originally, but thought it would take me too long (didn't take half as long as I thought it would!). So this 'prototype' will eventually be superseded by a slightly more streamlined model, when I get time to make a new body. This needs to be a few mm taller at the back to accommodate the yolk comfortably, and so I can't just modify the existing body.
Cheers,IW
-
19th February 2015, 08:04 PM #22
Be inspired. Be creative. Be bold.
- Join Date
- Apr 2001
- Location
- Perth
- Posts
- 10,824
Hi IanThe only thing I don't like about my new toy is my blade-holding mechanism.
Another modification is better support for the blade. I used a brass insert. This is not as tricky as it sounds (there are instructions on my website), but really adds stability to the blade and makes for precision and easy of adjustment ...

Regards from Perth
DerekVisit www.inthewoodshop.com for tutorials on constructing handtools, handtool reviews, and my trials and tribulations with furniture builds.
-
19th February 2015, 08:23 PM #23
GOLD MEMBER
- Join Date
- Mar 2004
- Location
- Brisbane (western suburbs)
- Age
- 77
- Posts
- 12,127
Derek, yes, I was actually intending to make a bed like yours, & even got a bit of brass angle out ready. But I thought I'd just try the wooden bed, first, because I was in my usual hurry to get the tool working. It worked far better than I thought it would, straight up. I think that's because both the yolk and the bed are notched, holding the blade stem very firmly. There is no tendency for the blade to twist or move (having two screws to twitch it up increases the holding force, too). The round eye bolt doesn't lock the stem, so your design gets most of its support from the bed, making it very important you get good mating surfaces, I think. A bit of extra polished brass never goes astray, though, so I may incorporate a similar bed in my next attempt, though I've made that a bit difficult for myself, with the new yolk I made - there may have to be a third G model, before the dust settles. Originally Posted by derekcohen
All great fun...IW
-
20th February 2015, 07:04 PM #24
GOLD MEMBER
- Join Date
- Mar 2004
- Location
- Brisbane (western suburbs)
- Age
- 77
- Posts
- 12,127
Absolutely, Definitely, the last modification
It's been bucketing down all day, so lots of time in the shed, cleaning up & organising a few things. Been thinking about possible 'improvements' ever since I finished OWT Mark I (actually, even before it was finished!
") ). Well, one thing leads to another....
). Well, one thing leads to another....
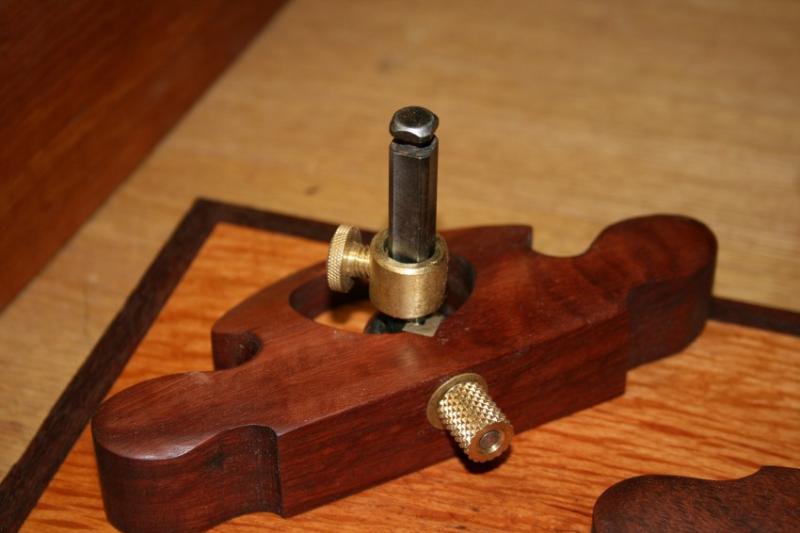
I'd thunked up a different retaining system, which I wanted to try. The original looked crude, even though it worked perfectly well, and making the depth collar had given me an idea for an alternative. While I was in metal-work mode, I made a knurled-headed screw for the depth collar as well: Eye & collar.jpg
The 6mm steel screw is Loctited into the brass collar, and the knurled nut is open-ended this time, instead of closed, so I could make it a bit shorter.
I remade the body, because I thought it needed to be a bit thicker (30mm vs 25 for Mk I) to accommodate the new retainer. I kept the original shape (which is slightly modified from Derek's original), because I was quite satisfied with that: Front.jpg
And Derek, just to please you, I have made a brass blade bed: Back.jpg
Mark II works well, too, but no better than Mark I. Does look a little more refined, though.
OK, that's my last tilt at OWTs. I've had a heap of fun and learned a few new things, but now I've got to get back to doing some real jobs.....
Cheers,IW
-
20th February 2015, 07:28 PM #25
Be inspired. Be creative. Be bold.
- Join Date
- Apr 2001
- Location
- Perth
- Posts
- 10,824
That looks damn good, Ian - much nicer than mine!

Regards from Perth
DerekVisit www.inthewoodshop.com for tutorials on constructing handtools, handtool reviews, and my trials and tribulations with furniture builds.
-
20th February 2015, 08:54 PM #26
GOLD MEMBER
- Join Date
- Mar 2004
- Location
- Brisbane (western suburbs)
- Age
- 77
- Posts
- 12,127
I don't think I'd go that far Derek, though I think the brass collar looks a bit more cool than an eye-bolt. Originally Posted by derekcohen
I definitely owe you for the idea and the initial development work, not to mention plagiarising your design almost verbatim (you did provide us with a measured sketch ) . I'd still be thinking about it if you hadn't shown the way!
This is a tool that won't come out every day, but I've already found a couple of uses for it I hadn't anticipated. Can't imagine why it took so long for me to get around to owning one. Thanks again!
Cheers,IW


 Reply With Quote


