

 Thanks:
  Likes:
  Needs Pictures: 0
 Picture(s) thanks: 0
Results 1 to 9 of 9
Thread: Two New Mortice/Cutting Gauges
-
23rd February 2015, 03:55 AM #1
 Be inspired. Be creative. Be bold.


- Join Date
- Apr 2001
- Location
- Perth
- Posts
- 10,824
 Two New Mortice/Cutting Gauges
Introduction
As one of the few handtool-orientated woodworkers in my local woodwork club, I have been asked to present a regular lecture at meetings on handtools. This will be hands-on, for example, using tools to create joints. This coming month I plan to present a demonstration on mortice-and-tenon joinery.
It occurred to me that the only mortice gauges I own are Japanese, not Western types. I have two, one being a Kinshiro (thanks Wiley), which is the very best mortice/cutting gauge, in my opinion. It is not simply that they are so well made and have amazing knives that leave a clean line, but they are ergonomically so well designed, and fit the hand like a glove. I also like that the Adjuster Screw is situated so that they may be tightened with one hand.
I have built a number of single cutter gauges based on the Kinshiro, which are excellent for dovetails, or may be used in pairs for mortice-and tenons. The wide fence provides a lot of extra stability.
Original Kinshiro on the right ...

One should mark mortices and tenons from the same gauge, working from a reference face. In this regard, the single flaw of the Kinshiro is that that are not suited for marking mortices that are set back from the edge of a stretcher ..

The advantage of the traditional Western mortice gauge is that one adjusts the pins to the width of the mortice chisel, and then the fence may be adjusted in-and-out as necessary.
My thoughts went along the path of a fixed gauge, that is, one that was set up for a specific mortice chisel size. Indeed, why not make two, or more ..?
I also recalled I had a rarely used set of Tite-Mark wheel cutters for a mortice gauge. Perhaps these could be pressed into service? At the same time, while I like and have a number of wheel gauges, I found that these wheels required more downforce than a knife. Perhaps a heavier gauge than the Tite-Mark ...?
In the end I built two different mortice/cutting gauges. The first one looks traditional but has a few novel features, one of which I have not seen elsewhere. The second looks novel, but is more traditional.
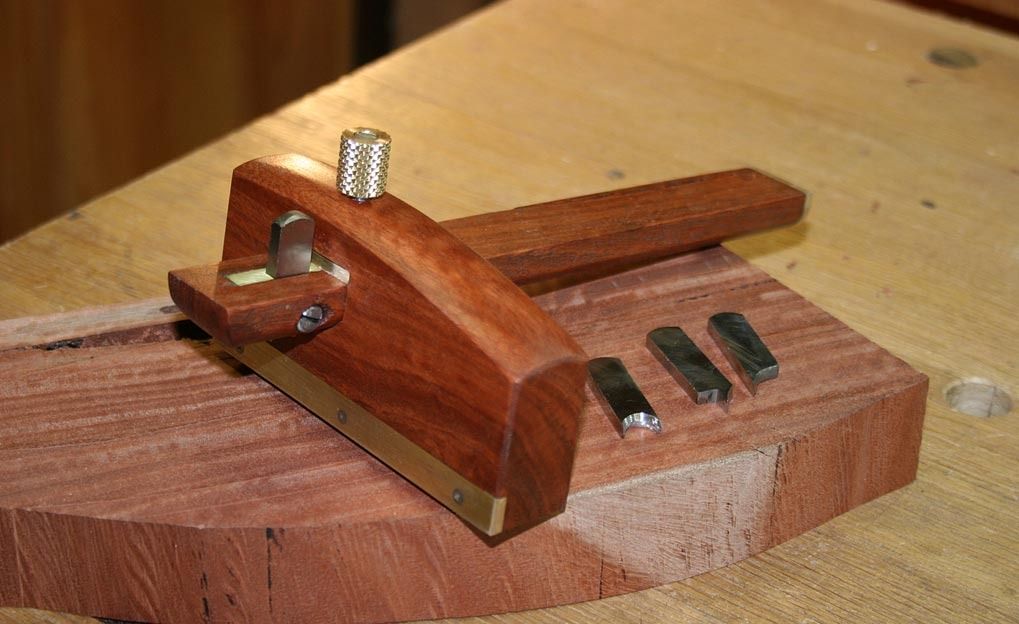
Gauge #1
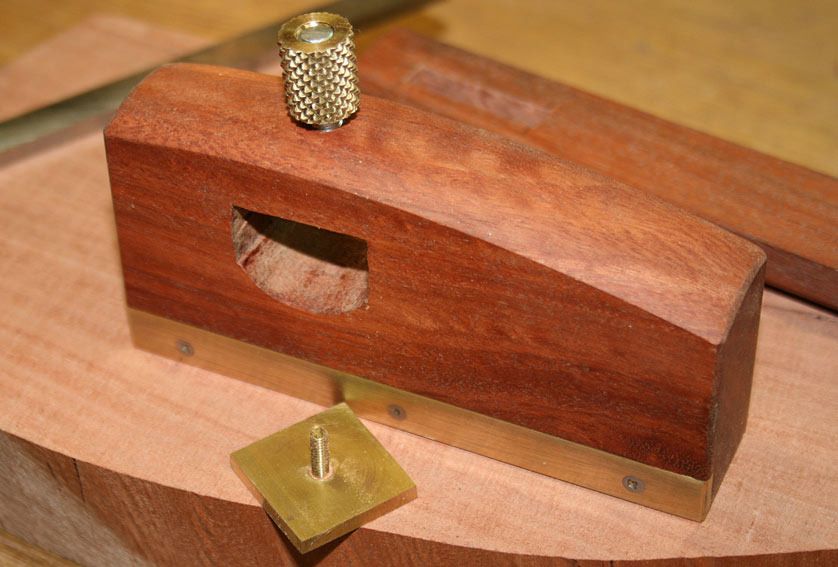
The first gauge is based on the Kinshiro profile, but has a Western arm. It is made from some scrap Fiddleback Jarrah and brass. The fence is 4 1/2" long x 2" high ...
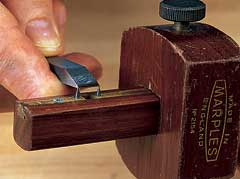
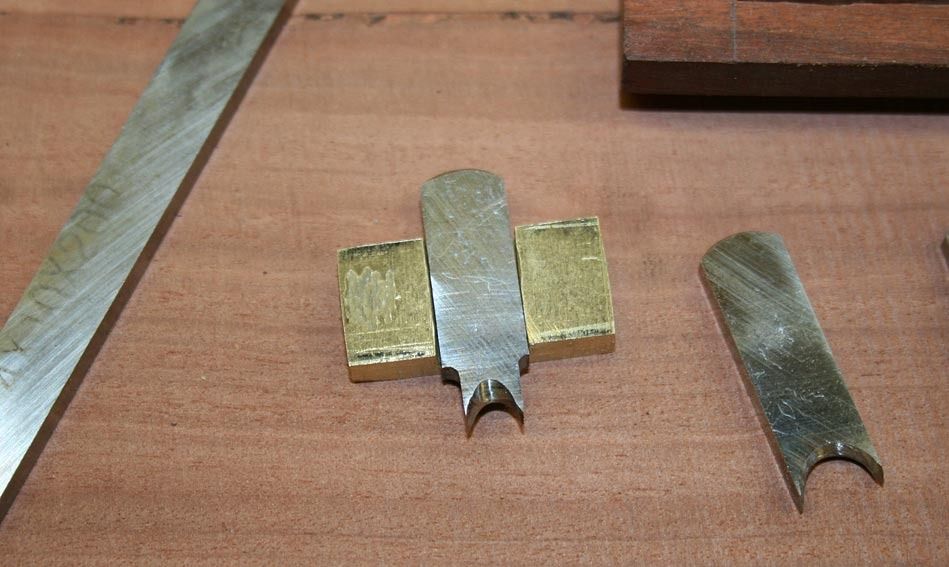
The novel feature here is that the blade is a fixed width, but is exchangeable for other fixed width blades ..
The knives are made from 4mm thick HSS (they should not need resharpening for a while!). So far I have made double-sided knives for a 1/4" and 3/8" mortice-and-tenons, and two straight knives (I made a second when I realised that the first would score 3/8" away from the fence). The idea for these knives came from dovetail planes.

The knives sit in a brass "cassette". This is fitted permanently in the arm ...
As seen in the first image, each knife may be dropped in or out and is held with a set screw. As mentioned earlier, I have not seen a similar system on a marking gauge before.
The second design feature is a rounded lower section to the arm ..
The reason for this is twofold:
Firstly, this is a very strong design that locks the arm very securely. Just a little downforce and there is no sideways movement at all.
Secondly, the rounded lower section offers better visibility that either a square section or a cutaway at the knife.
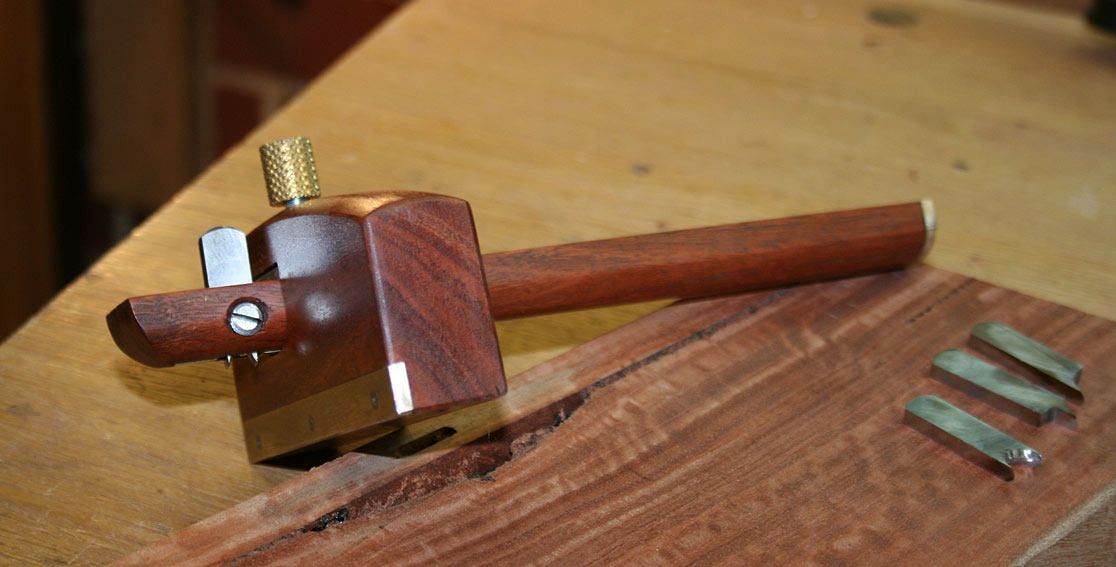
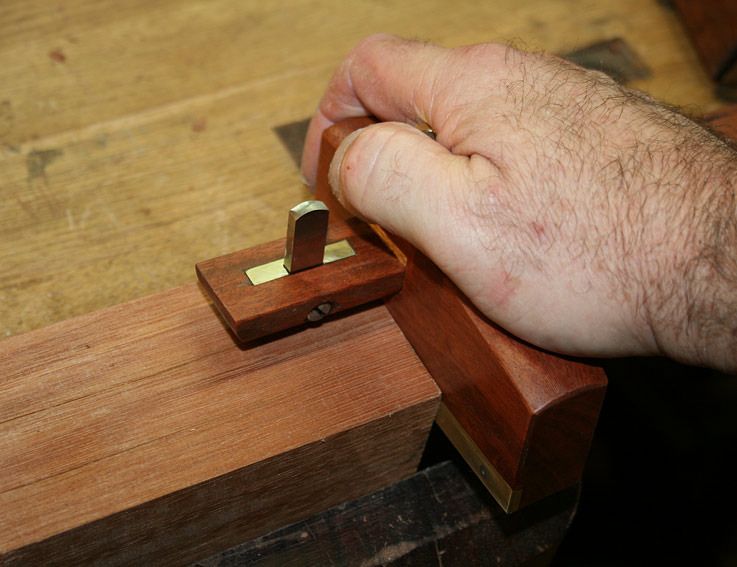
In practice, this is very comfortable to use, and the knives cut clean lines both with and across the grain.
 Visit www.inthewoodshop.com for tutorials on constructing handtools, handtool reviews, and my trials and tribulations with furniture builds.
-
23rd February 2015 03:55 AM # ADSGoogle Adsense Advertisement
- Join Date
- Always
- Location
- Advertising world
- Posts
- Many
-
23rd February 2015, 03:56 AM #2
Be inspired. Be creative. Be bold.
- Join Date
- Apr 2001
- Location
- Perth
- Posts
- 10,824
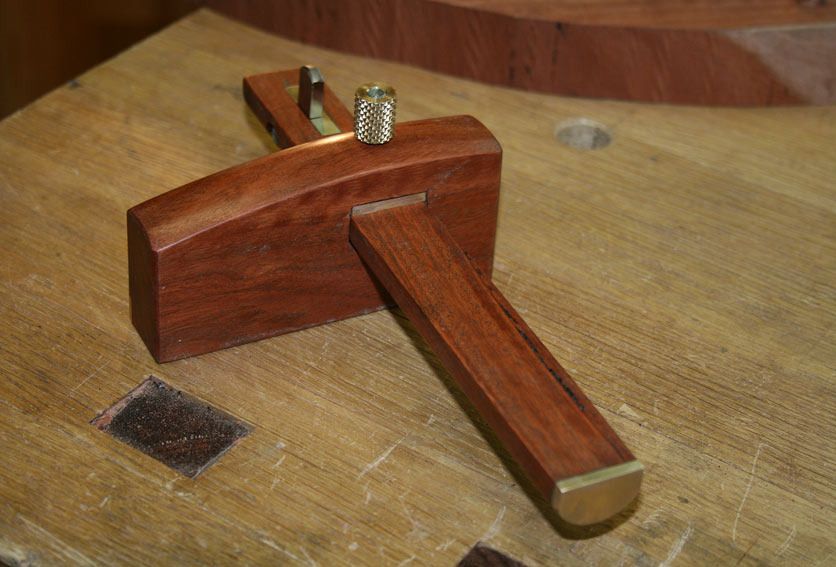
Gauge #2
The second gauge was less clever and more fun - really an opportunity for a little functional art. It turned out to be a wonderful user.
The face is 1/4" thick (very hard) brass, the wood is more scrap Fiddleback Jarrah, and the arm was donated by an ex-screwdriver. The knives are the Tite-Mark ones mentioned earlier.
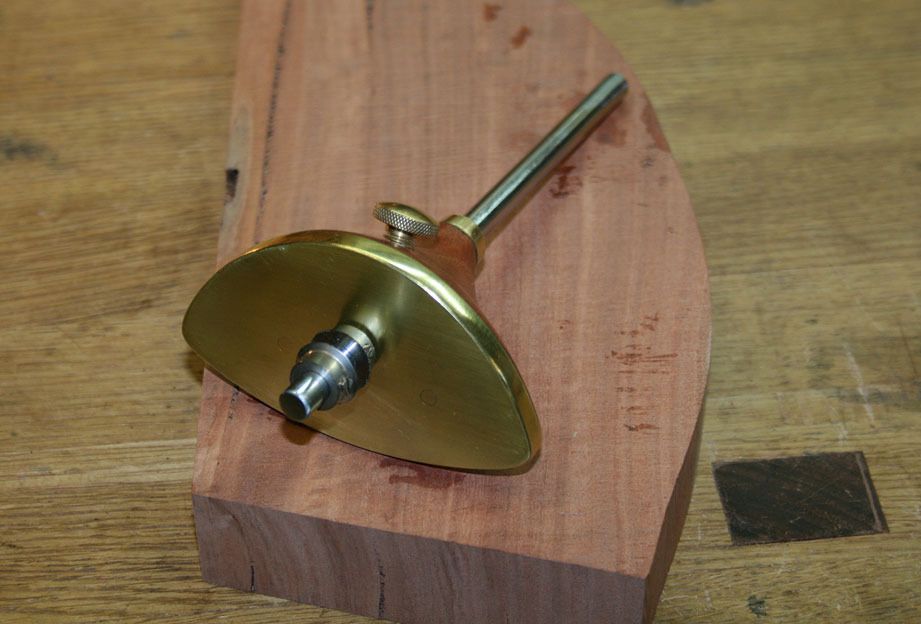
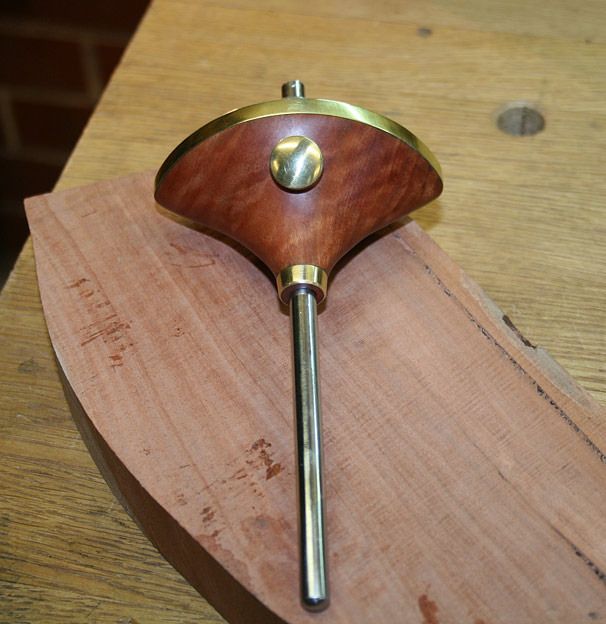
Here it is set up for a 1/4" mortice chisel and a 3/4" thick stretcher ...
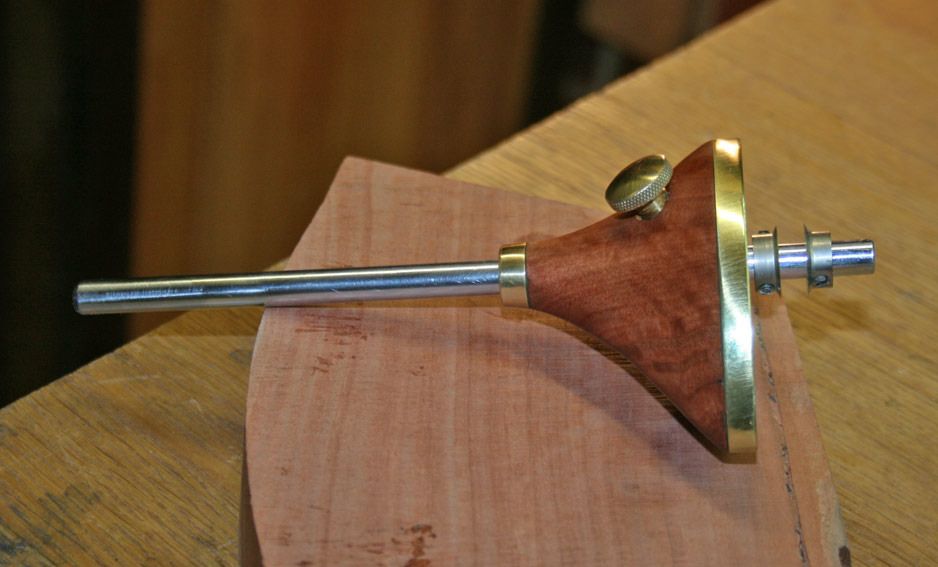
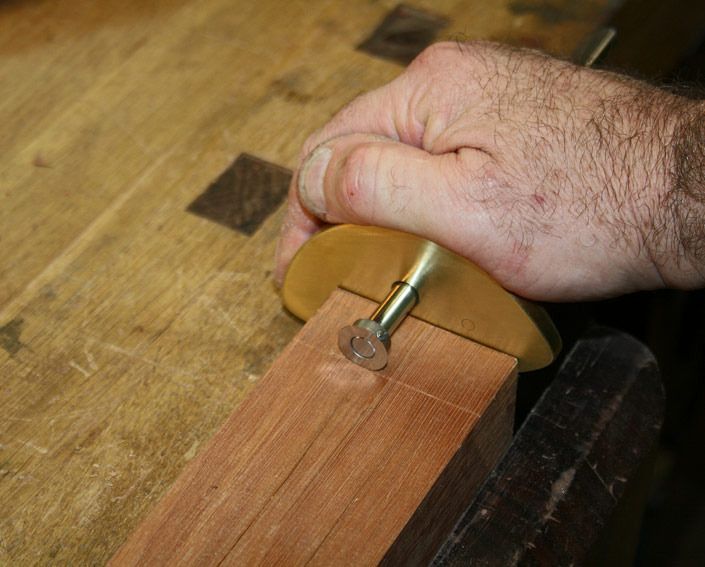
The adjuster screw is set at an angle (the end is rounded so it grips easily and tightly). This is allows the palm of the hand to rest comfortably over it.
Remove one wheel and you can use it as a cutting gauge ...
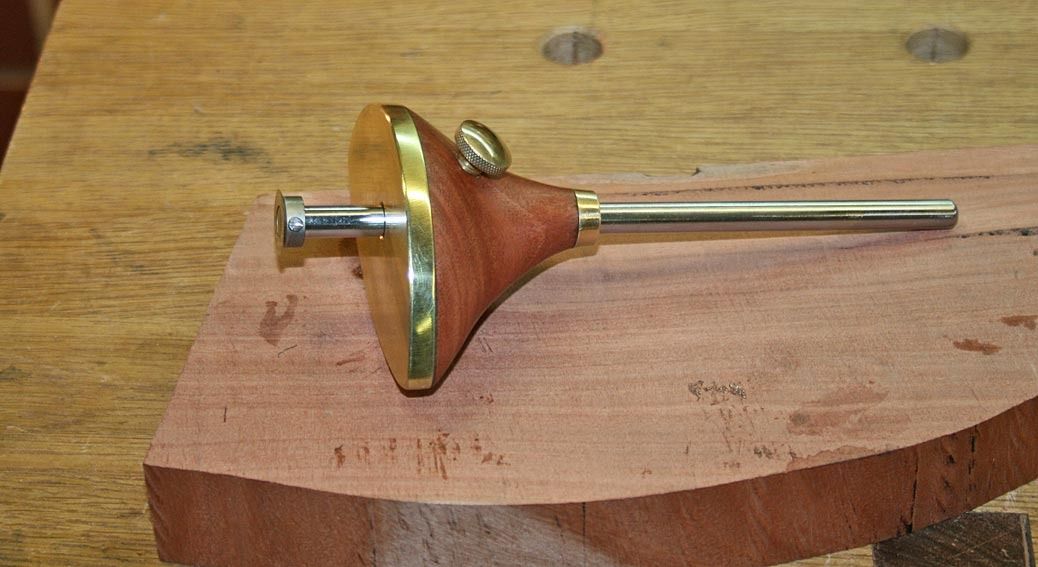
It is also very comfortable to hold, and the extra mass over the Tite-Mark is very noticeable ..
Here is a size comparison of the two gauges along with the Tite-Mark and the offset Veritas ...

Your comments and critique welcomed.
Regards from Perth
DerekVisit www.inthewoodshop.com for tutorials on constructing handtools, handtool reviews, and my trials and tribulations with furniture builds.
-
23rd February 2015, 06:47 AM #3
GOLD MEMBER
- Join Date
- Jun 2007
- Location
- North Of The Boarder
- Age
- 68
- Posts
- 16,794
Derek that brass one is looking good. Son has asked for something similar.
What glue did you use in joining the bras and Jarrah?
What sort of point did you use on the lock screw?
-
23rd February 2015, 10:16 AM #4
GOLD MEMBER
- Join Date
- Apr 2012
- Location
- Sydney
- Posts
- 1,503
Very impressive.
With the single edge blade on model #1, could you just flip it around so that the cutting edge was next to the base?
-
23rd February 2015, 10:18 AM #5
Be inspired. Be creative. Be bold.
- Join Date
- Apr 2001
- Location
- Perth
- Posts
- 10,824
I always use both epoxy and screws when joining wood and brass. The holes in the brass receive a very slight chamfer, and then the heads are filed flush.
The screw end is round. That way it does not matter what angle the end connects with the steel rod.
Regards from Perth
DerekVisit www.inthewoodshop.com for tutorials on constructing handtools, handtool reviews, and my trials and tribulations with furniture builds.
-
23rd February 2015, 11:23 AM #6
GOLD MEMBER
- Join Date
- Mar 2004
- Location
- Brisbane (western suburbs)
- Age
- 77
- Posts
- 12,127
First up, I do like your (many) ways of thinking outside the box, Derek. I reckon you missed your time on earth by a century-and-a-bit, you & Justus Traut could've been bosom buddies (or savage competitors) in the hunt for perfect tools, to suit every conceivable situation & taste!
 Every bloke should have at least a few personalised tools, and gauges are one area where you can go wild, since just about any design will work. Obviously we all end up with ones we prefer.
Although I'm not a fan of wheel gauges, yours is a work of art, and is also practical in the way you've added a nice chunk of wood to give a comfortable hand-hold and given it a decent face, more appropriate to woodworking than those silly two-bob sied thingies. One of the 'faults' of wheel gauges for me is the spindly shaft, which my increasingly arthritic hands find awkward to hold. Apart from that, the wheels leave too fine a line for my ageing eyes, and it is very difficult to mark up to a fixed point without under or over-run. I was indoctrinated by that half of the woodworking community that abhors layout lines left on any surface, even those that usually remain unfinished, so I usually go to some trouble to avoid marks that won't be obliterated in the construction process. This is one reason I still use 'old-fashioned' point gauges, as well as cutting gauges (which are also hard to stop at a precise point). However, your design has answered one of my complaints rather nicely.
BTW, the shafts in the larger old inkjet printers are a great source of accurately dimensioned and polished steel rod.....
I'm in two minds about the mortise gauges. On the one hand, it's nice to have a gauge pre-set to a particular chisel width, but now you need several of them for the most common mortises you make, which adds considerably to the gauge drawer! I'm hardly one to claim I minimise my gauge collection ( ) but I can get by very well with a single adjustable mortise gauge (so why do I have two!). The first one I made was the very simple type with a sliding adjuster arm locked by the thumbscrew which simultaneously locks the stock. Now they ARE beasts of tools, and trying to keep the points set whilst setting the stock is a test of patience that would have Job spitting expletives in no time!
So one of my earliest sallies into gauge-making was a screw-adjusted mortise gauge, based on the common style whose origin I don't know, but it was widely copied in several countries, so the patents ran out a good century or more ago. Then I saw an old Stanley 77, & I just had to have one of those. (So that's one reason I have 2.)
Since most mortises & tenons are maarked into long grain, & I allmost always wish to mark to a deinite stop-point, for me, pins are far preferable to cutters or wheels, in this context.
Just my opinions...
Cheers,IW
-
24th February 2015, 10:19 AM #7
GOLD MEMBER
- Join Date
- Mar 2004
- Location
- Brisbane (western suburbs)
- Age
- 77
- Posts
- 12,127
Derek, you stole my thunder a little with your reference to the rounded mortise for the beam. I was going to start a new thread extolling the virtues of round beams, but it's probably appropriate to add it to your thread, since it's another design consideration for folks to ponder.
It began a year or two back when I was looking at ways of 'improving' gauges. I have always struggled a bit with the mortise in the stock, it's not an easy matter to cut a very clean, very accurate, hole in a small piece of the bone-hard woods I favour for gauges, and if it isn't spot on, the beam may not lock as firmly as I like. Also, I like to round the edges of the beams to make them as hand-friendly as possible, but the rounding leaves small gaps in the corners of a square mortise. They are barely noticeable, even when you look critically at the gauge, but trying to cut the corners of the mortise to match the rounded beam is exceedingly exacting & if not done very well, has the potential to end up looking worse! So I've just tolerated that small 'flaw' for a long time. RB2.jpg
But I got to thinking, why not use a round beam, that can be fitted to a drilled hole? The beam has to be prevented from rotating, but that could be achieved by planing a small flat, which mates with a brass shoe inside the mortise. So I have made a few of these now, and it seems to work well. That's when I made the 'discovery' that the full-rounded bottom of the beam locks extremely firmly, even though the beam may be a bit smaller than the hole. RG1.jpg
It's a bit more fuss making the round beam - a good exercise in precise turning and working the flat, which has to be accurate, too, or the beam won't slide nicely when the thumbscrew is lightly loosened. I've experimented with beam diameters for comfort and aesthetics, and reckon that 18mm is about right for my 'standard' gauge size.
On the round-beamed gauge above, I also tried a different method of retaining the shoe in the stock. I wanted to use a thicker shoe because it is narrower, and might bend under the thumbscrew, which meant it would be very difficult to make neat bends at each end (my normal method). So I attached a small nipple on the shoe, which engages the hole drilled for the insert: shoe.jpg
Fiddly, but if done well, it looks very neat, and the shoe doesn't need to be scalloped out to allow the pin to move back to the face of the beam. Not that you ever need to do that in use, but it is handy to close it up to protect the cutter or points when storing your gauge...
Cheers,IW
-
25th February 2015, 03:09 AM #8
Be inspired. Be creative. Be bold.
- Join Date
- Apr 2001
- Location
- Perth
- Posts
- 10,824
Hi Ian
That is a very neat version. Your gauge with the round arm is gorgeous!
I was inspired to round the bottom by thoughts of the LN gauge, which is triangulated at the lower side. The LN has a different blade connection (it is a single cutter on the front of the arm), which would not work for a mortice gauge. Round works and offers good visibility as well.
I shaped both the arm and the through mortice by hand - no drill or lathe. I need to work out a better system for the next one - although your version is tempting ...
Regards from Perth
DerekVisit www.inthewoodshop.com for tutorials on constructing handtools, handtool reviews, and my trials and tribulations with furniture builds.
-
25th February 2015, 10:17 AM #9
GOLD MEMBER
- Join Date
- Mar 2004
- Location
- Brisbane (western suburbs)
- Age
- 77
- Posts
- 12,127
Thanks Derek - it is a particularly nice bit of Gidgee, which worked nicely with (very!) sharp tools, though it had a tendency for some of those curly-grained bits to pick out. Some ringed Gidgee I've had was almost impossible to work with cutting tools, but this lot was better than average. I had just enough of it for a matching pair, and a striking knife: RG gauges.jpg Originally Posted by derekcohen

They used to use Ebony as the wood for premium tools, and admittedly, it's very nice stuff, but polished RG can be even nicer, imo!
Well, I went this way initially because I thought it might be an easier & neater construction method. It was only after I'd made the first one I discovered how nicely it locks down, with minimal thumbscrew pressure, compared with the square beam method. So it was a win on that front. Originally Posted by derekcohen
Square beams take me a good deal of time to fit. I first chisel the hole as neatly as possible, a fraction of a mm small, then sneak up on the fit using a double-cut file with its sides ground safe. It takes me a lot of care & concentration to avoid ever so slightly rounding the side of the mortise with the file - every stroke has to be dead square, so I use a 'blunt' chisel to pare away the inside by a couple of thou to create a very slight hollow, which helps to keep the file riding on the outside edges. I also spend quite a bit of time carefully sanding each beam so the sides are dead parallel and don't bind anywhere along their length.
Using round beams alleviates the tedium of mortising, and virtually guarantees the beam will be perfectly perpendicular to the face of the stock (if it's not, there is no way to fix it!), but it's a bit fiddly getting a precise fit of brass end-piece & beam. I fit the square ends to a slightly oversize beam, then carefully plane them to almost flush, & finish by sanding. The flat on the round beam has to be very accurate, too, if you want a smooth-sliding beam. On balance, I think the round beam style is fractionally easier to make, is slightly neater, and a fraction nicer to hold in the hand, but there's not much difference, and both systems can work very well.
I've done some mucking about with the shape of the stock, inspired by first seeing your Japanese gauges quite a while back. I've tried a couple of variations, but usually end up coming back to a symmetrical shape. One trouble with these sorts of shapes: shaped stock.jpg is that they become 'handed', and risk being awkward for a left-hander to use, something I am conscious of, having had a spouthpawed father, & seeing how awkward it was for him to use certain tools that weren't made with lefties in mind. Keeping them symmetrical doesn't disadvantage that minority group....
Cheers,IW


 Reply With Quote

Similar Threads
-
Some more marking gauges
By IanW in forum HAND TOOLS - UNPOWEREDReplies: 14Last Post: 17th April 2013, 12:34 PM -
Cutting gauges
By derekcohen in forum HAND TOOLS - UNPOWEREDReplies: 19Last Post: 8th April 2012, 12:03 PM -
Cutting a Mortice and Tenon Were the Tenon has a Curved Shoulder
By thumbsucker in forum WOODWORK - GENERALReplies: 5Last Post: 30th January 2010, 10:46 AM -
screw gauges
By Ivor in forum WOODWORK - GENERALReplies: 27Last Post: 26th February 2009, 07:38 PM
