

 Thanks:
  Likes:
  Needs Pictures: 0
 Picture(s) thanks: 0
Results 31 to 45 of 185
-
15th March 2015, 12:31 PM #31
 Be inspired. Be creative. Be bold.


- Join Date
- Apr 2001
- Location
- Perth
- Posts
- 10,824

All is fixable. It has a learning curve so do not expect a perfect result immediately. I can safely say that it was several months for me before it became automatic.
Rule #1 is that no chipbreaker comes ready to work, regardless of manufacturer. Think of them as you would a blade - every blade must be honed before use. None are sharp out-of-the-box.
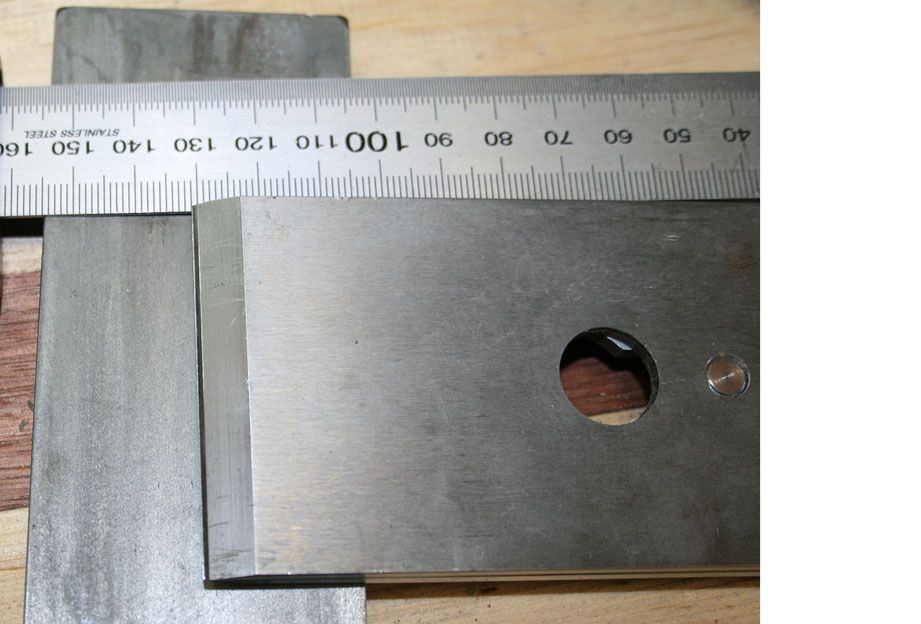
The leading edge of the LN chipbreaker is generally 30 degrees. Same as the LV ones. I have compared all types (there is a review on my website). This angle is too low. It needs to be around 45 degrees. A little more is OK. The Kato testing went as high as 80 degrees in a 40 degree bed, but I think that this is too much - oops, I will stay on the topic.
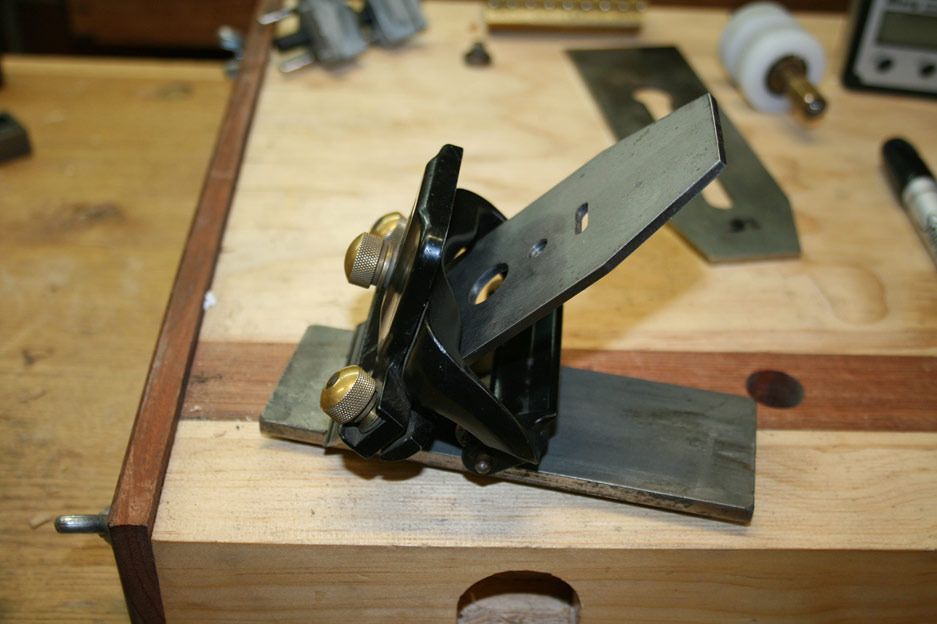
The underside of the chipbreaker must be perfectly flat. This become more criticial the closer you move the chipbreaker to the edge of the blade. Use a diamond stone that is flat, flat, flat. Monitor progress with lapping fluid or a marker. Look at the photo above.
Rule #2 is that the benefit of the chipbreaker is lost beyond 0.6mm. This method takes some practice to get right - BU high angled planes are much easier to get great results from - but the chipbreaker can obtain better results if done correctly. You are aming to get the chipbreaker to 0.3 - 0.4 mm from the edge. But it is trial-and-error at first. Too close to the edge and you will get very crinkly shavings and a chatter-like finish. Just right, and you will see the shaving straighten out and stop curling.
Tune. Practice.
Regards from Perth
DerekVisit www.inthewoodshop.com for tutorials on constructing handtools, handtool reviews, and my trials and tribulations with furniture builds.
-
15th March 2015 12:31 PM # ADSGoogle Adsense Advertisement
- Join Date
- Always
- Location
- Advertising world
- Posts
- Many
-
15th March 2015, 02:17 PM #32
GOLD MEMBER
- Join Date
- Sep 2010
- Location
- Sydney
- Posts
- 1,983
In addition to what you have been advised, I find myself going back to instructions of the honing guide in times of trouble. Especially as I like to use the registration stops for different angles. Originally Posted by section1

It's worth confirming that when you selected the 45 degree high angle on the blade registration stop at position I according to the instructions that you also select the high angle position on the blade carrier.
http://www.leevalley.com/US/shopping...s.aspx?p=51880
-
15th March 2015, 06:36 PM #33
GOLD MEMBER
- Join Date
- Oct 2011
- Location
- Gold Coast
- Age
- 53
- Posts
- 1,097
Derek how am I supposed to create a 45� bevel on a chipbreaker when the back of the flat edge is raised and will be completely taken out.
-
15th March 2015, 06:52 PM #34
GOLD MEMBER
- Join Date
- Sep 2010
- Location
- Sydney
- Posts
- 1,983
The 45 degree is applied to the side that is already beveled at 30 degrees rather than the flat face that goes against the blade. You should be increasing the angle.
-
15th March 2015, 06:58 PM #35
GOLD MEMBER
- Join Date
- Sep 2010
- Location
- Sydney
- Posts
- 1,983
Or if you prefer
Originally Posted by derekcohen
-
15th March 2015, 08:24 PM #36
Be inspired. Be creative. Be bold.
- Join Date
- Apr 2001
- Location
- Perth
- Posts
- 10,824
S1 Originally Posted by section1
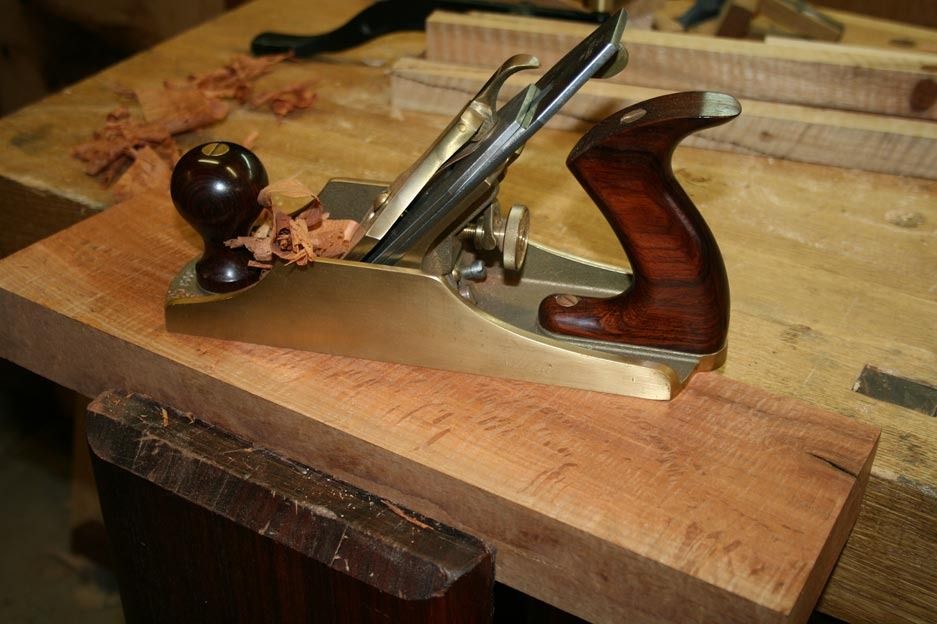
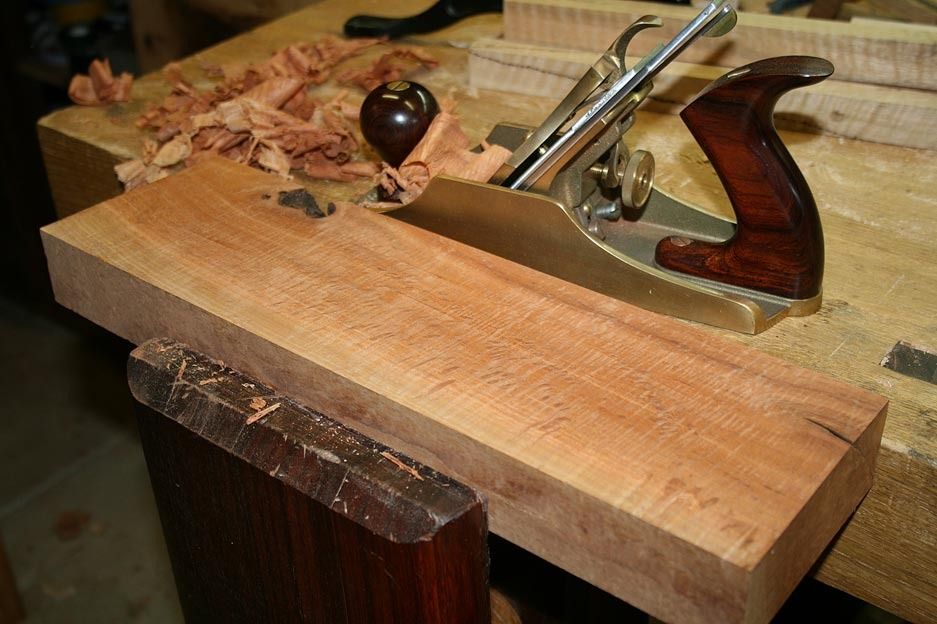
Here is a quick tutorial in all. Plane - LN #4 1/2 with 50 degree frog (still too low for interlocked West Australia timber)- LN only because you are using one. I get the same results with a tuned English Stanley #3 ...
1. Flatten the underside. Mark beforehand ..
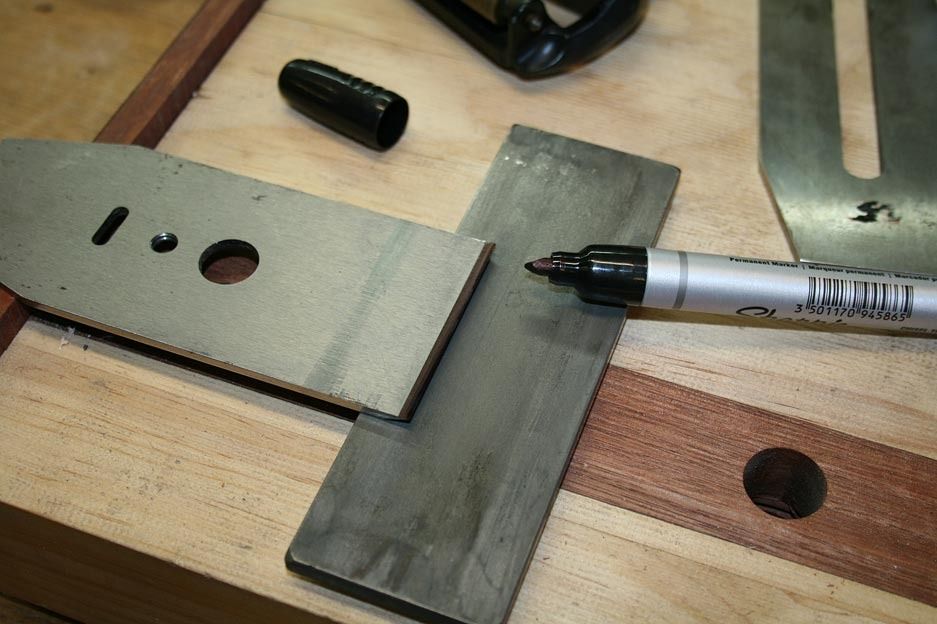
2. Hone on a fine diamond stone. I am resting the rear of the chipbreaker on the planing rest of a small bench top- bench I have. Note that this is slightly undercutting the front ledge (that is, towards the rear).
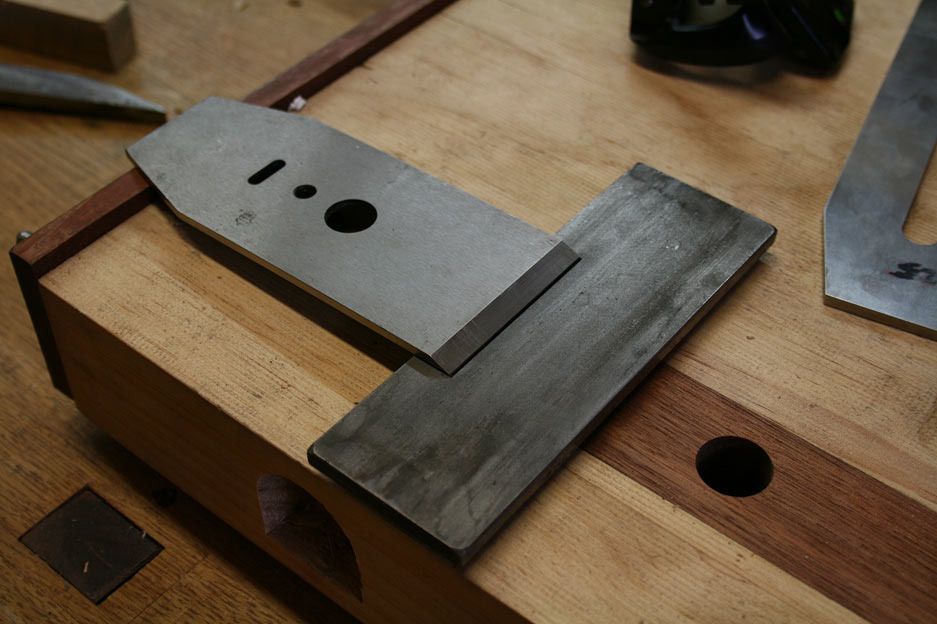
This is the result ...
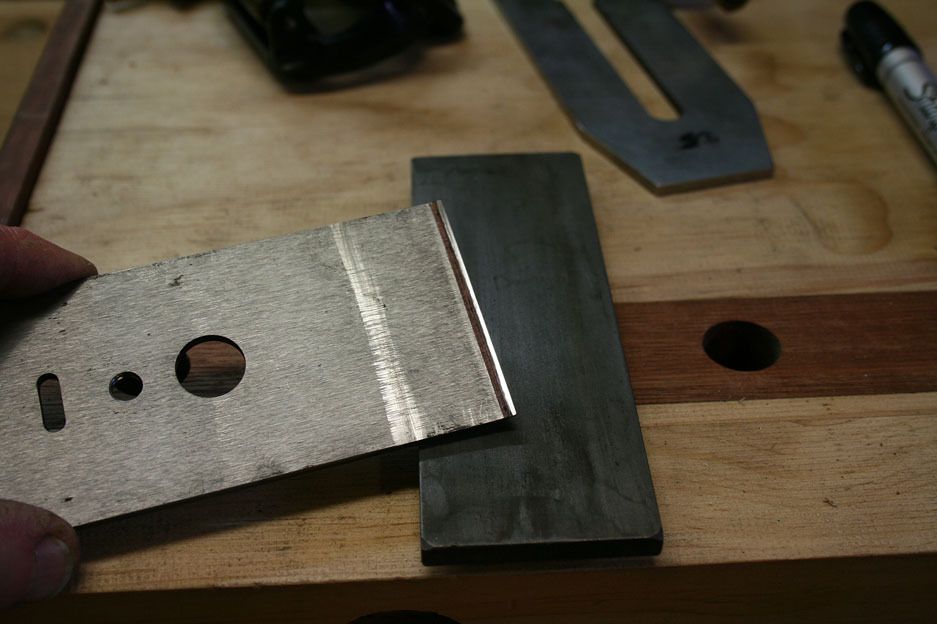
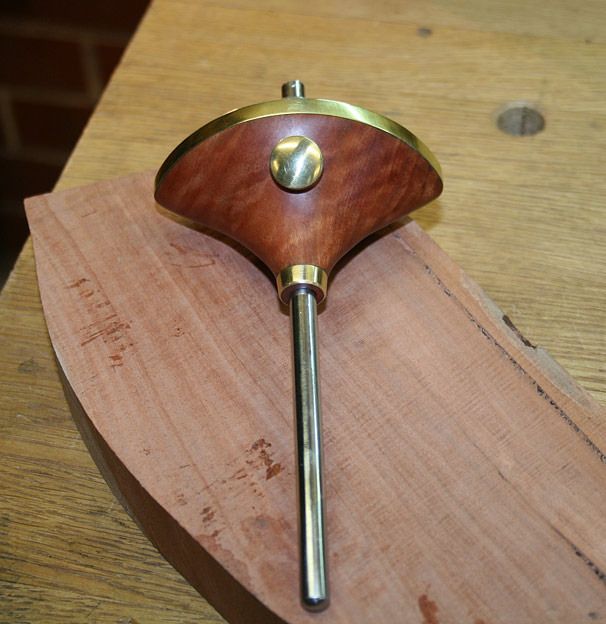
4. Hone the leading edge of the chipmaker to 45 degrees. Here I am using the LV Honing Guide (because you have one) ..
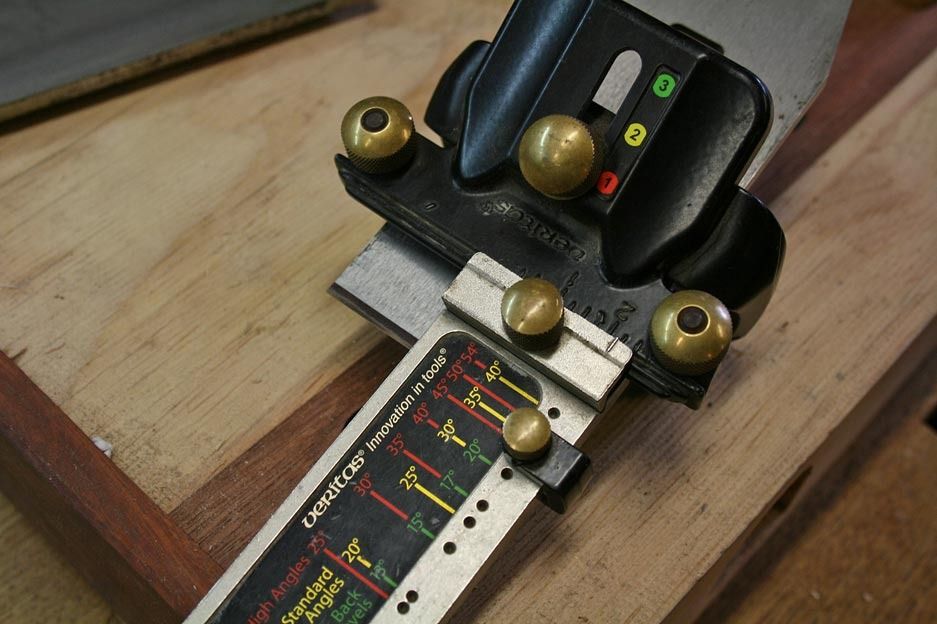
Not very accurate, is it ...

5. Hone. I only used a fine diamond stone. However this one is broken in and probably about 3000 grit now ...
Return to step #1 to remove the wire edge. It is tenacious so drag the edge through some end grain.
6. Set the chipbreaker. I've gone about 0.3mm (perhaps a tad less). This took me 0.3 seconds to do now. When I started out, it took about 3 minutes.
7. Set the blade for appropriate depth, open the mouth a little (it is not going to make much of a difference, if any), and start planing.
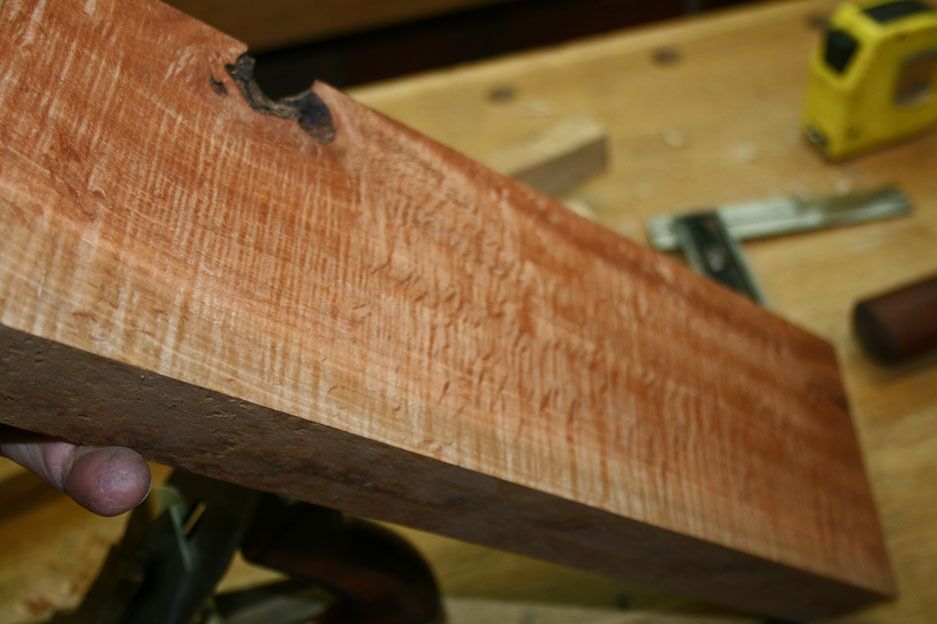
Here I grabbed a test board - Fiddleback Jarrah, and I am planing into the grain just to show off
Watch the savings - they should be straighter than usual. Here they are straighter than curly, but not as straight as they can be. On the other hand, this is Jarrah and I am planing into the grain ..
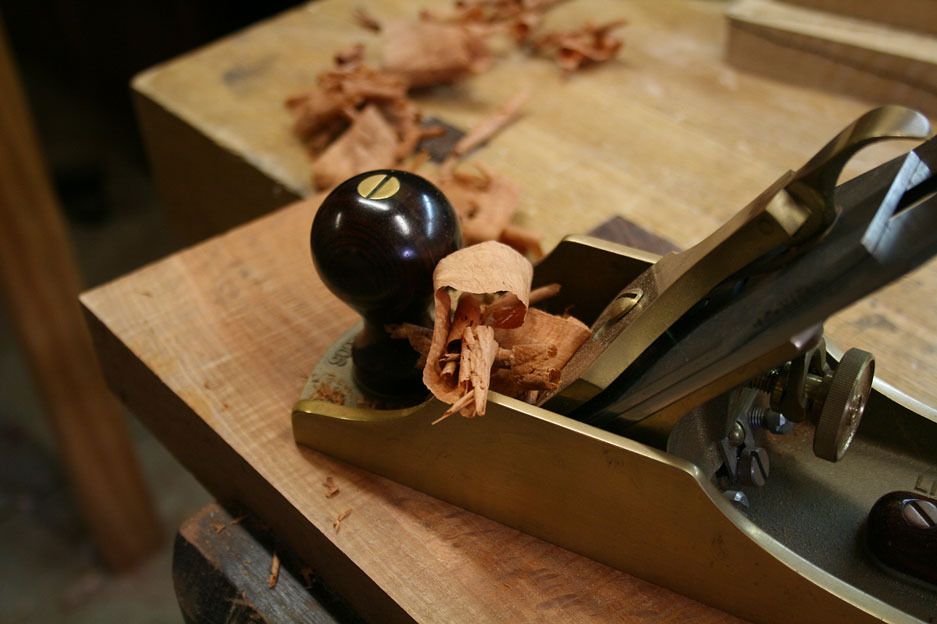
The results ...
No tearout.
 Visit www.inthewoodshop.com for tutorials on constructing handtools, handtool reviews, and my trials and tribulations with furniture builds.
-
15th March 2015, 08:25 PM #37
Be inspired. Be creative. Be bold.
- Join Date
- Apr 2001
- Location
- Perth
- Posts
- 10,824
Let us know how you get on.
Regards from Perth
DerekVisit www.inthewoodshop.com for tutorials on constructing handtools, handtool reviews, and my trials and tribulations with furniture builds.
-
16th March 2015, 09:42 AM #38
GOLD MEMBER
- Join Date
- Mar 2004
- Location
- Brisbane (western suburbs)
- Age
- 77
- Posts
- 12,127
I must be due for new specs, Derek, because that looks awfully like a piece of Allocasaurina, or something with prominent medullary rays, to my eyes! Originally Posted by derekcohen
 Not that that has any bearing on the message, of course....
Cheers,IW
-
16th March 2015, 03:44 PM #39
Be inspired. Be creative. Be bold.
- Join Date
- Apr 2001
- Location
- Perth
- Posts
- 10,824
Hi Ian
You may be - probably are - right!
I've been working with some logs that are an unusual Jarrah - light, rosy in patches and white in others, lots of curl (they look like rays) ... You would swear that they are a causurina instead of a eucalyptus. I grabbed a board that looked flat enough to plane. For all I know, this chunk may have been given to me by you! Perhaps it is a parent recognising its child?
Beautiful whatever it is.
Regards from Perth
DerekVisit www.inthewoodshop.com for tutorials on constructing handtools, handtool reviews, and my trials and tribulations with furniture builds.
-
16th March 2015, 06:03 PM #40
Deceased
- Join Date
- May 2008
- Location
- Australia
- Posts
- 2,357
Fiddleback Jarrah. Ian's not the only one who needs to consider new specks.

-
16th March 2015, 06:34 PM #41
Be inspired. Be creative. Be bold.
- Join Date
- Apr 2001
- Location
- Perth
- Posts
- 10,824
We all have those days ...... sigh ....
Regards from Pert
DerekVisit www.inthewoodshop.com for tutorials on constructing handtools, handtool reviews, and my trials and tribulations with furniture builds.
-
17th March 2015, 09:00 AM #42
GOLD MEMBER
- Join Date
- Oct 2011
- Location
- Gold Coast
- Age
- 53
- Posts
- 1,097
This is the first time I am able to view this site but through my iPad and not on my computer still neither internet explorer, Mozilla Firefox nor chrome recognizes the sites address anymore.
i did as you showed me initially you did say 1/8" wide the bevel needs to be I went as far as a tad over 1/16 as I got tired of it. The results are the cap iron is now too short as I thought it would be for the blade to advance. I had to order a new one but till it arrives I had to set the chipbreaker about 1/16 from the edge and open the mouth and it will take only light shavings.
in your newer pics the bevel is less than 1/16 wide but I have noticed that the back of the cap iron is not resting on the bench. Also as you said before it must a diamond stone since I don't have one I used a sheet of 240 wet n dry on a marble stone. The back of the cap iron rested on the stone and I flattened the chip breaker that way. Is this method correct? If brought up to the light only the very tip of the chipbreaker had full contact but the flat part on the underside was reduced considerably due to the large bevel I honed.
Even after done all that but unable to set the chipbreaker .5mm from the blade due to being able to advance the blade the results were still the same "tearout"
-
17th March 2015, 04:34 PM #43
Be inspired. Be creative. Be bold.
- Join Date
- Apr 2001
- Location
- Perth
- Posts
- 10,824
I do not understand why you cannot close up the chipbreaker? Is this an original LN blade/chipbreaker?
Setting the chipbreaker 1/16" from the edge will not make any difference. With an opened mouth this combination will make matters worse! You need the chipbreaker to be about 1/32" from the edge of the blade, that is about 0.4mm.
Regards from Perth
DerekVisit www.inthewoodshop.com for tutorials on constructing handtools, handtool reviews, and my trials and tribulations with furniture builds.
-
17th March 2015, 05:20 PM #44
GOLD MEMBER
- Join Date
- Oct 2011
- Location
- Gold Coast
- Age
- 53
- Posts
- 1,097
The reason is because the chipbreaker is actually too short since that square groove for the adjustment mechanism is a set distance from the opening of the plane. As I honed trying to get a width of 1/8 as you suggested i was also making it shorter. I didn't even reach the 1/8 mark.
i spoke to LN in regards to flatness of their chipbreakers and they said it is flat and if it isn't to return it and they will provide one that is. They also said that their chipbreakers best work set 1/16 from the edge which is true, I have set them as close as 1/64 and got clogging then 1/32 and only fragments i founds stuck to the bottom which to me seemed to act like a gap filler and the shavings past over.
if you like once I receive the new cap iron I'll mail you the stuffed one and you can have a better look at it .
-
17th March 2015, 06:25 PM #45
Be inspired. Be creative. Be bold.
- Join Date
- Apr 2001
- Location
- Perth
- Posts
- 10,824
LN say this because they offer high angle frogs and do not teach using the chipbreaker. I had their high angle frogs (55 degrees, on a #3 and a #4 1/2), and they were still too low to work with many Australian hardwoods. High angle frogs on these planes are also a bigger effort to push. I have moved to lower angles and learned to use the chipbreaker. Originally Posted by section1
I have not run out of room to adjust my chipbreaker after honing the leading edge. Do you have another chipbreaker to try out, such as a Stanley? I also wonder if others here have experienced any similar issues?
Just keep in mind that the chipbreaker, set up as it is, is not altering anything from what you were previously doing.
Edit: An alternative to the chipbreaker and a high angle frog is to add a micro back bevel to the blade. If you add a 15 degree (micro) back bevel, the plane will cut at an effective 60 degrees. Keep in mind that this is the same as a high angle frog, and will be harder to push. Adding candle wax to the sole of the plane will help.
Regards from Perth
DerekVisit www.inthewoodshop.com for tutorials on constructing handtools, handtool reviews, and my trials and tribulations with furniture builds.


 Reply With Quote


Similar Threads
-
art deco shapton holders
By fletty in forum WOODWORK - GENERALReplies: 3Last Post: 9th October 2011, 09:58 AM -
Shapton ceramic stones help
By elanjacobs in forum SHARPENINGReplies: 9Last Post: 24th July 2010, 10:59 AM -
Shapton stones differences?
By rsser in forum SHARPENINGReplies: 7Last Post: 28th April 2010, 04:47 PM -
Sharpening: Norton Vs King Vs Shapton Vs Whatever...
By markharrison in forum SHARPENINGReplies: 29Last Post: 4th January 2008, 03:50 PM
