

 Thanks:
  Likes:
  Needs Pictures:
  Picture(s) thanks:
Results 1 to 8 of 8
-
20th August 2015, 04:53 AM #1
 New Member


- Join Date
- Aug 2015
- Location
- Virginia, USA
- Posts
- 9
 Requesting advice on an abutment-cutting saw
Hi all,
I'm looking for some help on improving my speed when sawing abutments. I'd love to hear from all comers, but I'm especially hoping Isaac will weigh in on this. (pretty please Isaac )
)
When making a wooden bench plane, one needs to make two sawcuts on each side of the throat. Here's a pic showing these cuts:
IMG_1309.JPG
The length of these cuts ranges from about 3 1/2" to 5", depending on the plane. The back cut is a through-cut, the other is a stopped cut (for double irons). Normal material is QS beech.
Currently, I use a saw I made out of an old compass blade. It looks like an edge float. The blade is .060" thick, 7" long, and 8 tpi, filed with 10� rake and 10� fleam. It's flush-cutting and has no set. It gives nice accurate cuts, but is slow and can bind a little near the end.
Here's what I'm looking for advice on:
1) Thickness. I definitely prefer having a stiffer saw than the typical flush cut saw, because it helps keep those long cuts straight. But I'm thinking that a slightly thinner blade, maybe .032-.040, would help speed things up. I have some .034"-thick 1074 that I could use. Does that sound right, or would something else be better?
2) Optimum filing. As far as the ideal tpi and rake/fleam, I really don't know, so I'm totally open to suggestions. Anecdotal evidence: I started with the hybrid 10�/10�, then modified it to a more typical crosscut filing. That was terrible--took all day--so I went back to the hybrid filing. I've toyed with the idea of a straight rip filing, but I want a good surface on the front cut, so I'm not sure if I would still get that. I'm using 8 tpi only because that's how the donor blade was filed.
3) Set. I'm toying with the idea of making a left/right pair, and setting only one side of each saw. Is it worth the trouble?
Thoughts, anyone? If you've read this far, thanks for your patience in wading through this long post!
Steve
-
20th August 2015 04:53 AM # ADSGoogle Adsense Advertisement
- Join Date
- Always
- Location
- Advertising world
- Posts
- Many
-
20th August 2015, 05:04 AM #2
 GOLD MEMBER
- Join Date
- Mar 2010
- Location
- US
- Posts
- 3,112
I know you've seen my provision for this, but i'll throw it up here in case this becomes a collection.
http://www.shopsmith.com/ownersite/c...lushcutsaw.htm
That's not where I bought it, I think I might've gotten it from hida, but i haven't seen it elsewhere since. I'm somewhat mortified to see that harbor freight is either selling it or a copy of it (I'd get one with the sticker to avoid the risk - theirs does say "japan" on the handle, though - every once in a while they accidentally sell something made in the first world).
what I've found out with it is that I can cut the abutments very fast if I have something to hold the wedge template in place. Two fingers against the wedge template and the saw (despite being flexible) doesn't wander and I can cut an abutment that doesn't need follow up work in about two minutes (as in, I can cut them faster now than I could in the video I put on youtube). to be clear, I mean one finger closer to the wear and one closer to the top and the saw stays straight in between - it starts cutting a kerf full length on the first pull, and if the first couple are straight, it stays straight in its kerf. I haven't had a crooked cut yet with it.
The nice thing about the saw is it has no set, it still doesn't bind in the cut for some reason (maybe because it's pulling out all of the fine dust), and if you're deliberate about setting it against the wear, it will cut all the way to the wear pretty well.
The only trouble is that it that it's a bit tall, and it might not fit in a smaller coffin smoother mortise.
It's not comparable to western flush cut saws that still have a substantial amount of set on the top side of the teeth (and two sets of teeth, too).
-
20th August 2015, 01:54 PM #3
Member
- Join Date
- Mar 2015
- Location
- toronto, canada
- Posts
- 61
Interesting... I am just using chisels... Carving...poking holes cerainly will make it easier...
-
20th August 2015, 01:59 PM #4
Member
- Join Date
- Mar 2012
- Location
- Doe Run, Pennsylvania
- Posts
- 91
Keep in mind that I have never made a plane, so...
Do you need/want a surface that is ready to use off of the saw, or do you clean it up afterwards?
What is the distance between the abutments (how wide of a blade can you get in there)?
1. If you aren't using a back, I think the 0.032" would be a bit thin. I'd try the 0.042 (if you ask real nice, I might even send you enough to make a saw or two).
2. I'm a little surprised that you noticed that much difference in cutting speed between the hybrid and x-cut filings. You didn't happen to try filing sloped gullets, did you (that makes the point of the tooth less, well, pointy)?
3. The thicker the blade, the more likely you are to be able to get a saw to cut straight if it is set on only one side. I've tried that on saws with thin blades, and it just didn't work for me in cuts like yours. They work fine for trimming dowels and things like that, but not so well in real cuts like this that need to be accurate. If the blade is thick enough and the cut is shallow enough, you can resist the blade's desire to drift; where that line is that separates thick from thin and shallow from deep, I'm not sure, but I think there is a better solution.
If you stick with a blade that is essentially the same as what you are using now, just taper grind it. It will take a bit of work, but on such a narrow blade it won't be too bad. You can use a file, sander, or scraper to do this. It would be a one time job, and probably take less than an hour to do. And you'd only need to make one, not two.
If there is enough room between the abutments, maybe something like the veneer saw below would work.
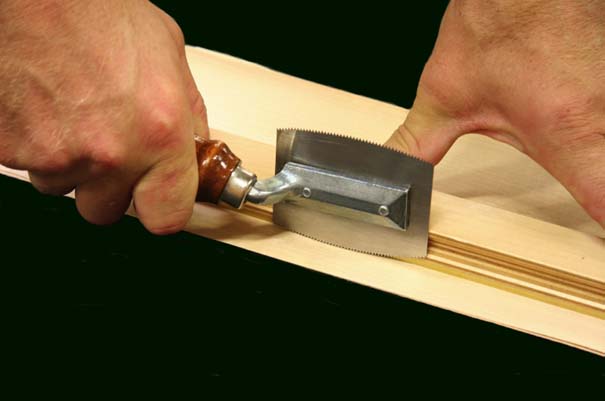
The blade and spine would need to be narrower and longe, and you'd want a straight toothline. I don't think you'd need the handle to be offset, either. Then you could use an even thinner blade. I would still either add a very small amount of set, or try taper grinding the blade. This one might be more difficult to taper, but still not too bad.
-
20th August 2015, 02:46 PM #5
New Member
- Join Date
- Aug 2015
- Location
- Virginia, USA
- Posts
- 9
Dave, I appreciate the advice, but aside from the aforementioned blade thickness issue, there are a couple other reasons I don't want to use a japanese pullsaw. For one, I feel more comfortable with a push stroke in this situation--I think I can be more aggressive and also control the depth of cut more easily. The other thing is, I want to be able to resharpen the saw myself.
Basically, I like the process I have, just want to make it a little more efficient.
Side note on spacer blocks. I keep separate spacer blocks for each common plane size and make the rough mortise a light press fit for the block. I don't like having to hold the block--I'd rather use one hand to saw and the other to push the blade down on the spacer. If I screw up and make the rough mortise a little large, I shoot some Spray 77 onto the spacer block. Mineral spirits cleans up the glue residue just fine.
-
20th August 2015, 02:54 PM #6
New Member
- Join Date
- Aug 2015
- Location
- Virginia, USA
- Posts
- 9
Isaac, thanks, that is very helpful. The idea about taper grinding is genius and I can do that pretty easily. It didn't occur to me, but of course you're right--the blade will want to drift if it's only set on one side.
To answer your questions: the surface always gets cleaned up, but the less the better. I'm going for a 95% surface off the saw. On the smallest planes I make, there is 1.25" between the abutments, so I think the veneer saw approach probably won't work.
I'm still wondering about tpi and rake/fleam, but I'll contact you offline. Maybe I can get some of that .042, and order some Bahco files to make it worth your while. Thanks!
-
13th August 2019, 11:57 PM #7
New Member
- Join Date
- Nov 2014
- Location
- Sydney
- Posts
- 2
Has anyone ever filed an 1/8" edge float for crosscutting to cut these abutments? Or is this a silly idea?
-
14th August 2019, 10:07 AM #8
GOLD MEMBER
- Join Date
- Mar 2004
- Location
- Brisbane (western suburbs)
- Age
- 77
- Posts
- 12,117
I have a similar challenge when cutting out the slot for the 'shoe' for my marking gauges: 7a.jpg
The woods I use are extra tough, and the hole for the beam is 3/4", so not much room for a saw, and hard to see what's happening when you do get one in there! I tried a keyhole saw but it was too flexible and I couldn't get a neat cut with it however hard I tried. Obviously, the slot needs to be very accurate, or it would detract rather severely from appearance: RG gauges 2.jpg
So I made a stiffer saw with a 4" blade that is around 3/8" wide at the toe, to 3/4" at the handle end. Because the stocks are about 1 1/4" thick, that length of blade is adequate, & 25 thou plate proved to be stiff enough. I experimented with various tooth profiles and settled on 20 degrees rake and 45 degrees fleam (roughly what Disston used on their 'no set' 77), and a pitch of around 15tpi. I'm not sure why this weird profile works as well as it does on teeth with no set, but even on larger saws it binds less than 'standard' crosscut profiles, and those knife-like teeth leave very clean edges. This works well enough for me, but I appreciate you are dealing with a longer cut, needing a longer blade and coarser teeth. I would have aimed for a saw that is a bit more than twice the length of your maximum length of cut, so a bit over 7" in your case, and for that length of saw, I would have thought 30-35 thou would be plenty stiff enough - the thicker the saw, the harder you have to work!
You are always going to be up against it with a stopped cut, there is just no way for the saw to clear the sawdust at the stopped end. Curving the tooth line up at the toe (like a stair saw), helps, but of course then you can't cut to full depth at the end of the cut. This is one situation where a pull-cut saw often works better than a push-cut, as D.W. suggests....
I'll be interested to hear what solutions you come up with....
Cheers,IW

 Reply With Quote
Similar Threads
-
table saw cutting advice
By skara in forum TABLE SAWS & COMBINATIONSReplies: 19Last Post: 17th March 2015, 01:30 PM -
Beginner requesting advice on cutting coves
By Eowyn in forum WOODTURNING - GENERALReplies: 15Last Post: 14th November 2014, 11:29 PM -
requesting advice re a sled
By jow104 in forum WOODWORK - GENERALReplies: 11Last Post: 27th September 2007, 11:15 PM -
requesting advice on router table
By jow104 in forum TRITON / GMCReplies: 13Last Post: 6th April 2007, 10:27 AM -
requesting box mading advice
By jow104 in forum WOODWORK - GENERALReplies: 4Last Post: 21st July 2005, 10:54 PM
