

 Thanks: 0
 Likes: 0
 Needs Pictures: 0
 Picture(s) thanks: 0
Results 1 to 15 of 63
-
30th August 2008, 08:25 PM #1
 Happily receives emails.


- Join Date
- Jul 2005
- Location
- 'Delaide, Australia
- Age
- 65
- Posts
- 8,138
 BETH - new build with pics by Norm Lehman
Well ... I added the pics. Remember that BETH is really a boat for more experienced sailors. Her building method is pretty simple for first time builders, but it is good if the sailors are about at the level where they can sail a Laser happily and don't mind getting wet occationally.
OH .. and keep an eye out for the boat in Norm's shed!!!
 Originally Posted by norm
Howdy Norm,
If the skids divide the width of the cockpit area into about thirds that will be best.
If anyone asks about the additional bulkhead ... I would probably recommend getting rid of the original one and boxing in the base of the mizzen mast (which is probably what I was trying to avoid in the original design. Oh, be clear that this is not a compliaint!!!
The buttstrap and the cockpit stiffener worked to make the bottom of the boat just stiff enough in the original Beth, but there were no bottom skids on the original boat so I think yours will be stiff enough. I don't like to add much weight to the boat ... but some would say I am manic about such things - but I do try to only include what is really necessary in the structure.
I will look forward to seeing the pictures of your paint job!!!! Drop me an email when you put them up on the WB forum!
rudder - The rudder for Beth is so shallow I decided to leave it fixed. It actually is the first part to go on the boat when rigging, rather than near the last like a normal boat. Boat does not move at all while being rigged in this way.
Simplifies the boat enormously. Also I liked the idea that there was nothing to go wrong with a rudder I could not reach easily.
Rudder size works nicely if you use the mainsail sheeting to steer - in medium and stronger winds the boat will turn easily because of the higher speeds. In very light winds when you want to point up, use the rudder and ease the mainsheet a foot or two. When you want to bear away in very light winds and the boat does not spin easily you can pull on the mainsheet and the boat spins like a ballet dancer .. it is quite a fun feeling.
Also I have a strong aversion to kick up rudders ... they are the worst of all possible worlds and people persist with them purely because they have not experienced ... the style on the GIS and the Puddleduck is superior in every way - in terms of shallow water steering, certainty that the rudder will be down when you need it and the ability to swing back over obstacles but it will come down automatically. Problem is ... you need to be able to reach the rudder top to push it down and that is the problem.
I know this is just a part answer ... please respond with your thinking
Best wishes
Michael Storer
A ship shape boat sailed very nicely. I can see instantly that you know what you are doing!"Nice boat in the shed!"
Thanks Mik. That's my cutter Fiddlers Green. She's 28 ft, gaff rigged and coming on 50 years old. I've had her for more than 30 years and right now I'm in year 4 (!) of a planned 1 year re-fit. That's why I wanted to build Beth - I need to get back on the water.
Michael
http://www.flickr.com/photos/boatmik...7607022294047/
Actually, One of the interesting things about BETH is obvious here. Whe I built the first one I went from loving the shape to hating it all the way through. It is quite strange like that. Sometimes it looks so striking and other times I remember saying I thought about "hiding it in the combustion stove".
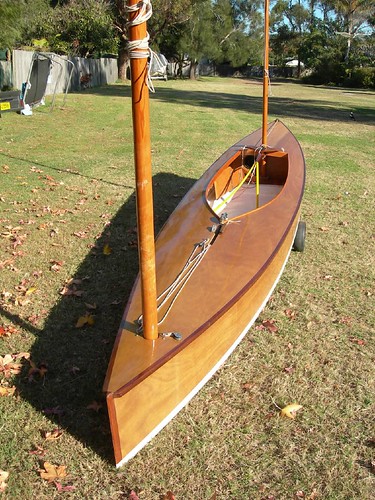
But don't forget for a moment what the end result is like!!!! From Dennis

You can see pics of a finished BETH sailing canoe in this thread
MIK
-
30th August 2008 08:25 PM # ADSGoogle Adsense Advertisement
- Join Date
- Always
- Location
- Advertising world
- Age
- 2010
- Posts
- Many
-
1st September 2008, 12:45 PM #2
Intermediate Member
- Join Date
- Aug 2008
- Location
- Toronto, ON Canada
- Posts
- 31
A few notes on building Beth
Hi Mik. The last few days saw a lot of progress - but Beth attracts so much attention at the boatyard, I think I lost 2 hours each yesterday and today answering questions! No worries though, I just talk about how easy it is to build, show them the sail plan, and watch the gleam come into their eyes.

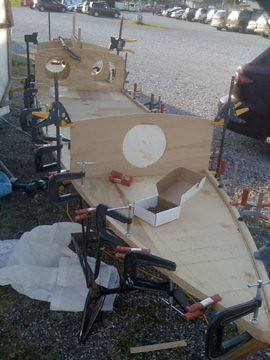
Yesterday I installed both sheer strakes - western red cedar - and did all the fitting for the daggerboard case and bed logs - and that process taught me a lesson I'll share.
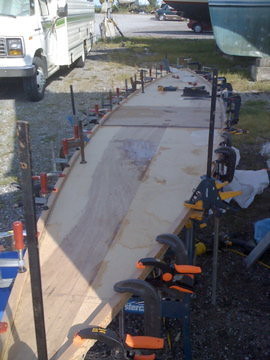
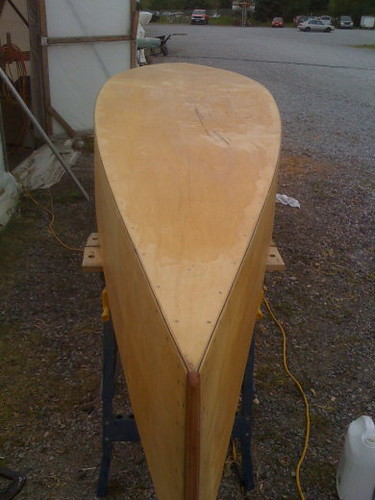
As the first picture shows, the hull is resting on two workmate-type benches, mostly unsupported over its length.

I fitted the case to a "T", working hard to get the front and bottom into perfect contact. When I was happy with it I prepared to install it by doing a a dry run of the glue up with all the clamps in place.

Guess what? It didn't fit!! There were big gaps, and for a minute I though the whole thing was upside down. After a few deep breaths and a few more choice words, I realized what had happened.
The issue was that the unsupported bottom had sagged a bit - enough so that when it was properly supported and pushed into place, the relationship between the bottom panel and bulkhead #2 - now correct - was out of whack with the case that I had so carefully fit to the out-of-alignment surfaces!
The problem only showed up because I had clamped some cross pieces underneath ( you can just see them in the next pic) to give me something to push against when setting the case. Those cross pieces squared everything up nicely, of course, but now the case was all wrong - well not too wrong - just a few MM in fact, and the plane took care of it - but wrong enough.

After fixing it up, I proceeded to glue everything in place - quite a set-up if I do say so myself!

So a word to the wise - on a boat with a light plywood skin, beware of sag before you do a final fit!
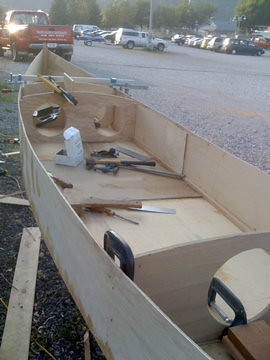
I also did most of the beveling of the sheer strakes and bulkheads today - it's really looking like a boat now. Tomorrow the knees and almost ready to finish the inside. More pics to follow!
- Norm
-
3rd September 2008, 12:27 PM #3
Intermediate Member
- Join Date
- Aug 2008
- Location
- Toronto, ON Canada
- Posts
- 31
More progress
Here's some pics from today:
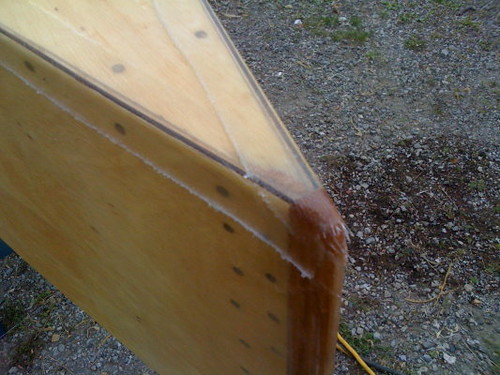
Daggerboard case is in and trimmed up. Plenty strong!

One of my ugly but effective fillets

One of the deck supports waiting its fillet

Test fitting the foredeck

A simple gadget for marking the nailing line.

A shot under the deck to check the fit

A good day. Tonight I'll cut the holes in the steps, tomorrow the inside gets its epoxy coat.
- Norm
-
5th September 2008, 12:02 PM #4
Intermediate Member
- Join Date
- Aug 2008
- Location
- Toronto, ON Canada
- Posts
- 31
Progress!
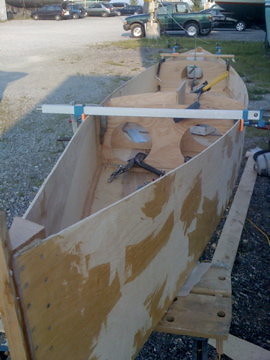
A few more pics. The interior structure is all done and epoxied. I primed it all tonight but ran out of light to take a picture.


- Norm
-
6th September 2008, 12:44 AM #5
Happily receives emails.
- Join Date
- Jul 2005
- Location
- 'Delaide, Australia
- Age
- 65
- Posts
- 8,138
Howdy,
This build demonstrates something that I felt very strongly when building the original Beth.
Particularly when upside down during the build I just couldn't get my confidence up.
Sometimes I really liked her look and other times, well, I remember saying "I wanted to hide her in the combustion stove" that was used to warm the workshop during that cold winter in 1989.
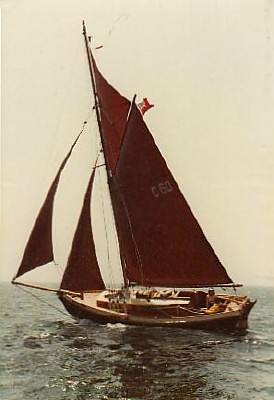
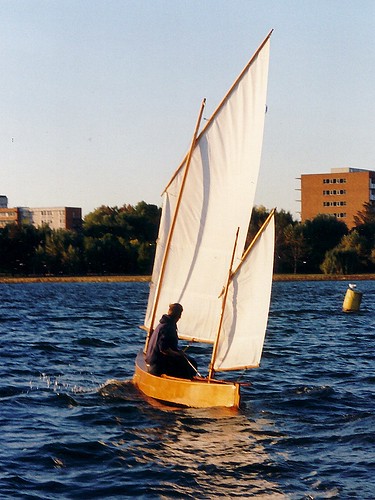
There was certainly a lot of interest from anyone who came to visit duckflat at the time too. They broke into two camps. A very divisive boat before it is decked and preferably with a mast or two up in the air. And then everyone started liking it more and more. And on the water where that boxy shape disappears and the sheer becomes the dominant line ...
Ends up looking something like this.
One important postscript ... Beth does require some skill to sail. Probably about the same level of skill required to sail a Laser in the same wind with a similar risk of receiving a dunking. Rather similar speeds too.
More Beth Sailing Canoe pics here
Best wishes
Michael Storer
-
6th September 2008, 11:09 AM #6
Intermediate Member
- Join Date
- Aug 2008
- Location
- Toronto, ON Canada
- Posts
- 31
Inside painted.
Mast steps next - then decks!!!
- Norm


-
6th September 2008, 06:17 PM #7
Happily receives emails.
- Join Date
- Jul 2005
- Location
- 'Delaide, Australia
- Age
- 65
- Posts
- 8,138
Howdy Norm,
You will scrape or heatgun the areas where mast steps and partners are going to glue down?
I imagine you are ... but someone else might read this thread later!
Best wishes
MIK
-
6th September 2008, 11:21 PM #8
Intermediate Member
- Join Date
- Aug 2008
- Location
- Toronto, ON Canada
- Posts
- 31
Hi Mik. I tried to avoid the
Hi Mik. I tried to avoid the mast step areas - you can see the bare area for the mizzen in the last photo. But yes, I'll clean them up before gluing in the steps, and with luck, that will happen today.
- Norm
-
7th September 2008, 10:08 AM #9
Happily receives emails.
- Join Date
- Jul 2005
- Location
- 'Delaide, Australia
- Age
- 65
- Posts
- 8,138
Howdy Norm,
I just thought of it looking at your photos... and thought it might be a good reminder to have in the thread for future reference!
You are going so fast with this build!!!!
Wonderful
-
8th September 2008, 09:32 AM #10
Intermediate Member
- Join Date
- Aug 2008
- Location
- Toronto, ON Canada
- Posts
- 31
Sunday progress
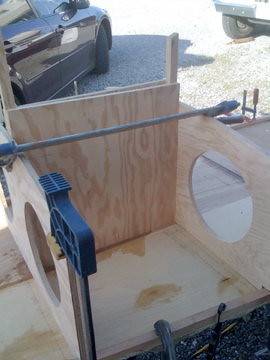
Some Sunday afternoon progress - fitting and installing the mizzen step.
The step piece in 1" teak, rabbeted to fit against the stringer and bulkhead. Still some scraping to do first. The plywood base is a 1/2" piece epoxied to the bottom.

Step in position with holes pre-drilled for locating screws.

The mizzen partners and bulkhead with matching rabbets to increase gluing area and created a "locked" joint

Both pieces in position, ready for glue up. The vertical piece is just a spacer that lifts the partners into the right plane. The deck will be glued directly to the top piece after it's shaped to the deck camber.

- Norm
-
10th September 2008, 11:15 AM #11
Intermediate Member
- Join Date
- Aug 2008
- Location
- Toronto, ON Canada
- Posts
- 31
Rudder and board
Some detail work today. I had glued up the blank for the rudder a long time ago, and roughly shaped the dagger board - today was the day to get them ready to finish. Mik provides templates for shaping. I used my wood eraser (5 inch grinder with a 60-grit disk), a plane and spokeshave, then a RO sander. The wood is black cherry from a 4/4 plank that was given to me by a friend. Nice wood. I ripped the plank into narrow staves, flipped every other one and glued them up.
Rudder


Rudder foil shape at bottom

Dagger board


Both together

- Norm
-
10th September 2008, 03:36 PM #12
Happily receives emails.
- Join Date
- Jul 2005
- Location
- 'Delaide, Australia
- Age
- 65
- Posts
- 8,138
I generally increase the side of those chamfers on the end so the end of the board is about 1/3 the original width. Then use a long sanding block to round the end. Are the ends of the CB cut to the angles yet?
Looking great and going real quick!!
Best wishes
-
10th September 2008, 11:36 PM #13
Intermediate Member
- Join Date
- Aug 2008
- Location
- Toronto, ON Canada
- Posts
- 31
Thanks Mik. The board is square - I'll go back to the plan and get the correct angle - I forgot that it goes in the boat at an angle! I'll also do as you suggest on the chamfer. I think it's going to be pretty slick.
- Norm
-
11th September 2008, 08:01 AM #14
SENIOR MEMBER
- Join Date
- Oct 2007
- Location
- Poland
- Age
- 67
- Posts
- 805
Hi Boatmik, Norm and All

Norm! Fine job!!!
Thanks for new photos of Beth building process
This Boatmik's design is my favourite still
Aloha!!!
-
11th September 2008, 12:15 PM #15
Intermediate Member
- Join Date
- Aug 2008
- Location
- Toronto, ON Canada
- Posts
- 31
Thanks Robert. Stay tuned, because tomorrow the decks go on! That is, they do if the weather co-operates. After 3 weeks of perfect sunshine, it started raining this week, so I've had the boat inside my shelter for the last few days. But there's not much room in there, and it slows down the progress. Forecast is for dry tomorrow, then rain for 4 days. I hope they're right!
- Norm


 Reply With Quote

Similar Threads
-
Plans for Beth Available digitally?
By jbbaird in forum Michael Storer Wooden Boat PlansReplies: 3Last Post: 16th October 2008, 10:01 PM -
BETH - Sailing Canoe
By Boatmik in forum Michael Storer Wooden Boat PlansReplies: 7Last Post: 30th August 2008, 08:54 PM -
finished lapsteel build (pics)
By thelloydr in forum MUSICAL INSTRUMENTSReplies: 3Last Post: 12th April 2008, 11:36 AM -
Beth Ireland DVD
By baxter in forum BANDSAWN BOXESReplies: 11Last Post: 31st December 2006, 03:42 PM
