

 Thanks:
  Likes:
  Needs Pictures: 0
 Picture(s) thanks:
Results 3,316 to 3,330 of 3347
-
23rd January 2015, 02:15 PM #3316
 GOLD MEMBER


- Join Date
- Jan 2009
- Location
- Blaxland, Australia
- Age
- 65
- Posts
- 2,551

Hi Ross,
Thank you for the kind (re-)invitation :). The shed kit (minus doors and whirlybird, which come separately) arrived on a truck today, and will be put up next week. Once the shed is up and some of the building impediments are out of the way, I'll be able to get the boat out (and back in!) more easily. That will mean that I will be more likely to get into gear to go sailing!
Cheers,
Alex.
-
23rd January 2015 02:15 PM # ADSGoogle Adsense Advertisement
- Join Date
- Always
- Location
- Advertising world
- Age
- 2010
- Posts
- Many
-
24th January 2015, 06:16 PM #3317
Happily receives emails.
- Join Date
- Jul 2005
- Location
- 'Delaide, Australia
- Age
- 65
- Posts
- 8,138
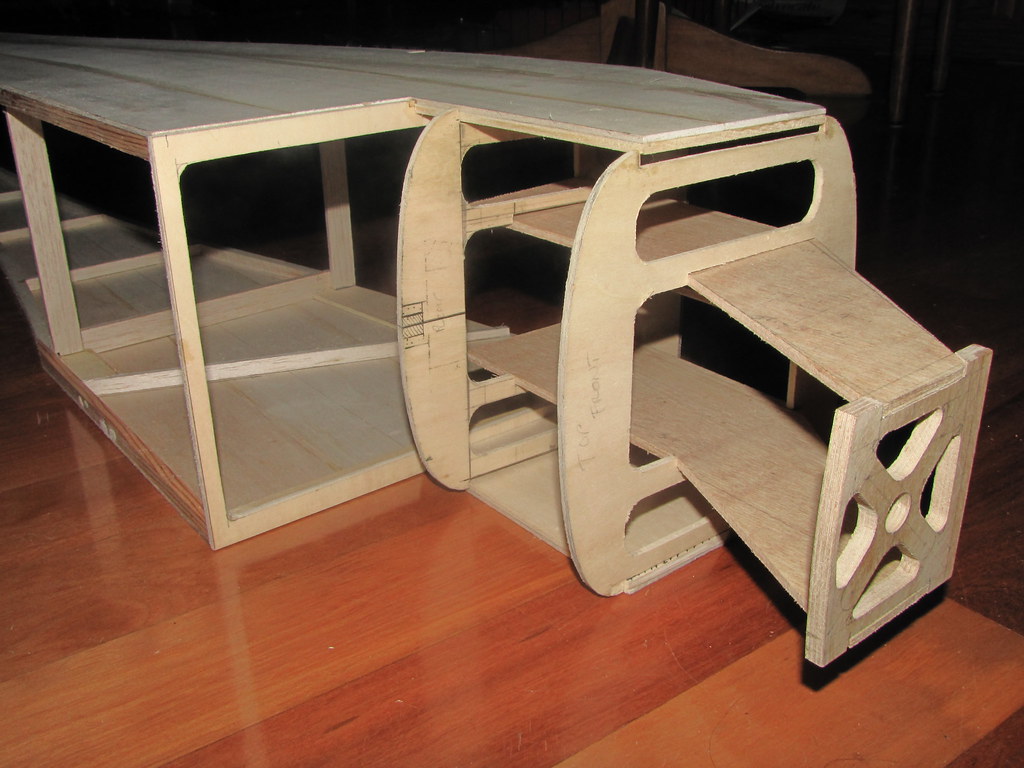
YOur photo of the fastening box is impressive Alex!
MIK
-
25th January 2015, 11:50 AM #3318
GOLD MEMBER
- Join Date
- Jan 2009
- Location
- Blaxland, Australia
- Age
- 65
- Posts
- 2,551
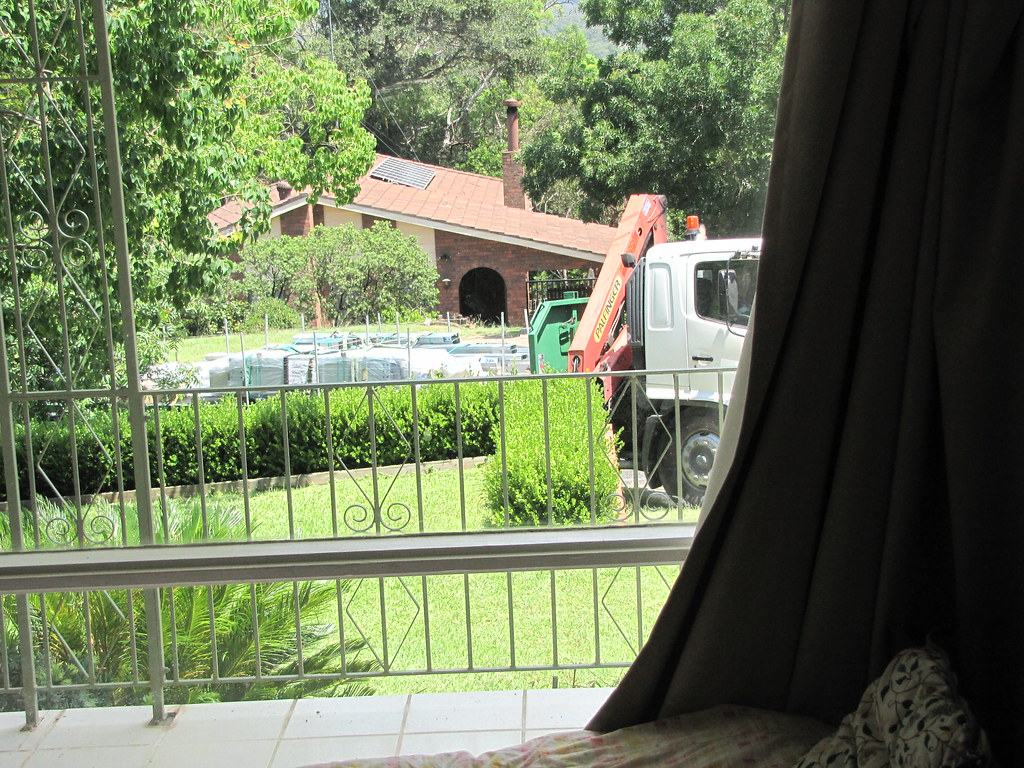
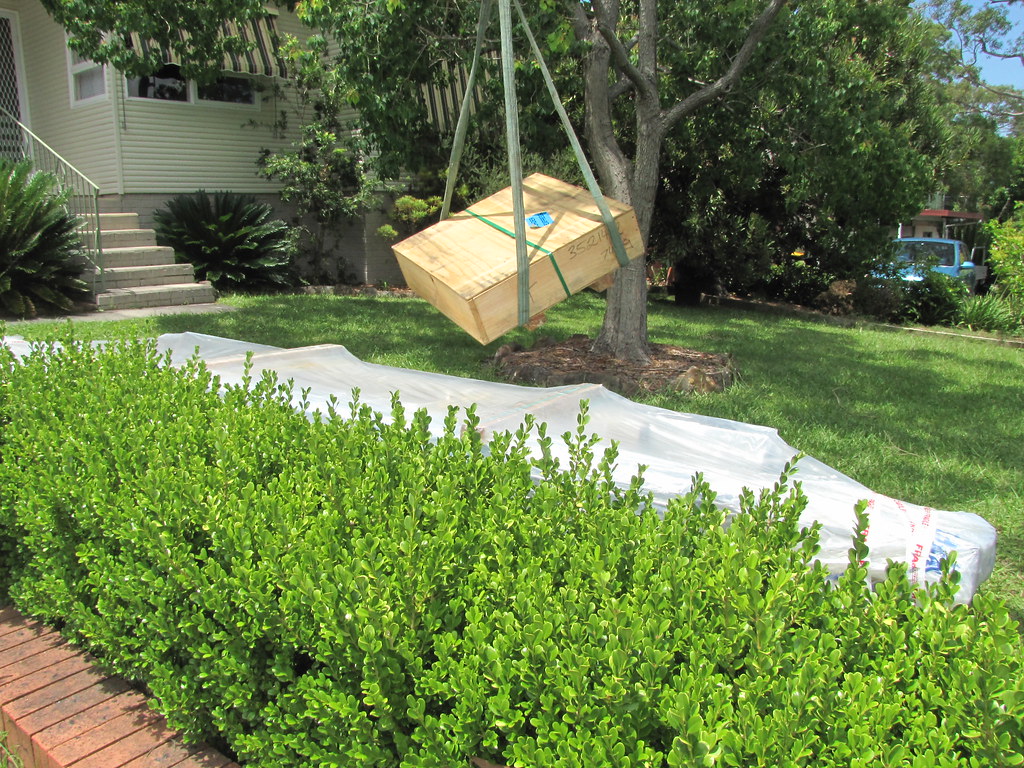
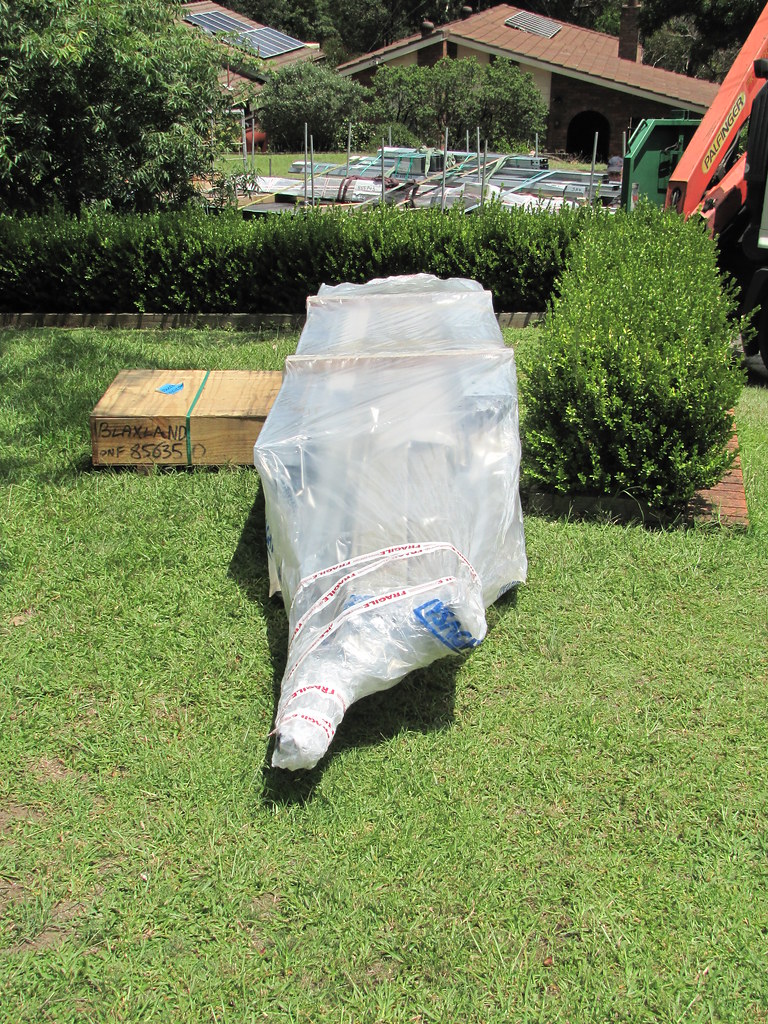
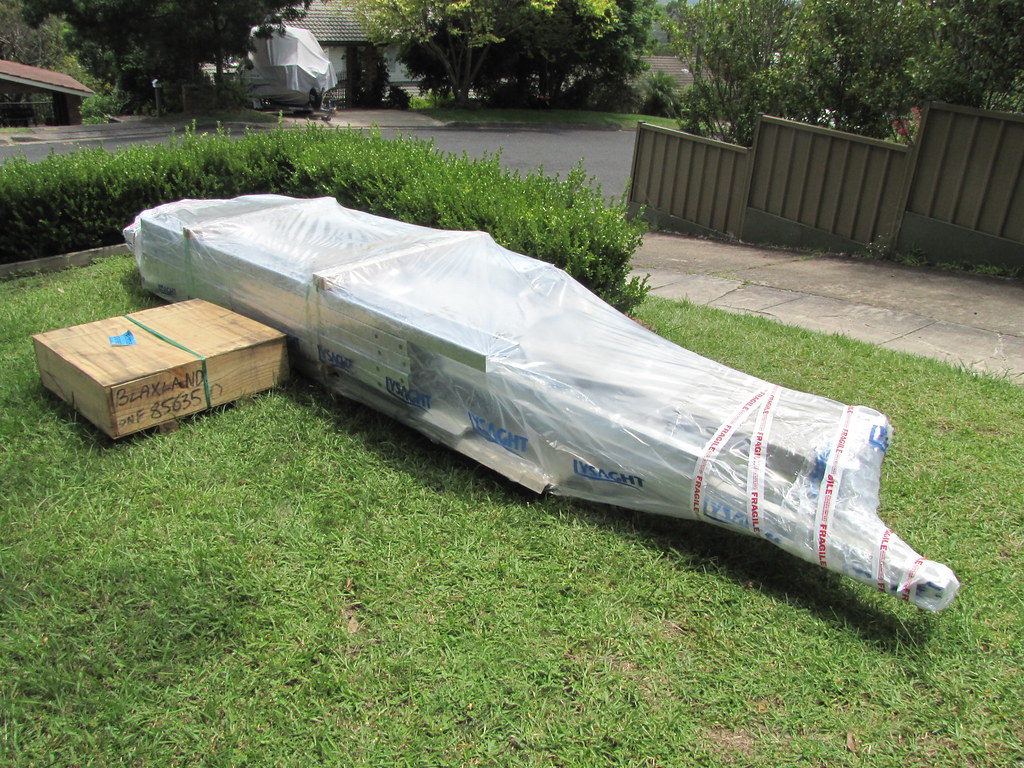
Thank you MIK. I suppose I should link some of the "delivery" snaps here, then:
1. The shed kit arrives! Apologies for the wonky snap: I was too excited! Our kit is the one closest to the house, i.e., on the RHS of the truck...
2. Box of fasteners being craned on-site (is this the snap you meant, MIK?)

3. Fastener box nearly on the ground. Yes, we have a front lawn as well as a back lawn. And a box hedge. one of our former neighbours had a box hedge, too. This one needs a trim...
4. Crane has done its job. this driver was a lot more dacrefull than the one whole delivered the rep mesh for the slabe (and took a good bit of the north side of the tree out in the process). The shed kit driver didn't touch a leaf (made easier of course by the previous removal of largish chunks of tree)

. Main kit and fastener box. Kit delivered fresh from the Lysaght/Bluescope factory in Newcastle (NSW ;), and contains roofing, wall cladding, gutters and downpipes and framework. Window came in a separate box (not seen here); doors are arriving separately
.
Follow this link to my Flickr account
I have since moved the fastener box up the hill a bit and covered it with heavy orange concrete underlay to keep it dry in the face of the (current) seasonal monsoon troughs...
Congratulations to m2c1Iw on his fantastic Herreshoff Coquina build! Exquisite job! See from here for more recent photos :).
So where's Mr Snappy? I don't know - I think he's hibernating (or aestivating) somewhere. I dare say he'll crawl out from hiding (read, uncovered) once the shed is built - and various piles o' junk are moved into said shed.
-
16th February 2016, 10:39 AM #3319
GOLD MEMBER
- Join Date
- Jan 2009
- Location
- Blaxland, Australia
- Age
- 65
- Posts
- 2,551
OK, Right. Well, here we are again. Me, at any rate.
What hasn't been happening? Quite a bit, as it turns out; but also quite a lot else has been going on.
First off, the new shed is "finished" (subject to Council approval - the builder and said council keep arguing between themselves about approvals, so it still hasn't been officially signed off, I wish they'd sort it out), I have partially moved into it (still setting up), and am arranging the wood heap at my father-in-law's.
I'm still wading through the aftermath of the Workswamp and my poor housekeeping therein, and I won't be doing any "work" in the new workshop until 1. I am properly organised; 2. I have cleaned up everything and removed all the RUST and DUST; 3. got all the necessary machinery installed and operational. In fact, any boat-related activiites will be shifted to my father-in-law's - another work-in-progress.
Secondly, I have finally bent on Mr Storer's "new" sail. Snaps below, some of which have also appeared (some months ago) on the BritModeller.com web-site. Mr Snappy, by the way, is lurking about somewhere...
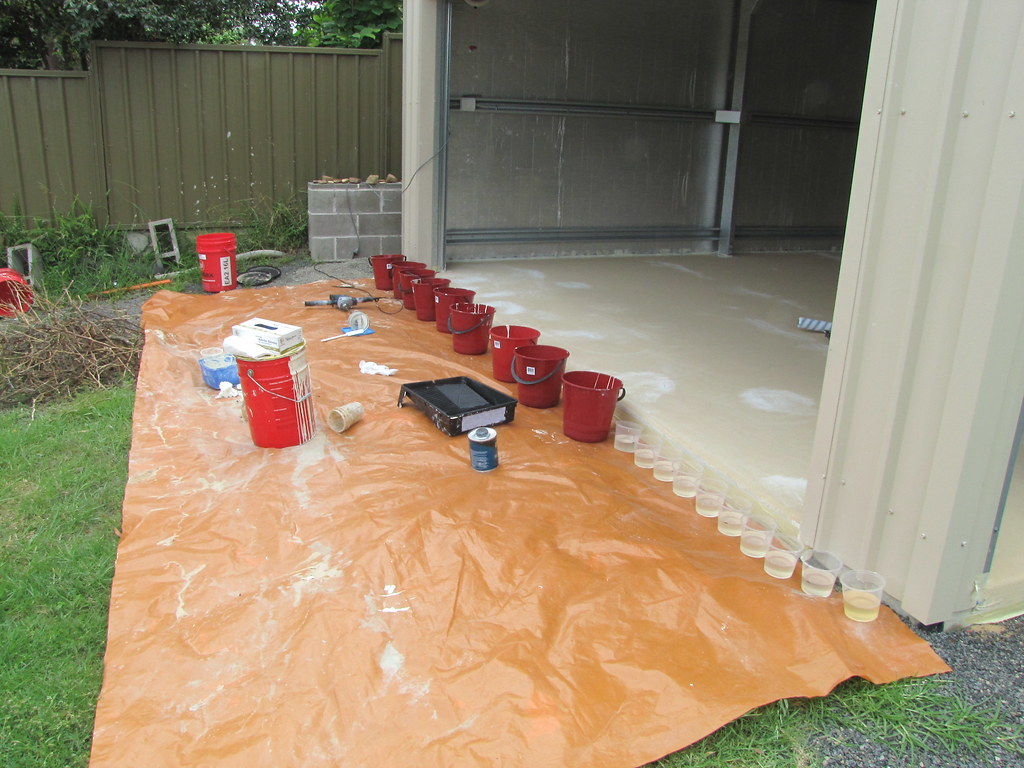
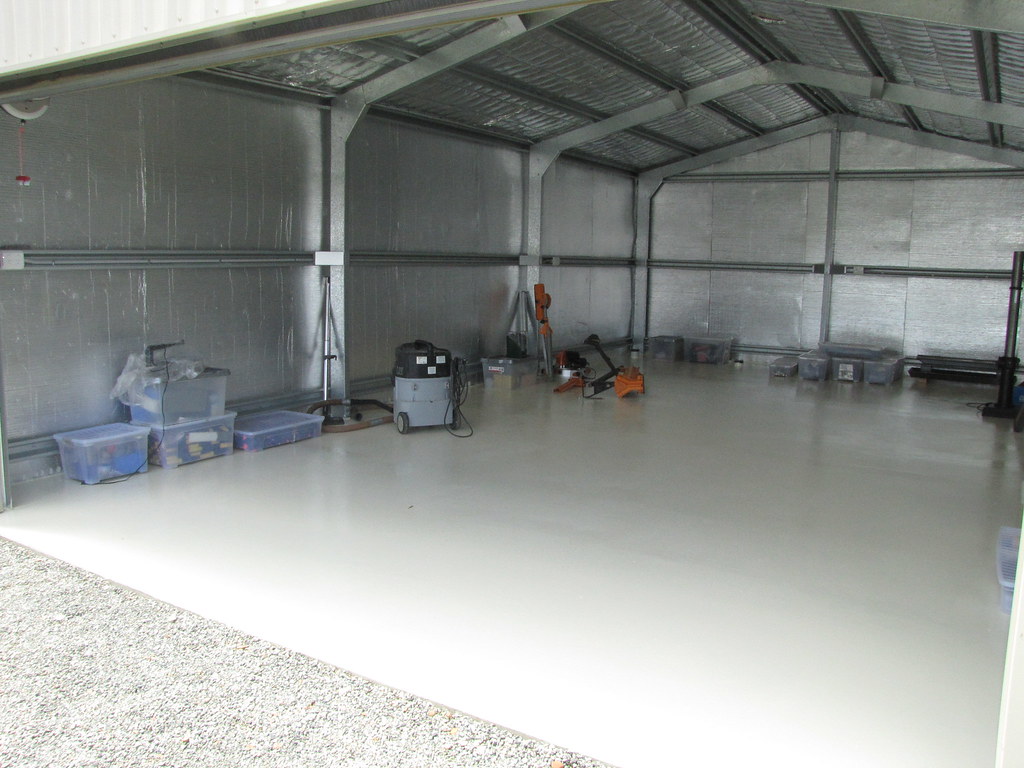
1. Setup for the final epoxy layer - I coated the concrete slab with EpiMax 330 and non-slip sand after mowing the concrete flat with diamond bits, via Kennards Concrete Care at Meadowbank...each bucket contained 1200 ml of resin mixture - 900 ml of resin and 300 ml of hardener (3:1 ratio). That amount almost filled the lower part of the roller tray, and I used special epoxy-roller covers (i.e., especially designed 12 mm-nap rollers for use with epoxy resin) from Epoxy Supplies in Queensland (roller cover visible on RHS o' snap)
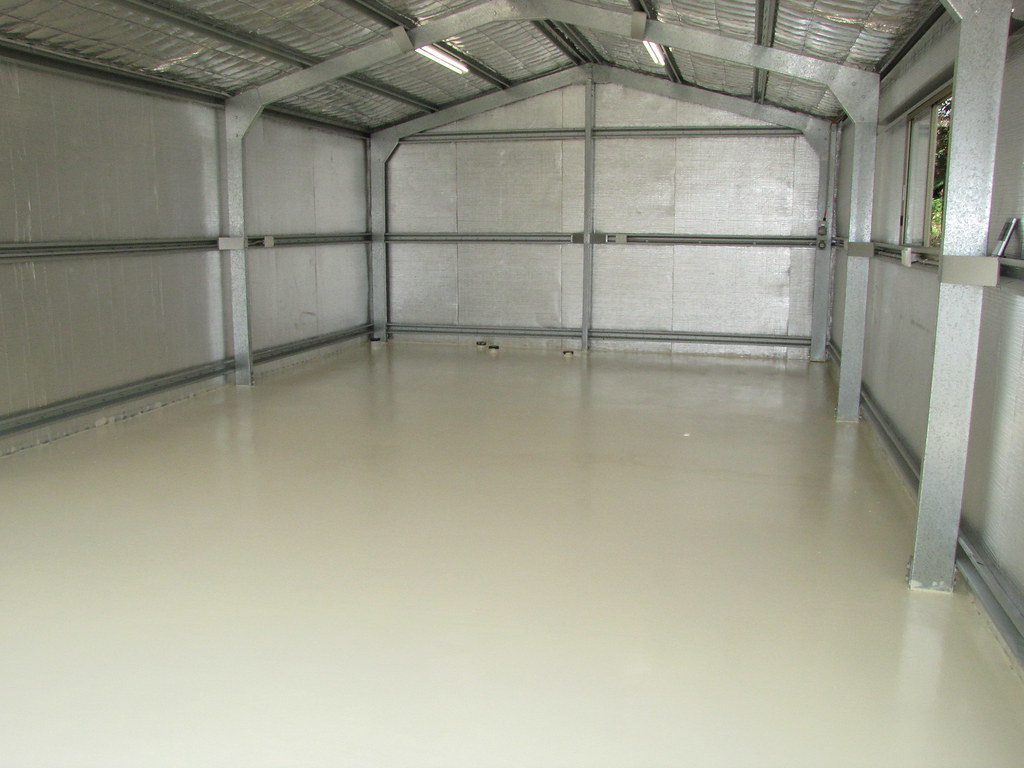
2. Painting finished! No more painting! Well, not strictly true, as I missed a 40 mm x 90 mm triangular patch (approx) next to a stanchion - nothing that didn't take a few minutes with a small paint brush
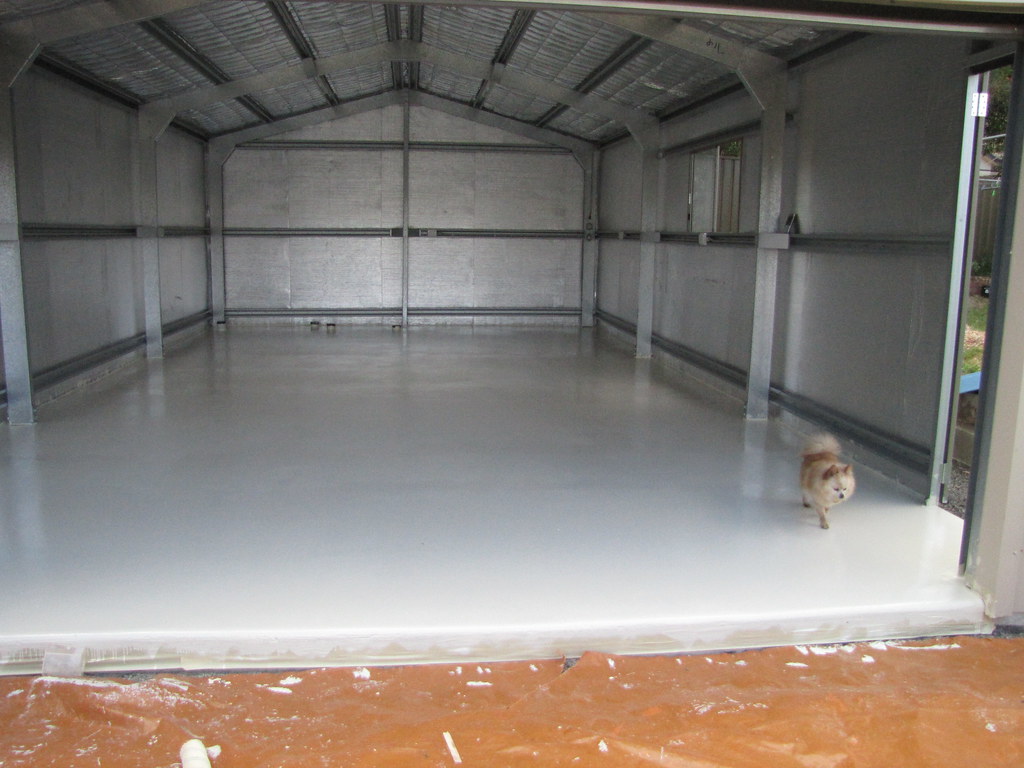
3. The floor having met with his approval, the Dreadful Dog leaves by the front door
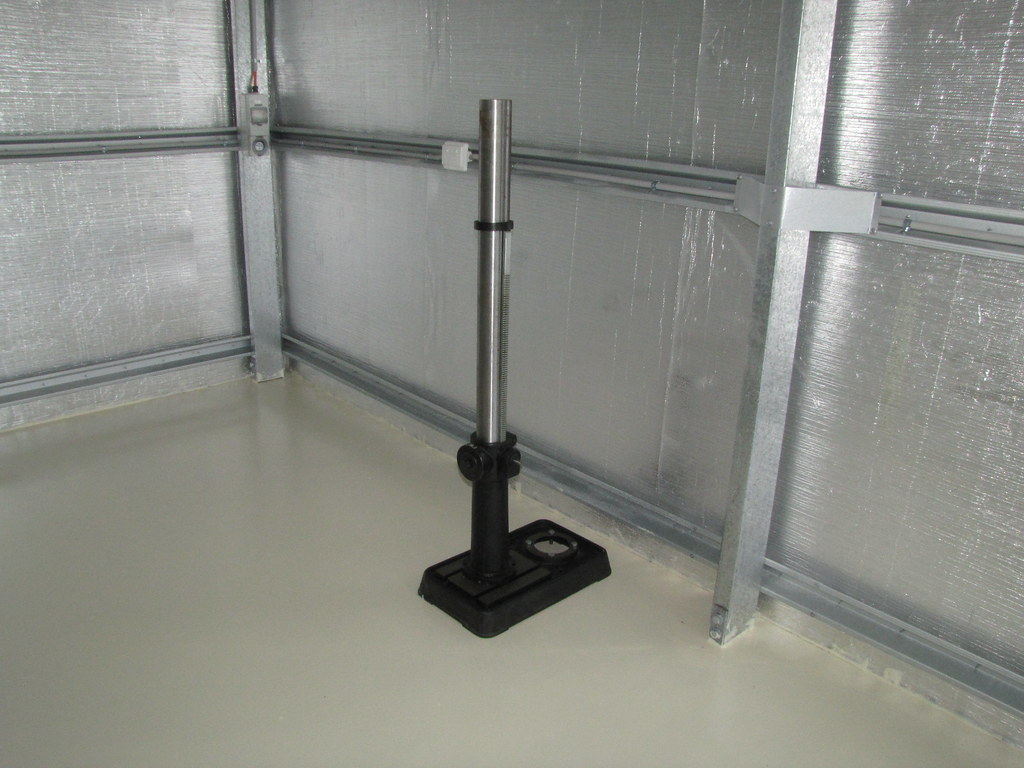
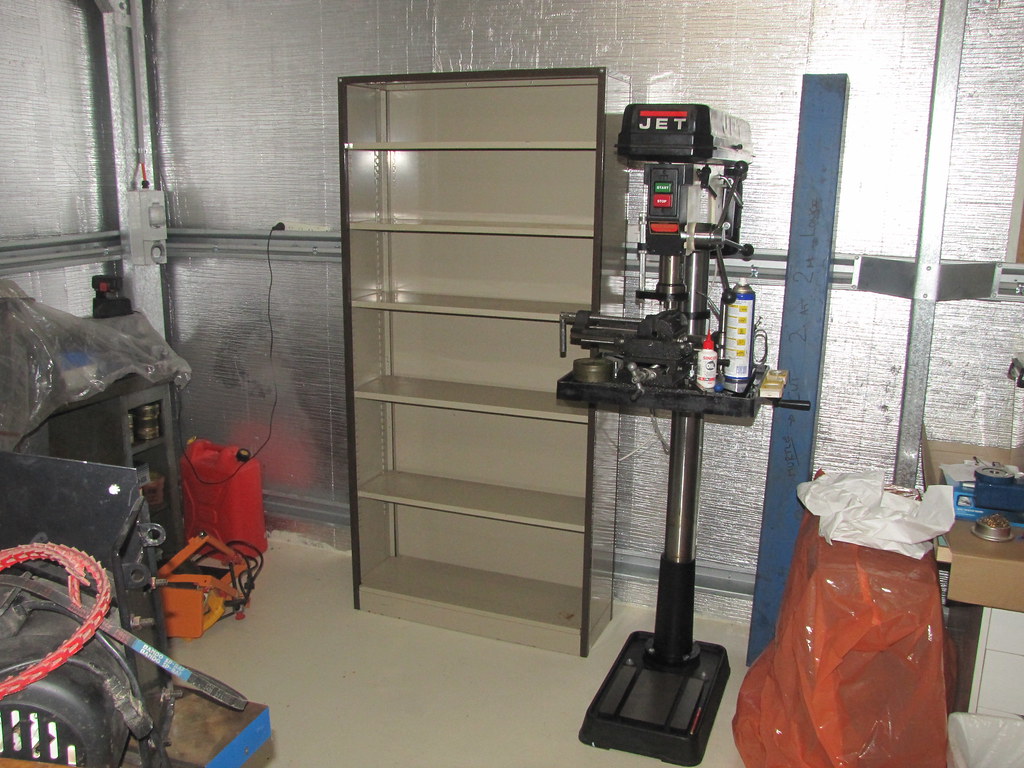
4. First items in: the JET drill press column perched on its base: note that it is NOT in its correct position, which is at the back of the base; this is just a temporary expedient
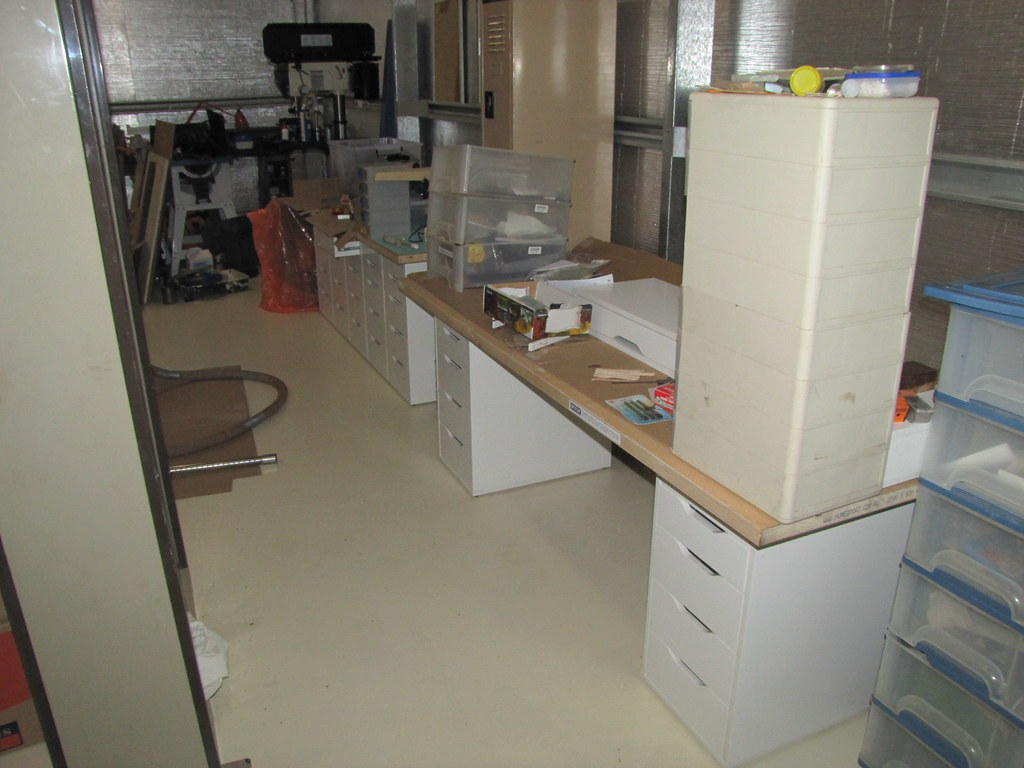
5. Clutter increasing...
6. More clutter: at least the two benches seen here are more-or-less in final positions; the "aeromodelling" bench has been stripped down and sanded prior to epoxy+PU coatings

7. Two new benches: reed-making/plastic modelling/other bench in foreground; mini-mill/mini-lathe bench in background. The benches are IKEA "Alex" drawer units (complete coincidence) with solid-core doors on top; tops still awaiting various coatings
8. JET drill press almost complete; the shelves have been moved over to the other side of the shed, out of the way...
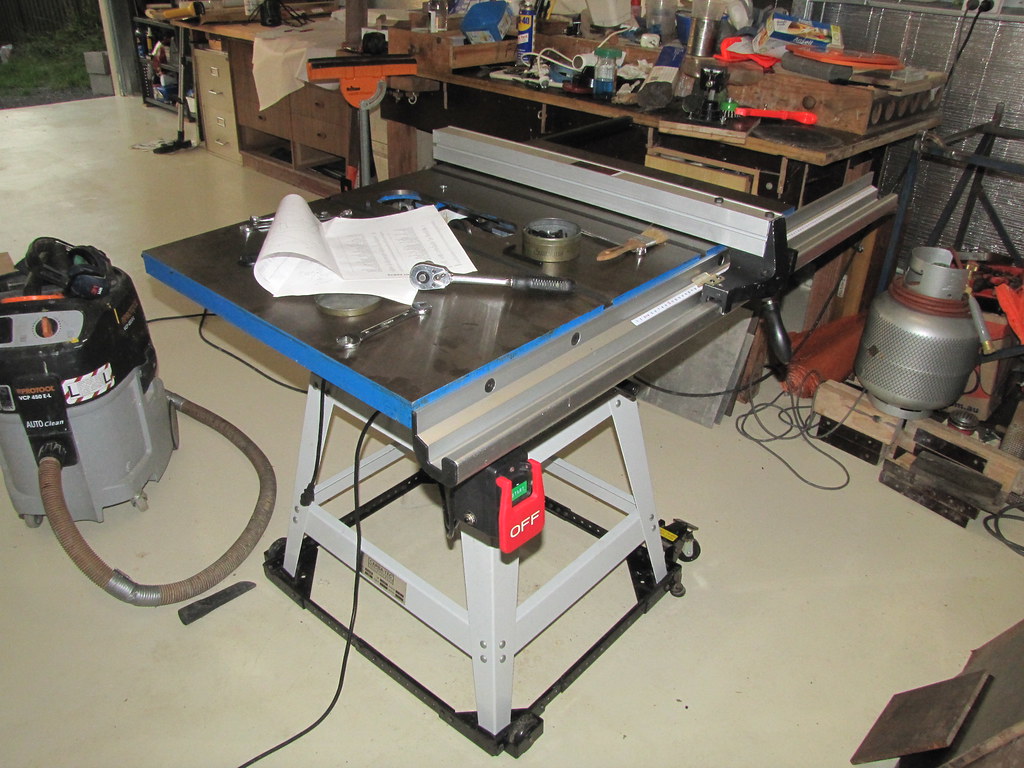
9. Carbatec table saw almost set up: this required an ENORMOUS amount of work to get rid of all the RUST and sawdust. It was in a lamentable and parlous state. Some people should be allow to have good tools...
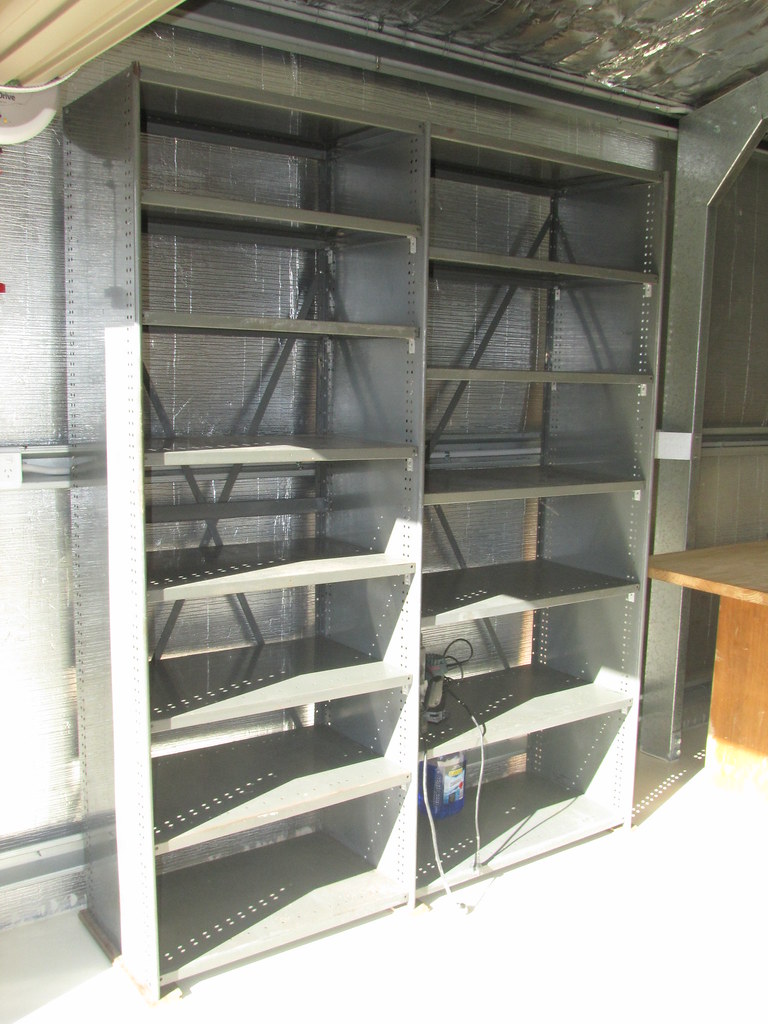
10. Some "Steelbilt" shelving units, generously donated to us by my father-in-law. They are now stuffed full and I can't find anything in them...
Follow this link to my "New Shed" set on Flickr; this is to page 8 - see also, pages 7, 6, 5, etc. ...
That will do for the moment: in my next post, I shall put up some snaps of my Nice New Sail(TM) from Mr Storer's Really Simple Sails, with which I am exceedingly pleased and can't wait to try out now that I have got it mostly installed :).
-
16th February 2016, 05:58 PM #3320
Sawing hack
- Join Date
- Oct 2007
- Location
- Sydney
- Posts
- 178
Hey Alex .. after a year's silence it's good to hear you're still tinkering away. How is life in the mountains? I suppose the Napean River is your closest waters for sailing.
I'm back in Oz now, living in Northmead. My OzRacer is in my shed waiting for a trailer to be organised so I can take her out. I think the Parramatta River around Meadowbank/Rhodes is my closest sailing option.
Let me know when you plan to get Mick's sail wet. I'd be interested in checking it out.
Mark
-
16th February 2016, 07:57 PM #3321
Intermediate Member
- Join Date
- Aug 2009
- Location
- Sydney
- Posts
- 48
Theodor, I think you will find that the closest sailing to Northmead is on the Parramatta River at Putney. The club is Concord Ryde SC and, for my sins, I am "class captain of the A-Division" where A stands for All-Sorts! In practice we have 5 Firebugs sailing regularly (plus 2 in build), an occasional Sabre or Minicat. So Ozracer/PDR would complement the Firebugs, also 8 foot plywood boats.
A Class/Firebug - Concord & Ryde Sailing Club
Hope you will come and see if we meet your needs.
-
16th February 2016, 08:50 PM #3322
GOLD MEMBER
- Join Date
- Jan 2009
- Location
- Blaxland, Australia
- Age
- 65
- Posts
- 2,551
Hello Mark! Good to hear from you :). I'm glad that you are back in Oz. Good luck with the trailer. I got one as a kit from Carlex in Victoria, and it was pretty easy to assemble. I do have my eye on the Nepean, although people here say that the Aquatic Centre/lakes are better for sailing, and there is a sailing club around there somewhere too, I believe. And there is always Wentworth Falls Lake, although I suspect that that boating is prohibited there. See also below...
Cheers,
Alex.
Having received the nice new sail in the post in early February 2014, this isn't exactly "new" - but it is unused, since it has been lurking flaked up and unattached under the sofa along with the mast, boom and yard (watching Doctor Who in safety, especially after 2015's abominable series, about which nothing much good can be said - this year's was t least 1,000,000 per cent better) until a few weeks ago.
I am very keen to try it out, now that I have more-or-less installed it (while shedding the odd tear at the replacement of my old sail, which I put an awful lot of work into). Sadly, however, that won't be until I have patched the accursed hull bottom YET AGAIN on account of the thrice (and more) accursed lite-ply.
I have had enough of it: in winter, if I have nothing better to do (ha ha), I shall get out the palm router and sacrifice one of my expensive CMT bits (or by a suitable sacrificial lamb from the local hardware store) and remove the blasted stuff. I'm sick of it. The latest cause o' damage was the trailer-tie-down ratchet straps biting into the (glassed) poplar ply, despite rubber truck inner tube pieces 'twixt straps and hull to try and alleviate damage. Bah humbug is a suitable phrase in this instance, I think. More resin, more paint, more sanding. More money. More time. Aaaaargh.
I am awaiting some resin pumps from BoatCraft (a hiccup yesterday with the old address - despite previous deliveries here in Blaxland from 'em - directed my package to not-here), since I don't trust myself to measure out the right amounts by hand, before I tackle the not-waterproof dings in the accursed hull bottom.
Another new sink for my time is the Rural Fire Service, the local brigade of which I joined at the beginning of 2015 after watching a nearby bushfire from the safety of our place, and thinking that I should do something to help. Which means that I also have a new First Aid Certificate, and a Chainsaw Cross-cut Certificate besides. It's not just bushfires that we get called out to, and it's "not just for Christmas", either...
OK, where was I - I seem to have distracted myself with an unwholesome rant...
Ah, yes, the Nice New sail(TM). So, without further ado:
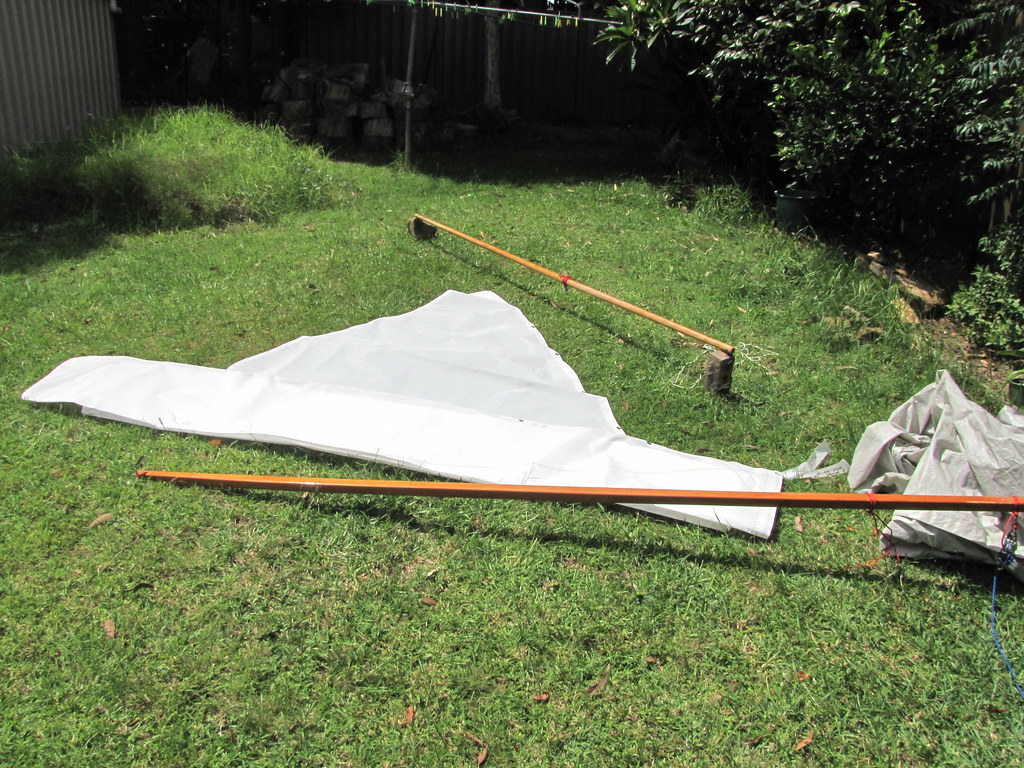
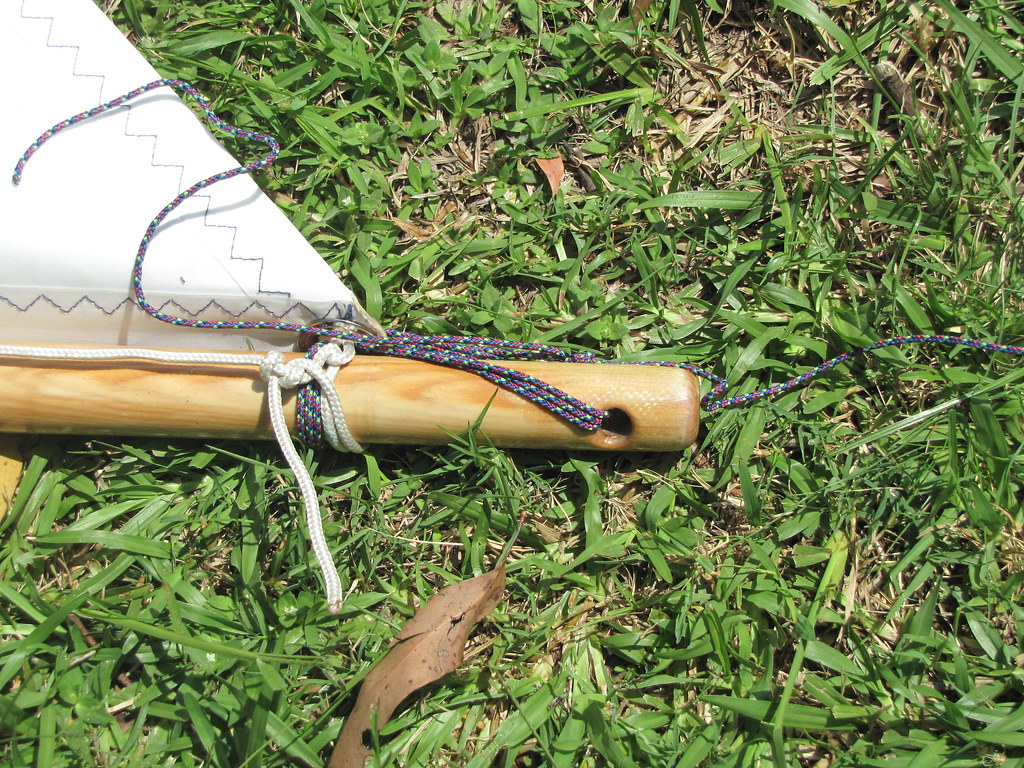
1. New Oz Racer sail for Wood Duck: old sail mostly removed except for at the clew. I needed to leave at least one example so that I could get it right on the new eyelets (I have snaps o' the old, but they are buried deep in my Flickr labyrinth, and I have run out of string and patience). Old polytarp sail can be seen bundled up at the fore-end of the boom. New sail still half-flaked here. The subtle difference in the overall shape of the old and new sails may be a result of my poor "lofting", but also may be an improvement to the outline by its designer (I was as careful as I could when making that polytarp sail)
2. Close-up of the foot: note the (stainless steel) eyelets. The original polytarp design of Mr Storer's did not have the foot eyelets. I will only be using the tack and clew

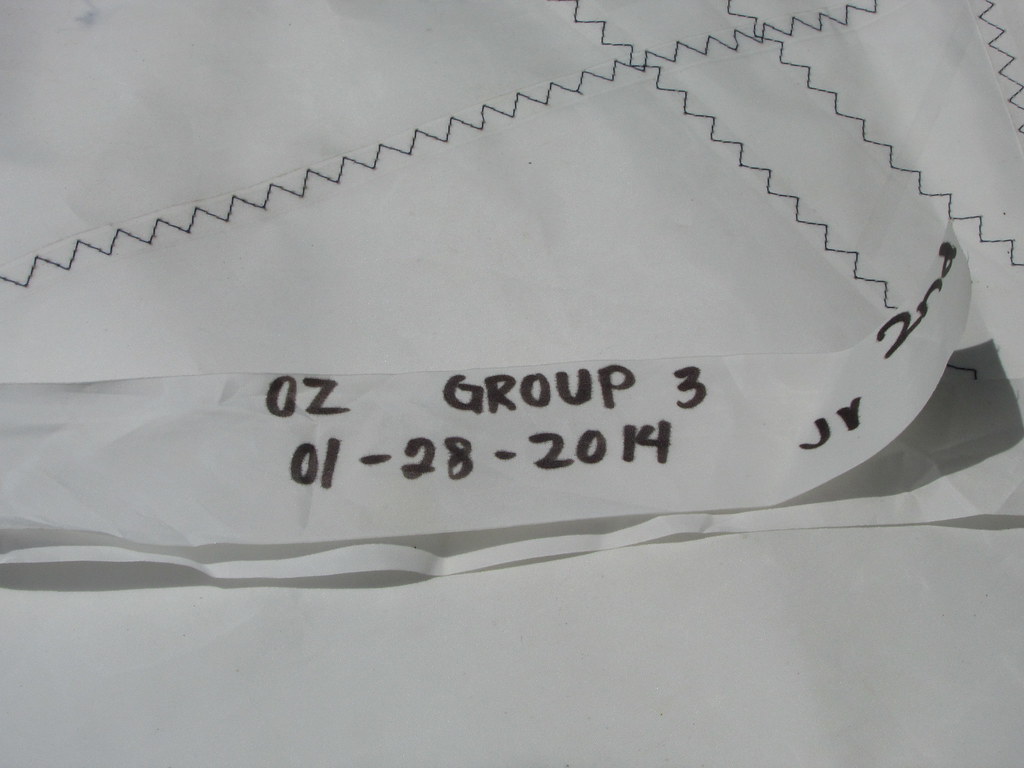
3. Label attached to sail as it came. Note that the sail is made from relatively lightweight Dacron� - certainly lighter than the original polytarp. Date says it all...I have the workshop sufficiently under way to allow a bit of time for things like this (I have also cleaned up my resin pumps and containers, although the hardener pump is refusing to work)
4. New sail bent onto the spars! This process was actually a lot easier than I was expecting/remembered it to be. The outline of the new sail is subtly different from that of the old; and is also made in separate panels, unlike the original single-panel polytarp balance lug sail. This will allow it to have a better, more efficient shape when powered up. I have to add the reef-tapes/tell-tales myself (the reefing eyelets and patches are already installed), so will have to get Emilio Wossname's sailmaking book out again...

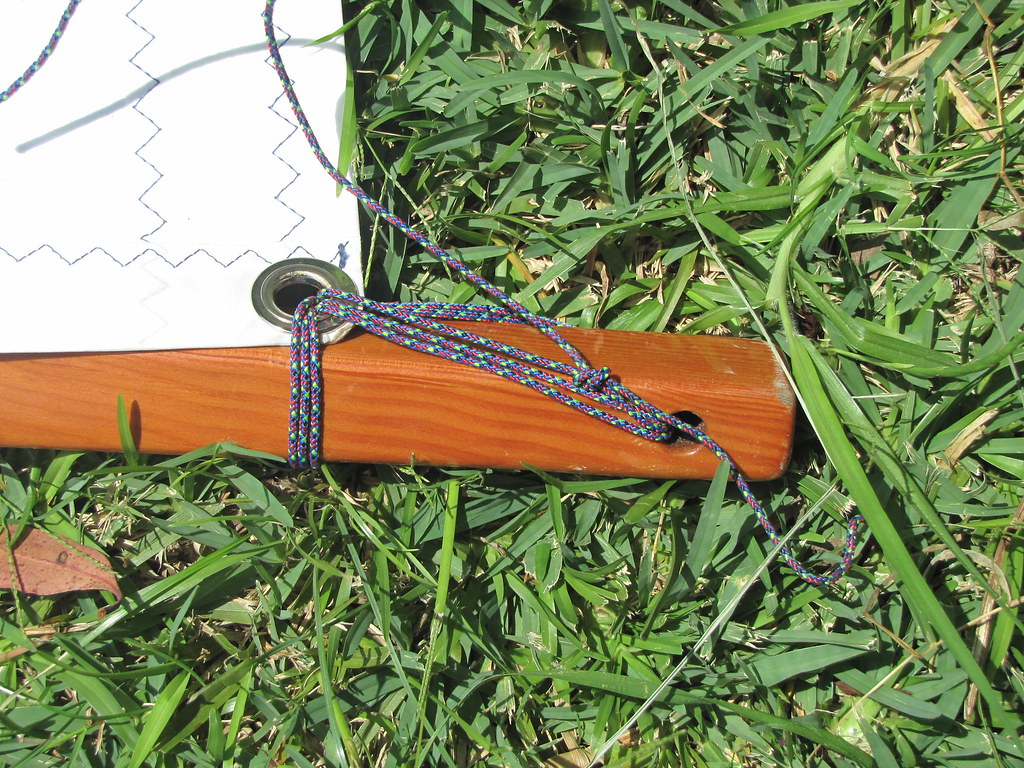
5. Clew attachment. The cord is expensive 2 mm Spectra(TM), from memory. Note the neat stitching on the sail - done by someone who knows what they are doing :)
6. Tack attachment point. Note the STAINLESS STEEL eyelet(s): I originally used brass eyelets, which of course have oxidised and are now mostly covered in a layer of verdigris

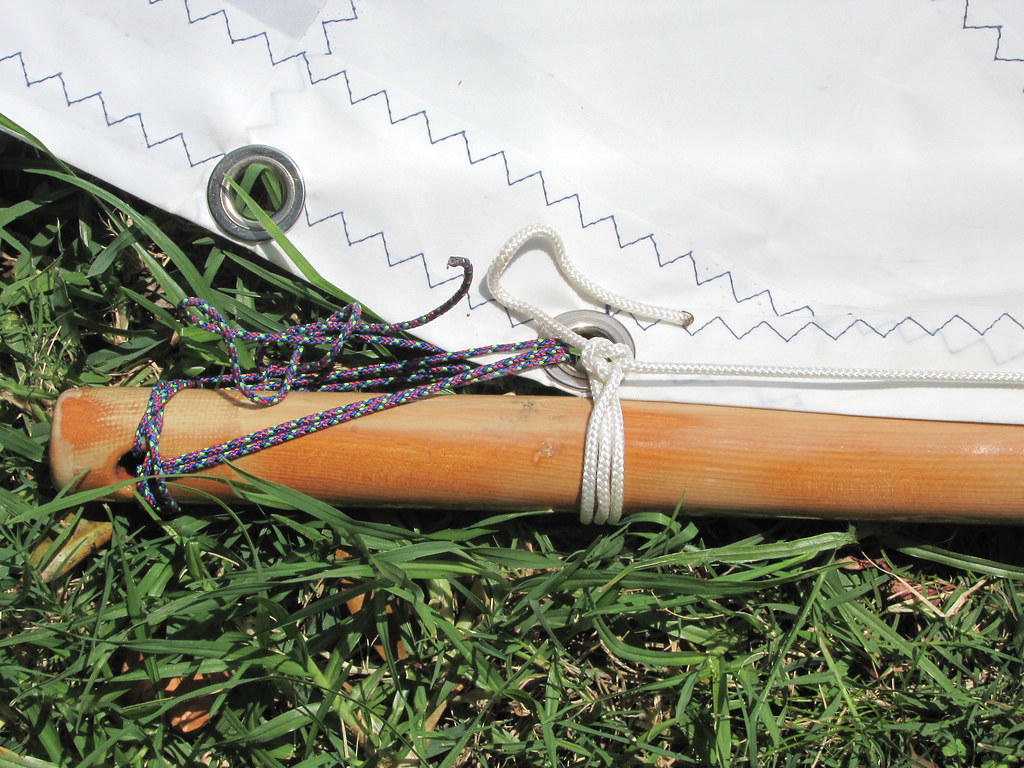
7. Peak attachment point. That head-lacing tie-off is very substandard, and will need to be fixed
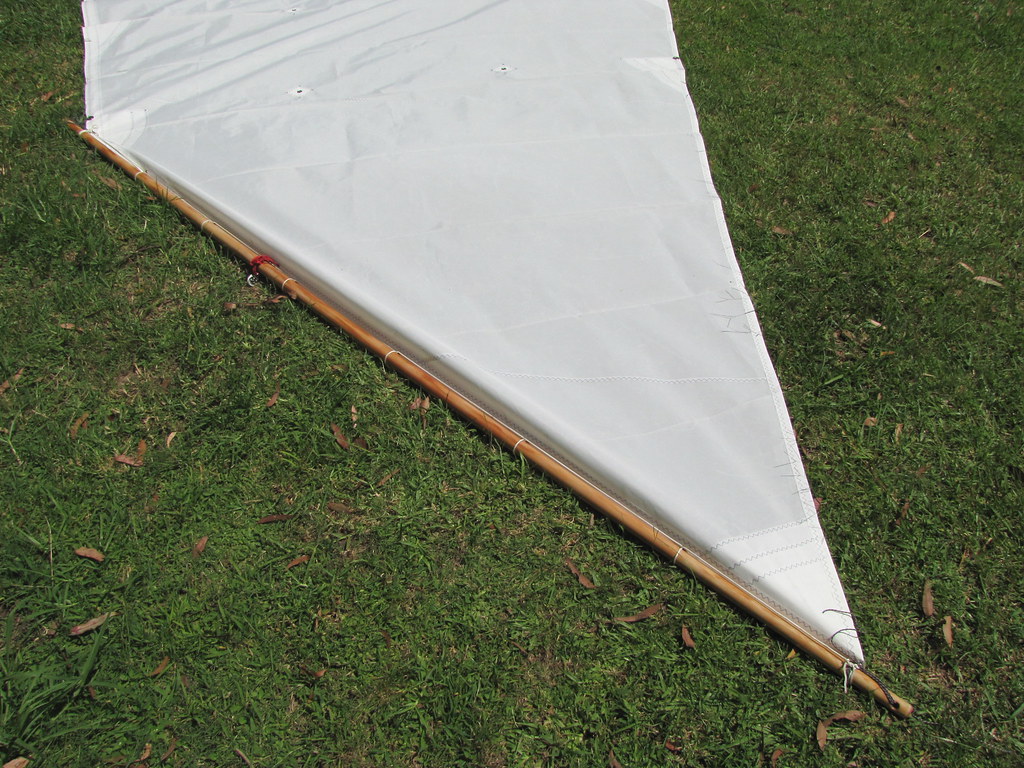
8. Throat attachment. Head lacing start is fine, but I appear to have missed a turn around the boom and through the boom hole respectively - hence the extra cord waving about in the breeze. Something else to fix. Again, note the neat, professional stitching
9. Overview of the head of the sail lashed onto its yard. The luff of the new sail design is also different: it lacks the strengthening gusset between clew and throat. This is, no doubt, as a result of the more robust (and lighter) Dacron(TM) sail cloth. I'm really looking fowrward to trying this out, but have to patch the boat hull - again - after tie-down strap damage on the blasted lite-ply bottom. Grrr. The latter may be being replaced this winter!
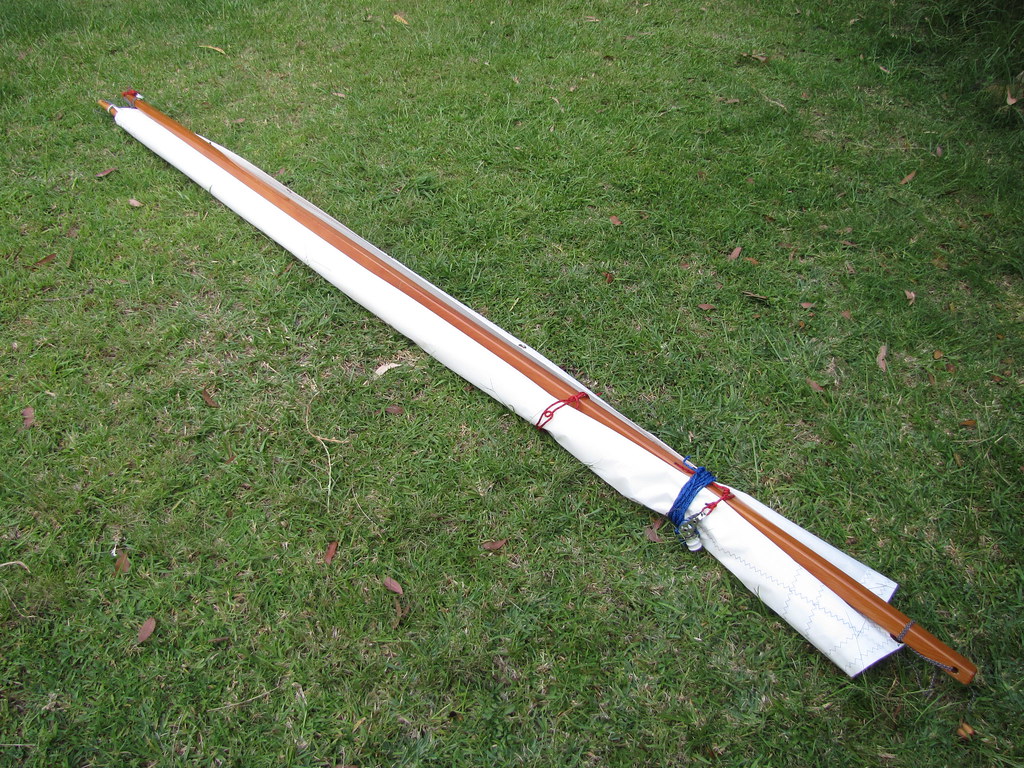
10. New sail rolled up onto its boom and yard, secured with the downhaul and its (relatively) new double-block system (latter still untried on the water as-yet) wrapped around it; nice and neat and crisp all round :)
Follow this link to my Flickr account
- the new sail even has its own album here...
I'm hoping to get up to Wentworth Falls soon, where the 'Duck is stored currently, and patch the hull - then I can think about thinking about going sailing. Maybe...since the sail is of very high, professional quality in manufacture and fittings, however, I do have something of an incentive.
-
16th February 2016, 09:22 PM #3323
GOLD MEMBER
- Join Date
- Jan 2009
- Location
- Blaxland, Australia
- Age
- 65
- Posts
- 2,551
I forgot, I will let you know when I get going, sailing-wise. I'm currently battling with the shed, plus there is my on-going oboe practise... Originally Posted by Theodor

Hello Ross, Originally Posted by RossV
I haven't forgotten your kind offer to sail the 'Duck at Concorde - see my reply to Mark above ;).
Cheers to you both,
Alex.
-
18th February 2016, 07:59 PM #3324
GOLD MEMBER
- Join Date
- Jan 2009
- Location
- Blaxland, Australia
- Age
- 65
- Posts
- 2,551
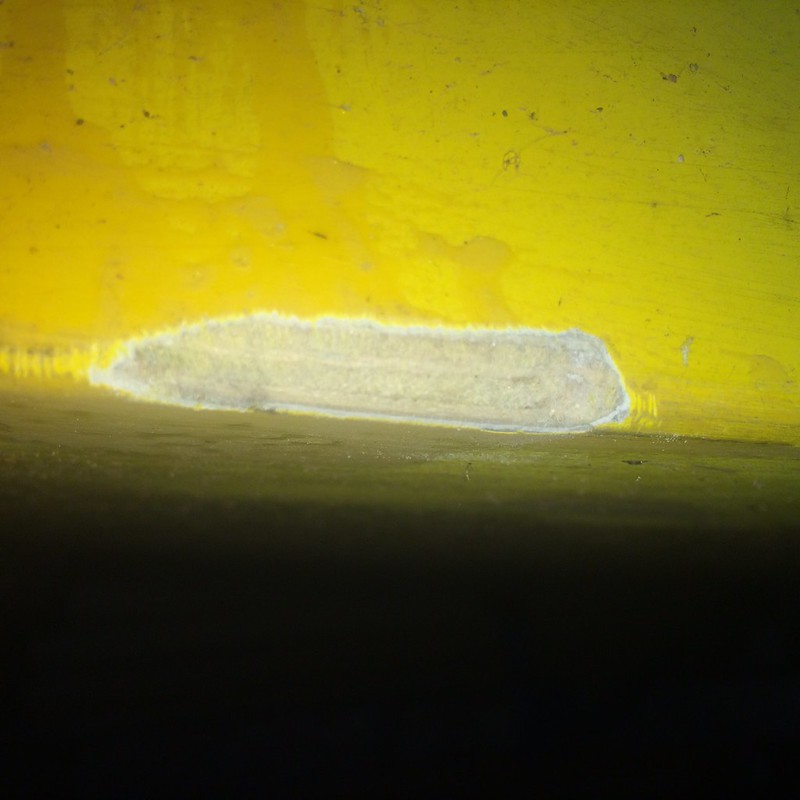
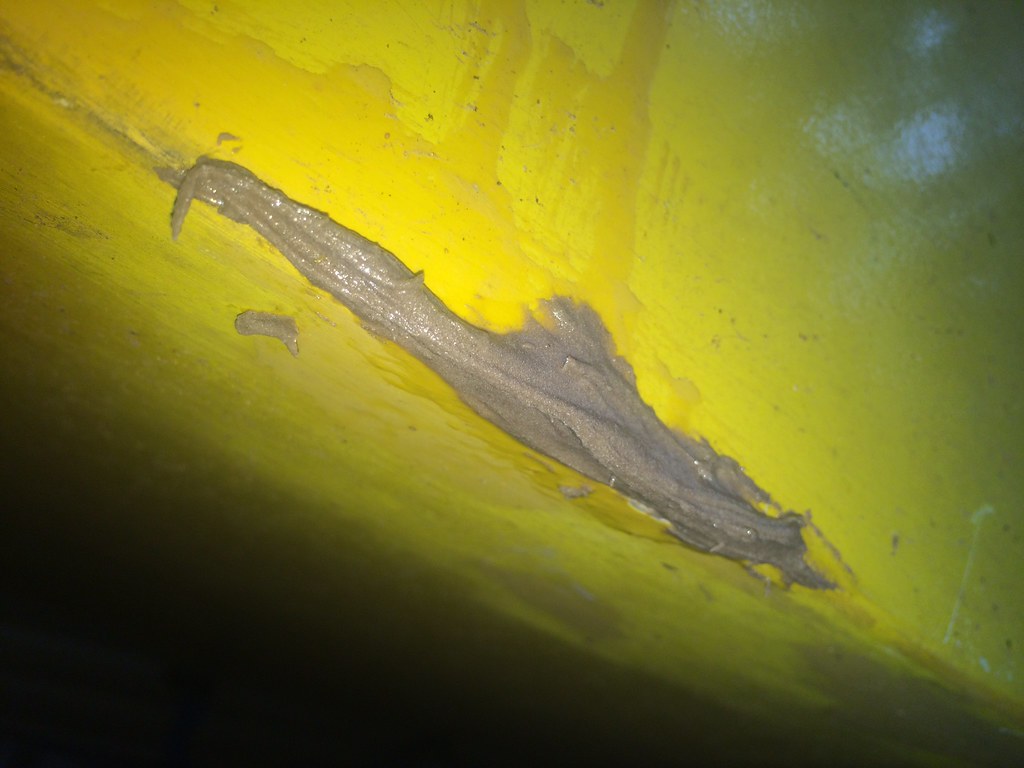
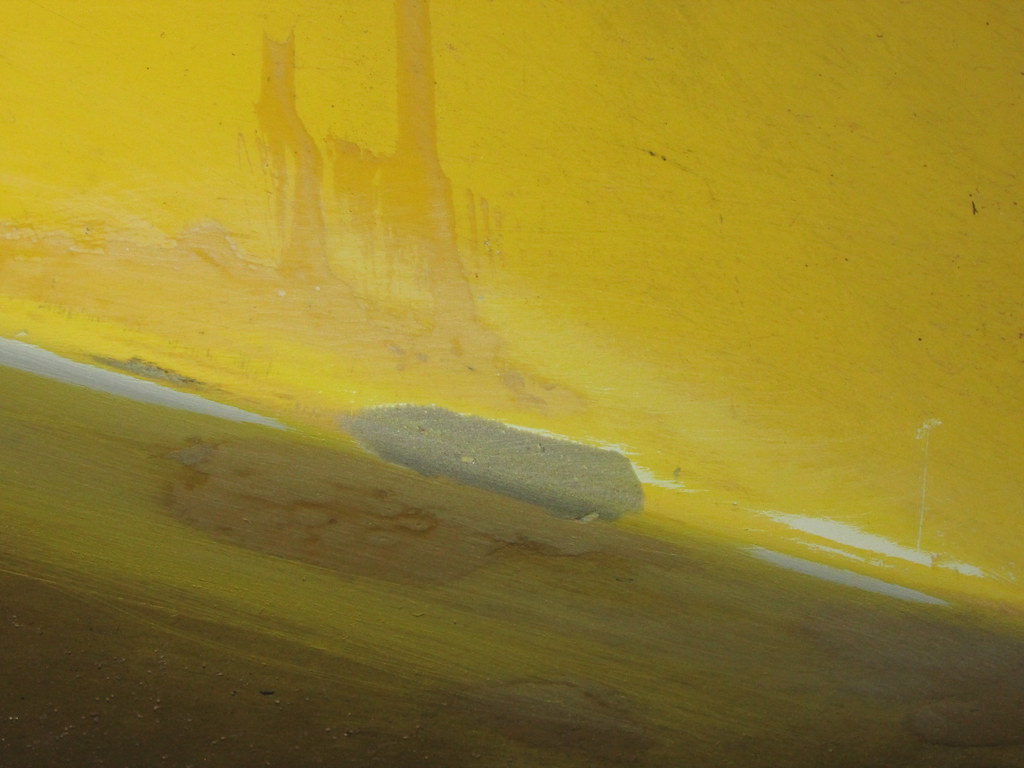
Herewith a really poor snap (even by my poor snapping standards) of the ding (one only, happily), taken with the iPhone camera when I was up at Wentworth Falls on other business today, and uploaded straight to Flickr as an experiment. The stupid camera appears to have had trouble focussing: it refused to accept the centre as the area of interest, and kept hunting between the ding and the background. None of the six-ish snaps was focussed, but I had thought that this was one of the better ones, until I got to have a good look at it on the big screen, as it were. I really don't like autofocus - digital auto-everything cameras are a mixed blessing.
1. Strap-inflicted ding in lite-ply. Not at all happy about this: the lite-ply will be replaced with some Pacific maple marine ply at the earliest opportunity. Well, it wojn't just be plywood, will it? A lot of glueing and sanding and painting as well, and and sanding and...I wonder if it would be worth all that

2. Here's a slightly sharper view of the ding, albeit somewhat smaller:
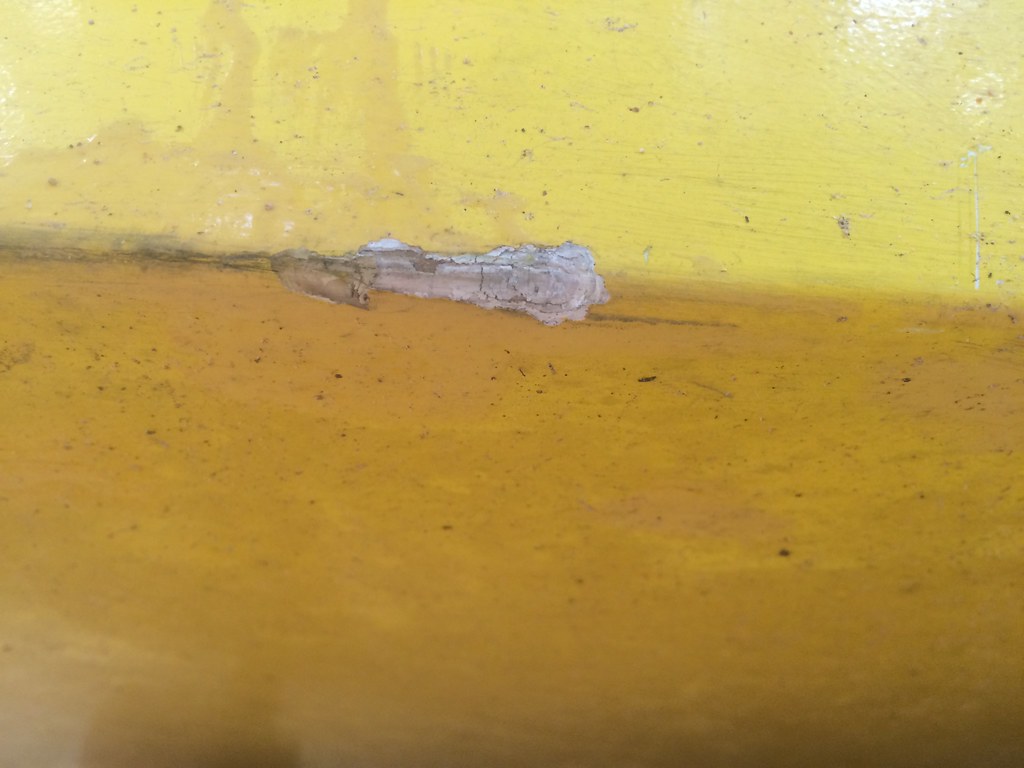
Follow this link to my Flickr account; this snap also lives in the Wood Duck Repairs set in said account.
Despite the risibly lamentable quality of the first snap, you can see the damage quite well (especially in the second). Some epoxy (neat and glue) will easily and quickly fix that as a temporary expedient - and thank goodness it's just the one ding. The yellow International Brightside paint isn't looking too flash, though: it does not appear to be weathering well at all. Another reason for an off-season refit. Having just got a coat of epoxy on one of my benchtops, I am starting to get my hand in again. 1 21 " UniPro nap roller seemed to work well, although is strictly a one-use only cover: it was starting to shed before I had finished one square metre. On the other hand, it didn't shed much, and seemed to give that up early on. A bit of pre-coating treatment with solvent prior to use might help that: having got excellent results using microfibre covers on the Norglass paint on the Boat Roof(TM), I thought I'd see how they go with the epoxy. A bit early to tell since the thristy pine hoovered up the applied resin quick smart.
-
27th February 2016, 12:46 PM #3325
GOLD MEMBER
- Join Date
- Jan 2009
- Location
- Blaxland, Australia
- Age
- 65
- Posts
- 2,551
Some boat-related progress:
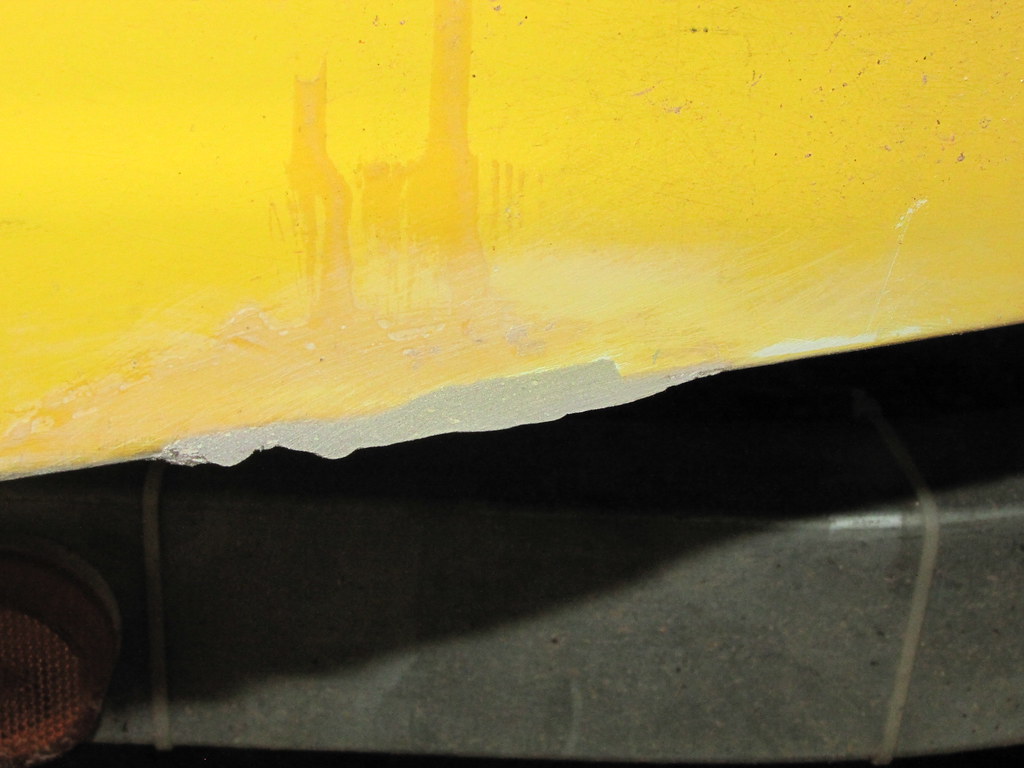
1. Lite-ply ding filed back with Perma-Grit files. Possibly my most used and useful tools, the Perma-Grit stuff. I forgot to switch the camera phone back to ordinary aspect ratio from square for this and the next few snaps. Apologies for the poor phone camera focus - I must remember to take the Canon with me next time: even though its macro function is shot, it still does better-focussed snaps than this thing...
2. Filed plywood area primed with Bote-Cote epoxy resin. Nice and soaked. Apologies for the soft focus (shifting focal plane) yet again, it's that bothersome phone (iPhone) camera (see also above). It was in focus when I pressed the button

3. High-strength glue filler added to the filed nick. Bote-Cote high-strength filler powder used. Note the 'orrible state of the paintwork - I bought a(nother) litre of Norglass "Opal White" gloss marine enamel to deal with this monstrosity down the track (once I've done a bit of sailing and have replaced that pestiferous lite-ply hull bottom). The flash seems to have forced the camera to focus in the centre: maybe it thought that it was snapping (at) a face... "Hey, that's my job!", says Mr Snappy.
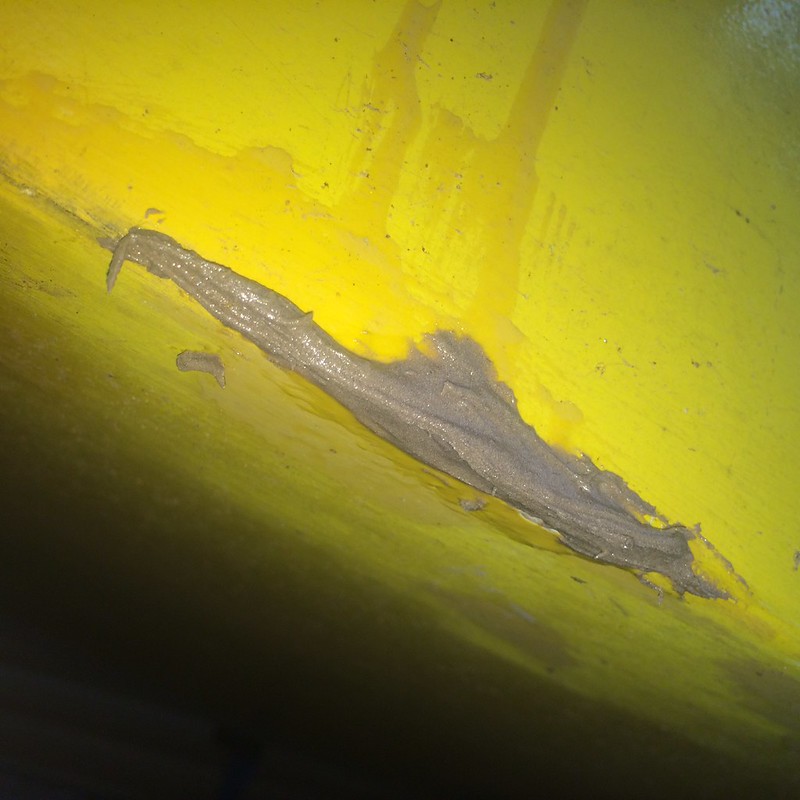
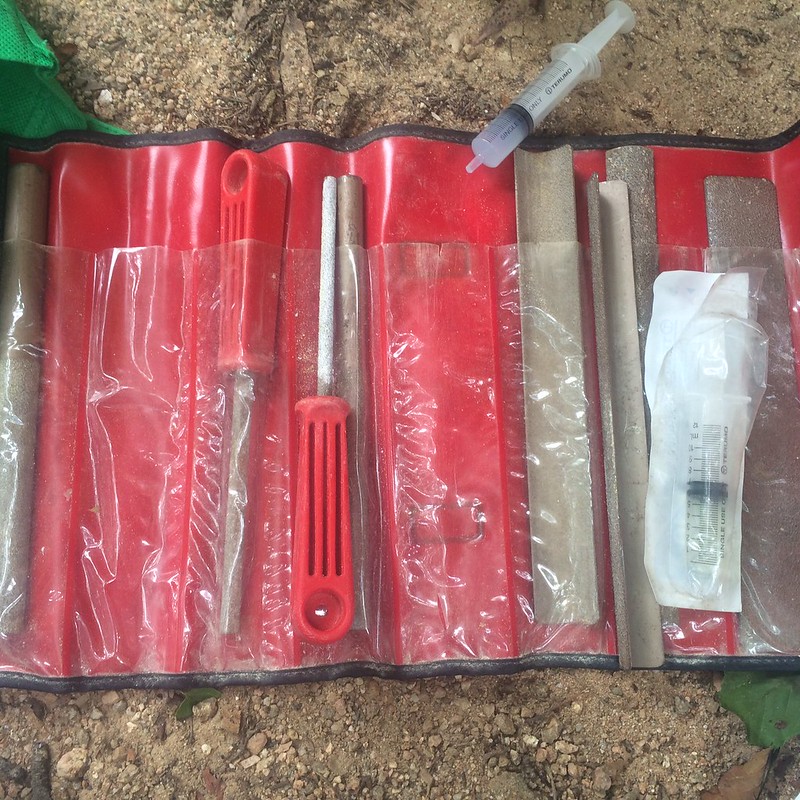
4. Perma-Grit file wallet and resin syringes: portable boat-repair kit ;). This is the coarse file set (I also have a fine set, of course). Syringes (of various sizes) make for an ultra-handy and accurate way of dispensing resin - especially useful n a situation such as this, and in modelling
5. Here's a snap from my General Aircraft Skyfarer construction sequence (indefinitely deferred like almost everything else). It shows the general sharpness that can be obtained with Perma-Grit files on liteply and epoxy-laminated marine ply (the electric motor mount at the front, in the case of the latter)
6. Another view of the filled region: normal aspect ratio view, I should say. Six mls of 2+1 resin mixture used. Once the resin has gone off, I will sand it back and declare the boat ready for sailing again...any other problems inside under the roof that I haven't seen yet (such as bird, mammal or arthropod inhabitants) notwithstanding. I won't bother painting the patch, given the imminent reconstruction of the hull bottom. Note that I appear to have missed a bit of primed plywood with the glue: that should be fine, since it's primed with resin. I'll check it out post-sanding to see if it needs a spot more glue; I did fiddle with it a bit as it was going off before I left (in rather an emergency hurry) for the day, so I may have inadvertently fixed it, In any case, it seems not to be through the bottom 2-part Bote-Cote epoxy primer layer...
Follow this link to my Flickr account
Getting there, by degrees. A few swipes with the sanding block and 120-grit Wuerth sandpaper will see off the excess bits of the glue-blob - I suppose I could always sail it as-is - and I should hopefully be ready to sail. In theory, anyway. Unless I need to see to the missed spot...
-
27th February 2016, 10:41 PM #3326
Intermediate Member
- Join Date
- Aug 2009
- Location
- Sydney
- Posts
- 48
Alex, Tbeodor, As I previously said, you would be most welcome at CRSC. An exception would be in mid April when the entire Firebug "tribe" is heading to Hobart to race their Firebugs.
Sydney Hobart for 8footers!
-
28th February 2016, 10:33 AM #3327
GOLD MEMBER
- Join Date
- Jan 2009
- Location
- Blaxland, Australia
- Age
- 65
- Posts
- 2,551
Many thanks, Ross. The next week or so is going to be a bit fraught, following the death in Adelaide of our 22-year-old nephew from a rare and aggressive bone cancer. I'll be in touch.
Best regards,
Alex.
-
28th February 2016, 11:33 AM #3328
Intermediate Member
- Join Date
- Aug 2009
- Location
- Sydney
- Posts
- 48
Alex, Words of strangers don't serve any value in such situations.
Best wishes.
-
28th February 2016, 11:38 AM #3329
GOLD MEMBER
- Join Date
- Jan 2009
- Location
- Blaxland, Australia
- Age
- 65
- Posts
- 2,551
Thank you, Ross. Much appreciated.
A.
-
10th March 2016, 01:34 PM #3330
GOLD MEMBER
- Join Date
- Jan 2009
- Location
- Blaxland, Australia
- Age
- 65
- Posts
- 2,551
The boat is now more-or-less sea-worthy. Or river-worthy. Or lake-worthy. Or...
1. Glue-blob sanded flat on the outer face: 120 grit W�rth sandpaper and cork block used. Back to using the Canon SX1 (which also had a lot of trouble focussing...)
2. Glue-blob sanded fair. Less than five minutes' worth o' sanding, all up. I'm not sure where that varnished(?) patch came from, maybe I spilled some accidentally and didn't notice, way back in the past when I was fixing up the hole in the foredeck. Or something
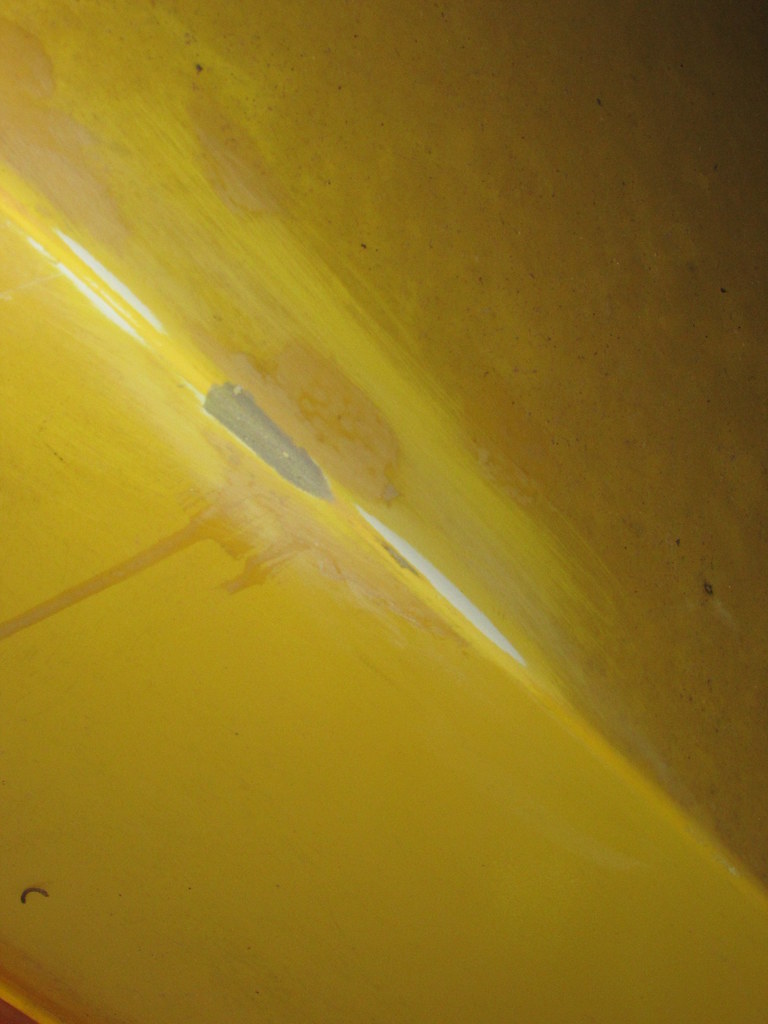
3. Closer-up view of the faired glue-blob. There is a slight dip at the inside after end of the patch, but as it was saturated with neat resin it is completely sealed, and the whole bottom may be coming off relatively soon (but see below, however - and there is a decent glue layer between the ply and the framing member that it is attached to), it may not matter very much. I may seal the glue patch with some neat resin, I will see how I go
Follow this link to my Flickr account, or my Flickr Wood Duck Repairs set
I have been pondering the colossal amount of work involved in removing, cleaning up and reattaching/filleting the bottom, not to mention priming/repainting the new bottom (both sides) and the rest of the hull, over the last week or so, and am rapidly going off the idea. I have too many other things that need to be done far more urgently, even - or especially - in the "off season".


 Reply With Quote

Similar Threads
-
New Queensland PDRacer Build
By duncang in forum Michael Storer Wooden Boat PlansReplies: 71Last Post: 26th April 2012, 08:30 AM -
Oz PDR build in Adelaide - sexy black PDRacer
By m2c1Iw in forum Michael Storer Wooden Boat PlansReplies: 39Last Post: 27th April 2009, 06:30 PM -
OZ PDRacer - Dylan's build in the Philippines
By Boatmik in forum Michael Storer Wooden Boat PlansReplies: 16Last Post: 23rd February 2009, 05:50 PM -
Brisbane Timber and Working with Wood. Boatmik/PDRacer
By Boatmik in forum Michael Storer Wooden Boat PlansReplies: 1Last Post: 11th April 2007, 08:06 PM -
Flawed wood on the TS --DUCK!
By Robert WA in forum WOODWORK - GENERALReplies: 7Last Post: 19th February 2004, 11:42 AM
Tags for this Thread
balanced lug,
boatmik,
build,
dacron(tm),
douglas fir,
duck,
enamel,
epoxy resin,
fibreglass,
hoop pine,
interminable,
lug,
machinery,
materials,
michael,
oregon,
oz racer mk 2,
ozracer,
paint,
paulownia,
paulownia/glass mast,
pdracer,
plywood,
polytarp,
primers,
really simple sails,
sail-making,
sailmakers thread,
sanding,
storer,
sydney,
timber,
tools,
varnish,
verbose,
western red cedar,
wood,
wood duck,
wrc
