

 Thanks: 0
 Likes: 0
 Needs Pictures: 0
 Picture(s) thanks: 0
Results 16 to 21 of 21
Thread: DIY Wing Sail
-
26th April 2009, 10:07 AM #16
 Happily receives emails.


- Join Date
- Jul 2005
- Location
- 'Delaide, Australia
- Age
- 65
- Posts
- 8,138

Hey Catman,
Regarding fillet and tape in the other thread ... no such thing as a fail safe join. Where it is reliably as strong as the plywood ... it is enough and no need to go any further. We used to make up boxes of fillet samples for people to break at boatshows about 15 years ago when it was all a bit new.
They would say "impossible". We would hand them a sample and say "break it".
Any pics of your C-class? Haven't seen one for a million years! Is it a wooden hull?
Any chance of sticking a flash camera into the interior and taking a few shots of the structure if it is wood?
MIK
-
26th April 2009 10:07 AM # ADSGoogle Adsense Advertisement
- Join Date
- Always
- Location
- Advertising world
- Age
- 2010
- Posts
- Many
-
26th April 2009, 12:45 PM #17
New Member
- Join Date
- Apr 2009
- Location
- Comox,B.C. Canada
- Posts
- 7
Hi Boatmik, Yes, she is wood all right. Built out of door skins, which as you know do not have waterproof glue between the veneers, so it is imperative to keep them dry.The exterior was covered in glass set in polyester, then painted. They had been stored upside down on their trailer for several years and water had got into the plywood from the edges of the centreboard slots. So the first thing I did was to peel off any veneer that was obviousy lifted off and falling to pieces , run some slow cure epoxy down between the edges of what looked like sound wood that was just coming apart,then replace the missing veneer with a couple or three layers of glass cloth set in epoxy and refaired the whole area with the usual epoxy and glass bubble mix. However I was worried that the interior might also be coming apart, so after I had made some cradles on casters I rolled one into the workshop and cut the deck away around the centreboard slot so I could get a good look at the area and also get at it if any fixing needed doing. It all appears to be sound from that side on the first one I have done that to but I think I shall epoxy some 6mm contour cut divynicell over the area where I had had to make repairs to the outside, backed with a layer of glass cloth, just to ensure that there is adequate stiffness against "oil canning" in that location. Weight is no longer of any concern to me from the speed sailing point of view. So I can send you a picture of one hull upside down on the trailer so you can observe the profile and one or more of the deck, the area cut away and what the inside currently looks like. Do I send these to the list or to your home address?
You will note that the bow is well curved, maximum waterline length was not a priority when it was built. There is a local reason for that. Years ago all the timber that was moved in bulk in this timber producing province was moved by sea in log booms. These sometimes lost a few logs if the weather turned bad, and until they either came ashore at high tide or were picked up by small boats that made a living at it (you may remember a TV show from here called "The Beachcombers") they floated around and were very hazardous to small craft. It helped if ones bow was not plumb but well curved so that it would run up and over one if you saw it too late to avoid. These days the logs are mostly carried in self dumping log barges or ships and the hazard is much less than it was, but to a fast moving lightly built hull they are still bad news. My Turissimo lost two daggerboards to logs that the bow had ridden over, for example, but the heavy reinforcement I had incorporated into the bows coped OK.
Let me know about the pictures.
-
26th April 2009, 07:10 PM #18
Happily receives emails.
- Join Date
- Jul 2005
- Location
- 'Delaide, Australia
- Age
- 65
- Posts
- 8,138
Wow... the beachcombers was one of my favourites in the '70s
MIK
-
27th April 2009, 12:35 AM #19
New Member
- Join Date
- Apr 2009
- Location
- Comox,B.C. Canada
- Posts
- 7
Filmed in Gibsons, which is where we lived from 74 to 97. The Hero "Nick" in real life considered himself God's gift to both acting and women, wheras the sort of villain "Relic" had been a Shakespearean actor for years and was a very nice person too.It's also where I built the cat, from 82 to 87.
-
27th April 2009, 04:23 AM #20
Yacht Designer & Builder
- Join Date
- Feb 2008
- Location
- Eustis, FL, USA
- Posts
- 2,270
Filleting and taping (if required) on the inside of a corner (a chine for example) and radiusing and taping the outside is standard here in the USA.
I think what happens, as Michael has pointed out in previous postings, is some designers aren't engineering the structures, but rather making them "strong enough" or in other words, overly heavy, epoxy laden and over use of fabrics. I'm at the age where most of my contemporaries are actually engineering structures, but a fair percentage of my generation (say 40%) and most of the previous generations of designers, are using "rules of thumb" developed in the 60's and 70's. This was before we knew as much about the actual strength and bond qualities of the materials and techniques we employ in our structures currently. Hell, it was a half a century ago, we were guessing.
An example of modern, light taped seam construction is one I just did for a Canadian client.
It's a 10' long, 4' 3" beam, single chine uni rigged sailboat. The bottom and sides are 1/4" plywood, the chine is filleted and taped inside, and only taped outside. There is a short keel batten under the mast, back to the daggerboard case. There is a sheer clamp (I think you'd call this an inwale), two 1/4" plywood bulkheads (filleted both sides, taped one side), one forward, one aft, forming air chambers, a centered thwart which lands on the trailing edge of the daggerboard case and a single stringer about midway up the sides of the boat in the cockpit area, plus a small foredeck also in 1/4" plywood. Two longitudinal stringers capture the plywood partner at the mast and that's it for the structure. There is a keel rub strip and a sheer rub rail, but they aren't structural. The boat has about 45 sq. ft. of sail on a Bermudian sprit boomed 2:1 aspect sail and weighs about 65 - 70 pounds full up. There are a few fasteners, but most are rig attachment points or removable pieces, like the rub strips. Everything else is glued, with a some things requiring fillets and some fillets and tape (only the chines and the inside of the bulkheads are taped). This is classic taped seam construction with an eye on weight, ease and speed of build.
I still see taped seam builds with intermediate frames, floors, keels, etc. If structural analyses was preformed, the need for these pieces would be realized (and eliminated), but old coots die hard and I don't think it's necessarily indigenous to Americans. I've seen plenty of "off shore" designers using these "old school" methods, many of whom have fine reputations. Most people, designers included, "stick with what they know". The wise professional tries to keep current with material physical property developments and additions. In other words, I'm sure L. F. Herreshoff would have cussed at free standing carbon spars, but he would have eventually read up and studied the material and likely have changed his mind. I know I've head to reset my mind set on many methods and materials over the years, so maybe I'm getting to be an old coot too.
-
27th April 2009, 01:02 PM #21
Happily receives emails.
- Join Date
- Jul 2005
- Location
- 'Delaide, Australia
- Age
- 65
- Posts
- 8,138
Howdy PAR,
The university tests showed the optimum fillet had a radius of 2.3 times the ply thickness plus or minus a little.
My rule of thumb for that is I always specify 3 times the ply thickness. But if the angle is too obtuse for the epoxy to form a good fillet I will move over to glass or a flat backed fillet rather than a radiussed one.
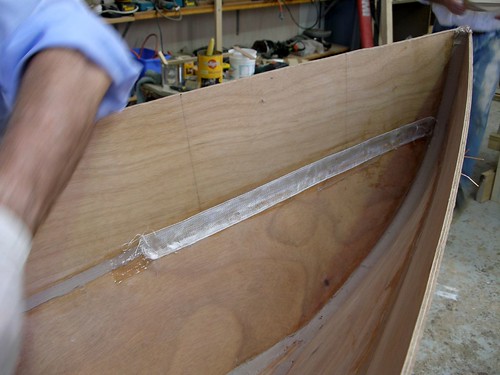
Like in this Eureka - the epoxy under the glass tape for the topside join (the bottom panel join is at a good angle for a fillet alone) is purely so there is a more or less smooth ride over the copper stitches. So a real amalgam of methods ... keeping the ugly and time consuming one up in the ends of the boat.
Timber works much along the same line too ... so bonding surface has to be about 3 times the thinner of the ply thicknesses in the joint.
MIK


 Reply With Quote
Similar Threads
-
Sail design and home sail making
By keyhavenpotter in forum Michael Storer Wooden Boat PlansReplies: 43Last Post: 14th July 2009, 03:34 AM -
Table Saw - Router wing
By ptygmit in forum WOODWORK - GENERALReplies: 0Last Post: 18th September 2007, 09:35 PM -
TSC-10HB saw and router wing
By Ray153 in forum HAND TOOLS - POWEREDReplies: 6Last Post: 14th March 2007, 09:50 PM -
TSC10HB wing tables
By EMistral in forum HAND TOOLS - POWEREDReplies: 3Last Post: 10th May 2005, 01:01 PM -
Wing Nuts
By Potterage in forum HOMEMADE TOOLS AND JIGS ETC.Replies: 10Last Post: 12th September 2004, 11:29 AM
