

 Thanks: 0
 Likes: 0
 Needs Pictures: 0
 Picture(s) thanks: 0
Results 1 to 15 of 18
Thread: push knife
-
28th December 2009, 02:42 PM #1
 Novice


- Join Date
- Jul 2008
- Location
- Michigan, US
- Posts
- 13
 push knife
i have been trying to work out how to make a bird fan and simple fans out of one piece of wood. turning out to be harder than i thought. I am looking for a push knife but when i google it i get how to stab someone. wrong push knife. i would like to make one, any suggestions?
-
28th December 2009 02:42 PM # ADSGoogle Adsense Advertisement
- Join Date
- Always
- Location
- Advertising world
- Posts
- Many
-
28th December 2009, 11:09 PM #2
SENIOR MEMBER
- Join Date
- Jul 2009
- Location
- Waitpinga
- Posts
- 835
You can find a push knife listed in Lee Valley on line here:
Lee Valley Tools - Important Announcement
Personally I reckon you'll get more use out of a draw knife. I find them much more versitile. Again Lee Valley's version can be found here.
Lee Valley Tools - Important Announcement
To address your first question re fan-feather carving, I use a good pocket knife for that kind of work. I've attached a few samples of fan -feathered birds I do to illustrate what I'm talking about. All three birds in the photo are made from single pieces of wood.. no glue. (the third bird is mounted on a separate branch but the bird wings and tail are all one piece.)
The same technique can be applied to all sorts of fanning projects like peacocks, angels, hand-held cooling fans etc. Is this what you are after?
-
29th December 2009, 07:36 AM #3
Novice
- Join Date
- Jul 2008
- Location
- Michigan, US
- Posts
- 13
yes that is exactly what i am talking about. i am trying to work it out myself how to do it but am having problems with the splitting. i dont know what i am doing wrong. as i understand it you can use just about any wood as long as it has a straight grain and flexable. it cant be kiln dried.
am i right so far?
now what is a good size piece to start with? can geen wood be used without cracking and warping issues as it dries? When cutting the segment you are working with are you cutting with the grain or against it?
-
29th December 2009, 07:54 AM #4
Novice
- Join Date
- Jul 2008
- Location
- Michigan, US
- Posts
- 13
how thick should the fan pieces be split? I gathered from the woodwrights show that is should be approximately 2 1/2 playing cards or about a mm thick. about right?
-
29th December 2009, 10:40 AM #5
SENIOR MEMBER
- Join Date
- Jul 2009
- Location
- Waitpinga
- Posts
- 835
Fan-feather carving is a complicated mixture of factors... not all of which are in your control. Its easy to demonstrate but a bugger to describe. I'll do my best.
First the wood:
The timber you use has to be one that splits straight AND will take up water when soaked. There are timbers like WRCedar which will split beautifully but is well known for NOT taking up water, which is why its so often used in building. Oregon is another. These do not work well at all in my experience. They split well, but when it comes to twisting them around into various angles, they just break off at the hinge.
I live in Australia. My experience with North American timbers is limited. The one I know will work well is Eastern White Pine. The guy who taught me lives in BC and winters in Arizona. He could possibly tell you other species that work. His name is Rick and you can get him here [email protected]
I've never tried green wood, but I can't think of any reason why it wouldn't work. I don't have access to any green wood of a species that would work with this project, so for me it has never come up. I should think that sap would make the job a bit messy but other than that, I reckon its worth a try.
Preparation:
Your wood has to have been soaked and remain saturated at time of carving. I usually soak my pieces for at least a month, 3 months is better in my experience. This is vital, not so much for splitting but for the manipulation of the 'feather' pieces afterwards. The hinge must hold no matter how much you twist your 'feathers' around. Wood that is too brittle or too dry, will not bend, and the 'feathers' break off when you try to manipulate them. Soaked wood also splits a little easier where you want it to. The soaked timber seems easier to cut cleanly in predictable thicknesses.
As far as I am aware, kiln dried wood works fine, but it may require longer to fully saturate in the soaking process. Remember, the part of the project that most needs to be wet and pliable, is the hinge which is inevitably in the MIDDLE of the block. You need to soak your piece long enough that the water gets all the way in. This will take longer with kiln dried wood.
Your blanks need to be split out for width. Sawn pieces almost never line up with the grain perfectly. You can cut your blanks for length but they need to be split out for width so that the edge of your blank is exactly parallel with your grain.
Dimention
The size and shape of your 'blank' depend on the project you're working on. The four I know (birds, angels, peacocks, and cooling fans) all start with different shaped blocks. There are undoubtedly others. Birds are the most common in my experience, probably because they do not require any kind of pattern to be cut into the blank prior to carving. They are roughly the same dimentions, proportionally, as a thick, slightly elongated, domino. It doesn't need to be exact. Experiment a bit. You'll soon get the feel of it. I've made little birds down to about one inch and monsters up to about 12 inches, but proportionally, the blocks are all about the same. Most of the birds I do start as blocks between 3 and 6 inches long.
Technique
For the life of me, I can't think how you would use a push knife to make a fan-feathered bird... but that just means I haven't ever seen it done. I use an ordinary, and very sharp, pocket knife. I don't use a vice or any other holding device. I do find a solid surface makes the job easier but its not essential.
I prefer the thickness of the 'feathers' to be about half a mil, but the exact thickness isn't critical. As long as they are thick enough for a degree of strength so that they will hold at the interlocking and thin enough to be pliable so you can manipulate them. Its probably more important that they are consistant, so you don't get a very thin one trying to interlock with a very thick one. Don't get too bent out of shape if your thicknesses are all over the place at first. It takes a steady hand and LOTS of practice to get them uniform consistantly. I actually bevelled one blade on my knife on only one side to make this slicing process easier. It worked quite well, but of course you have to save that blade exclusively for that project.
You always split your 'feathers' with the grain. The rest of the carving is like any other where you can be cutting in whatever direction the situation demands.
I think that's about covers everything you asked about. I'm sorry if its still not clear, but its one of those projects that is very difficult to describe. If you're still having trouble let me know and I'll try to knock up a WIP on the subject over the next few days.
Good luck and don't forget to post your results....
-
29th December 2009, 12:27 PM #6
Novice
- Join Date
- Jul 2008
- Location
- Michigan, US
- Posts
- 13
very nicely done.you did answer my questions. very well at that. If you have the time I would like to see a wip on one. I am trying to find a carver in michigan that gives lessons. lucky for me there is a few. I am getting the feeling that this is one of those projects its just easier to see it done. bummer but I might end up with less cuts and bruises that way. lol. look forward to seeing the wip. thanks
-
30th December 2009, 12:01 PM #7
Novice
- Join Date
- Jul 2008
- Location
- Michigan, US
- Posts
- 13
i did find this and let me know what you think.
history and symbolism
the fan bird represents the holy spirit, the dove-of-peace. in early times, it was customary for people to surround themselves with items that had meaningful symbolism. the fan bird is one of these (see picture 1).In the homes, the bird was hung by a string so that it moved freely with the air currents. It appeared to come alive and symbolised the Holy Spirit, protection, health and happiness for the family.
By the 1900s, the fan bird seemed to be everywhere throughout Scandinavia and Europe. In fact, two distinguished ethnographers proclaimed it a "cultural phenomenon". However, as time passed, fewer local artisans made fan birds. In time, the 'pulpit bird' was even replaced by a solid wooden dove. Sadly, few fan-birds are made today - in some countries they are only found in museums. Fan-carving is almost a lost folk art.
Regardless of style, all fan-carved items must have three basic cuts: the interlock, the hinge and rived wood.
blank removal
score the width of the blank with a large knife/hatchet and mallet 25mm (1in) down. place the hatchet blade parallel to the bark 19mm (3/4in) in from the outer edge of the round (thickness of blank + bark) and give it a solid whack with a mallet. the force will cause the blank to 'pop out' as the fibres split along the score lines. use the hatchet to remove the bark, thus shaping the blank. repeat the process for more blanks.moisture content
for adequate moisture content, place the blanks in water and simmer over heat for 90 minutes. when cool, they are ready to carve. store in plastic bags and refrigerate if used within two weeks. for longer periods, place blanks in the freezer but thaw before carving.step-by-step
1 the finished dove
2 the fan-carved dove, shown on the postage stamp of sweden, was found in most churches in the 17th century. it hung in the pulpit directly over the minister's head, hence the name pulpit bird
3 it is interesting to note that some european styles of the fan bird are made from two or more pieces of wood. if we look at the example above, you will notice the two-piece construction of this bird: one piece is for the wings whilst the other piece is for the body and tail
4 once your blanks have been adequately prepared for moisture content, you are ready to begin carving your own fan-tail dove. start the process by shaping one end of your blank so that it is rounded - this will become the tip of the feathers
5 measure 25mm (1in) from the rounded end. draw a line across the 50mm (2in) dimension on both sides of the blank, where the feathers interlock. use a pelican knife or a no.9 12mm gouge to carve the c-shaped interlock on each side of the blank. leave 1/3 for the centre
6 draw two lines on both sides of the blank. the first: a straight line 3mm (1/8in) below the interlock cuts. the second: a diagonal line 63mm (2 1/2in) from the rounded top on one edge and 55mm (2 1/4in) on the other
7 use a knife or a no.1 25mm chisel to make a v-cut along the bottom line on both sides of the blank. it is a long taper as well as a diagonal. note - do not cut above the first line drawn - just below the interlock
8 using your knife or chisel, the next step in the process is to carve equal portions from each side so that you leave a base of 3mm (1/8in). the hinge is where the feathers turn
9 to rive the feathers, secure the blank in a vice with the longer tapered side (63mm) away from you. begin riving on that side and work toward yourself. the 3in drawknife is ideal. hold it with the flat-back side facing you. to determine the thickness of the feather, tilt the drawknife so you can see the cutting edge
10 stand the knife straight up and just push down. keep the flat back of the drawknife 'snug' to the solid piece being rived. to insure you achieve a uniform feather, do not allow a gap to come between the knife and the wood. the hinge will serve as a stop cut
11 always strive for thin feathers, even if some fall off. they will hardly be noticed after the feathers are interlocked, so try not to worry. the first few rived feathers are sacrificial. they are at the back of the bird's head and will be cut off later in the process
12 after the feathers are rived, use a knife or no.11 6mm gouge to trim the interlock and the hinge so they are narrower. they were left wider during the riving process so the wood would not wobble. the interlock centre should now be about 3mm (1/8in), the hinge about 1.5mm (1/16in).
13 next, trim the lower part of the short taper. this area needs to be airspace so the feathers can freely turn and interlock. make a nice flat plane.
14 next, draw the dove onto the blank
15 carve the bird's body. as you shape the bird's head, the sacrificial feathers are cut off
16 flex the feathers to loosen the fibres at the hinge so they will easily turn when interlocked
17 with the bird's beak facing you, take the first feather and turn it to the left side of the head
18 next, turn the second feather to the right side of the head before moving on to the third feather
19 turn the third feather to the left and interlock it with the first feather. continue alternating and interlocking the feathers to build the two wings. save an uneven number of feathers for the tail
20 to form the tail, the very last feather will serve as the centre/anchor feather
21 take the second feather to the right of the anchor feather and interlock it
22 take the next (third) feather to the left and interlock it to that side of the anchor feather. continue alternating and interlocking the feathers until the tail is complete. to achieve the desired appearance, you can take some feathers from the wings and place them into the tail, or vice versa
23 to hang up your bird, make an eyelet from 20-gauge wire with needle-nose pliers. thread it with a string and then just push the eyelet among the wing feathers just behind the head
24 to give your dove character and personality, shape the wings by pulling them up alongside the head. the wings can be adjusted upward or more flat at the hinge point to gain the style you like
25 heartwood side of bird. after the bird has dried for a few days, spray it with a preservative such as bulls eye shellac
it is still is a little hard to follow but does it folow how you do yours.
-
30th December 2009, 07:41 PM #8
SENIOR MEMBER
- Join Date
- Jul 2009
- Location
- Waitpinga
- Posts
- 835
Seems to be the basic bird 'formula'. The specific dimentions mentioned are only applicable if you want that particular style of bird made from that specific sized block of wood. If your experience is anything like mine, you'll find yourself making them out of all sorts of 'odds and sods' and the specific dimentions go right out the window.... However the proportions are about the same relative to the block size. The best way to learn is to first see it done, and then practice practice practice... My technique is quite different in that I do all mine with a pocket knive only. I've never seen one done with a gouge... still trying to get my head around that one...
I'll do what I can about a WIP in the next day or two.
-
3rd January 2010, 07:03 PM #9
Intermediate Member
- Join Date
- Oct 2006
- Location
- Melbourne lower templestowe
- Posts
- 33
push knife
Hi ! I know about this technical trick (use spruce pine and cut perpendicular of the grain) Before cut live in the water 3 hours or boiling 15 min I am using normal knife (cut like butter) Best regards Mikhail
-
3rd January 2010, 08:19 PM #10
GOLD MEMBER
- Join Date
- Jan 2007
- Location
- Adelaide
- Posts
- 2,794
Can't comment on the fanning technique, never done and not planning doing it, but I like your knife handle, Mikhail.

-
3rd January 2010, 11:49 PM #11
SENIOR MEMBER
- Join Date
- Jul 2009
- Location
- Waitpinga
- Posts
- 835
Thanks for that Mikhail. I haven't seen that variation before.
As promised, here's the way I do these. I took advantage of a quiet spot during a Craft Market I was selling at this past weekend. Unfortunately, I didn't have anyone to photograph for me so some of the step that involve two hand I had to just do 'before' and 'after' photos for. Hope you can follow it... anyway, here it is.
The first two photos show the block of wood as a starting point. Dimentions were approx. 10 x 40 x 120 mm. The wood was King Billie Pine. You can see how it was split out of a larger piece rather than cut.
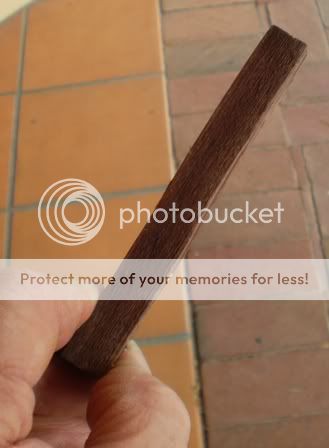

This shot shows the face roughly dressed with a knife.

First step is to bevel one end of the block to a point. It does not particularly matter which end you start with assuming there are no obvious knots or other grain irregularities. The next two photos illustrate this step.


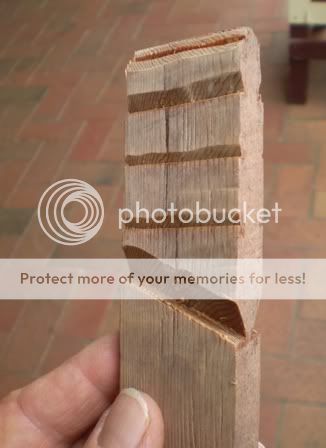
Next, carve a series of notches in both faces of the block. The one imeadiately below the bevel end will determine the shape of the interlocking 'flap'. It should be symetrical on both sides and parralell to the end of the block. The next two notches are shallow and cosmetic only. They should also be symentric and paralell with the first notch. They do not effect the structure of the bird. They just make the 'feathers' look more 'featherish'. This will become clear shortly.
The final notch is CRITICAL. It must be as close to symetrical as humanly possble. You will note from the following photos that it is deeper than the other notches. In fact there should be only 1 to 2 mm of wood left at the centre of the block along this notch line. This notch is the HINGE on which all the 'feathers' will eventually pivot. It must be right. The other thing you should note is that this notch is NOT paralell to the others. The angle is not critical but it should be there. Hopefully the following photos illustrate how the notches are positioned and shaped. Note to that the tapered side of the notch is on the same end of the block as the other notches, while the flat part of the notch is on the end of the block that is not notched. I will refer to this flat side of the hinge as the 'STOP'.


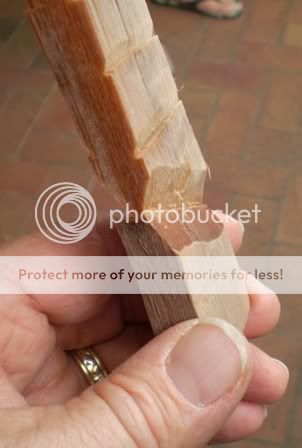
Next we commence splitting out the feathers. This is why the wood must be straight grained and preferably the block has been split out from its source, so that the grain will be alligned with the edge of the block. (Sawn blocks rarely do allign and give problems at this point.) The angled hinge means that the 'feathers' are shorter on one side of the block than the other. Start your splitting at the side with the shortest 'feathers' The next photo shows the feather splitting process commenced.

Try to keep the 'feathers' between 1/2 and 1 mm thick. Consistancy is more important than specific thinkness. 'Feathers' of varying thicknesses do not interlock easily which gives problems later. The next photo shows the 'feather' splitting process complete.

The number of 'feathers' will vary depending on their thickness and the width of the block. This one had about 40 or so. Make sure you split each 'feather' all the way down to the hinge stop. Also remember that while the stop helps deter the further passage of your knife blade, it will not prevent it if you push too hard, so gently here to prevent you knife from passing all the way through the block which would ruin the work and necessitate a new start.
Once you are about 3/4 of the way through the block with splitting, you note that the remaining unsplit 'feather' block starts to feel 'wobbly' under the knife. This is usually an indicator that you have split enough 'feathers'. Leave the remainder of the 'feather' block unsplit as per the illustration above.
Once the 'feathers' are split, you must remove the hinge stop as it will interfere with the fanning process. The following two photos illustrate this. First one side...
and then the other...

-
4th January 2010, 12:16 AM #12
SENIOR MEMBER
- Join Date
- Jul 2009
- Location
- Waitpinga
- Posts
- 835
Now we are ready to carve the 'head' end of the bird on the part of the block that has not been split. The first step is to remove the unsplit part of the 'feather' block. Just break it off. This becomes the back of the head of the bird. The next few photo show the carving of the bird head and body. I did this one really fast and it is admittedly pretty rough. You can please yourself what kind of bird you carve here and how much time you take to make it look good. I tend to do these fast because I use them as 'demo' projects while people are watching and most people get bored after 10 minutes or so. I try to have the whole bird done in about that time but this takes practice.


This ends the carving part of the project.
Now to commence the fanning of the 'feathers'...
Start at the bottom of the 'feather' stack and measure roughly between 1/4 and 1/3 of the 'feathers'. Count them. You must have an ODD number of 'feathers'. I used 7 in this project. These 'feathers' will form the tail of the bird. Start with the tail 'feather' on the inside of the group. Take the next 'feather' and push it sideways, pivoting it on the hinge and interlocking the tabs of the two 'feathers'. Take the next 'feather' and push it the other way and interlock it on the other side of the first 'feather'. Repeat this process working back and forth on each side. Work toward the outside of the tail 'feather' stack. You will eventually have the first 'feather' you started with in the centre of a fan with the remaining tail 'feathers' fanned out alternatively on either side of it. Each 'feather' pivots on the hinge. The next illustration show the start of this process.

Now for the wings...
Take the first 'feather' which adjoins the centre tail 'feather' and pivot it out and interlock it with the outside edge of the tail. It doesn't matter which side you choose. Pivot the next 'feather' to the otherside and so on... Eventually you will have all the wing 'feathers' fanned out alternatively on either side of the tail. At this point the tail and wing 'feathers' will be flat level and paralell with each other as per the next photo.
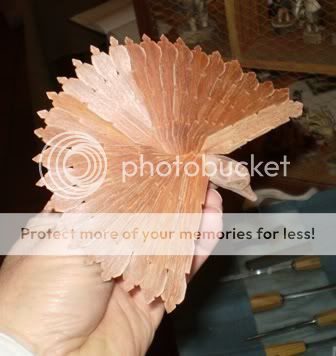
If you study the above photo carefully, you should be able to differenciate between the tail and wing 'feathers' by the way in which they overlock each other.
This next part is very hard to discribe but easy to demonstate. I'll do my best...
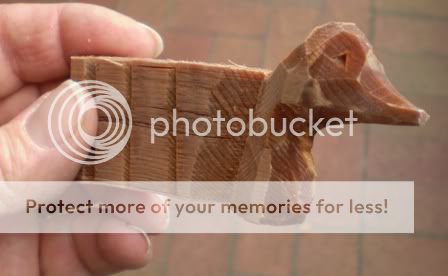
Grasp the chest of the bird frimly in one hand and with the other rotate one of the wings (all the 'feathers' in one wing) 90 degrees toward the front of the bird, so that they are fanned vertically to the tail fan. Repeat this on the opposite wing. You should now have two distinct wing fans and a tail fan as per below.

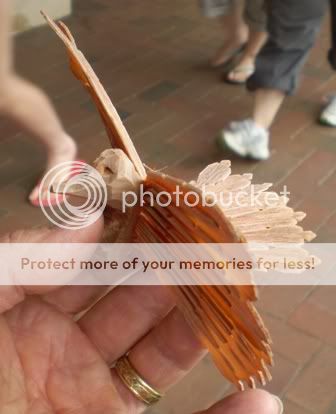
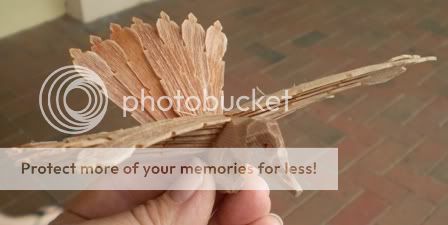
The bird wings and tail can be gently manouvered so that the bird will stand upright balanced on wing tips and tail, or you can use the eyelet of a fish hook (hook part removed and shaft pushed into the back of the bird head leaving just the eyelet protruding) to hang your bird.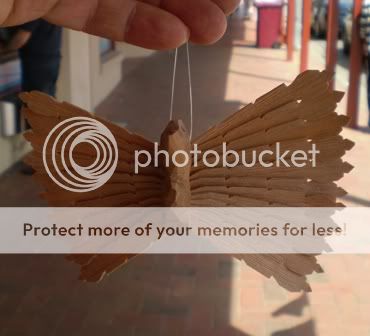

I hope this is clear enough for you to give this a try. If you are still having difficulty, I'll try to tackle the specifics of whatever aspect you are not clear on.
Good luck and don't forget to post your results.
-
4th January 2010, 11:42 AM #13
GOLD MEMBER
- Join Date
- Jan 2007
- Location
- Adelaide
- Posts
- 2,794
10 minutes! Very impressive.
Do you advertise making and selling them on the spot, like the ironsmiths making miniature horseshoes? I remember seeing one of them selling half a dozen pre-made ones for each demo session (advertised with large signs). The trick was to put the one just made in a small box with the others, to reinforce the illusion of the "just made now in front of your eyes". On a group of say 20 watchers all in the box were usually sold.
-
4th January 2010, 02:29 PM #14
Novice
- Join Date
- Jul 2008
- Location
- Michigan, US
- Posts
- 13
all i can say is wow. i cant wait to try this out. i dont think you could have done better if you were standing next to me holding my hand. ill let you know how it goes. thanks for the wip. awesome job for shooting one handed.
-
4th January 2010, 11:17 PM #15
SENIOR MEMBER
- Join Date
- Jul 2009
- Location
- Waitpinga
- Posts
- 835
Hi Frank,
I used to sell these birds, but not very often any more. I'm more likely to just give it away to someone in the crowd who appears particularly attentive to the demo. Its a project that is more than usually dependant on the grain of the wood you're working with. In order to split consistantly thin feathers, the block edges need to align with the grain. This means the block must be spit out, not cut. This tends to be particularly wasteful of wood that has been sawn
There are very few timbers in Australia suitable for this project and almost all of these are kiln dried and sawn. Because its so hard to find good timber and also because it takes so long to adequately soak, it just isn't worth the hassle to keep it as a sales line. However, it makes a cracker-jack demo and usually sparks sales of other things on the stall. It looks really complicated but in reality its pretty easy once you master the feather splitting. With a bit of practice you can do the whole bird in under 10 minutes which is another reason it makes a good demo. The down side is that you're at the mercy of the grain, which doesn't always give you what you want. In private this is ok... you just do another one. In public it looks like you stuffed it up even though its not your fault . NO NO... ITS THE GRAIN I TELL YOU!

 Reply With Quote
Similar Threads
-
Do You Push A CSM OR Pull it?
By echnidna in forum SMALL TIMBER MILLINGReplies: 17Last Post: 16th February 2008, 08:41 AM -
Give me a push
By Allan at Wallan in forum WOODIES JOKESReplies: 1Last Post: 19th August 2007, 03:40 PM -
Could you give me a push please?
By Bob Willson in forum WOODIES JOKESReplies: 0Last Post: 14th October 2004, 03:09 PM -
Push stick
By bennylaird in forum TRITON / GMCReplies: 1Last Post: 30th April 2004, 01:00 PM
