

 Thanks: 0
 Likes: 0
 Needs Pictures: 0
 Picture(s) thanks: 0
Results 1 to 13 of 13
Thread: Roosta WIP for Tyton
-
16th December 2011, 11:07 PM #1
 SENIOR MEMBER


- Join Date
- Jul 2009
- Location
- Waitpinga
- Posts
- 835
 Roosta WIP for Tyton
Sorry this has taken so long. I forgot that while the carving is pretty straight forward, the step by step photographing, uploading, sorting, labeling, resizing and posting the images of it take a lot longer than the carving ever did!
Anyway, this project is a good one for people with limited tools (a pocket knife) and access to materials.. (all you need is a forked stick).

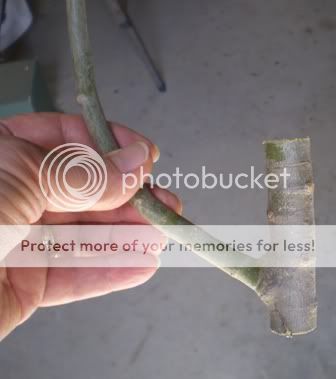
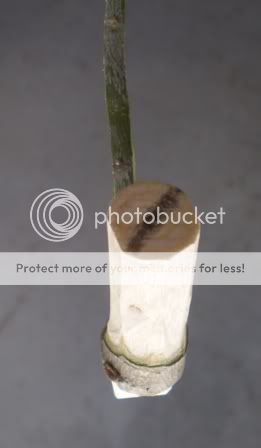
The type of wood doesn't really matter. You'll soon discover which woods make the best roostas. The wood should be green. This one is poplar but most types of wood will work. Shape of the fork isn't important either. A variety of shapes gives a variety of finished roostas. This is called 'found wood carving' and utilises the shapes that nature provides... in this case a fork.
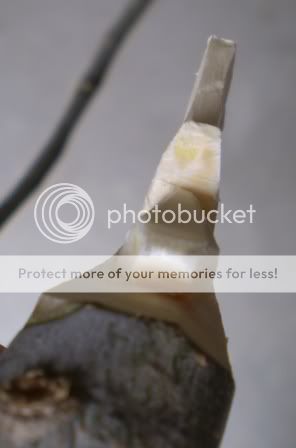
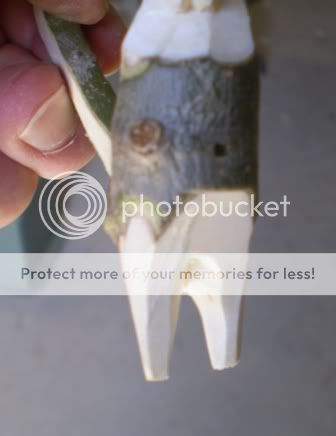
Form the leg area by cutting a scallop from the front and rear below the fork and shaping the sides of the leg. Next remove the bark above the fork but leave a band of bark between the upper leg area and lower 'body' as in the illustrations below.
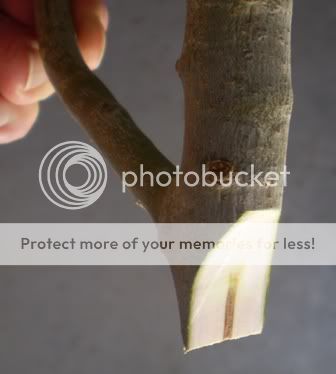

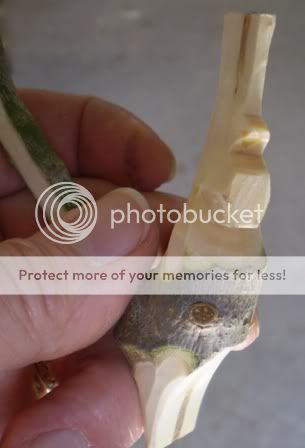
Next remove the bark on either side of what will eventually become the tail. Shave both sides of this fork until it is only about 5 mm wide. This will make it easier to cut the tail later.
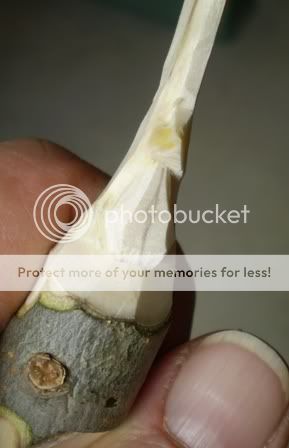
The next step is deciding which way your roosta will be looking. Tilting the head to the right or left adds a degree of interest to the finished work. You can see by the pencil line in the next photo that I've decided to have the roosta looking to his right.
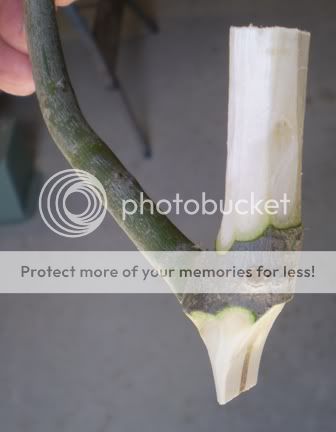
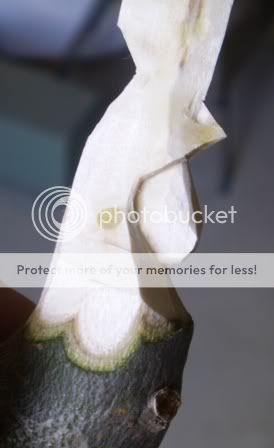
Next carve away the material on both sides of the body of the roosta allowing it to taper up to the top which should be only 3 mm or so wide and in line with the direction you decided on in the previous step. You can see this done below.

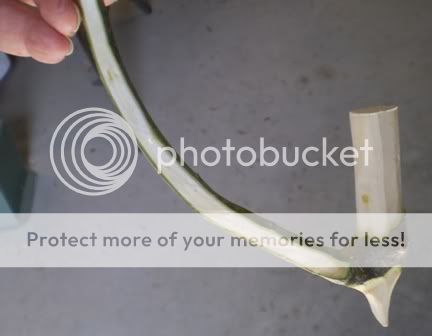
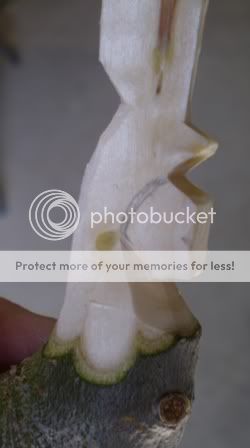
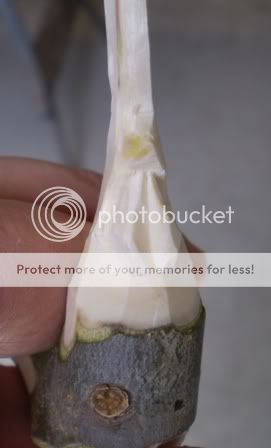
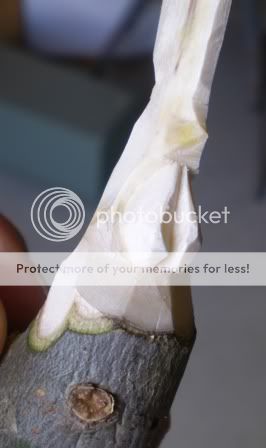
Next we begin to cut the head of our chook. First the area from the top of the beak upward...

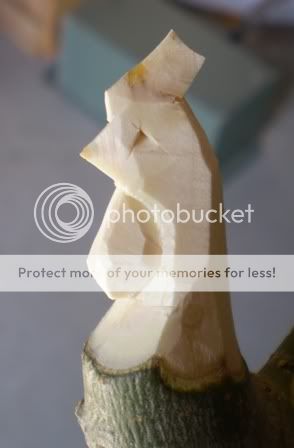
Now a notch below the beak. This defines the beak profile

-
16th December 2011 11:07 PM # ADSGoogle Adsense Advertisement
- Join Date
- Always
- Location
- Advertising world
- Posts
- Many
-
16th December 2011, 11:24 PM #2
SENIOR MEMBER
- Join Date
- Jul 2009
- Location
- Waitpinga
- Posts
- 835
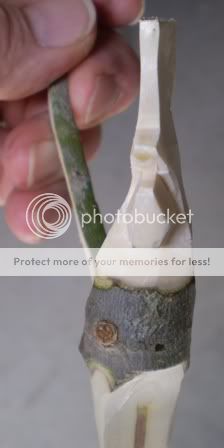
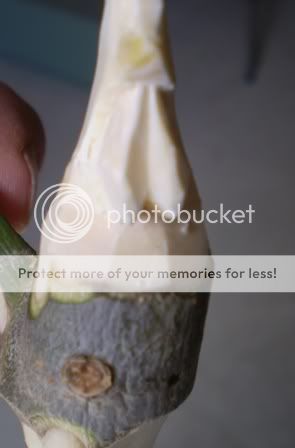
Next a notch below the wattle (that bag that hangs under his beak). Note the angle of the cut... straight in on top and angled up from underneath...

The next two shot shows how the wattle begins to be shaped... removing the outside corners of the wattle.
The back of the head is shaped... first a notch, then round the back of the head up into the cut.


Next we need to define the sides of the wattle, making it narrower than the neck of our bird. The first photo shows a pencil line marking where the stop cut goes. A second cut removes the material on the wattle side. Repeat this on the other side. The second photo shows how this should look when done.
Next we have to flatten the face or front of the wattle. The next two photos show this before and after. Note the difference in the second shot. We now have a flat wattle ready for the next step.


Next we need to refine the beak a little. I've took the next photo looking at the beak from underneath. Note the beak is square ended. The second shot shows this after it has been shaped to more of a point on the sides. Becareful here... its very easy to cut the beak off entirely at this stage... so take it easy.

-
16th December 2011, 11:38 PM #3
SENIOR MEMBER
- Join Date
- Jul 2009
- Location
- Waitpinga
- Posts
- 835
Next comes more refinement of the wattle. On a real chook the wattle is actually two little flaps of skin. We need to separate our wattle to give the illusion of being two. The first photo shows the line of the 30 degree wedge I want to cut. The next photo shows this wedge removed.
Next a small 'v' wedge out of the bottom of the wattle to further strengthen the illusion of two parts and finally round the whole thing out so its not so 'blocky' looking.
Now it time to shape the crest of the head below what will become the comb. Note the arch which starts at the back of the head and crests over to come down to the top of the beak. This needs to be the same height on both sides of the head. The material for the comb is further reduced in thickness to 1mm or less.


Finally we come to the shaping of the comb. The first photo shows the pencil line I intend to follow. The second shows the comb completed. I usually carve the front of the comb first and then cut the back, moving upward with the grain in both cases to meet at the crest in the middle. The wood isn't usually very thick so care needs to be taken here so you don't break the comb.


-
17th December 2011, 12:00 AM #4
SENIOR MEMBER
- Join Date
- Jul 2009
- Location
- Waitpinga
- Posts
- 835
Next a simple chip cut serves for an eye and you can remove the material to form the legs. (The legs can actually be done much earlier if you wish)
Finally we come to carving the tail. All other aspects of your carving should be done before you tackle the tail as it is quite fragile. I usually wait a day or two at this point in order to allow some of the moisture to evaporate from the tail wood. If the wood is too wet the tail 'feathers' will not curl. If its too dry they break off. The drying time varies with species so experiement to find what's best for the wood you end up using.
Anyway, I usually some sort of brace to put the feet of the chook against with a bit of rag down to prevent damage to the beak. Start on the underside of the tail and carve a short strip as shown in the first photo below. The next strip starts a little bit higher and goes a little deeper, creating a slightly longer 'feather'. The third is longer and deeper again and so on... Each succeeding 'feather' is longer than its predecessor.


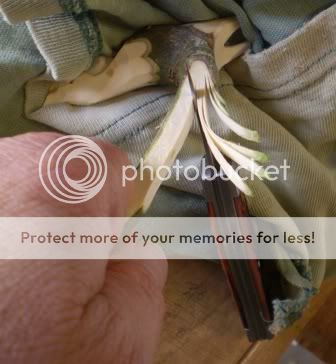
Eventually, you work your way all the way through the tail fork and the excess is jettisoned. Now you can spread the tail 'feathers' carefully into a fan. The wood I used was still a little wet so the 'feathers' didn't curl as well as I would have liked, but you get the idea.
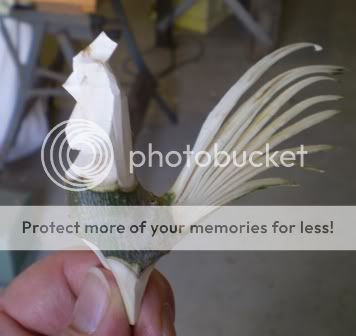
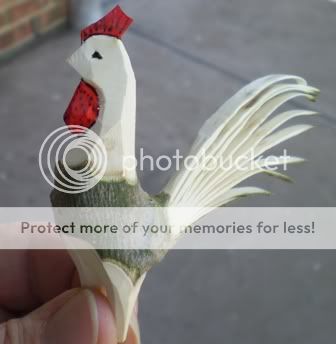
Finally, add a bit of colour and you have your finished roosta.
Whew... a lot more complicated to explain than it is to do!
What makes this project so good for beginners is that it doesn't take much in the way of tools... I used just two blades of a pocket knife for this... and the material for it is literally EVERYWHERE. Don't worry if you stuff one up... throw it away and have a go at another. Practice makes perfect.
There is also enough variation in this project to keep one interested for quite a while. Nature never gives you the same starting point twice so each chook is unique. In addition, you can vary the angle of the heads to create all kinds of different expressions on your cooks. Putting a few togeather always brings a smile.
Good luck with it all. I'll be interested to hear (and see) how you go.
-
17th December 2011, 07:16 AM #5
GOLD MEMBER
- Join Date
- Dec 2007
- Location
- Gold Coast
- Posts
- 1,050
Thank you Whittling.
I, amongst others, have been waiting patiently for this one. You are right about doing a Tutorial.
It is a lot more difficult than actually doing the carving. You have to stop, rethink what you are doing and when you are just on a roll, have to stop again and reposition the camera then when you are ready to go again your partner calls out the Dinner is ready so you have to leave it and your train of thought and then start all over again.
I look forward to doing this one, so will look around for some suitable material and some other photos of some Roosters, it appears to me , once you are shown the basic cuts the shape of the Rooster might just appear.
That little axe that was on some of the originals, was that done differently and just glued on or is it part of the original tree limb.
Thanks
pete
-
17th December 2011, 08:11 AM #6
 The Laird
- Join Date
- Jan 2007
- Location
- Katoomba NSW
- Posts
- 4,774
Thanks Whittling, a great tutorial.
 I've never carved anything but I am going to give this a go.
-
17th December 2011, 10:48 AM #7
Skwair2rownd
- Join Date
- Nov 2007
- Location
- Dundowran Beach
- Age
- 76
- Posts
- 19,922

Whittling, you have done yourself proud!!
Fabulous tutorial. I,m sure we all appreciate the time you have put into doing this.
 bravabrava
-
17th December 2011, 11:10 AM #8
Timber Hoarder
- Join Date
- Sep 2002
- Location
- Minbun, FNQ, Australia
- Age
- 66
- Posts
- 12,881
Cliff.
If you find a post of mine that is missing a pic that you'd like to see, let me know & I'll see if I can find a copy.
-
17th December 2011, 11:20 AM #9
SENIOR MEMBER
- Join Date
- Jul 2009
- Location
- Waitpinga
- Posts
- 835
Thanks Pete, Originally Posted by STAR

I put this up late last night...in one go so by the time I got finished, I didn't have energy to talk about the accessories!
I haven't mentioned the mounts for the Roosta. I usually just cut a round off the end of an appropriately sized limb, mark where the roosta feet contact it with pencil, drill two appropriately sized holes and glue the old chook in!
You can mount him on other things of course. Some I know mount the chook on the side of a small forked stick, sanded flat on the bottom, to give the impression of chook feet. I've also seen several mounted on one short length of bough as though the lot of them got togeather for a crowing match.
The axe is carved sepeately. You'll need a peice of wood about 3 to 4 mm wide and long enough along the grain to accomodate the axe handle. I just sketch the axe outline directly on the wood, cut it out with a saw and then shape it with my knife. Painting is optional but it adds to the realism.
I mount it in a 'slit trench' in the mounting block that I cut with a dremil and conical cutter... glued in with white glue, like the roosta itself.
You can have some fun with this if you want to take the trouble. Chooks don't have binocular vision. When they want to look hard at something, its only through one eye at a time. Thus they turn their heads to stare from one eye or the other. If you get a fork that has one tine coming out near horizontal to the mounting plane, you can carve your chook looking directly at the spot where you mount the axe.
The visual impact of the chook 'inspecting' the axe can be very amusing.
Hope to see how you go with this... so I'll be looking for some posts.
-
17th December 2011, 11:26 AM #10
SENIOR MEMBER
- Join Date
- Jul 2009
- Location
- Waitpinga
- Posts
- 835
I'll look forward to seeing your results... Originally Posted by NCArcher
There are so many ways you can fool around with this one that it takes a long time before it gets boreing. In the mean time you will have developed your skills with a blade to the point where you may feel more cofidence to try more complicated things.
What I'm driving at is.. this is a great project for beginners because of its simplicity, versatility and abundance of material. Many an experieced carver has got his/her start this way. Its the tip of the wedge... but be careful... its addictive!
Have fun....
-
18th December 2011, 08:13 PM #11
GOLD MEMBER
- Join Date
- Dec 2007
- Location
- Gold Coast
- Posts
- 1,050
Thanks again, Whittling.
My enthusiasm for woodwork and carving was dwindling because of outside pressures. But this little Rooster has fired up the imagination again.
Unless I am enthused about a project I know it will turn out a disaster. My Avatar, Wally the Toad was a carving I did for my daughter. I sort of new it would come out ok, regardless of how long it took me.
This Rooster will be an inspiring project, but I do not expect it to get done in a day. But it will be a great project to work on bit by bit.
I'm excited again.
Pete
-
18th December 2011, 11:23 PM #12
SENIOR MEMBER
- Join Date
- Jul 2009
- Location
- Waitpinga
- Posts
- 835
Looking forward to seeing it when its done...
-
18th December 2011, 11:35 PM #13
GOLD MEMBER
- Join Date
- Jun 2008
- Location
- sydney
- Age
- 40
- Posts
- 1,142
I love it nice work
DANGER!!!!I'm Dyslexic Spelling may offend!!!!!

 Reply With Quote


