

 Thanks:
  Likes:
  Needs Pictures:
  Picture(s) thanks:
Results 1 to 15 of 99
Thread: Aquarama
-
21st August 2019, 06:26 PM #1
 Senior Member


- Join Date
- Dec 2011
- Location
- Harrington, NSW
- Posts
- 119
-
21st August 2019 06:26 PM # ADSGoogle Adsense Advertisement
- Join Date
- Always
- Location
- Advertising world
- Posts
- Many
-
22nd August 2019, 10:05 AM #2
 GOLD MEMBER
- Join Date
- Dec 2003
- Location
- lower eyre peninsular
- Age
- 74
- Posts
- 3,580

for someone with zip experience in boating that looks stunning, you must be bored and have nothing else to do.
Going to be a yacht (stupid spelling) or radio controlled speed boat?I would love to grow my own food, but I can not find bacon seeds
-
22nd August 2019, 11:44 AM #3
Senior Member
- Join Date
- Dec 2011
- Location
- Harrington, NSW
- Posts
- 119
I'm retired and it keeps me out of the pub
 )
)
RC speedboat (in theory) I am working it out as I go.
Bulkheads w'proof ply first planks will be Tassy 2mm then Pine 2mm, steam bending the planks when I learn how to do it.
-
22nd August 2019, 02:00 PM #4
GOLD MEMBER
- Join Date
- Mar 2018
- Location
- Sydney
- Posts
- 1,166
that makes it more oarsome (
 ) in my eyes since you're working it all out along the way!
-
23rd August 2019, 02:58 PM #5
Senior Member
- Join Date
- Dec 2011
- Location
- Harrington, NSW
- Posts
- 119
Started planking below the chines.
Tassy 2.4mm for strength, I had to use boiling water to soak the planks in before forming around the bulkheads. I tried dry bending but snapped a few, I see why it was always done thus - traditional bending. I will put some pine next layer for fair shaping and then a coat of white epoxy up to the water line.
The sticker at B4 C is the dead pivot of the keel.
I trimmed the planks roughly with a saw blade on the Dremel.
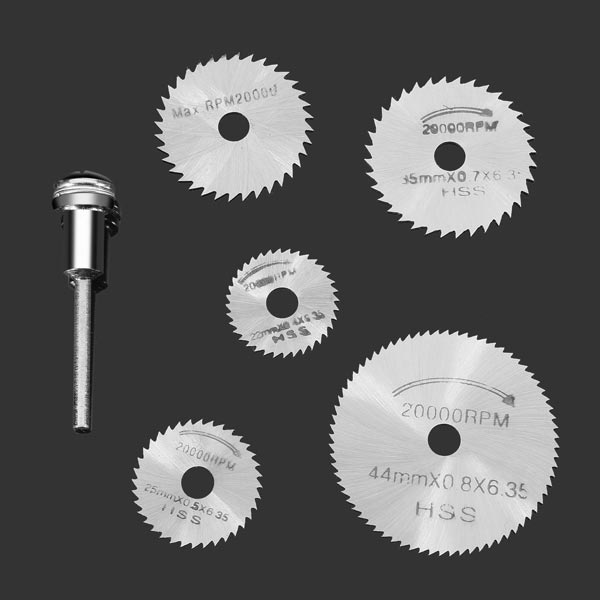
Blades cut well but the little buggers are hard to get balanced and even at 10k rpm they vibrate the tool disturbingly.
Note the novel clamping weights.
7.jpg
8.jpg
9.jpg
10.jpg
11.jpg
12.jpg
-
29th August 2019, 10:22 AM #6
Senior Member
- Join Date
- Dec 2011
- Location
- Harrington, NSW
- Posts
- 119
Work on second layer of bottom. All planks on this layer are 90 deg to the first. Using pine so I can fair it more easily. Will be painted over with white resin later.
This layer is going much better as it has the sanded first layer for a bed. Still have to steam bend wood first before attaching.
using CA now for rapid fixing. The CA grabs much faster to a slightly damp plank than a dry one.
14.jpg
17.jpg
20.jpg
Cad work on the bulkheads. Having trouble getting a gunnel rail piece to follow a curve through the apexes.
Was driving me crazy on how to do it.
Ended up getting the solution from a tutorial on line. What did we ever do before the internet, books I suppose but it was much slower. I think I was born 30 years too early)
Bulkhead joining.jpg
-
2nd September 2019, 12:48 PM #7
Senior Member
- Join Date
- Dec 2011
- Location
- Harrington, NSW
- Posts
- 119
Installing the spray deflector above the rear chines. One side dry fitted
22.jpg
Getting hard to find a way to mount the hull now the floor is fully planked. It will get more harder when I plank the sides.
24.jpg
Note the scale plan stuck on the pull down roller blind for quick reference.
33.jpg
Second spray rail fitted and both glued up. I am using Gorilla Grip PVA now for all gluing instead of CA as the longer pieces are too hard to position with CA.
34.jpg
Next is milling up some red cedar for the side planks.
Hope someone is finding this interesting, I am enjoying finding out about boat building. It has been the hardest wood project I have tried.
-
2nd September 2019, 04:11 PM #8
GOLD MEMBER

- Join Date
- May 2015
- Location
- Brisbane
- Posts
- 1,147
I am enjoying it, well done so far. It is something i would like to tackle one day.
-
10th September 2019, 03:56 PM #9
Senior Member
- Join Date
- Dec 2011
- Location
- Harrington, NSW
- Posts
- 119
Milling Australian Red Cedar. Lovely stuff, no wonder my Grandfather raved about it to me as a boy.
I had four 100 / 100 / 2000 logs left over from a previous life. Had them in the roof for 30 years, finally found a good use for some of it.
Split it down to 50/25 and then into 10/2 mm strips. Made a jig for the band saw for the little planks ripping. Tried the saw bench but it was a bit brutal on the finer pieces.
36.jpg
Beginning side planking, it was easy to use clamps at first but became impossible as I got further up the sides.
39.jpg
Fairing planking as I go with spoke shave. The shave gave great tactile use cutting easily when cantered at 45 deg to the planks, long red cedar shavings.. yum.
42.jpg
More sanding, sanding, more sanding - I am sick of sanding, the stuff gets in my sinuses and they ache all night. I have run into this before particularly with cedar less with other woods.
Apparently the dark resin in red cedar can cause cancer in the sinus oooooh.
46.jpg
New ways to clamp planks. Learning as I go. I has some flexible foam packing that I made into blocks to hold the planks down, works very well. Tensioned them with 1" strips of cloth pulled tight around the hull. The cloth can be pulled tight without damaging the sharp gunnel edges. The foam also make great sanding blocks as I can shape them easily to conform to the boat sides. Did I say I hate sanding?
48.jpg
Inside view of cedar planks. I will spray lac into the inside of the boat as soon as I have the first layer completed to stop moisture getting into this lovely dry wood.
49.jpg
First layer of planks are now faired and sanded to 80% good.
Second layer of cedar to come next.
ps
Busted another band saw blade, that is two this month. Buggered if I can see why, I keep resetting the adjustments as per the book. It is only light work on the thin cedar and ply????
Probably need a new saw - for my birthday, better drop some hints.
-
10th September 2019, 06:09 PM #10
GOLD MEMBER
- Join Date
- Oct 2007
- Location
- Alexandra Vic
- Age
- 69
- Posts
- 2,810
Interesting project and some nice work. How big is the boat and what do you intend to power it with? Fairly gutsy servo for the rudder?
I used to be an engineer, I'm not an engineer any more, but on the really good days I can remember when I was.
-
10th September 2019, 06:40 PM #11
Senior Member
- Join Date
- May 2019
- Location
- Sydney
- Age
- 45
- Posts
- 215
Thouroughly enjoying watching this develop.
-
10th September 2019, 07:22 PM #12
Senior Member
- Join Date
- Dec 2011
- Location
- Harrington, NSW
- Posts
- 119
Well the power seems a long way off. The original 60s project called for a Graupner 700 single in the middle with a split gearbos driving 2 prop tubes to 40mm props. I scouted around and that seems impossible to come up with. I don't know a lot about what to get yet but I'm trying to research the hell out of it. Do you have any suggestions. Does two 3000kv brush-less sound right?
Biggest problem on the horizon I see is how to cut in the prop tubes and what lengths?
Boat is 1/10 scale OA is 820mm
Hardest thing I have tried to do.
Then I have to upholster the seats.....
-
10th September 2019, 10:18 PM #13
Senior Member
- Join Date
- May 2019
- Location
- Sydney
- Age
- 45
- Posts
- 215
Try Here for a start.
Brushless Boat Motor - Radio Control Info
I have a baby rc boat. prop tube is packed with grease so no water comes in even if end of tube is below waterline. Will need to be long enough to have correct angle and still fit motor on its mount.
Or use a couple of these babies:
OS Engines .21XM VII Outboard Aircraft Marine Engine | Buy Surface Engines from Modelflight
-
11th September 2019, 09:06 AM #14
Senior Member
- Join Date
- Dec 2011
- Location
- Harrington, NSW
- Posts
- 119
Ha ha two of those babies would probably destroy it very quickly.
Thanks for that, yes I have seen the Info site already, good information. It seems I need about 2 X 2000 kv. One R hand and one L hand prop. I think I have just enough room for two LiPos as per the reference list, up either side of the two motors. I have seen so much debate on brush-less vs brushed motors that it has become confusing to me.
Two rudders are called for behind the props about 25X35mm and servo, controller etc. So much to learn. Pump?
Regarding the angle. The drawing says 18deg to the two 20x20 rails on the floor (see photos) but that does not seem right. I don't how I am going to put the prop tube holes thru the rails yet, seems like a very hard problem.
I saw a Utuber putting one in a small full size runabout. Went to all sorts of trouble making an angle jig to drill thru and screwing it to the underside of the hull. And then he still had to relieve it a lot to get the angle right. Then fill the gaps with filler and resin etc.
I have seen a suggestion to drill vertically down from above with small pilot holes and cut 6mm slots. After the tubes are positioned they are set in resin, filled and smoothed down. That would be ok as the hull is painted below the spray chine.
That would allow me to trial position a dummy tube to get the lengths and angles. I am thinking I would need the motors and their mounts on hand before I settled on the correct angle and prop tube length?
Meanwhile I have a lot of sanding to do.
-
11th September 2019, 02:12 PM #15
Senior Member
- Join Date
- May 2019
- Location
- Sydney
- Age
- 45
- Posts
- 215
There are arguments for and against brushed vs brushless.
I�ve had a bit of experience with both and consider either option if well chosen are suitable.
Brushless is a relatively newer technology and some of the arguments I see put forward are likely no longer valid due to developments in their design and the newer esc.

 Reply With Quote
