

 Thanks:
  Likes:
  Needs Pictures: 0
 Picture(s) thanks:
Results 1 to 15 of 26
Thread: checking a square
-
10th April 2016, 06:32 PM #1
 SENIOR MEMBER


- Join Date
- Nov 2011
- Location
- Newcastle NSW
- Posts
- 775
 checking a square
Hey guys,
I was in a group environment (shared table saw at a workshop on box making, which my wife actually suggested we could do together, oh boy imagine the toys I can buy if SWMBO gets heavily into woodworking ).
).
I am sure most would be aware in this situation it's best to check everything is set right before you start cutting (in case someone before you has changes something, intentionally or accidentally) .I was helping someone (buddy system, who was fairly new to woodworking), and I was explained how what can happen is a new person to the table saw can mistake the height adjustment hand wheel with the angle adjustment hand wheel, they soon realise their mistake, but this results in the angle of the blade no longer being at 90 degrees.
I grabbed my trusty engineers square out, raised the blade (unplugged the machine of cause), and did a quick check, sure enough it was out (probably not enough to effect the project, but I thought it was good to help instil good habits). As I started adjusting the angle of the blade, one guy came over and said "It's at 90 degrees, I just adjusted it".
At this point it was engineer squares at 20 paces
Years ago, I was shown a quick way to check my square with the tools available in the workshop (obviously not to tight tolerances, but enough to feel confident with your woodworking project). I was surprised by how few in the workshop, even very competent woodworkers actually knew how to check that their square was actually square.
I have received a lot of help over the years from forum members, so I thought I would make a little post, in the hope that I may help someone who perhaps is struggling with getting tight joints (when it's the square that is letting them down).
So below is what I have been taught, the aim with this approach is to use what is already in your workshop to get a fair idea on if your square can be trusted for woodworking purposes. This is just how I was taught, and so far it has served me well. If you have a better/easier/more accurate way to check, please do add your approach to this thread.
I have a engineer square that I picked up at the TTTG sale that I know is a bit out, so I figured this would make a good example piece.
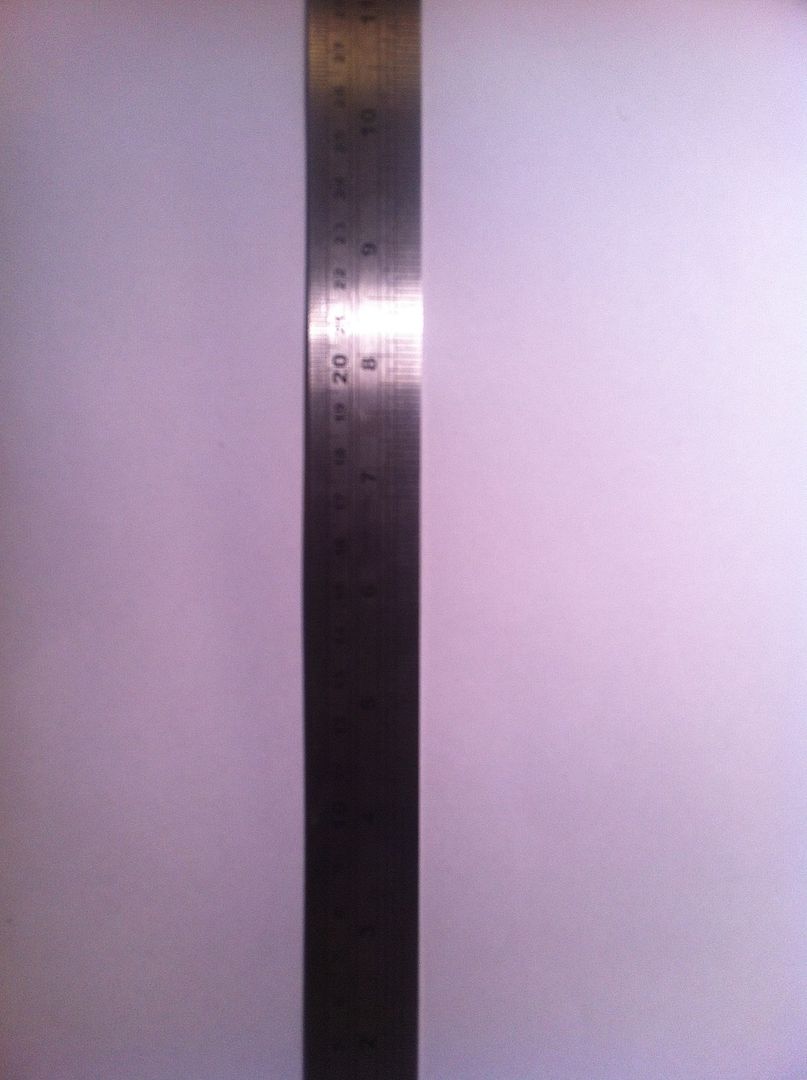
The first thing you need is something that you know is straight. For the precision I am after this metal rule should work, but I will do a quick check (by eyeballing it I could probably skip this step, but errors will be doubled).
On a piece of paper draw a line using your rule (you need a sharp pencil or pacer), and make a mark about half way along the rule.
Turn the rule 180 degrees, so the same face is facing the line but now on the top side of the line. Line the mark up to the same point on the rule (so say 150mm mark).
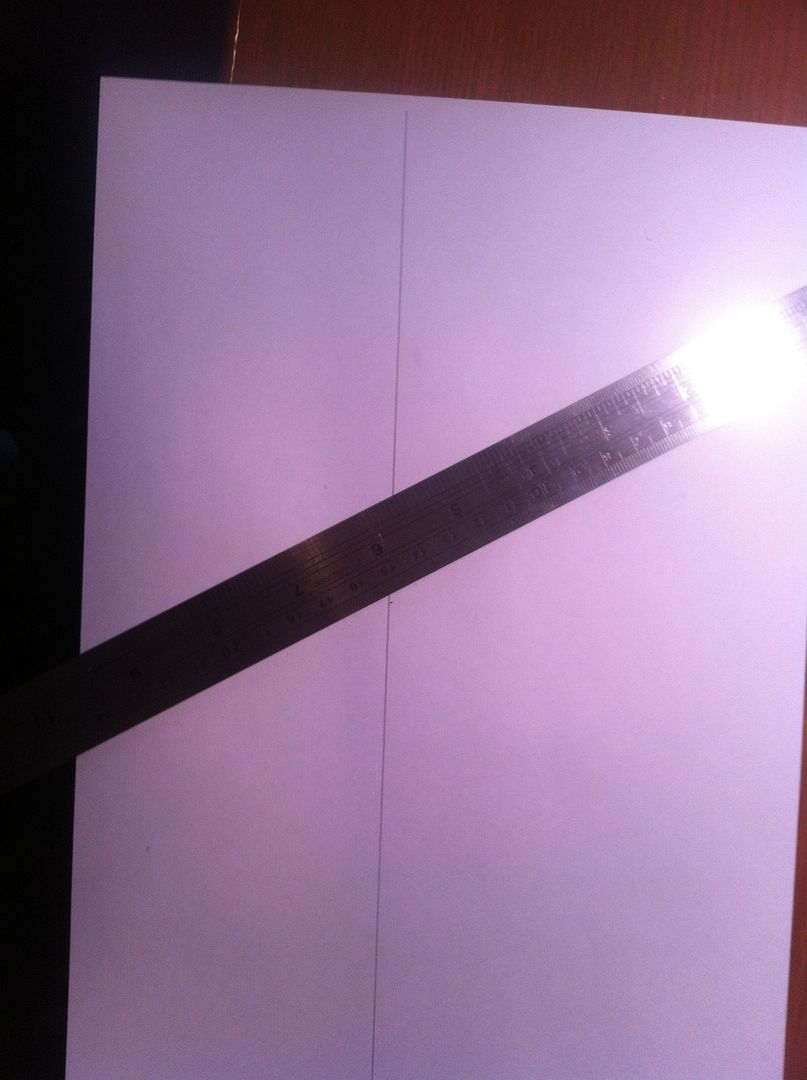
also line up the rule at both end.
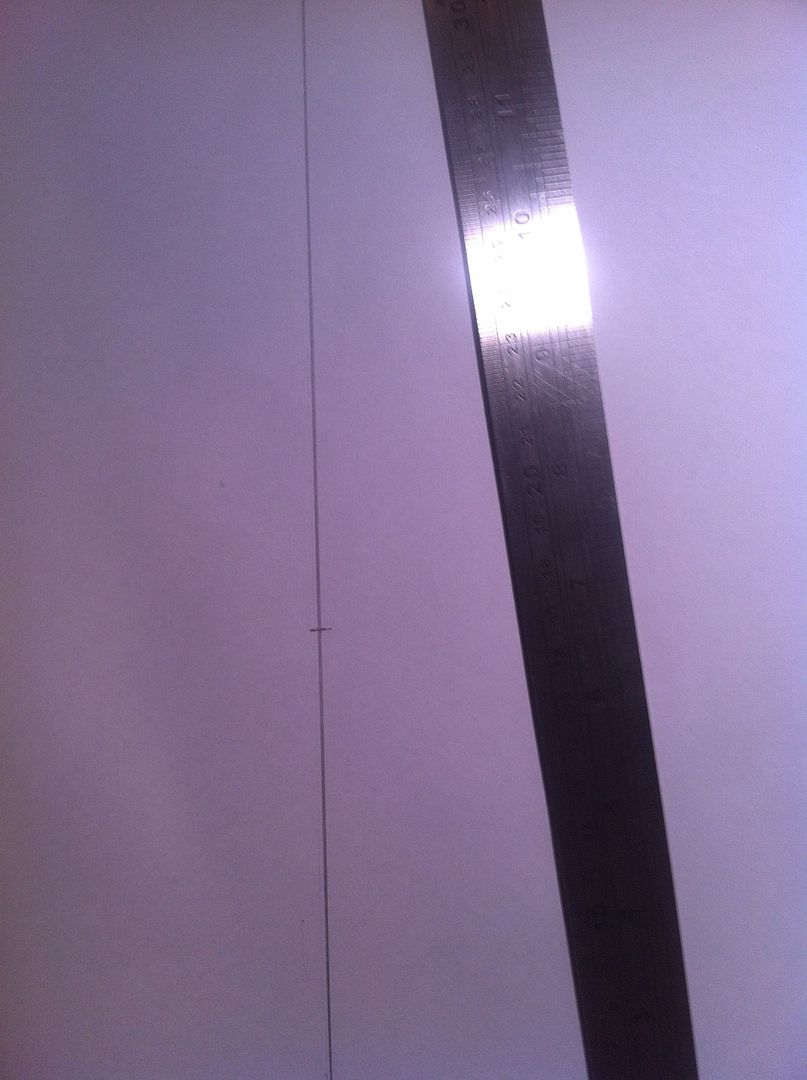
If the line you just drew meets up with the rule all the way along, you have a straight (well straightish edge, I am not talking to within 1000's of an inch here). If not you don't have a straight edge.
Now you know your rule is straight, this effectively means you have 180 degrees to work off (a straight line). Next get your engineers square and put one side against the rule

Draw a line on the other face of the square, making sure the square and rule do not move. Now holding the rule in place flip the square over so the same face is against the rule, and the other face is on the other side of the line you just drew.
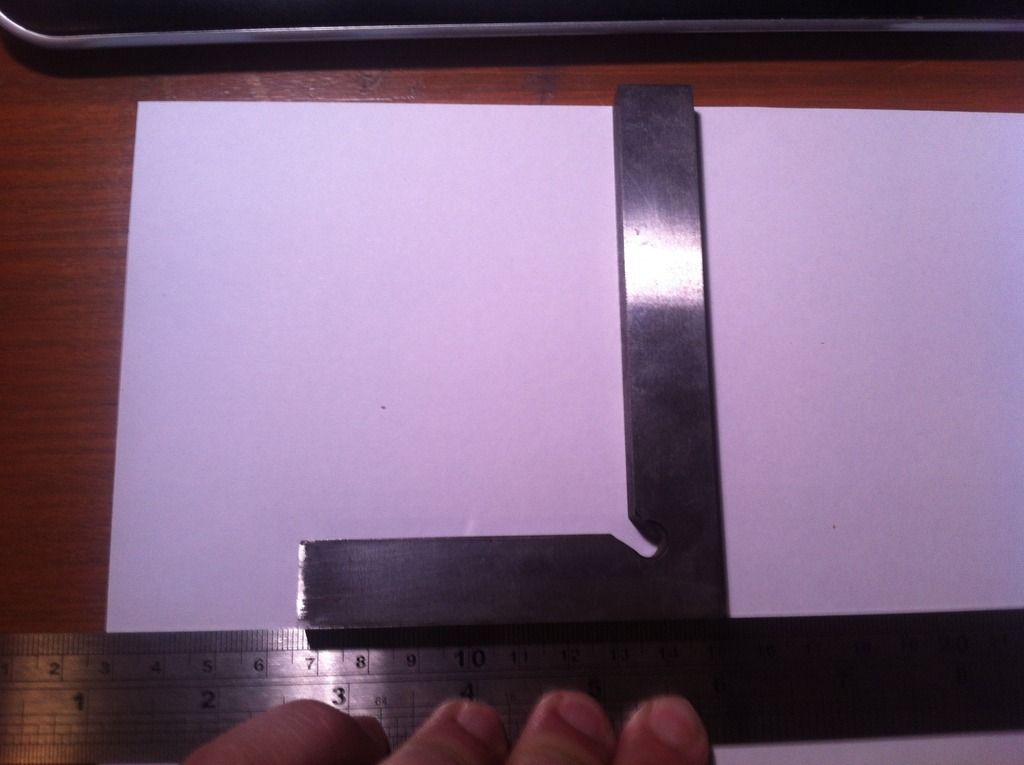
draw a second line

If these lines are not either one line or parallel to each other your square is not at 90 degrees, as 90 plus 90 equals 180. If you have got the mark right at the bottom and your square is out, you will have one line at the bottom, breaking into two lines at the top
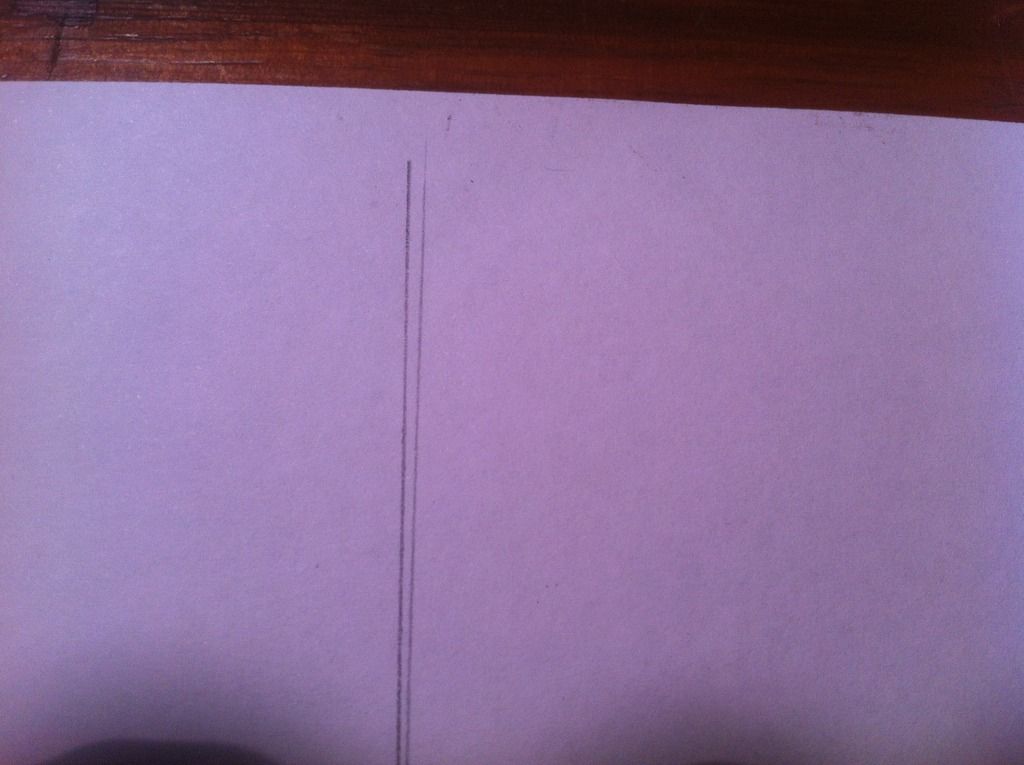
The actual 90 will be from the bottom point to a point that is half way between the 2 lines at the top.
You can also use this same principle when using a carpenters square, try square or combination square. You can use a piece of timber that is fresh off the jointer, or a machines side of ply or mdf etc. to rest your square against.
Well hopefully their will be at least one person who reads this and didn't know and finds it useful, and perhaps someone might read it with some suggestions of a better way and I might learn something new.
Cheers,
Camo
Sorry about the quality of the pictures, but hopefully it helped explain things.
-
10th April 2016 06:32 PM # ADSGoogle Adsense Advertisement
- Join Date
- Always
- Location
- Advertising world
- Posts
- Many
-
10th April 2016, 06:58 PM #2
GOLD MEMBER

- Join Date
- Jun 2014
- Location
- Seattle, Washington, USA
- Posts
- 1,857
While I did know this technique, I admit that I learned it from forum members, so I'm confident that someone who sees this will take away a new skill.
Thanks for the great post.
Cheers,
Luke
-
10th April 2016, 07:44 PM #3
GOLD MEMBER
- Join Date
- Nov 2012
- Location
- SE Melb
- Age
- 64
- Posts
- 1,277
Another way is to use the Pythagoras triangle. if the 2 sides of a right angle is 30mm and 40mm respectively, then the diagonal will always be 50mm.
-
10th April 2016, 08:05 PM #4
Taking a break
- Join Date
- Aug 2008
- Location
- Melbourne
- Age
- 34
- Posts
- 6,127
The only issue with that is that it leaves room for error with each measurement you take. If you're checking the square against itself there's no place for errors to creep in. Originally Posted by justonething

-
10th April 2016, 08:23 PM #5
GOLD MEMBER
- Join Date
- Jun 2014
- Location
- Seattle, Washington, USA
- Posts
- 1,857
Since someone else said it I'll jump in and back that up. I agree that introducing a manmade measurement device unnecessarily is a bad move. Originally Posted by elanjacobs
-
10th April 2016, 09:11 PM #6
GOLD MEMBER
- Join Date
- Nov 2012
- Location
- SE Melb
- Age
- 64
- Posts
- 1,277
But you can draw a right angle with just a pair of compass and a ruler. Surely it should count for something

-
10th April 2016, 09:16 PM #7
Taking a break
- Join Date
- Aug 2008
- Location
- Melbourne
- Age
- 34
- Posts
- 6,127
Ummm...I don't quite get how that helps you check if your square is accurate or not

-
10th April 2016, 09:33 PM #8
GOLD MEMBER
- Join Date
- Jun 2014
- Location
- Seattle, Washington, USA
- Posts
- 1,857
j1t, I'm with Elan in that I don't quite understand the method. Maybe you could give us a step by step?
-
10th April 2016, 09:40 PM #9
gentleman woodworker
- Join Date
- Mar 2005
- Location
- Camden, NSW
- Age
- 74
- Posts
- 3,576
Oh the joy of owning a Colen Clenton square! Exactly as Camo showed above, adjust the square with a screw diver to the half way point, check again....and get back on with the job. Yep, you can do it with a compass and rule, but I use Camo's method at the start of each new project. Old habits die hard.
flettya rock is an obsolete tool ......... until you don�t have a hammer!
-
10th April 2016, 09:46 PM #10
GOLD MEMBER
- Join Date
- Nov 2012
- Location
- SE Melb
- Age
- 64
- Posts
- 1,277
-
10th April 2016, 09:55 PM #11
Taking a break
- Join Date
- Aug 2008
- Location
- Melbourne
- Age
- 34
- Posts
- 6,127
I reckon the joy in owning one (or any hand made tool) is the craftsmanship more than the functionality. My $40 Irwin square has never led me astray and, short of it being dropped, I can see no reason for a square to ever need adjusting. Originally Posted by fletty
Actually, if I had to check my square each time I'd be buying a new square...
-
10th April 2016, 09:59 PM #12
Taking a break
- Join Date
- Aug 2008
- Location
- Melbourne
- Age
- 34
- Posts
- 6,127
I'm still lost... Originally Posted by justonething
I know the compass-and-ruler constructions, but I'm still not seeing how they help in checking the accuracy of a set square. Are you suggesting drawing one and checking the square against it?
-
10th April 2016, 10:06 PM #13
Senior Member
- Join Date
- Aug 2015
- Location
- Newcastle
- Posts
- 498
Why don't you just use a piece of ply with a straight edge, draw a line up then flip the square and do it again? It takes five seconds.
Same way works with a phone if you are using it as and angle finder, it doesn't have to be calibrated you just take two measurements then get the average.
-
10th April 2016, 10:32 PM #14
GOLD MEMBER
- Join Date
- Nov 2012
- Location
- SE Melb
- Age
- 64
- Posts
- 1,277
Sure, why not. Originally Posted by elanjacobs
By the way, the Pythagoras triangle becomes really useful if you have to build a right angle structure considerably bigger than an engineering square. but that's is not checking the trueness of a square.
-
10th April 2016, 10:41 PM #15
Taking a break
- Join Date
- Aug 2008
- Location
- Melbourne
- Age
- 34
- Posts
- 6,127
Because a) you have to rely on your drawing being accurate to start with and b) it's just another step that doesn't need to be there. Originally Posted by justonething


 Reply With Quote
Similar Threads
-
Checking square with an indicator
By Michael G in forum METALWORK FORUMReplies: 5Last Post: 8th October 2013, 12:52 PM -
Installing vice: how square is square?
By tomnewby in forum WOODWORK - GENERALReplies: 12Last Post: 27th June 2009, 08:03 AM -
square to table or square to fence
By yjnb in forum BANDSAWSReplies: 1Last Post: 20th July 2008, 07:50 AM
