

 Thanks:
  Likes:
  Needs Pictures: 0
 Picture(s) thanks: 0
Results 46 to 60 of 62
Thread: Dovetail markers - good guide?
-
9th November 2020, 08:38 AM #46
 GOLD MEMBER


- Join Date
- May 2010
- Location
- Not far enough away from Melbourne
- Posts
- 4,204
 That's great Roy. It seems to me that we are generally in agreement on this, but you seem to have not properly grasped the meaning of my post.
 Originally Posted by royflatmate

I know that there are plenty of courses out there that do teach skills and I think that is great. I was drawing a comparison between the skill-building courses and the build-a-windsor-chair-in-a-week type of courses. The latter ones have a legitimate place in this world (say for executives who want to have a week's break from the office doing something hands-on) where you walk away with a great piece of furniture and a warm fuzzy feeling but very little in the way of skills development.
As for craftsmen and women charging a fair price for running courses, well I doubt you could pay me enough to spend a week teaching half a dozen uncoordinated Accountants how to make a dovetailed box.
-
9th November 2020 08:38 AM # ADSGoogle Adsense Advertisement
- Join Date
- Always
- Location
- Advertising world
- Posts
- Many
-
9th November 2020, 08:48 AM #47
GOLD MEMBER
- Join Date
- May 2010
- Location
- Not far enough away from Melbourne
- Posts
- 4,204
Spot-on Ian. The lines are a guide. the direction is more important than the exact placement. Off by half a mm from each other? well you finish up with one line after the sawcut anyway, you can't cut down both lines independently of each other. Grandad used to say "It's more important for it to look right than to be right. Nobody's going to measure it unless it looks wrong." Originally Posted by IanW
-
9th November 2020, 07:58 PM #48
SENIOR MEMBER
- Join Date
- Oct 2019
- Location
- Brisbane, Australia
- Age
- 43
- Posts
- 519
Just as a follow up, I decided to "just do it"!
I used a nice thin piece of French Oak I picked up the last time I was at Carbatec.
PXL_20201109_065129539.jpg
Measured out the three ratios everyone seems to go for (1:6, 1:7 and 1:8). Following Derek's tip about having both sides useable for accuracy, I marked out the opposite sides at a width that left a gap of about 13-4mm wide when you were 19mm deep (a common size for panels), to give enough room for a 1/2 inch / 12mm chisel. I also left that gap to give me room for fine adjustments at the end. Now you can see how much this project cost in materials as well:
DM 2.jpg
PXL_20201109_065740720.jpg
I didn't take photos but then just knife-walled, chiselled down (with Paul Sellers' voice in my head going "looking for that pristine edge", "you want dead-on accuracy", "who'd use a power router all day" etc), until about 2mm down when it felt safe to finish up with a dovetail saw.
And the result: I just need to very carefully glue on some fences at 90 degrees after dinner. It actually came out a little better than the photo indicates because of perspective on the photo and because the paper doesn't sit flat. But I can very gently sand the edges as well to dial them in (I rapidly found out why people mark out on flat wood - paper is terrible for this type of thing!).
DM 4.jpg
Total cost of materials - well you can see the sharpie and I've still got most of the board!
As an aside, I am starting to get very jealous of European woodworkers. After recent work with Karri, Tassie Oak etc, French oak is such a sweet and easy to work material! They should all be shipped over here to spend a week using nothing but knotty pine and tas oak as your basic woods!
A lesson learnt with this is that I really should have left a straight section higher up before the angled section, to give me more room to glue a fence on, using the face of the marker instead of the top edge. It doesn't to matter much if it will flex slightly given you will be pressing this in as you mark.
-
9th November 2020, 09:42 PM #49
Be inspired. Be creative. Be bold.
- Join Date
- Apr 2001
- Location
- Perth
- Posts
- 10,820
Chris, have you sawn with- or across the grain? It looks like the latter. If so, that is weak and will break with the grain. You need to saw with the grain. No biggie - I've done this.
Regards from Perth
DerekVisit www.inthewoodshop.com for tutorials on constructing handtools, handtool reviews, and my trials and tribulations with furniture builds.
-
9th November 2020, 09:49 PM #50
SENIOR MEMBER
- Join Date
- Oct 2019
- Location
- Brisbane, Australia
- Age
- 43
- Posts
- 519
Err - across - although it's a thin plank so it was little sawing involved in the operation.
Do you mean it will break in use?
-
9th November 2020, 10:47 PM #51
Be inspired. Be creative. Be bold.
- Join Date
- Apr 2001
- Location
- Perth
- Posts
- 10,820
It will break.

Regards from Perth
DerekVisit www.inthewoodshop.com for tutorials on constructing handtools, handtool reviews, and my trials and tribulations with furniture builds.
-
9th November 2020, 11:37 PM #52
SENIOR MEMBER
- Join Date
- Oct 2019
- Location
- Brisbane, Australia
- Age
- 43
- Posts
- 519
Ah well, a good lesson learnt - thank you.
I'll keep the rest of the plank for that occasion!
-
10th November 2020, 07:46 PM #53
GOLD MEMBER
- Join Date
- May 2010
- Location
- Not far enough away from Melbourne
- Posts
- 4,204
While I definitely agree with Derek that you have cut the pieces in the wrong orientation, I would like to add that French Oak is probably one of the more forgiving timbers in regard to crossgrain strength, depending on other factors involving how the board was sawn. They may well hold up alright in use but then again they might not. I would be reluctant to invest a lot of material and effort into finished markers with those pieces but they would be ok for a prototype/practice piece. Originally Posted by Cgcc
Just be prepared for other woodies asking repeatedly why you cut them in that grain orientation.
-
10th November 2020, 09:26 PM #54
GOLD MEMBER
- Join Date
- Mar 2004
- Location
- Brisbane (western suburbs)
- Age
- 77
- Posts
- 12,117
I would think most of us have done something similar in our early years, I certainly did! You soon learn about the relative strength of cross-grain vs long-grain, and having something fail on you drives the lesson home rather forcefully. The OP should be commended for casting about for what he had on-hand & giving it a go, 'cos that's one of the best ways to learn things. As I've said before, we often learn more from a "failure" because it forces you to pause & try to figure out what/why things went wrong... Originally Posted by doug3030

Cheers,IW
-
10th November 2020, 10:37 PM #55
SENIOR MEMBER
- Join Date
- Oct 2019
- Location
- Brisbane, Australia
- Age
- 43
- Posts
- 519
Thanks Doug
I will tell them my wife is French and I'm making a point about the superiority of French imports.
I think they will be a prototype piece. I have glued a bit of a block on top and they are quite useable.
Another thing I would change is that I think I would make much larger in width. I think I mis-read Derek's tip about using both sides for accuracy. I thought he meant having a good size for pins on the left-and-right sides whereas the follow-up I think indicated he meant the sides were in line with the horizontal/top side.
-
10th November 2020, 11:07 PM #56
SENIOR MEMBER
- Join Date
- Oct 2019
- Location
- Brisbane, Australia
- Age
- 43
- Posts
- 519
Thanks Ian - that's very encouraging.
I am finding at the start I was almost paralysed by overanalysis.
Here is how it ended up. I decided I would pick up a piece I grabbed a while back that is definitely Australian (hairy oak):
PXL_20201110_120102321.jpg
To try and get a useable horizontal rule (at least for thin stock) I "jointed" all the sides by just using a shooting board, first referencing from the angled piece to shoot at side at 90 degrees, then turning it around to shoot back to a reference, and repeating until I got to the other side.
A small project but satisfying!
I managed to tear out a few fibres on the front face but I'll sand back in due course.
And now the idea seems to be to use until they break!
-
23rd November 2020, 12:33 AM #57
Be inspired. Be creative. Be bold.
- Join Date
- Apr 2001
- Location
- Perth
- Posts
- 10,820
Chris, here are a few more options ...
Now you know that you can use a sliding bevel to make the angle as well as a dedicated marker ...

... and it can go the other side as well ...

But the marker struggles to do the side on the outside ...

.. and the sliding bevel makes this easy ...

Make your own saddle square (and you can make dovetail markers like this as well!). I made this out of Lexan and glued them together with superglue ...


Regards from Perth
DerekVisit www.inthewoodshop.com for tutorials on constructing handtools, handtool reviews, and my trials and tribulations with furniture builds.
-
24th November 2020, 01:40 AM #58
Be inspired. Be creative. Be bold.
- Join Date
- Apr 2001
- Location
- Perth
- Posts
- 10,820
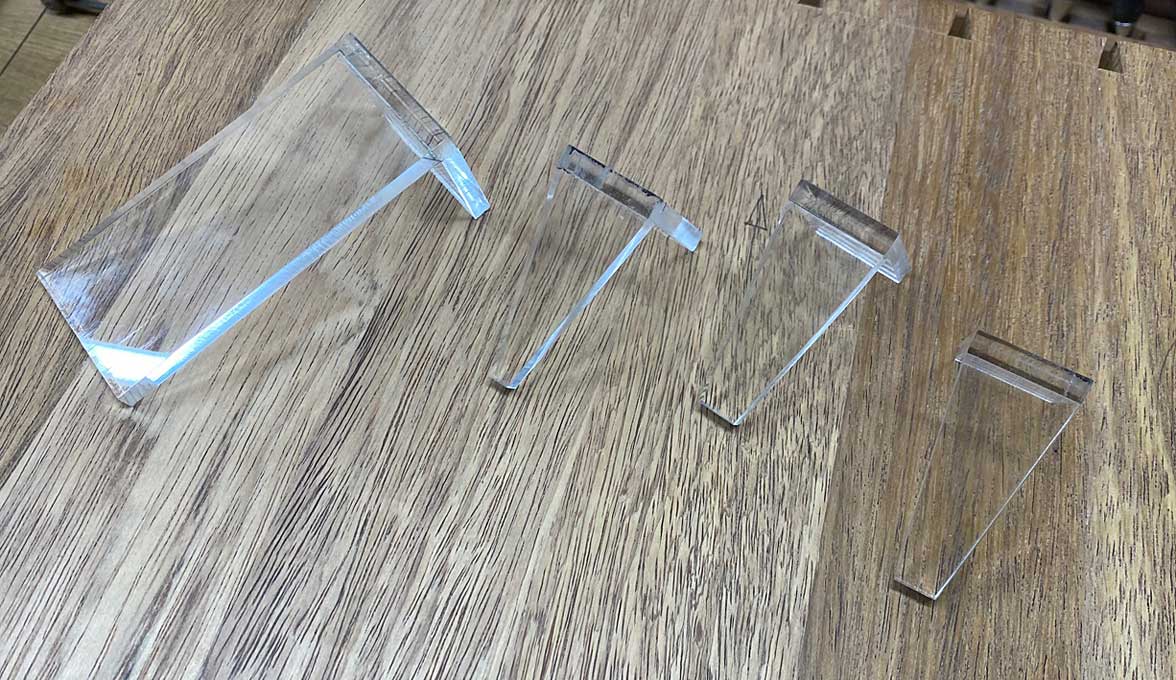
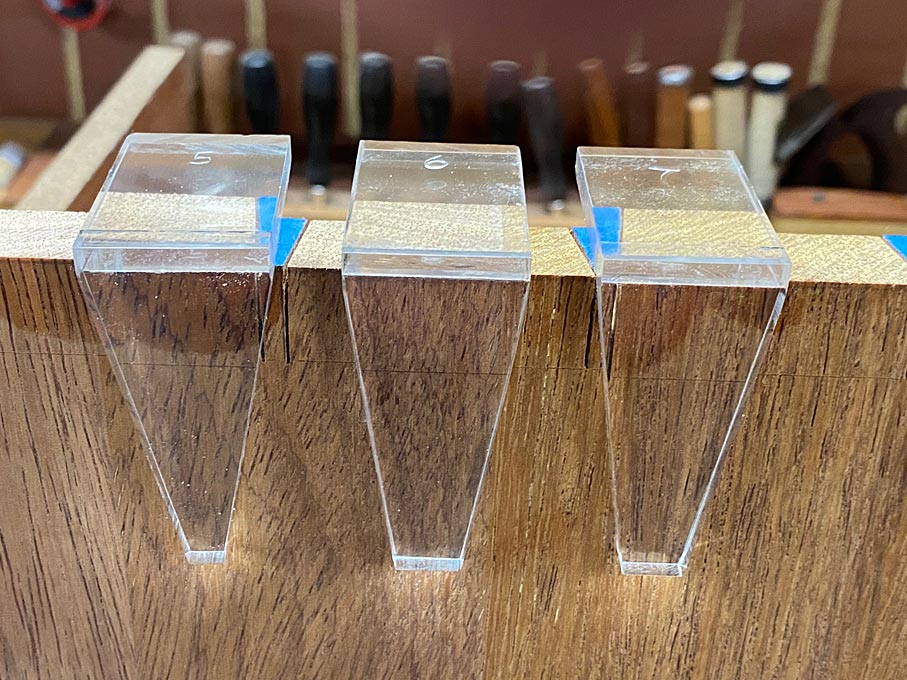
Magical Dovetail Markers
I knocked these up today out of Lexan. Sort of fun. Sort of interesting. But definitely useful. They are 2 1/4" in the face, and 1 1/2" over the top. Ratios 5:1, 6:1, and 7:1 (I find 8:1 too flat). There is also a saddle square.

If there is interest, I'll post a build.
Nice items to make as Christmas presents
Regards from Perth
DerekVisit www.inthewoodshop.com for tutorials on constructing handtools, handtool reviews, and my trials and tribulations with furniture builds.
-
24th November 2020, 07:19 AM #59
Franklin Ferrier
- Join Date
- May 2007
- Location
- Gold Coast
- Age
- 70
- Posts
- 2,736
For something completely different there is this 'improved' marker from Robert Wearing described in couple of his books.
Dovetail Marking System � Lost Art Press
My metal working skills have never been up to attempting to make it.
... and another blog on making the Sellers style
Blue Spruce Woodshop: How To Make A Dovetail MarkerFranklin
-
24th November 2020, 08:29 AM #60
GOLD MEMBER
- Join Date
- Mar 2004
- Location
- Brisbane (western suburbs)
- Age
- 77
- Posts
- 12,117
I'm sure you could manage it, Fuzzie, working brass is surprisingly easy, & with care you can make things very accurately with nothing more than a hacksaw & a couple of files. It's a nifty gadget, which allows you to set a size for your tails & repeat these across a board very quickly, so if you like your tails all the same & evenly-spaced, it would be the bees' knees. Originally Posted by Fuzzie
However, most of the time I like to vary tail widths across the board for a bit of visual interest, so that aspect doesn't appeal to me. I use the width of the marker as a guide & add or subtract increments by eye to vary the sizes. It's sufficiently accurate for purpose, & gets the boring task of setting out done quickly so I can get on with the more fun part of sawing them out. I do have to be careful not to mix up sides for different drawers, but then I like to vary drawer depths, too, so that's not usually a problem.....
Cheers,IW


 Reply With Quote


Similar Threads
-
Veritas Dovetail Saddle Markers
By NCArcher in forum WOODWORK - Tools & MachineryReplies: 2Last Post: 12th March 2017, 08:41 PM -
Dovetail Markers (first draft)
By kevjed in forum HAND TOOLS - UNPOWEREDReplies: 8Last Post: 18th September 2009, 10:54 AM -
Brass Dovetail Markers Design Comments Sought
By thumbsucker in forum DESIGN & DESIGNING / GOOGLE SKETCHUPReplies: 0Last Post: 6th June 2008, 11:52 PM -
A Couple of Dovetail Markers
By derekcohen in forum HAND TOOLS - UNPOWEREDReplies: 7Last Post: 25th September 2007, 12:05 AM
