

 Thanks:
  Likes:
  Needs Pictures: 0
 Picture(s) thanks:
Results 1 to 15 of 20
Thread: Dovetailing long boards
-
9th December 2008, 09:26 PM #1
 Senior Member


- Join Date
- Nov 2004
- Location
- Adelaide
- Posts
- 304
 Dovetailing long boards
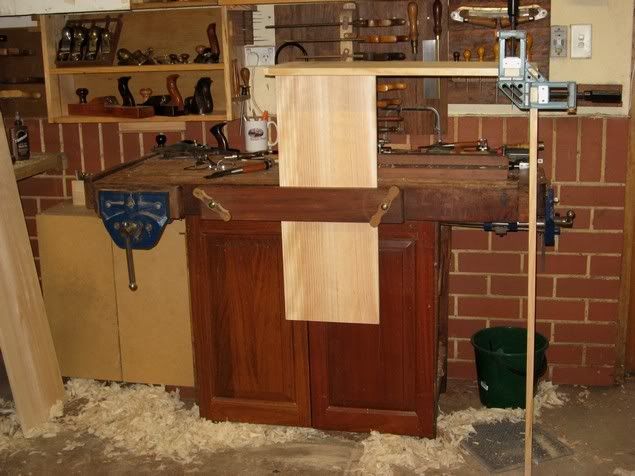
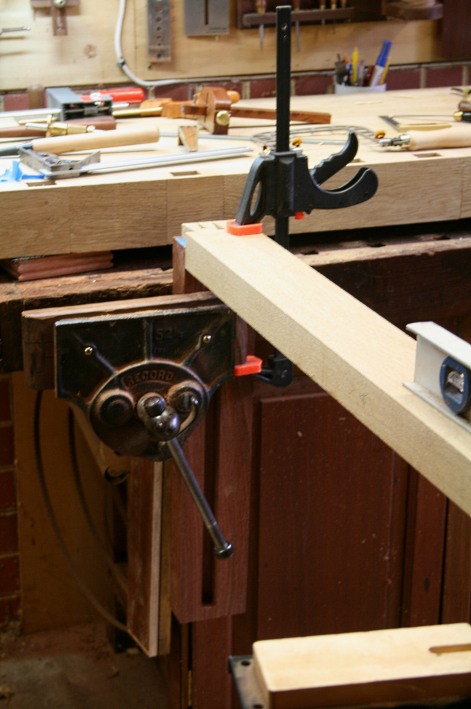
How do people mark the pins from the tails (or vice versa) when the boards are longer than the bench height? The only method I came up with is to clamp the boards to a square piece of timber - as in the photo - but aligning the boards is a bit tedious. Any better ideas?
-
9th December 2008 09:26 PM # ADSGoogle Adsense Advertisement
- Join Date
- Always
- Location
- Advertising world
- Posts
- Many
-
9th December 2008, 10:06 PM #2
Senior Member
- Join Date
- Sep 2005
- Location
- Mahogany Creek, Western Australia
- Age
- 71
- Posts
- 188
Well, I suppose you could dig a hole and put the bottom of the board down in it... Originally Posted by javali


I've seen pictures of set-ups that involved building a fancy set of steps to work from and just working up high in the air. If you're cutting them by hand, that's one thing. If using a jig, the only alternative would be impractical: rout horizontally. Let us know how long the board is that you are working on and how you ultimately proceed. Thanks!
Michael"In theory, there is no difference between theory and practice. In practice, there is." Yogi Berra
"Experience is the name every one gives to their mistakes." Oscar Wilde
"Whether you think you can or whether you think you can't, you're right." Henry Ford
My website: www.xylophile.com.au
-
9th December 2008, 11:24 PM #3
Be inspired. Be creative. Be bold.
- Join Date
- Apr 2001
- Location
- Perth
- Posts
- 10,826
When dovetailing carcasses of cabinets I use the end vise and a face vise (actually, that one is a dovetail vise). The face vise supports a board, which acts as a support for the board in the end vise.
The ends are joined with a mitre clamp.
Regards from Perth
DerekVisit www.inthewoodshop.com for tutorials on constructing handtools, handtool reviews, and my trials and tribulations with furniture builds.
-
9th December 2008, 11:53 PM #4
Retired
- Join Date
- Jul 2007
- Location
- Kiewa
- Age
- 64
- Posts
- 1,636
I dovetailed some 1.5m carcasses using my Leigh D4 jig. I had to build boxes for both the jig and one for me to stand on, just to gain the clearance needed. If cut by hand, I can't see the same problem??
Jeff
-
10th December 2008, 01:12 AM #5
Skwair2rownd
- Join Date
- Nov 2007
- Location
- Dundowran Beach
- Age
- 76
- Posts
- 19,922

Neat Derek and like your solution to Jeff.
Gives me some ideas but I have a Gifkins setup, Might be a tad awkward!
-
10th December 2008, 07:36 AM #6
Dehydrated Hydrographer
- Join Date
- Jun 1999
- Location
- Westleigh, Sydney
- Age
- 77
- Posts
- 9,550
-
10th December 2008, 08:30 AM #7
Senior Member
- Join Date
- Oct 2004
- Location
- Goondiwindi Qld
- Posts
- 261
Hi Javali, up to 1800 long & using a leigh jig I just clamp a plasterers stool with adjustable legs to the bench & clamp the jig to that. Lets me work up to eye height easily. To clear the front of the bench with the workpiece I put a board in each vise & clamp to it...that is more than enough offset. If hand cutting I use a long board in the vises, drop the job between it & the bench & clamp it all. Regards, Bill
-
10th December 2008, 11:42 AM #8
Be inspired. Be creative. Be bold.
- Join Date
- Apr 2001
- Location
- Perth
- Posts
- 10,826
Originally Posted by AlexS
Both ways work
Regards from Perth
DerekVisit www.inthewoodshop.com for tutorials on constructing handtools, handtool reviews, and my trials and tribulations with furniture builds.
-
10th December 2008, 02:54 PM #9
Senior Member
- Join Date
- Nov 2004
- Location
- Adelaide
- Posts
- 304
Thanks everyone.
The carcass measures about 1200x900, so cutting isn't much of a problem. I guess that once I get to the 1800 range I will have to start using some of the methods suggested here.
Now I need to upgrade my bench to be able to implement Derek's solution...
-
10th December 2008, 04:42 PM #10
 GOLD MEMBER
- Join Date
- Apr 2006
- Location
- Hobart
- Posts
- 5,130
When I cut sliding dovetails for large bookshelves that eventually covered 50 linear feet of wall space (SWMBO is an academic) I had the same problem. The shelves were cut from celery top pine 35 x 250 mm and each was 1.5 metres long. Eventually I put two work benches side by side and about 50mm apart. Then I put a B&D Workmate on top stradling the two benches and clamped the shelf vertically in the Workmate so that the tail hung between the two benches. It meant I had to stand on the work benches with the router and jigs: But it worked.
Derek's solution is much more elegant.
Cheers
Graeme
-
18th February 2022, 08:49 PM #11
New Member
- Join Date
- Feb 2010
- Location
- Memphis
- Posts
- 1
Heavens no to the Rube Goldberg contraptions and arrangements to mark one board from the other. I've never seen one that didn't look precarious and usually ridiculous. You simply put them face-to-face, mark out both halves of the joint with a dovetail marker (Richard Kell or lookalikes) and saw. What you're doing is assuming it's a joint that cannot be marked from the first sawn workpiece -- like a Japanese twisted dovetail joint (nejiri arigata) in which both boards have to be marked and then sawn -- one cannot be marked from the other.
This fellow illustrates the concept and sells dovetail markers to go with. You don't need his markers, necessarily, though he has built into them an "offset" that makes the process a little easier. If you've successfully cut dovetails before, you'll have no problem marking them and cutting them with a gauge you already have. I have no commercial interest in the products:
How It Works - TailSpin Tools
I'm providing the link to illustrate the process only.
-
18th February 2022, 10:26 PM #12
GOLD MEMBER
- Join Date
- May 2007
- Location
- Sth Gippsland Vic
- Posts
- 4,400
Fancy, complex, overly complicated waste of time and probably money is My first impression .
KISS Principal is the way .
Welcome to the forum too .
-
19th February 2022, 04:53 PM #13
Be inspired. Be creative. Be bold.
- Join Date
- Apr 2001
- Location
- Perth
- Posts
- 10,826
Hi Charles! Welcome to Oz ... great to have you here!
I saw that video a while back and must admit that I had a headache at the end - clearly I am spatially challenged, plus my encroaching senility makes it difficult to remember all the twists and turns. Interesting however.
I see that this is a very old thread, going some 14 years back. Substantially, I might dovetail in a similar manner. Just better work holding now.
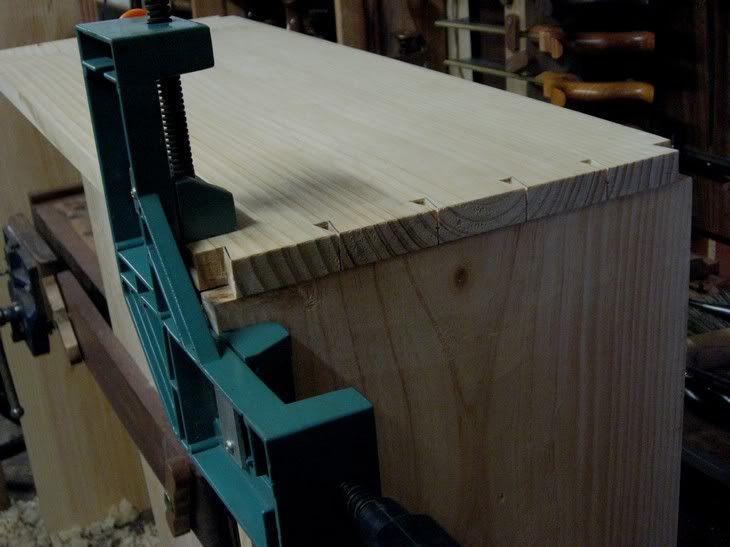
A few years later I did have to dovetail a near 8' board, which made the side of the bench I was building ...
... sawing the lines from the opposite side ...

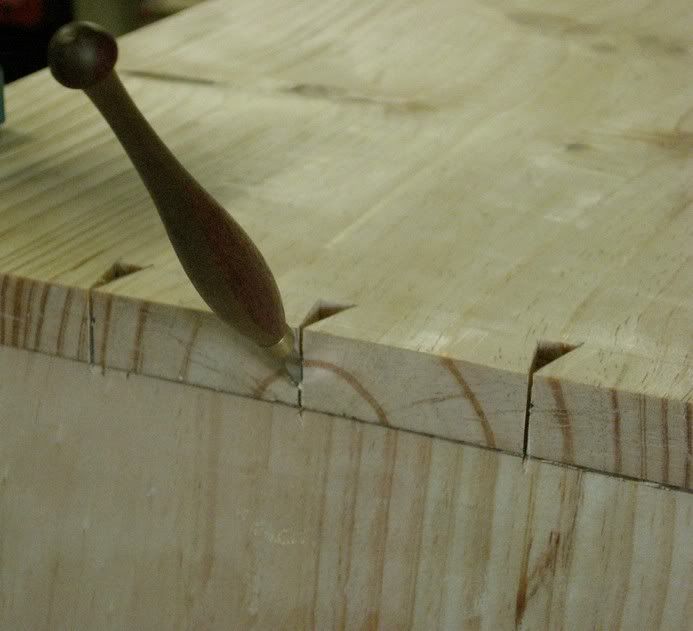
A lot easier to remove the waste ..

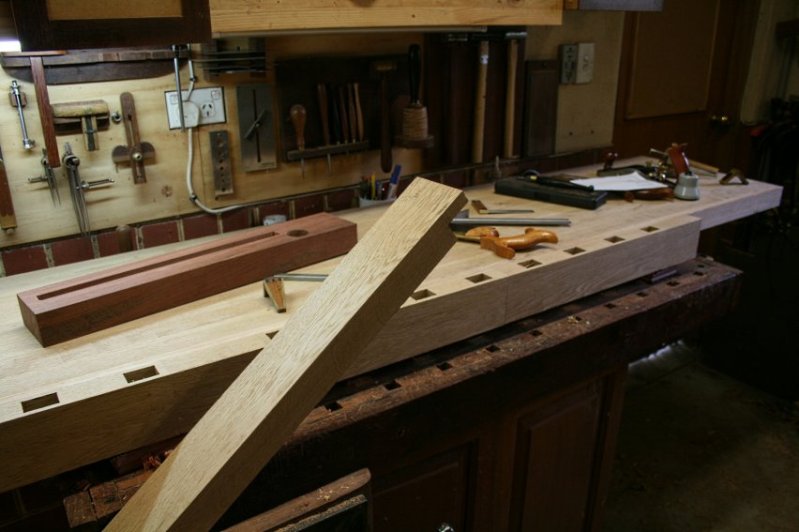
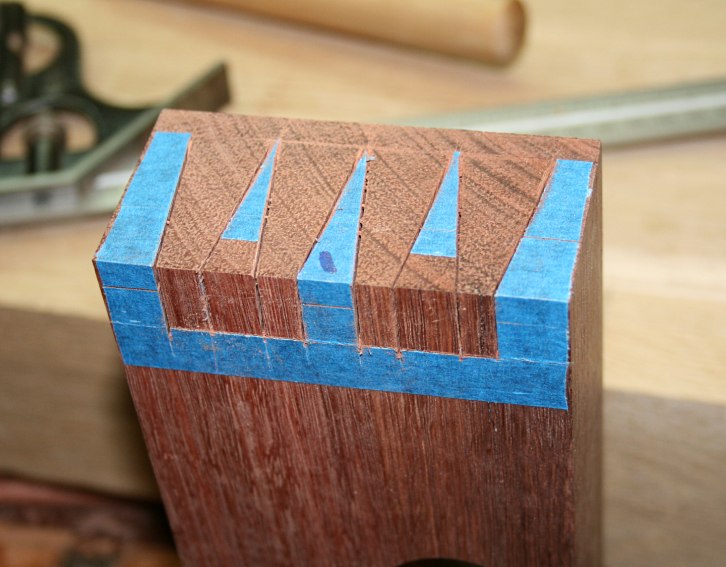
Transferring the tails to the pin board was also a stretch ...
Blue tape aided my spatial confusion (even then) ..
Regards from Perth
DerekVisit www.inthewoodshop.com for tutorials on constructing handtools, handtool reviews, and my trials and tribulations with furniture builds.
-
21st February 2022, 09:18 AM #14
GOLD MEMBER
- Join Date
- Mar 2004
- Location
- Brisbane (western suburbs)
- Age
- 77
- Posts
- 12,132
Funny how these old threads re-surface, sometimes with an interesting twist like this....
My first reaction was rather like Rob's - it seemed like a lot of fuss using these "Tailspin" markers and quite counterintuitive to the way I've been doing it for around 50 years. But on reflection, there is about the same amount of total effort involved as marking out any other way. I suggest that what made it look cumbersome in the video was the bloke butting the second gauge up to the first & changing his grip so he could mark the back of each pin or tail as he went along. We were taught to mark both back & front at school, but I gave up marking the back about 40 years ago, once I learnt to reliably saw square to a face. If you skip that step it would look a lot smoother.
We can argue forever about the best way to go about dovetails, but there is an incontestable benefit in transferring from a pre-cut set of pins or tails to its opposite board. It means any small errors in the first lot of cuts are automatically compensated for & (provided they aren't gross errors) will not affect the completed joint. Just pay full attention to the second lot of cuts & all will be well. Setting out on both boards simultaneously means you have to saw very, very carefully for both boards - Murphy's Law dictates that errors are always additive, never self-cancelling.
Funnily enough, we were taught to set out both boards simultaneously for dovetail joints in school woodwork, I didn't see the transfer method until I was an adult & received some tutoring from a cabinetmaker. Looking back, I think it was just to make us pay full attention & set out & saw accurately - as you can imagine with a bunch of 12 yr olds, that was a tall order & some rather strange joints were produced at times. Obviously, simultaneous setting out can work, but it increases the effort of concentration & chances of error when doing a large set of drawers. Cutting my chances of error by 50% is a good move, in my book...
Cheers,IW
-
21st February 2022, 05:52 PM #15
GOLD MEMBER
- Join Date
- Feb 2016
- Location
- Canberra
- Posts
- 5,125
Tape and rebates
Two of the tips that really worked for me are two I've learned here!
Tape and Rebates
The tape method was brilliant. Worked first time, even on tiny joints (attached). I use a kiridashi.
The second was to cut a rebate on the rear of the board and using this rebate to align, exactly as shown in Dereks post above Mine are small though, lucky to be 1 or 2mm .... not much need for more.
On a personal level, I've found titebond to be an excellent glue for these joints. It expands the fibres and hides many sins
edit - I also cheat a bit, as Im not very good, by making the depth of the sockets a mm or two deeper, then sheering them flush (with the sander!).
edit 2 - I find blind dovies so much easier than through tails. Through tails are HARD. I remember this always being the case, even from Year 8 to 10 woodworking classes (Jeez I love those classes).
tiny dovetails.jpg


 Reply With Quote


Similar Threads
-
cutting tenons in long boards
By EMistral in forum WOODWORK - GENERALReplies: 9Last Post: 15th April 2008, 03:08 PM -
CS Guide - cutting long boards
By niki in forum HOMEMADE TOOLS AND JIGS ETC.Replies: 7Last Post: 20th November 2007, 04:31 PM -
Shooting boards are dead simple you know ? (long post)
By JDarvall in forum HAND TOOLS - UNPOWEREDReplies: 16Last Post: 21st April 2006, 11:58 PM -
Ripping (resawing) long boards
By bitingmidge in forum BANDSAWSReplies: 23Last Post: 11th December 2005, 03:03 PM -
hand dovetailing
By ditchy in forum WOODWORK - GENERALReplies: 28Last Post: 23rd February 2004, 10:14 PM
