

 Thanks: 0
 Likes: 0
 Needs Pictures: 0
 Picture(s) thanks: 0
Results 1 to 4 of 4
-
21st October 2011, 02:06 AM #1
 The prize lies beneath - hidden in full view


- Join Date
- Oct 2010
- Location
- 1017m up in Katoomba, NSW
- Posts
- 10,677
 Wip my Wabeco drill press project - a DP for wood drilling
This project has been on the cards for some time, and this week I took delivery of the major components from Wabeco (Walter Blombach Gmbh) in Remscheid, Germany. The only other person I know of that has any Wabeco gear is GarethR, who had some difficulties with his (a different model). Mine arrived well packaged (and in tact), and a six hour return train trip to Mascot saw it in my Barn, unpacked and ready for assembly.
I never expected this to be, shall we say, top-flight German engineering, but rather the robust style, that may need a little tidying up, and so it has proved to be.
THE MISSION: to create a bench top drill press of very good quality, that is easy to operate, adjust etc for the purposes of woodworking. I have never been convinced that I need a huge drill press for this purpose, and the only thing that seems to be gained in the escalating sizes is more (unnecessary) power and a longer chuck travel. The latter has always been a sore point for me because my trusty Metabo drill stand has 80mm travel, and so do most of the bigger drill presses. In fact, to get any travel long enough, one has to buy the biggest, heaviest, dearest piece of Chinese/Taiwanese overkill available, and you still only get 120mm of travel. I PROTEST! This led to creating a couple of prototype drill decks fitted to my 25 year old Metabo which were quite successful, but I was never going to overcome some fundamental problems with the original drill stand design. The most aggravating of these is that to adjust the height of the whole drilling head you release a knob which also allows for lateral swinging movement (and it is impossible to prevent). This means that when changing to longer bits or adjusting the height for any other reason the head moves off the mark, and has to be re-adjusted every time. Its a real PITA. As you can see in the first photo, I also added a laminated Spotted Gum stabilising bar at the top of the Metabo stand to take out any wobbling that the unsupported stand has. This works very well, and will be a feature of the Wabeco press. The column is 1000mm tall and so there is even more need for stability. I would have preferred a 750mm column but the choices are 500mm or 1000mm.
The heavily modified 25 year old Metabo Drill Stand (so modified that in fact none of it is visble here!):

So, my requirements are:
- Robust, sturdy and accurate
- Smooth operation
- As many adjusting mechanisms as necessary for good control
- Small footprint, benchtop design
- A goodly amount of chuck travel
I have spent a very great amount of time developing the two prototypes in anticipation of working with the Wabeco raw material. Many of the ideas and components will carry over to the new one, including:
- Woodpeckers DP3 Drill Press Fence (a rock solid, crackajack piece of kit)
- Spotted Gum drill deck with T-Track, a wide variety of clamping mechanisms/techniques to cover all sorts of situations. This also includes Dust Extraction clamping (as covered in this thread), height and depth limiters that are easy and quick to operate, and virtual tool-triggered extraction courtesy of the Aldis Remote Control sockets that I was banging on about last week.
The components that Wabeco offer are quite varied, and some of them will introduce a whole new way of doing business:
- A Y-Axis toothed hexagonal arm (500mm) that will give me deep throat (another of my gripes with even the biggest presses). With this Hex bar I can also add another drill holder, and mount a second drill horizontally for use with a wire brush etc.
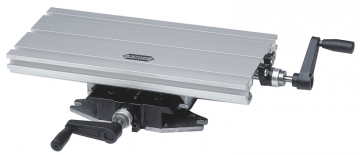
- Precision Cross Support work table (X & Y axis movement) so that I can move the job around with precision. A new Spotted Gum Drill Deck will be mounted onto this.
- Step Clamp Set (58 piece) for an even wider range of clamping choices
- A second clamping fixture and drill gun holder for the horizontal use
Later I intend to add things such as a Digital height scale, perhaps an X and a Y axis digital scale, and I may consider getting one of their 5 speed Drilling Motors (750-12,000 rpm, 680 watts, but they are $440). Certainly the Protool PDP 20 drill that I purchased for this project has stacks of grunt and a pretty good RPM range (760 watts, 44 Nm, 0-3050 rpm, and a keyless autolock chuck for one handed operation).
COST: The two main components (stand, 1000mm column) were $240 plus freight (where I was gouged at the Aussie end), and the cross table was $175. From memory the Protool drill was around $200, so to compare with a drill press that I could have purchased I spent $440 plus cross table plus freight. If you throw in the freight as well I could have picked up a 2Hp 12 speed jobbie from Carbatec all 138kgs worth, floorspace loss due to the footprint, painfully slow speed changes (leading to one speed being used), 120mm chuck travel (not bad but I want more if I can get it), no provision to raise the head (only table lowering), and Chinese made.
FREIGHT:
Wabeco refused point blank to send this by DHL Paket. The cost for that would have been about 200 Euros ($280). The used A.Hartrodt as a freight forwarder, and the cost was 230 Euros, but only delivered to Mascot. Then, Hartrodt Sydney demanded an additional $450! Of that, $150 was for a one line entry to Customs Break it, and $300 was for anything else they could think of. What really me off royally about this was that it was never explained by Germany that there would be charges after landing here, and Hartrodt's concealed the $300 charge for a lunch out somehwere nice until the very last minute. In fact, they didn't reveal it to me at all, but rather to a third party. It was all quite bizarre and distressing, but eventually I got them down to $240 (no charge for the one line entry). DHL Paket would have been exactly half the cost, much slower, but delivered to my door.
This exercise is not about saving cost, its about creating a Woodworking Drill Deck.
The Drill Stand with 1000mm column, 500mm Hex arm. Precision Cross Table, Drilling Motor (not purchased)

In the next post Ill go into my experiences so far, with some of my own pics of what I received.
Note to Mods: wasn't sure where to put this one, it's not really machinery (even though it's a machine), and it's not really a power tool (even though there's a power tool involved). Given that's it's specifically aimed at woodworking, and there's woodworking in the construction......
Cheers, FF
-
21st October 2011 02:06 AM # ADSGoogle Adsense Advertisement
- Join Date
- Always
- Location
- Advertising world
- Posts
- Many
-
21st October 2011, 12:15 PM #2
The prize lies beneath - hidden in full view
- Join Date
- Oct 2010
- Location
- 1017m up in Katoomba, NSW
- Posts
- 10,677
The second day - getting serious now!
After unpacking anything, I am always commanded by one of the three cats to get the box into a cat-ready state. This means removing big staples, cutting "hassle holes" in the sides etc. This box was no exception, but was no where near as popular as the Woodpeckers boxes. Perhaps they prefer the possible smell of the Woodpeckers Shed Dogs (3 apparently).
All the Wabeco components are very easily assembled. Curiously, there were no instructions included, but these are available online.

The first thing that I noticed was how robust this unit is. In its current location (not final) I only have it secured to the bench with one bolt, and yet the amount of wobbling in the drill head is minimal. By the time it is properly bolted down, and has the important timber beam to secure the top of the column to the wall it will be very solid indeed. The rack and pinions (2 of them) both run pretty smoothly, with very few slightly rough areas, and I imagine this will improve with a bit of wearing in. Even with the horizontal arm out about 2/3 of its travel it is still solid. I cant see that Ill need any more than this at this distance it yields a throat of 250mm and thats great! There is a 100mm lever to achieve lateral movement, and this is small enough to not get in the way, so will probably remain as is.
THE HEAD

The arm for adjusting the head height is considerably longer and my first thought was to replace it with a McJings wheel about 250m diameter, but this would be reasonably expensive, and pretty big & cumbersome. After a bit of thought I decided that I just need to put two small horizontal handles coming out of the main handle, which will achieve the same result in a compact way. The head is clamped to the column with two M8 cap bolts, and this allows for variable tension. At the right tension the head can be raised or lowered with ease, but does not drop under its own weight (including the heavy Protool drill). This is exactly what I wanted, because it allows for unlimited chuck travel, and therefore I can raise the head to change to a longer bit without moving off the mark, or I can drill a hole that is more than 80mm deep without having to fight the end of the return spring travel. This whole mechanism would be well improved by incorporating a polyethylene sleeve around the column. This would also stop the grey slurry that will build up from running cast aluminium over a steel pole (and Camellia oil will make it necessarily worse). The head is prevent from lateral movement by simply slipping two fat washers (provided) over the end of the M8 cap bolts, and the washers sit in the column channel acting like rollers. On delivery, one of these was out of whack and I couldnt slip the head onto the column rack, but a slight adjustment solved this. A polyethylene sleeve could have a block on it (what do you call that?) to run in this channel, and that would be even better.
There is also a return spring mechanism which allows for 80mm travel, and this is engaged by simply tightening a third bolt to secure the bottom of the return spring mechanism to the column. I plan to change this cap bolt to a wing nut (if it yields enough pressure) or an M8 thread with a lever reaching for a hex wrench all the time will become annoying. The are mm graduations cast into the side of the head to give a depth gauge reading against the bottom of the spring mechanism, but its all been black enamelled and therefore quite useless (apart from any wild inaccuracies that casting will provide). IMO a depth scale should be on the front because its referred to during drilling, so a modification to this will be required, and this will probably be in the form of an LCD readout at a later stage.
There is a depth stop post, also secured by an M8 cap bolt, and this needs to be changed to a wing nut. However, I still prefer my method of a clamp around the column, underneath the head, for depth stopping. The clamp stays in position regardless of how high the head is wound up, and therefore gives repeatability. One of the advantages of this is that to achieve a given depth I can just put a block of timber (with a thickness of the required depth) between the bottom of the head and the clamp, tighten the clamp, remove the block, and its then exact (and without measuring). Clearly this does not always apply for different depths, but I have a special series of wood blocks in the common dimensions for depths that I use.
Overall, Im very happy with the head mechanism.
THE CROSS TABLE
I purchased this thinking that it may get some use reasonably often, or that I might attach a timber deck to it for almost permanent use. I believe that the latter will prevail. The Acme screw mechanisms work very smoothly, although one is slightly tighter than the other (no biggie). Very small adjustments can be easily made. 1/10mm increments are theoretically possible (0.1mm is representing by a 2mm spacing on the turning ring) but there is a little play in the arm which probably renders this fine adjustment useless. Again, no biggie because I would be unlikely to use it in this way I prefer to move the job until the Brad point is registered with a mark in the job. The Cross Table has 280mm X travel and 120mm Y travel, and thats plenty for my purposes. Being able to have the Brad point sitting 1mm above the job and move the job around is just fabulous.The Cross table is quite high, but Ive got a metre of column to play with.
Apart from the smoothness of the table, the most impressive thing is that it is rock solid.
There is a design flaw in the table, and its a really dopey one. At the top of its arc, the front Y-axis handle is about 3-4mm above the table. This means that if I put a deck on it, or am drilling a large job then I cant move the table in the Y-axis. This will be easily solved by putting a smaller diameter wheel on to replace the handle, but fer cryin out loud its another example of a product not being field tested, as this would have shown up almost immediately. I could rebate the bottom of the timber deck, but thats a helluva lot of routing (allowing for 280mm X-axis movement and finger clearance) and will only reduce the heft of the deck and make it less strong.
HOW DUMB IS THIS??

IS IT PRECISE?
Out of the box, the answer is an emphatic NO FAQn WAY!
 First use of a newly arrived Woodpeckers square was to check the perpendicularity of the drill bit to the table. AARRGGHH! It was out by 3mm in 120mm in two directions! If this cant be corrected then the whole unit would be completely and utterly useless. Picture a drill bit that is perpendicular to the job, and now tilt it back 3 degrees, and to one side by 3 degrees. If you then move the bit down an axis that IS perpendicular to the job then your going to drill a slot, not a hole, and the drill will get buggered in no time flat. No amount of adjusting any of the bolts/clamps in the head made an improvement. I reversed the Hex bar, changed the drill holder to the second one no good! There was an improvement in the sideways tilt (lets call that pitch), but the yaw, or Y-axis angle was the same. There are any amount of places where this error can happen, and they could all compound together. There is also no way of making adjustments you can hold the drill gun at the right angle, but the clamping just takes it back to the error position.
With some trepidation I decided to put two spacing washers (almost 2mm thick) under the front of the cross table to tilt the table up at the front. Got my Pecker out again it was bang on! WHOS YOUR DADDY?! Somehow this also corrected the pitch angle to a woodworking acceptable less than about 1/3 mm over 120mm. But I was not out of danger yet if the drill bit was not parallel to the column then I would still be drilling slots. I got my bigger Pecker square and checked the table for perpendicularity to the column. Santa Maria! It was spot on!
I can tell you that this was an enormous relief! Today I will drill a hole in anger, and see what I get.
THE STEP CLAMPS

I have made some of my own clamps for the prototype decks, and quite remarkably, I finished up with a design that is VERY similar to the step clamps. These are pretty quick to put in place, and even though there is light between the meshing teeth, they are rock solid, and the job is very firmly held. These are designed for metalworking and I need to glue some non-slip rubber to the face that holds the job, to prevent marring (although there was very little on the Spotted Gum piece that I tested them with). The 58 piece set was about $50, so pretty good value. All the pieces have been blackened to slow down rust, but I went over them with Camellia Oil to be safe (internal and external threads as well). The holder that is provided is pretty useless, so Ill make something similar to one of my drill bit stands. All up, well pleased with these.
This is my clamping system from the prototype, and is designed to run in T-tracks on a Y-axis. This will be resolved when I build the new timber deck.

At the end of the second day I am still very pleased with the whole system, although some improvements can be made, and some of those are necessary. Its starting to feel like I will achieve a much better, and far more versatile result than I would with one of those underpowered Chinese bench top jobbies for $300.
Cheers, FF
-
21st October 2011, 09:53 PM #3
SENIOR MEMBER
- Join Date
- Oct 2005
- Location
- Yangebup, Perth
- Posts
- 444
Looking good.
Where did you get the step clamp kit. Cheapest I could find was about $100
https://www.machineryhouse.com.au/Search?S=step+clampThe world is a comedy to those that think, a tragedy to those that feel.
-
21st October 2011, 11:20 PM #4
The prize lies beneath - hidden in full view
- Join Date
- Oct 2010
- Location
- 1017m up in Katoomba, NSW
- Posts
- 10,677
That was Wabeco as well yowie. This one is the same as mine, which confirms what I had thought - Wabeco gets some of its stuff from China (I hardly think H&F are importing from Germany)


 Reply With Quote
Similar Threads
-
Drill Stands - WABECO
By GarethR in forum GENERAL & SMALL MACHINERYReplies: 6Last Post: 29th March 2011, 09:35 AM -
Drilling/Reaming/Facing Pen Blanks/Drill Press
By Penpal in forum WOODTURNING - PEN TURNINGReplies: 7Last Post: 28th September 2008, 11:34 PM -
Drilling angled holes without drill press
By jackliveshere in forum WOODWORK - GENERALReplies: 11Last Post: 4th August 2008, 10:22 AM -
My latest restoration project Drill Press
By Kudzu in forum HAND TOOLS - POWEREDReplies: 16Last Post: 14th February 2007, 02:54 AM -
Drilling Accurate Holes Without a Press
By DavidW in forum WOODWORK - GENERALReplies: 8Last Post: 27th August 2003, 10:08 PM
